---
title: "Deploy Astro to AWS Amplify"
description: "How to deploy your Astro Server-Side Rendered (SSR) websites to AWS Amplify."
source: "https://www.launchfa.st/blog/deploy-astro-aws-amplify"
author: "Rishi Raj Jain"
created_at: 2024-03-28T00:00:00.000Z
updated_at: 2026-07-02T00:00:00.000Z
---
> **Site index for agents**
> Fetch https://www.launchfa.st/llms.txt to discover every page on this site.
> Every page is also available as Markdown by appending `.md` to its URL.
 ℹ️ Available today with LaunchFast Starter Kits
In this guide, you will learn how to deploy an Astro SSR project to AWS Amplify. You will go through the process of setting up a new Astro project, enabling server-side rendering using the AWS Amplify adapter, and finally deploying it to AWS Amplify.
## Table Of Contents
- [Prerequisites](#prerequisites)
- [Create a new Astro application](#create-a-new-astro-application)
- [Getting Started with the AWS Amplify Adapter for Astro](#getting-started-with-the-aws-amplify-adapter-for-astro)
- [Deploy to AWS Amplify](#deploy-to-aws-amplify)
- [Conclusion](#conclusion)
## Prerequisites
You'll need the following:
- [Node.js 20](https://nodejs.org/en/blog/announcements/v20-release-announce) or later
- An [AWS](https://aws.amazon.com/free) account
## Create a new Astro application
Let’s get started by creating a new Astro project. Open your terminal and run the following command:
```bash
npm create astro@latest my-app
```
`npm create astro` is the recommended way to scaffold an Astro project quickly.
When prompted, choose:
- `Empty` when prompted on how to start the new project.
- `Yes` when prompted if you plan to write TypeScript.
- `Strict` when prompted how strict TypeScript should be.
- `Yes` when prompted to install dependencies.
- `Yes` when prompted to initialize a git repository.
Once that’s done, you can move into the project directory and start the app:
```bash
cd my-app
npm run dev
```
The app should be running on [localhost:4321](http://localhost:4321/).
Next, in your first terminal window, run the command below to install the necessary libraries and packages for building the application:
```bash
npm install dotenv
```
The libraries installed include:
- `dotenv`: A library for handling environment variables.
## Getting Started with the AWS Amplify Adapter for Astro
Before deploying your Astro project, you need to install the `astro-aws-amplify` adapter. This is easily done via the Astro CLI:
```bash
npm install astro-aws-amplify
```
The libraries installed include:
- `astro-aws-amplify`: An adapter that prepares Astro websites to be deployed on AWS Amplify.
Once the adapter is installed, you'll need to add it to your `astro.config.mjs` file. Open the file and add the following code:
```tsx title="astro.config.mjs" ins={2,5,6}
import { defineConfig } from 'astro/config';
import awsAmplify from 'astro-aws-amplify';
export default defineConfig({
output: "server",
adapter: awsAmplify(),
});
```
The additions do the following:
- Imports default export of `astro-aws-amplify`.
- Uses the above import as the `adapter` of your Astro application.
- Sets `output` to `server` to enable server-side rendering compatible output.
Then, create an `amplify.yml` at the root of the repository with the following code:
```yml
version: 1
frontend:
phases:
preBuild:
commands:
- npm ci
build:
commands:
- env >> .env
- npm run build
- mv node_modules ./.amplify-hosting/compute/default
- mv .env ./.amplify-hosting/compute/default/.env
artifacts:
baseDirectory: .amplify-hosting
files:
- '**/*'
cache:
paths:
- node_modules/**/*
```
The code above does the following:
- Uses `preBuild` commands to install the dependencies of your Astro project.
- Uses `build` commands to:
- Store all the environment variables into `.env` file at the root of the project.
- Build your Astro application.
- Move the `node_modules` directory and `.env` file to Amplify's compute directory.
## Deploy to AWS Amplify
The code is now ready to deploy to AWS Amplify. Use the following steps to deploy:
- Start by creating a GitHub repository containing your app's code.
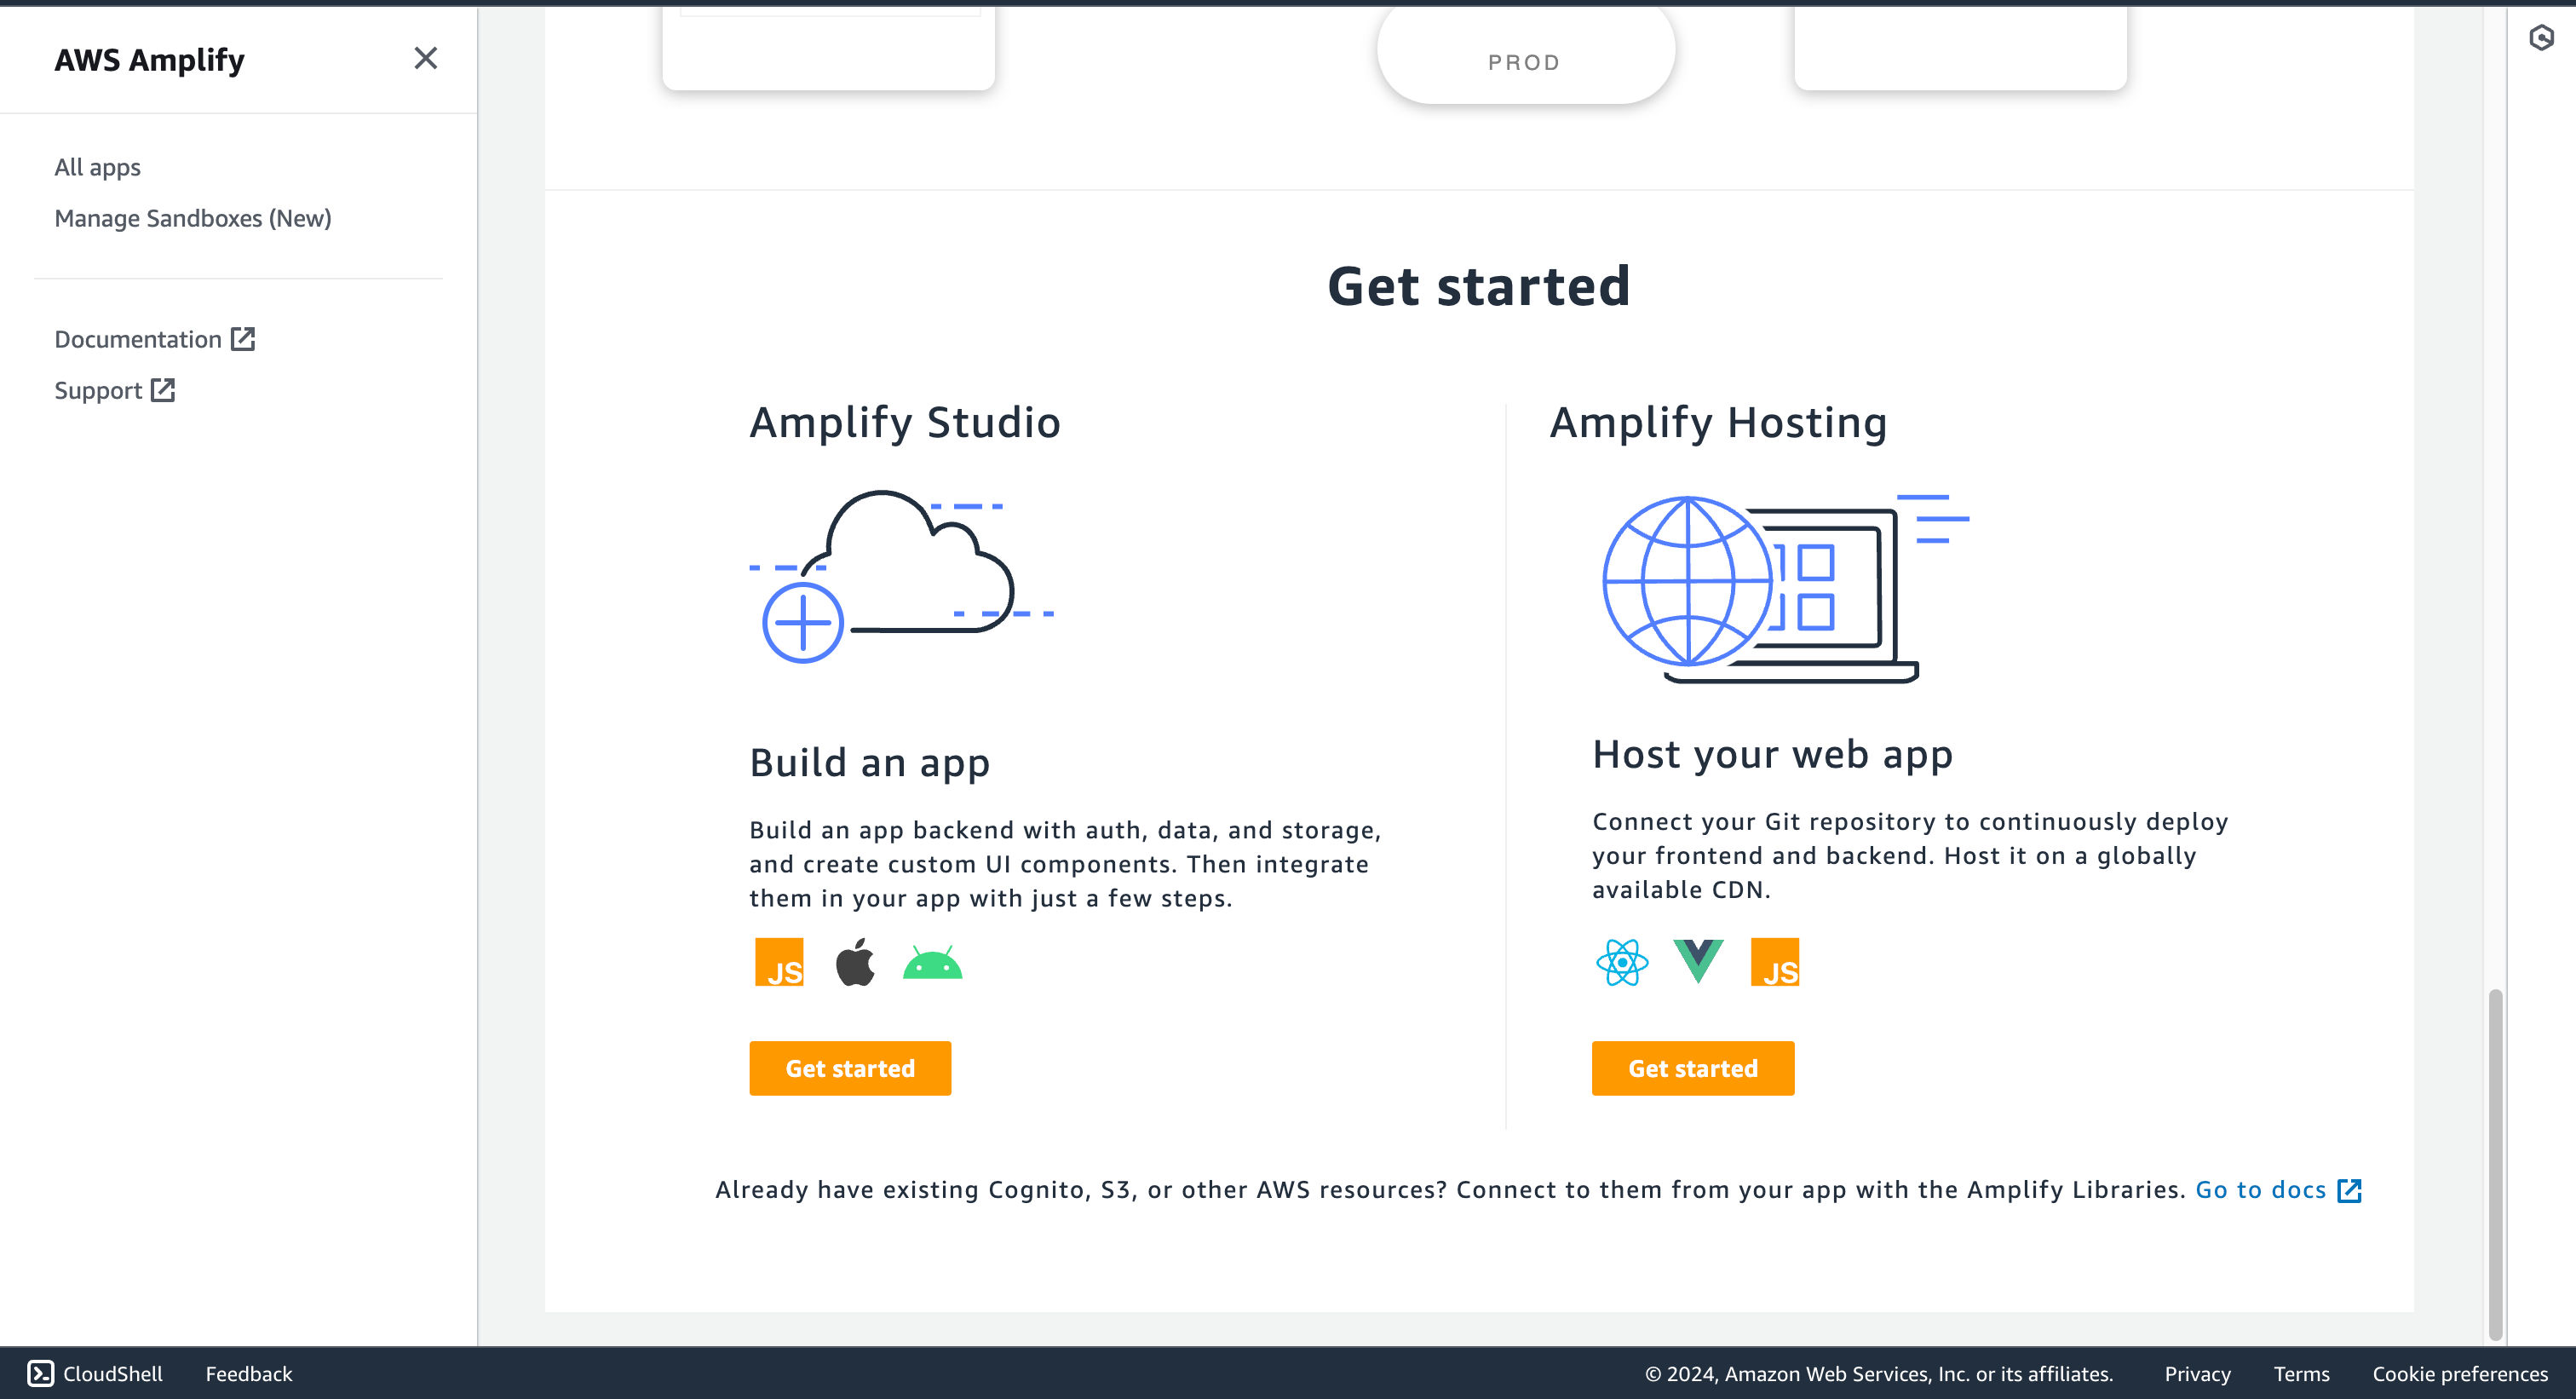
- Then, navigate to the AWS Amplify Dashboard and click on **Get Started** under the **Host your web app** section.
ℹ️ Available today with LaunchFast Starter Kits
In this guide, you will learn how to deploy an Astro SSR project to AWS Amplify. You will go through the process of setting up a new Astro project, enabling server-side rendering using the AWS Amplify adapter, and finally deploying it to AWS Amplify.
## Table Of Contents
- [Prerequisites](#prerequisites)
- [Create a new Astro application](#create-a-new-astro-application)
- [Getting Started with the AWS Amplify Adapter for Astro](#getting-started-with-the-aws-amplify-adapter-for-astro)
- [Deploy to AWS Amplify](#deploy-to-aws-amplify)
- [Conclusion](#conclusion)
## Prerequisites
You'll need the following:
- [Node.js 20](https://nodejs.org/en/blog/announcements/v20-release-announce) or later
- An [AWS](https://aws.amazon.com/free) account
## Create a new Astro application
Let’s get started by creating a new Astro project. Open your terminal and run the following command:
```bash
npm create astro@latest my-app
```
`npm create astro` is the recommended way to scaffold an Astro project quickly.
When prompted, choose:
- `Empty` when prompted on how to start the new project.
- `Yes` when prompted if you plan to write TypeScript.
- `Strict` when prompted how strict TypeScript should be.
- `Yes` when prompted to install dependencies.
- `Yes` when prompted to initialize a git repository.
Once that’s done, you can move into the project directory and start the app:
```bash
cd my-app
npm run dev
```
The app should be running on [localhost:4321](http://localhost:4321/).
Next, in your first terminal window, run the command below to install the necessary libraries and packages for building the application:
```bash
npm install dotenv
```
The libraries installed include:
- `dotenv`: A library for handling environment variables.
## Getting Started with the AWS Amplify Adapter for Astro
Before deploying your Astro project, you need to install the `astro-aws-amplify` adapter. This is easily done via the Astro CLI:
```bash
npm install astro-aws-amplify
```
The libraries installed include:
- `astro-aws-amplify`: An adapter that prepares Astro websites to be deployed on AWS Amplify.
Once the adapter is installed, you'll need to add it to your `astro.config.mjs` file. Open the file and add the following code:
```tsx title="astro.config.mjs" ins={2,5,6}
import { defineConfig } from 'astro/config';
import awsAmplify from 'astro-aws-amplify';
export default defineConfig({
output: "server",
adapter: awsAmplify(),
});
```
The additions do the following:
- Imports default export of `astro-aws-amplify`.
- Uses the above import as the `adapter` of your Astro application.
- Sets `output` to `server` to enable server-side rendering compatible output.
Then, create an `amplify.yml` at the root of the repository with the following code:
```yml
version: 1
frontend:
phases:
preBuild:
commands:
- npm ci
build:
commands:
- env >> .env
- npm run build
- mv node_modules ./.amplify-hosting/compute/default
- mv .env ./.amplify-hosting/compute/default/.env
artifacts:
baseDirectory: .amplify-hosting
files:
- '**/*'
cache:
paths:
- node_modules/**/*
```
The code above does the following:
- Uses `preBuild` commands to install the dependencies of your Astro project.
- Uses `build` commands to:
- Store all the environment variables into `.env` file at the root of the project.
- Build your Astro application.
- Move the `node_modules` directory and `.env` file to Amplify's compute directory.
## Deploy to AWS Amplify
The code is now ready to deploy to AWS Amplify. Use the following steps to deploy:
- Start by creating a GitHub repository containing your app's code.
- Then, navigate to the AWS Amplify Dashboard and click on **Get Started** under the **Host your web app** section.
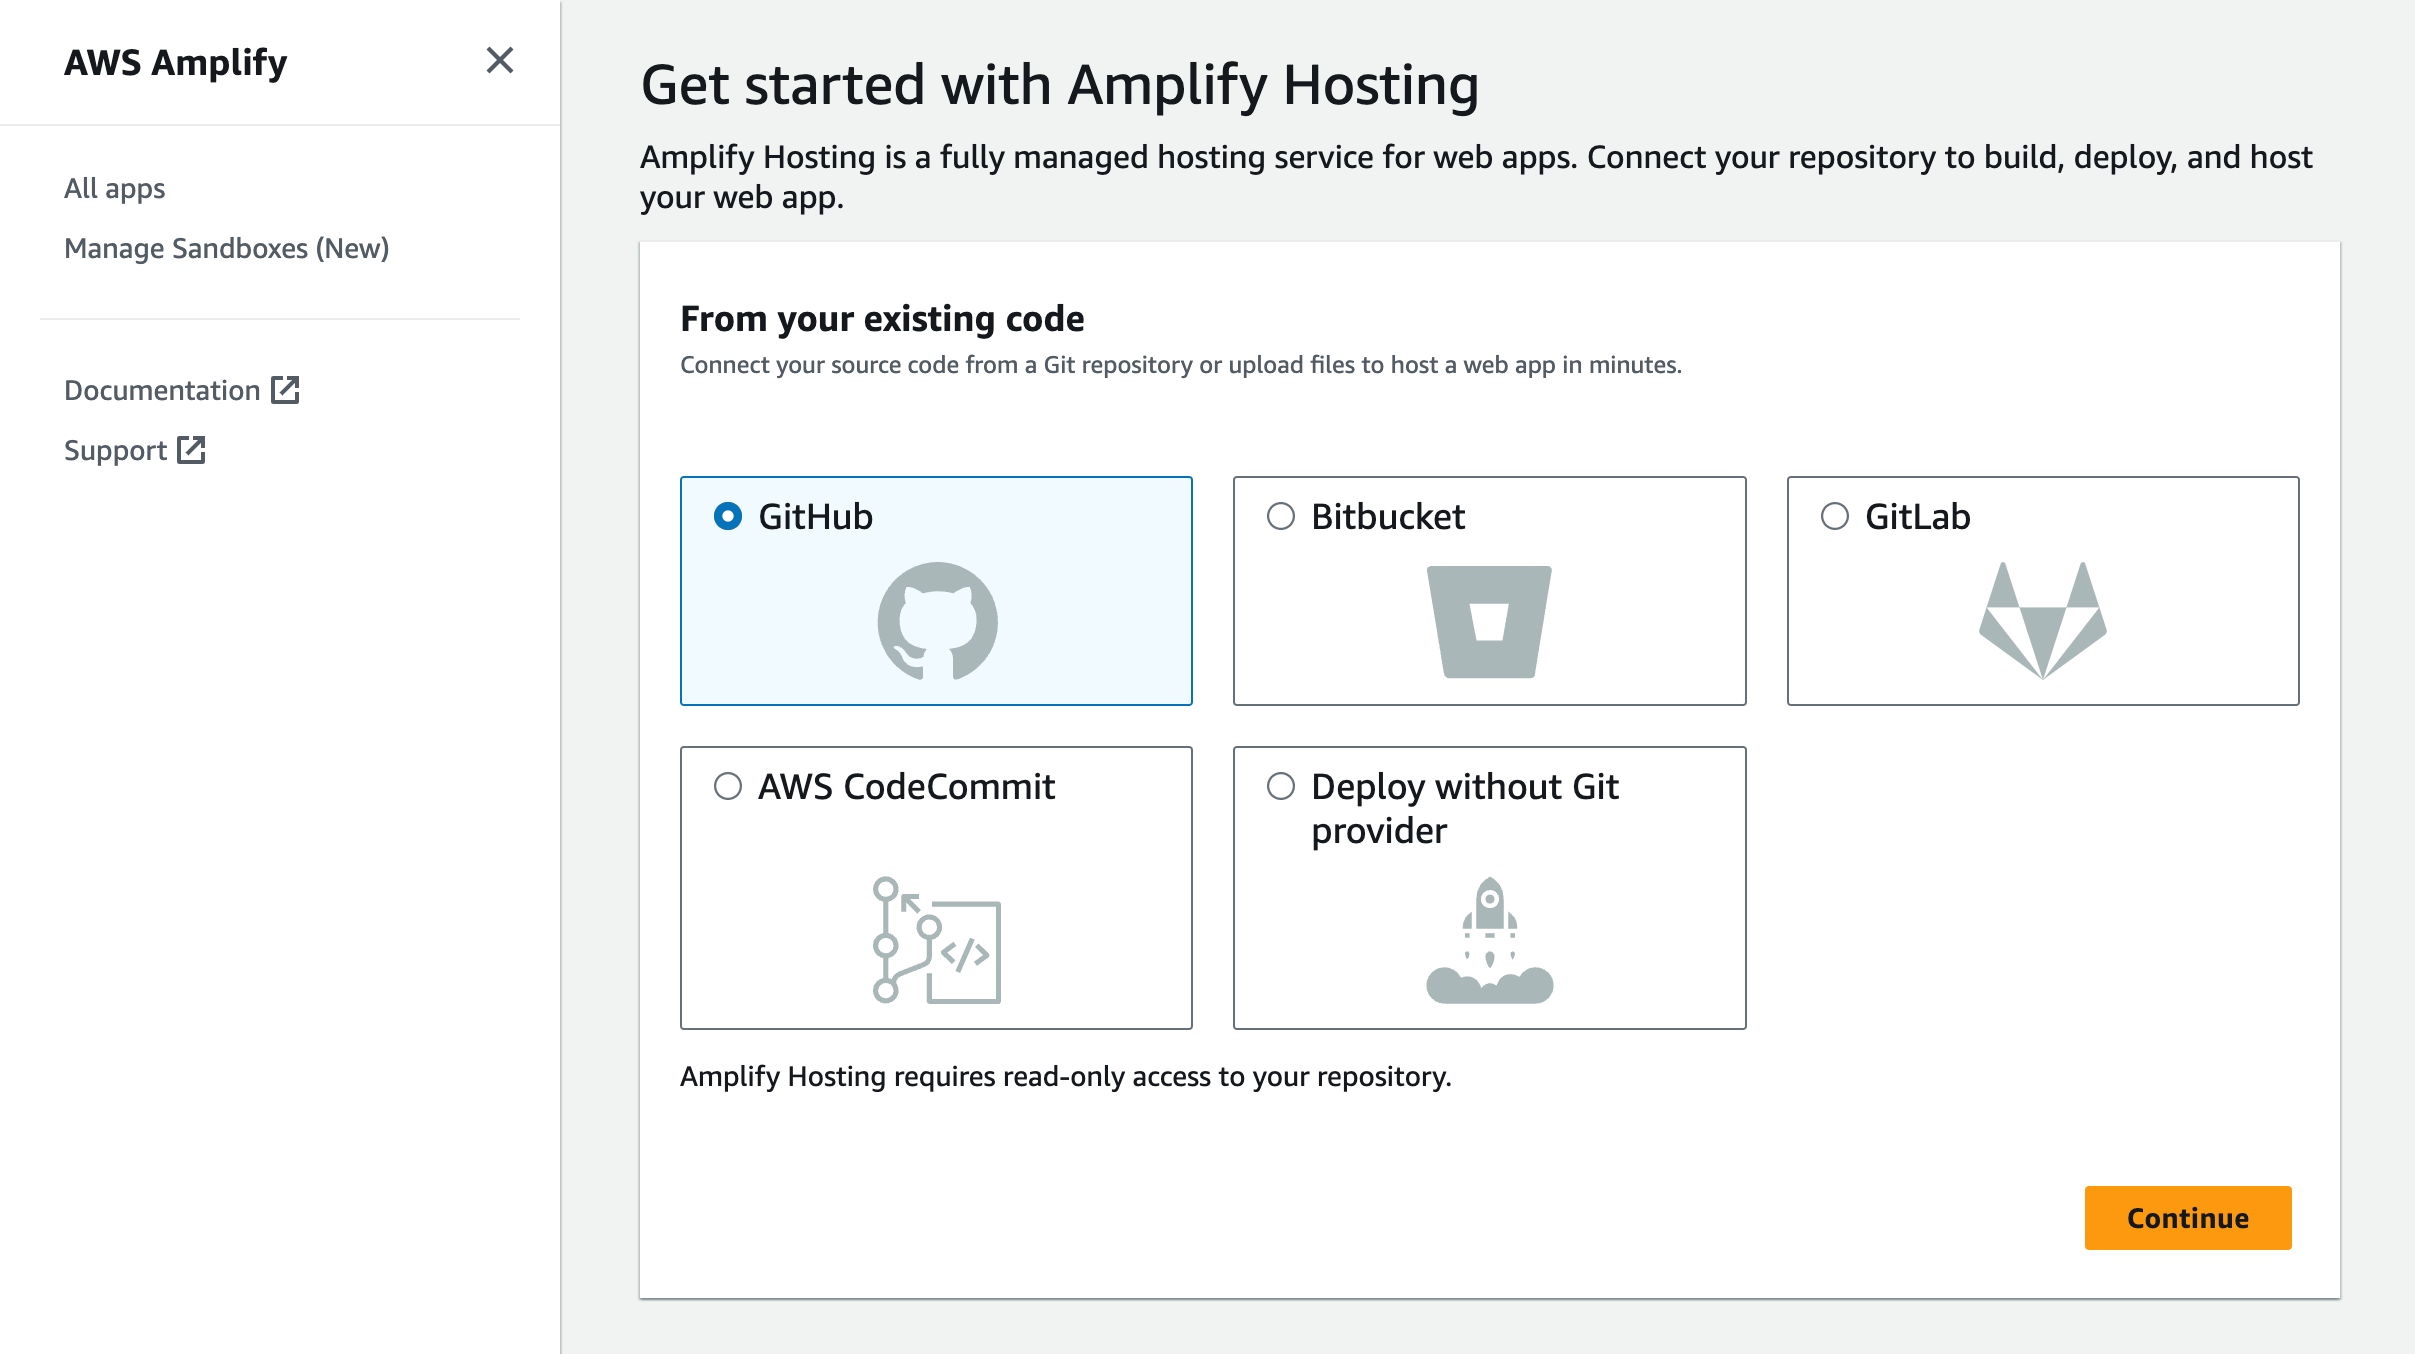
 - Select **GitHub** as the source of your Git repository.
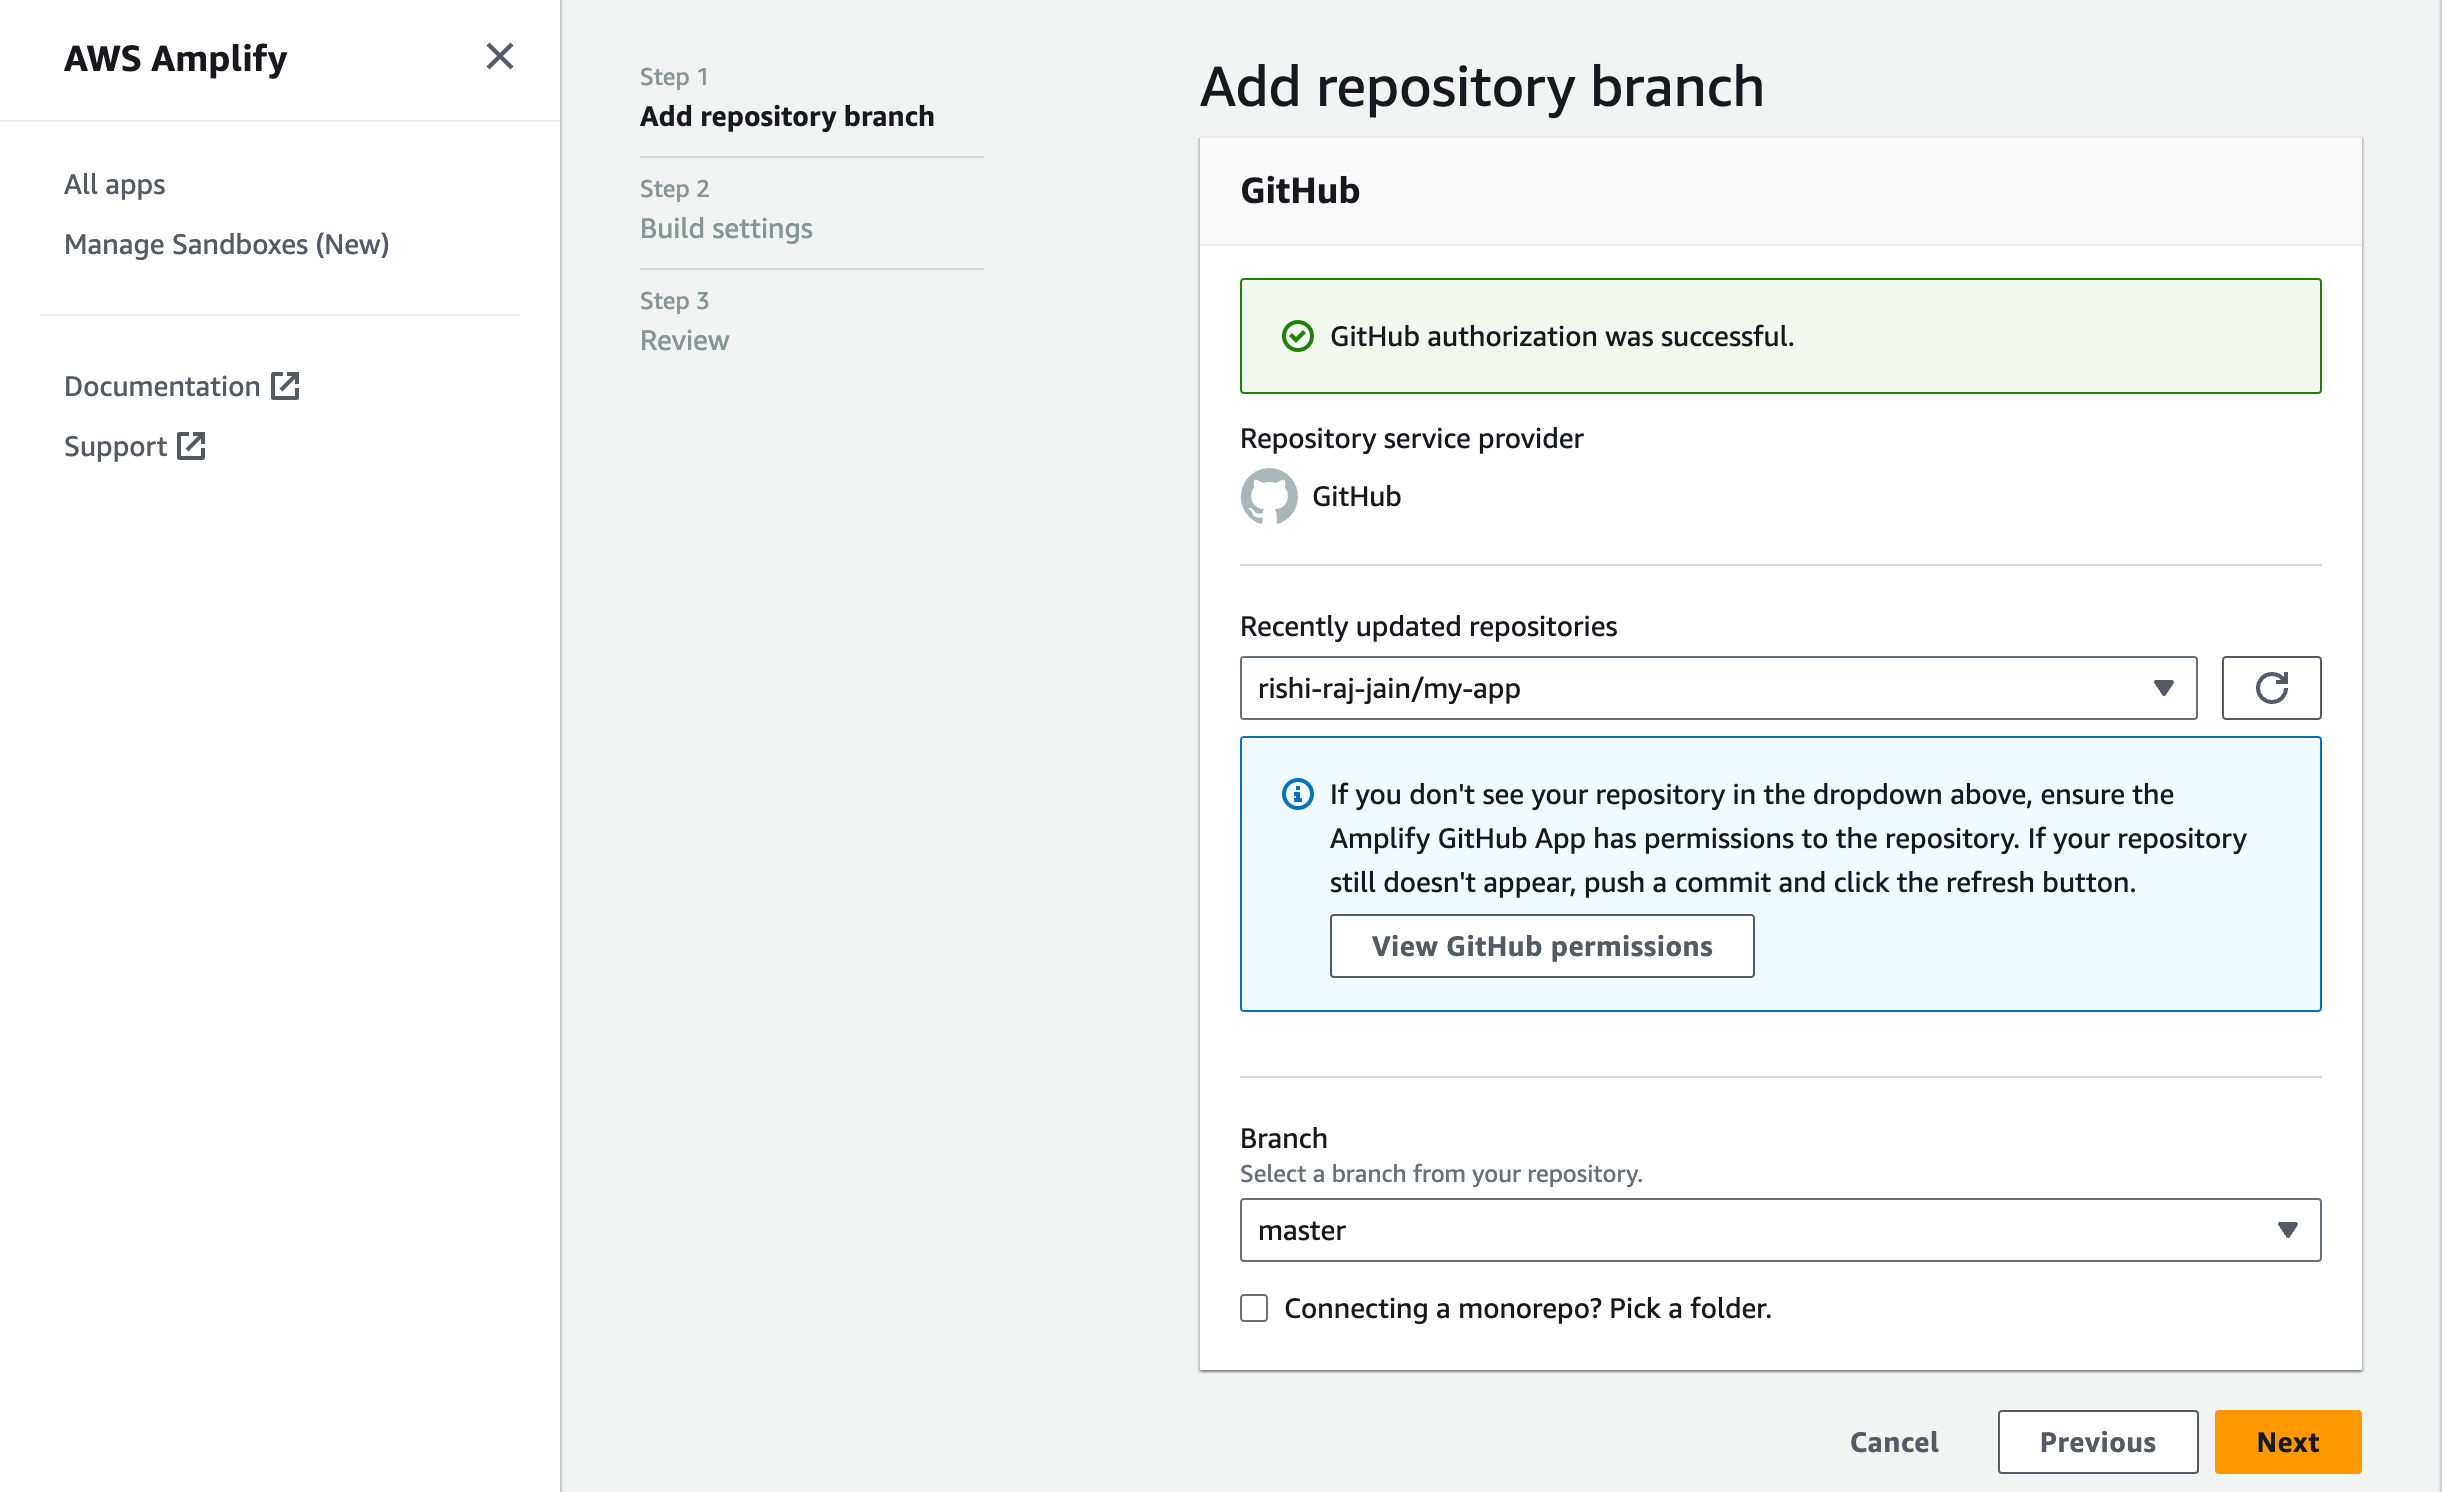
 - Link the new project to the GitHub repository you just created.
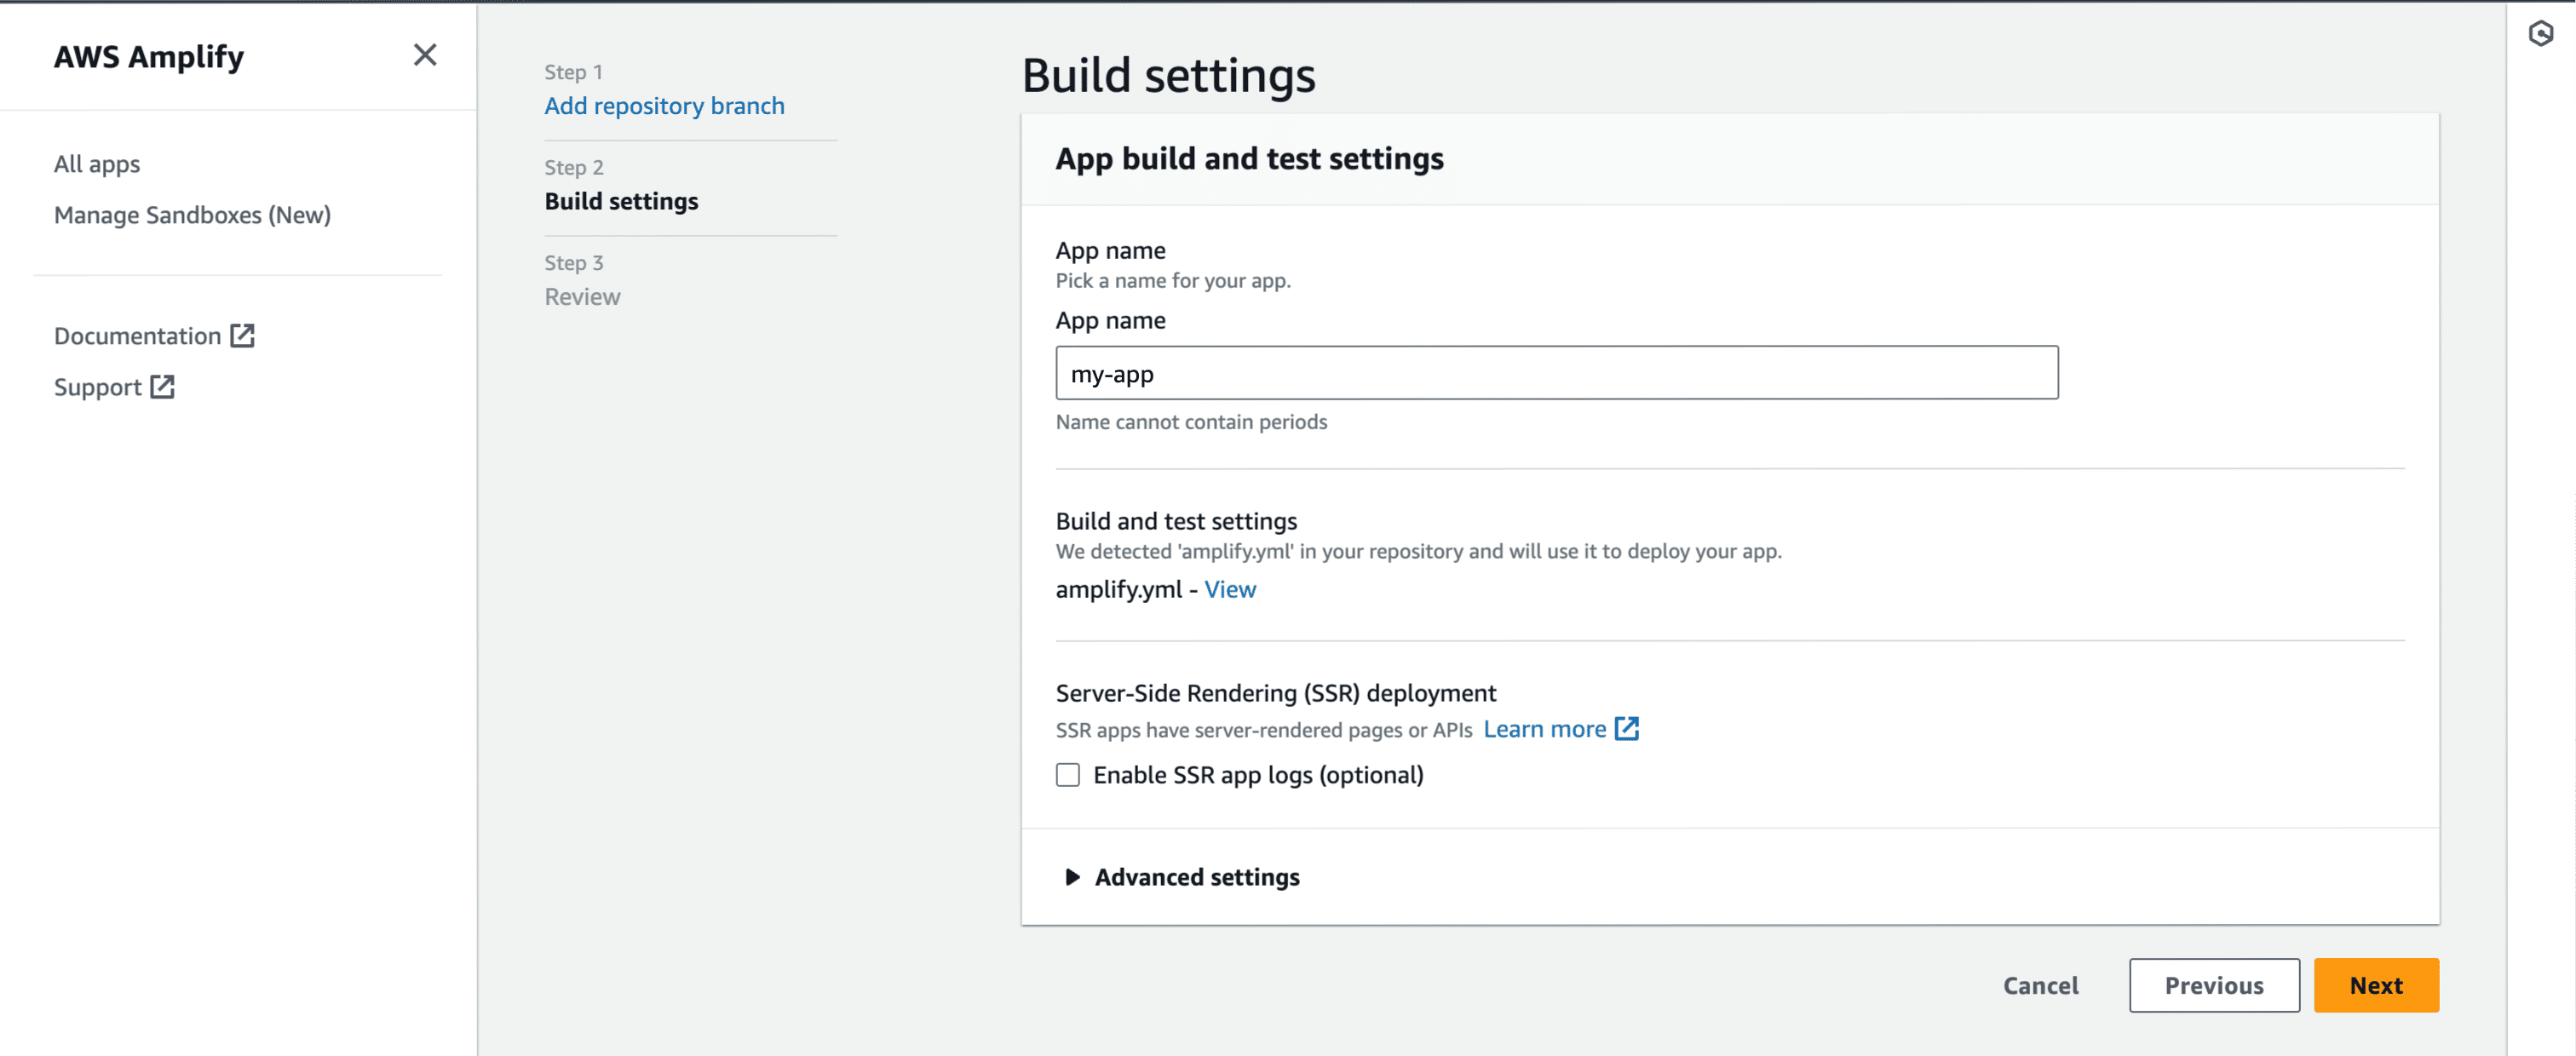
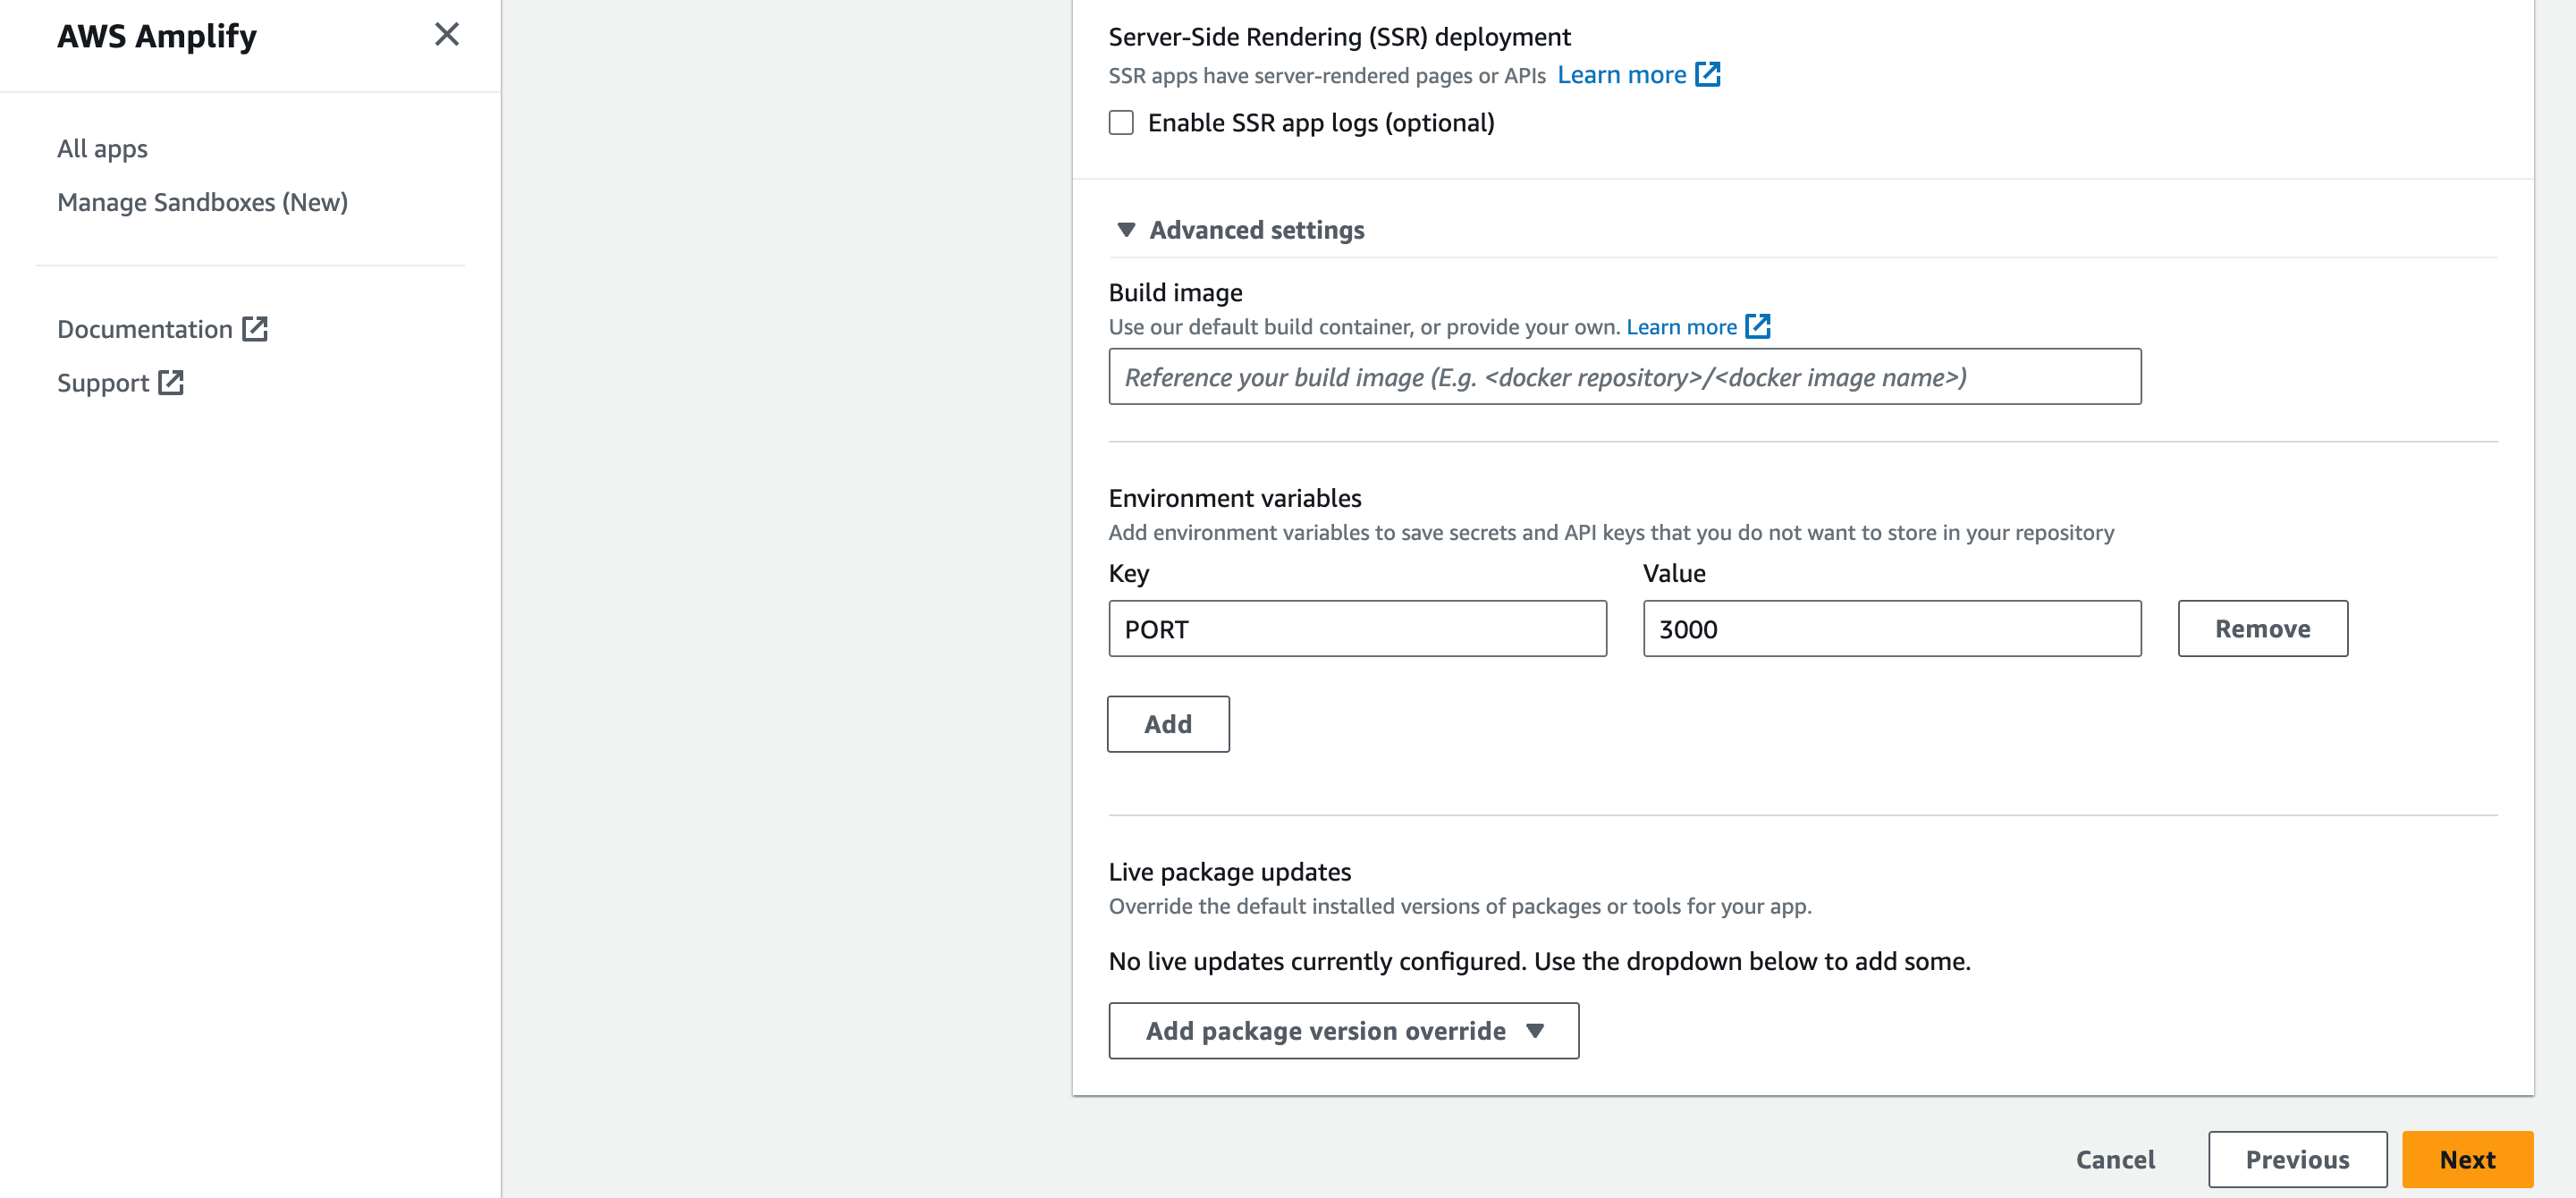
 - Give a name to your project, and click on **Advanced Settings**.
 - In **Advanced Settings**, update the **Environment Variables** to match those in your local `.env` file, and `PORT` as 3000. Click **Next** to proceed.
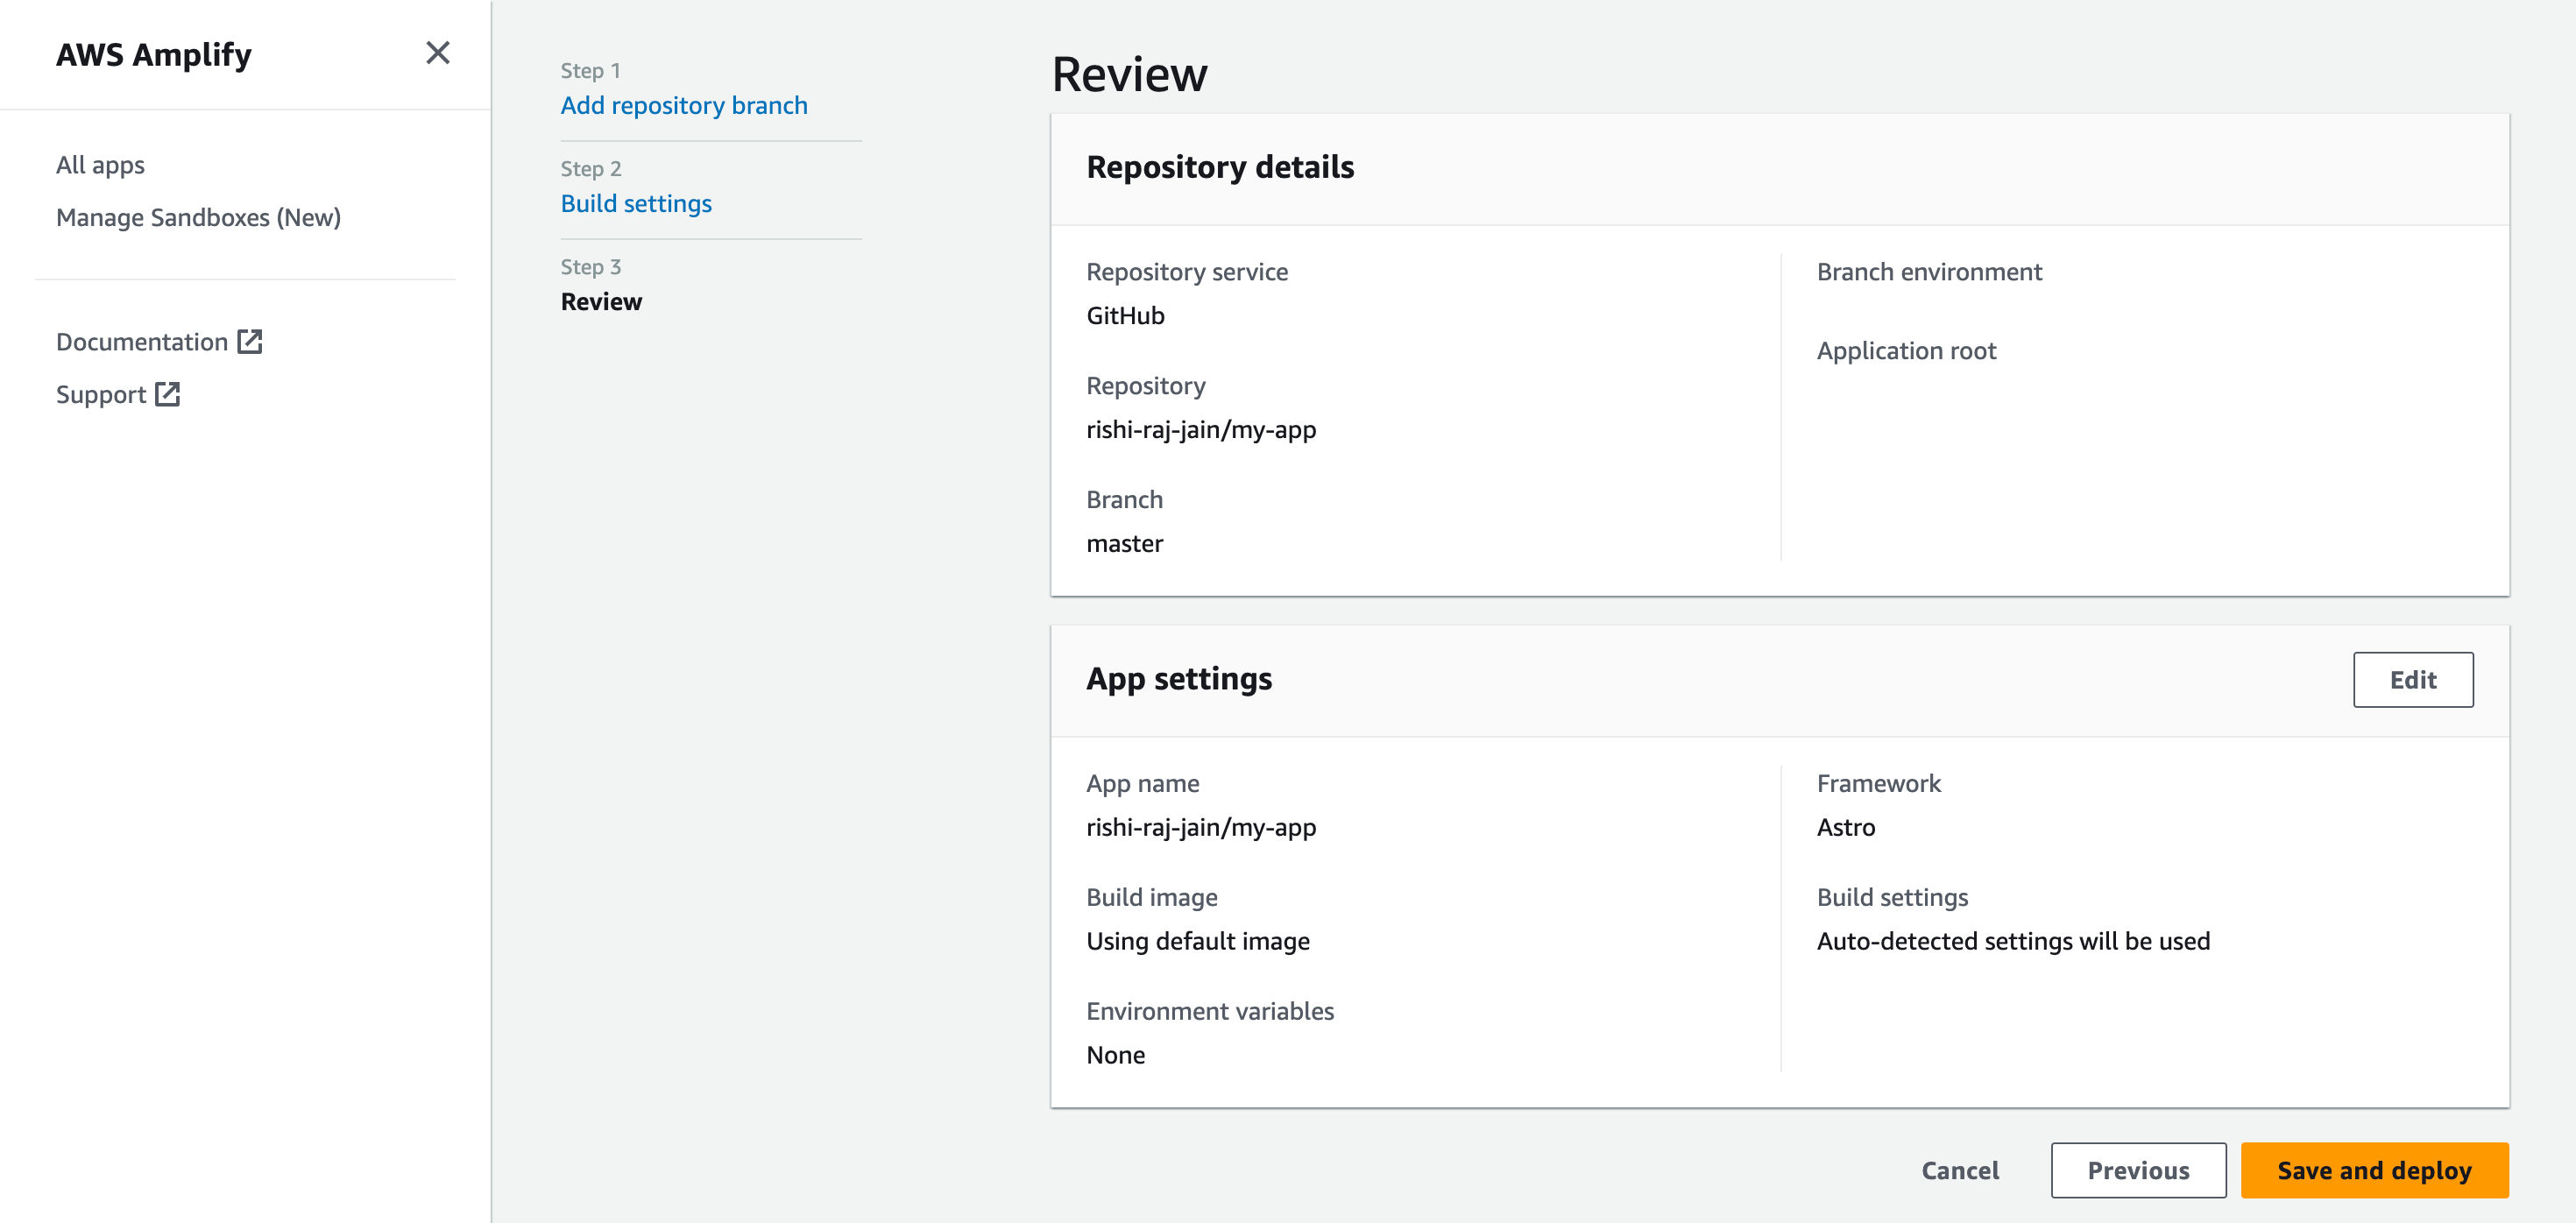
 - Click **Save and Deploy** to deploy your website.
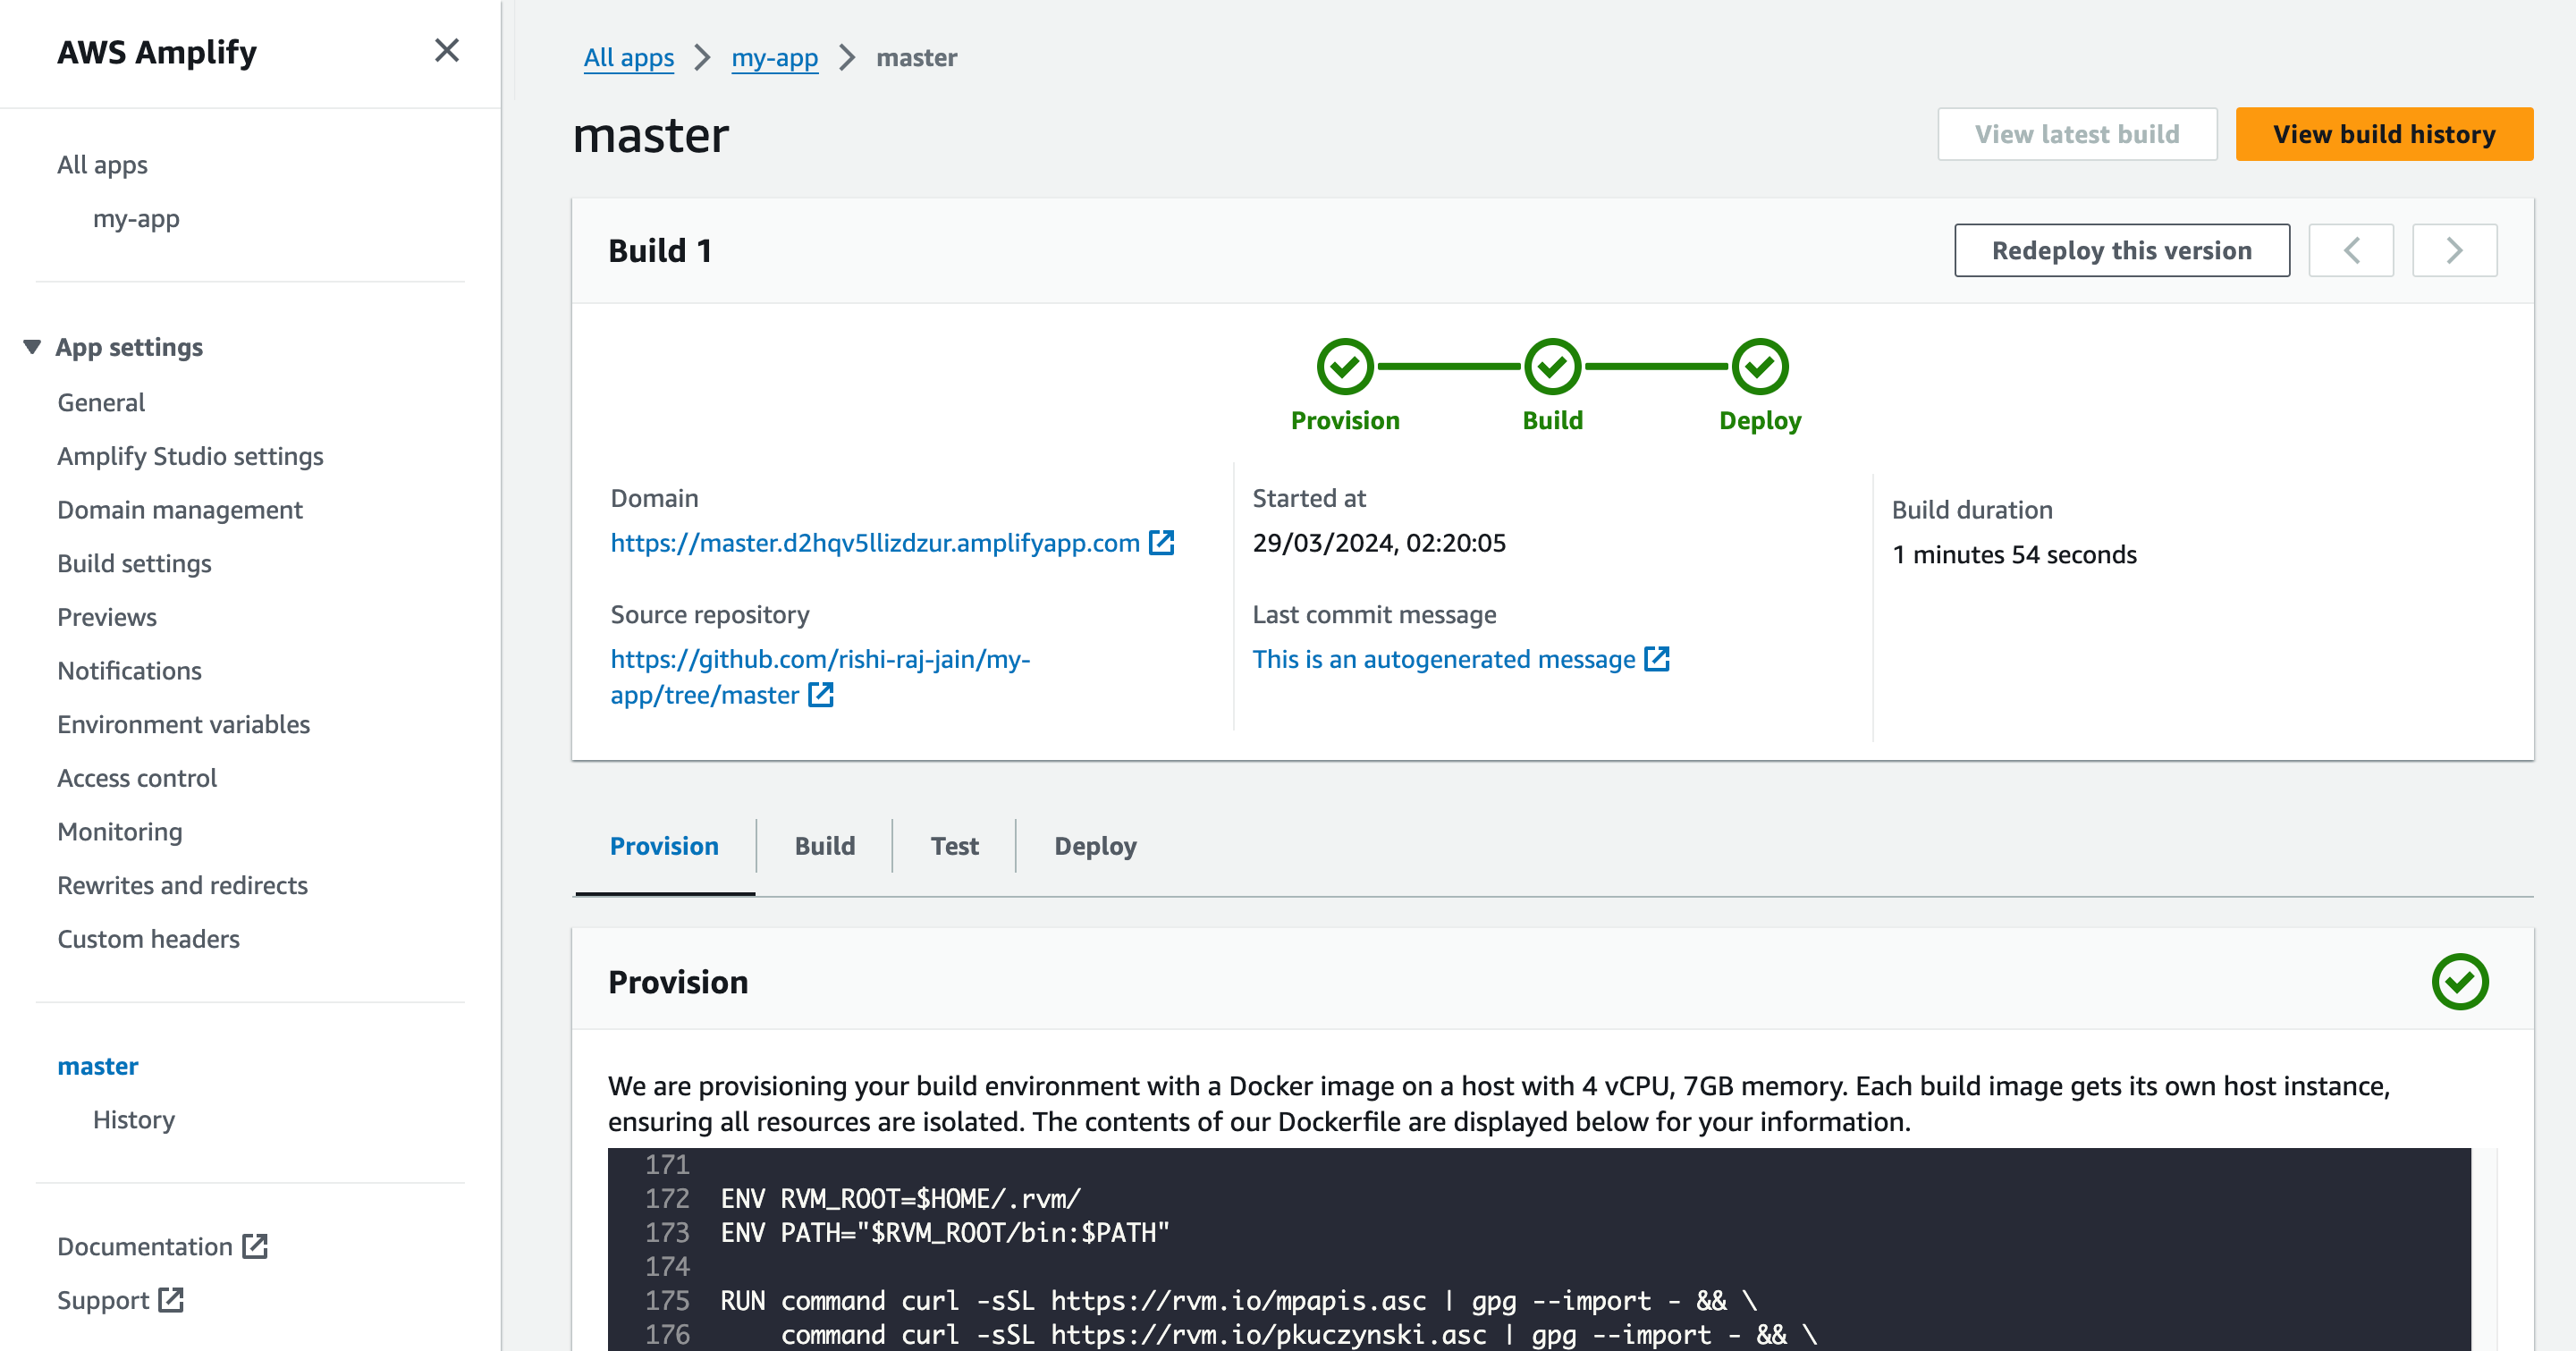
 - Grab the deployment URL under the **Domain** title in the successful build information.
 ## Conclusion
Yay! You now have an Astro project that automatically deploys to AWS Amplify upon Git push.
If you have any questions or comments, feel free to reach out to me on [Twitter](https://twitter.com/direct_messages/create/rishi_raj_jain_).
## Conclusion
Yay! You now have an Astro project that automatically deploys to AWS Amplify upon Git push.
If you have any questions or comments, feel free to reach out to me on [Twitter](https://twitter.com/direct_messages/create/rishi_raj_jain_).