---
title: "Deploy Astro to AWS Elastic Beanstalk"
description: "How to deploy your Astro Server-Side Rendered (SSR) websites to AWS Elastic Beanstalk."
source: "https://www.launchfa.st/blog/deploy-astro-aws-elastic-beanstalk"
author: "Rishi Raj Jain"
created_at: 2024-04-08T00:00:00.000Z
updated_at: 2026-07-02T00:00:00.000Z
---
> **Site index for agents**
> Fetch https://www.launchfa.st/llms.txt to discover every page on this site.
> Every page is also available as Markdown by appending `.md` to its URL.
 In this guide, you will learn how to deploy an Astro SSR project to AWS Elastic Beanstalk. You will go through the process of setting up a new Astro project, enabling server-side rendering, and finally deploying it to AWS Elastic Beanstalk.
## Table Of Contents
- [Prerequisites](#prerequisites)
- [Create a new Astro application](#create-a-new-astro-application)
- [Getting Started with the Node.js Adapter for Astro](#getting-started-with-the-nodejs-adapter-for-astro)
- [Configure your IAM Roles](#configure-your-iam-roles)
- [Deploy to AWS Elastic Beanstalk](#deploy-to-aws-elastic-beanstalk)
- [Conclusion](#conclusion)
## Prerequisites
You'll need the following:
- [Node.js 20](https://nodejs.org/en/blog/announcements/v20-release-announce) or later
- An [AWS](https://aws.amazon.com/free) account
## Create a new Astro application
Let’s get started by creating a new Astro project. Open your terminal and run the following command:
```bash
npm create astro@latest my-app
```
`npm create astro` is the recommended way to scaffold an Astro project quickly.
When prompted, choose:
- `Empty` when prompted on how to start the new project.
- `Yes` when prompted if you plan to write TypeScript.
- `Strict` when prompted how strict TypeScript should be.
- `Yes` when prompted to install dependencies.
- `Yes` when prompted to initialize a git repository.
Once that’s done, you can move into the project directory and start the app:
```bash
cd my-app
npm run dev
```
The app should be running on [localhost:4321](http://localhost:4321/). Next, execute the command below to install the necessary libraries and packages for building the application:
```bash
npm install dotenv
npm install -D prepend-file
```
The libraries installed include:
- `dotenv`: A library for handling environment variables.
The development-specific libraries include:
- `prepend-file`: A library to prepend data to a file.
## Getting Started with the Node.js Adapter for Astro
Before deploying your Astro project, you need to install the `@astrojs/node` adapter, execute the following command:
```bash
npm install @astrojs/node
```
The libraries installed include:
- `@astrojs/node`: An adapter that prepares Astro websites to be run as a Node.js server.
Once the adapter is installed, you'll need to add it to your `astro.config.mjs` file. Open the file and add the following code:
```tsx ins={3,7-10}
// File: astro.config.mjs
import node from '@astrojs/node';
import { defineConfig } from 'astro/config';
export default defineConfig({
output: "server",
adapter: node({
mode: "standalone"
}),
});
```
The additions do the following:
- Imports default export of `@astrojs/node`.
- Uses the above import as the `adapter` of your Astro application.
- Sets `output` to `server` to enable server-side rendering compatible output.
Then, create a `zip.mjs` at the root of the repository with the following code:
```tsx
// File: zip.mjs
import zl from "zip-lib"
import { join } from "node:path"
import { sync as prependSync } from "prepend-file"
const zip = new zl.Zip()
prependSync(join("dist", "server", "entry.mjs"), `import 'dotenv/config'\n`)
zip.addFolder("./dist", "dist")
zip.addFile("./package.json", "package.json")
zip.addFile("./tsconfig.json", "tsconfig.json")
zip.addFolder("./node_modules", "node_modules")
zip.archive(`./deployment_${Math.random().toString()}.zip`)
console.log('Zipped!')
```
The code above does the following:
- Imports `dotenv/config` in `dist/server/entry.mjs` to load all the environment variables into the scope, making them accessible via `process.env` object.
- Creates a zip with the following files and folders in it:
- `dist`: containing the static and server side required assets.
- `node_modules`: collection of installed dependencies.
- `tsconfig.json`: containing path aliases.
- `package.json`: used by AWS Elastic Beanstalk to run the `npm run start` command.
Now, execute the following command to generate a zip file containing static assets, server-side bundle and `package.json`:
```bash
npm run build && node zip.mjs
```
Once it completes, you'd see a zip file with the name beginning with `deployment_`. You'll use this zip to deploy your application on AWS Elastic Beanstalk. Let's get started with configuring the IAM roles required to deploy an application to AWS Elastic Beanstalk.
## Configure your IAM Roles
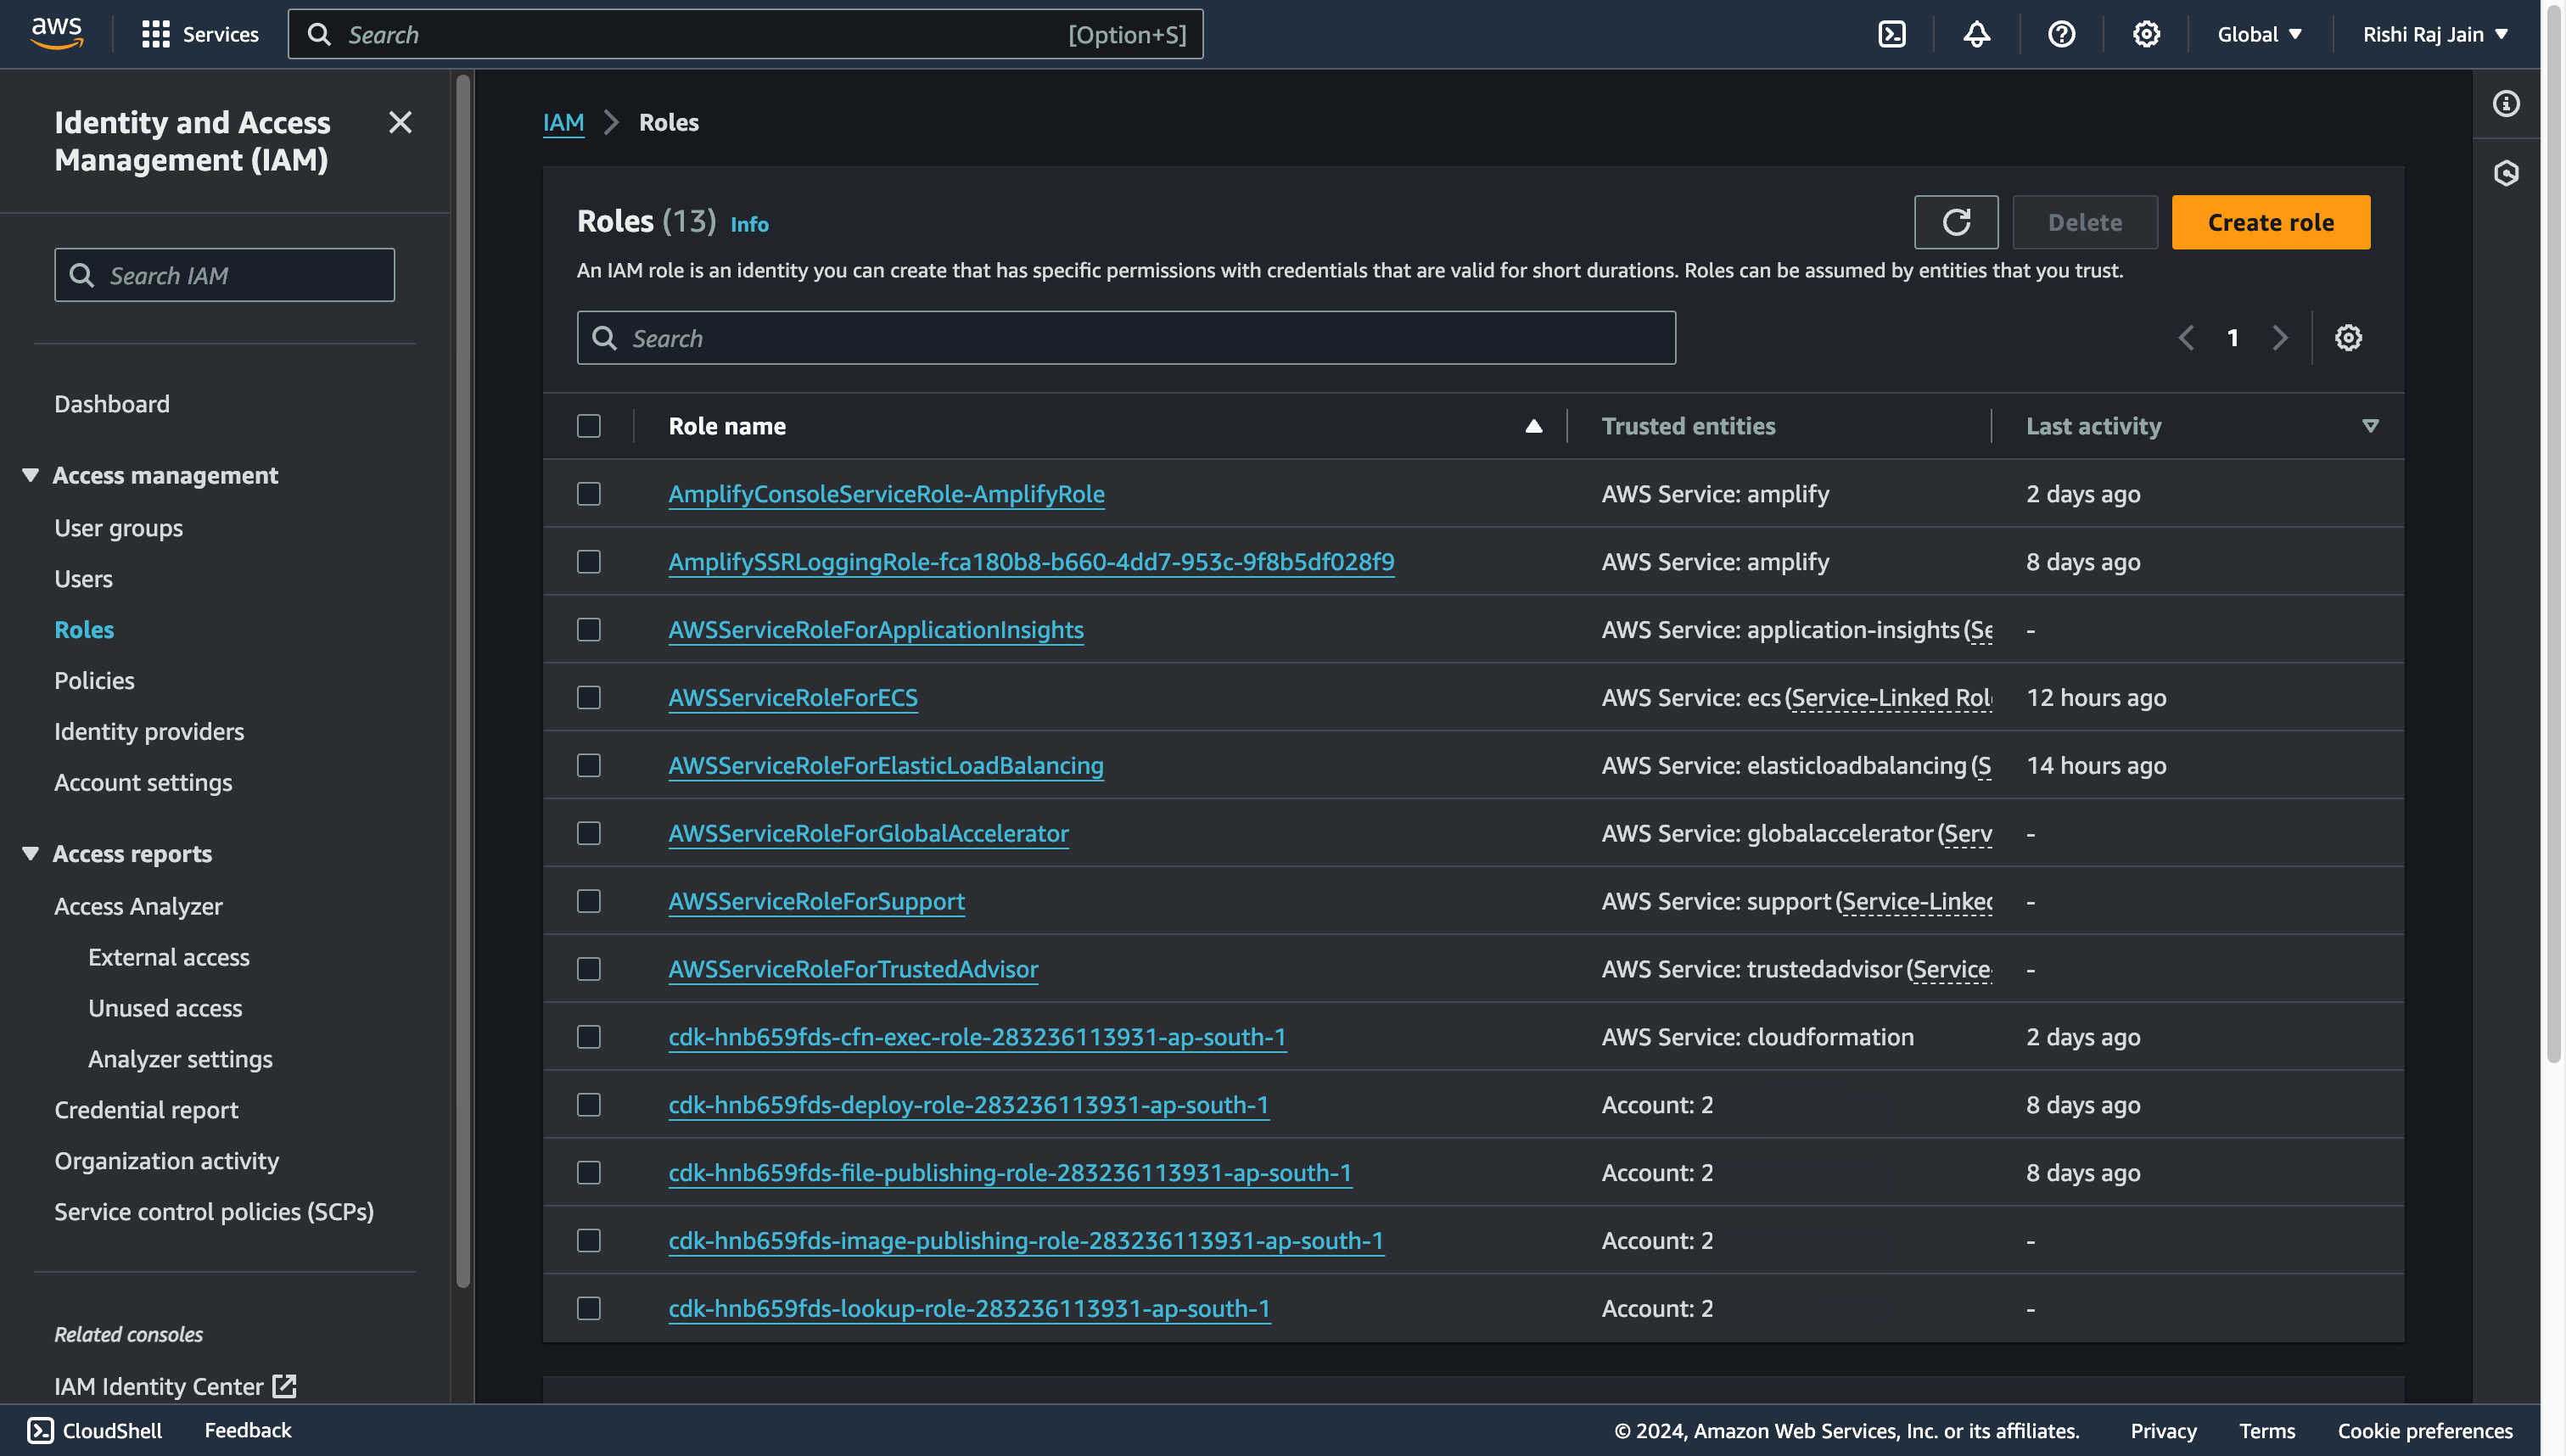
- Open the [IAM console](https://console.aws.amazon.com/iam/), and click **Create role**.
In this guide, you will learn how to deploy an Astro SSR project to AWS Elastic Beanstalk. You will go through the process of setting up a new Astro project, enabling server-side rendering, and finally deploying it to AWS Elastic Beanstalk.
## Table Of Contents
- [Prerequisites](#prerequisites)
- [Create a new Astro application](#create-a-new-astro-application)
- [Getting Started with the Node.js Adapter for Astro](#getting-started-with-the-nodejs-adapter-for-astro)
- [Configure your IAM Roles](#configure-your-iam-roles)
- [Deploy to AWS Elastic Beanstalk](#deploy-to-aws-elastic-beanstalk)
- [Conclusion](#conclusion)
## Prerequisites
You'll need the following:
- [Node.js 20](https://nodejs.org/en/blog/announcements/v20-release-announce) or later
- An [AWS](https://aws.amazon.com/free) account
## Create a new Astro application
Let’s get started by creating a new Astro project. Open your terminal and run the following command:
```bash
npm create astro@latest my-app
```
`npm create astro` is the recommended way to scaffold an Astro project quickly.
When prompted, choose:
- `Empty` when prompted on how to start the new project.
- `Yes` when prompted if you plan to write TypeScript.
- `Strict` when prompted how strict TypeScript should be.
- `Yes` when prompted to install dependencies.
- `Yes` when prompted to initialize a git repository.
Once that’s done, you can move into the project directory and start the app:
```bash
cd my-app
npm run dev
```
The app should be running on [localhost:4321](http://localhost:4321/). Next, execute the command below to install the necessary libraries and packages for building the application:
```bash
npm install dotenv
npm install -D prepend-file
```
The libraries installed include:
- `dotenv`: A library for handling environment variables.
The development-specific libraries include:
- `prepend-file`: A library to prepend data to a file.
## Getting Started with the Node.js Adapter for Astro
Before deploying your Astro project, you need to install the `@astrojs/node` adapter, execute the following command:
```bash
npm install @astrojs/node
```
The libraries installed include:
- `@astrojs/node`: An adapter that prepares Astro websites to be run as a Node.js server.
Once the adapter is installed, you'll need to add it to your `astro.config.mjs` file. Open the file and add the following code:
```tsx ins={3,7-10}
// File: astro.config.mjs
import node from '@astrojs/node';
import { defineConfig } from 'astro/config';
export default defineConfig({
output: "server",
adapter: node({
mode: "standalone"
}),
});
```
The additions do the following:
- Imports default export of `@astrojs/node`.
- Uses the above import as the `adapter` of your Astro application.
- Sets `output` to `server` to enable server-side rendering compatible output.
Then, create a `zip.mjs` at the root of the repository with the following code:
```tsx
// File: zip.mjs
import zl from "zip-lib"
import { join } from "node:path"
import { sync as prependSync } from "prepend-file"
const zip = new zl.Zip()
prependSync(join("dist", "server", "entry.mjs"), `import 'dotenv/config'\n`)
zip.addFolder("./dist", "dist")
zip.addFile("./package.json", "package.json")
zip.addFile("./tsconfig.json", "tsconfig.json")
zip.addFolder("./node_modules", "node_modules")
zip.archive(`./deployment_${Math.random().toString()}.zip`)
console.log('Zipped!')
```
The code above does the following:
- Imports `dotenv/config` in `dist/server/entry.mjs` to load all the environment variables into the scope, making them accessible via `process.env` object.
- Creates a zip with the following files and folders in it:
- `dist`: containing the static and server side required assets.
- `node_modules`: collection of installed dependencies.
- `tsconfig.json`: containing path aliases.
- `package.json`: used by AWS Elastic Beanstalk to run the `npm run start` command.
Now, execute the following command to generate a zip file containing static assets, server-side bundle and `package.json`:
```bash
npm run build && node zip.mjs
```
Once it completes, you'd see a zip file with the name beginning with `deployment_`. You'll use this zip to deploy your application on AWS Elastic Beanstalk. Let's get started with configuring the IAM roles required to deploy an application to AWS Elastic Beanstalk.
## Configure your IAM Roles
- Open the [IAM console](https://console.aws.amazon.com/iam/), and click **Create role**.
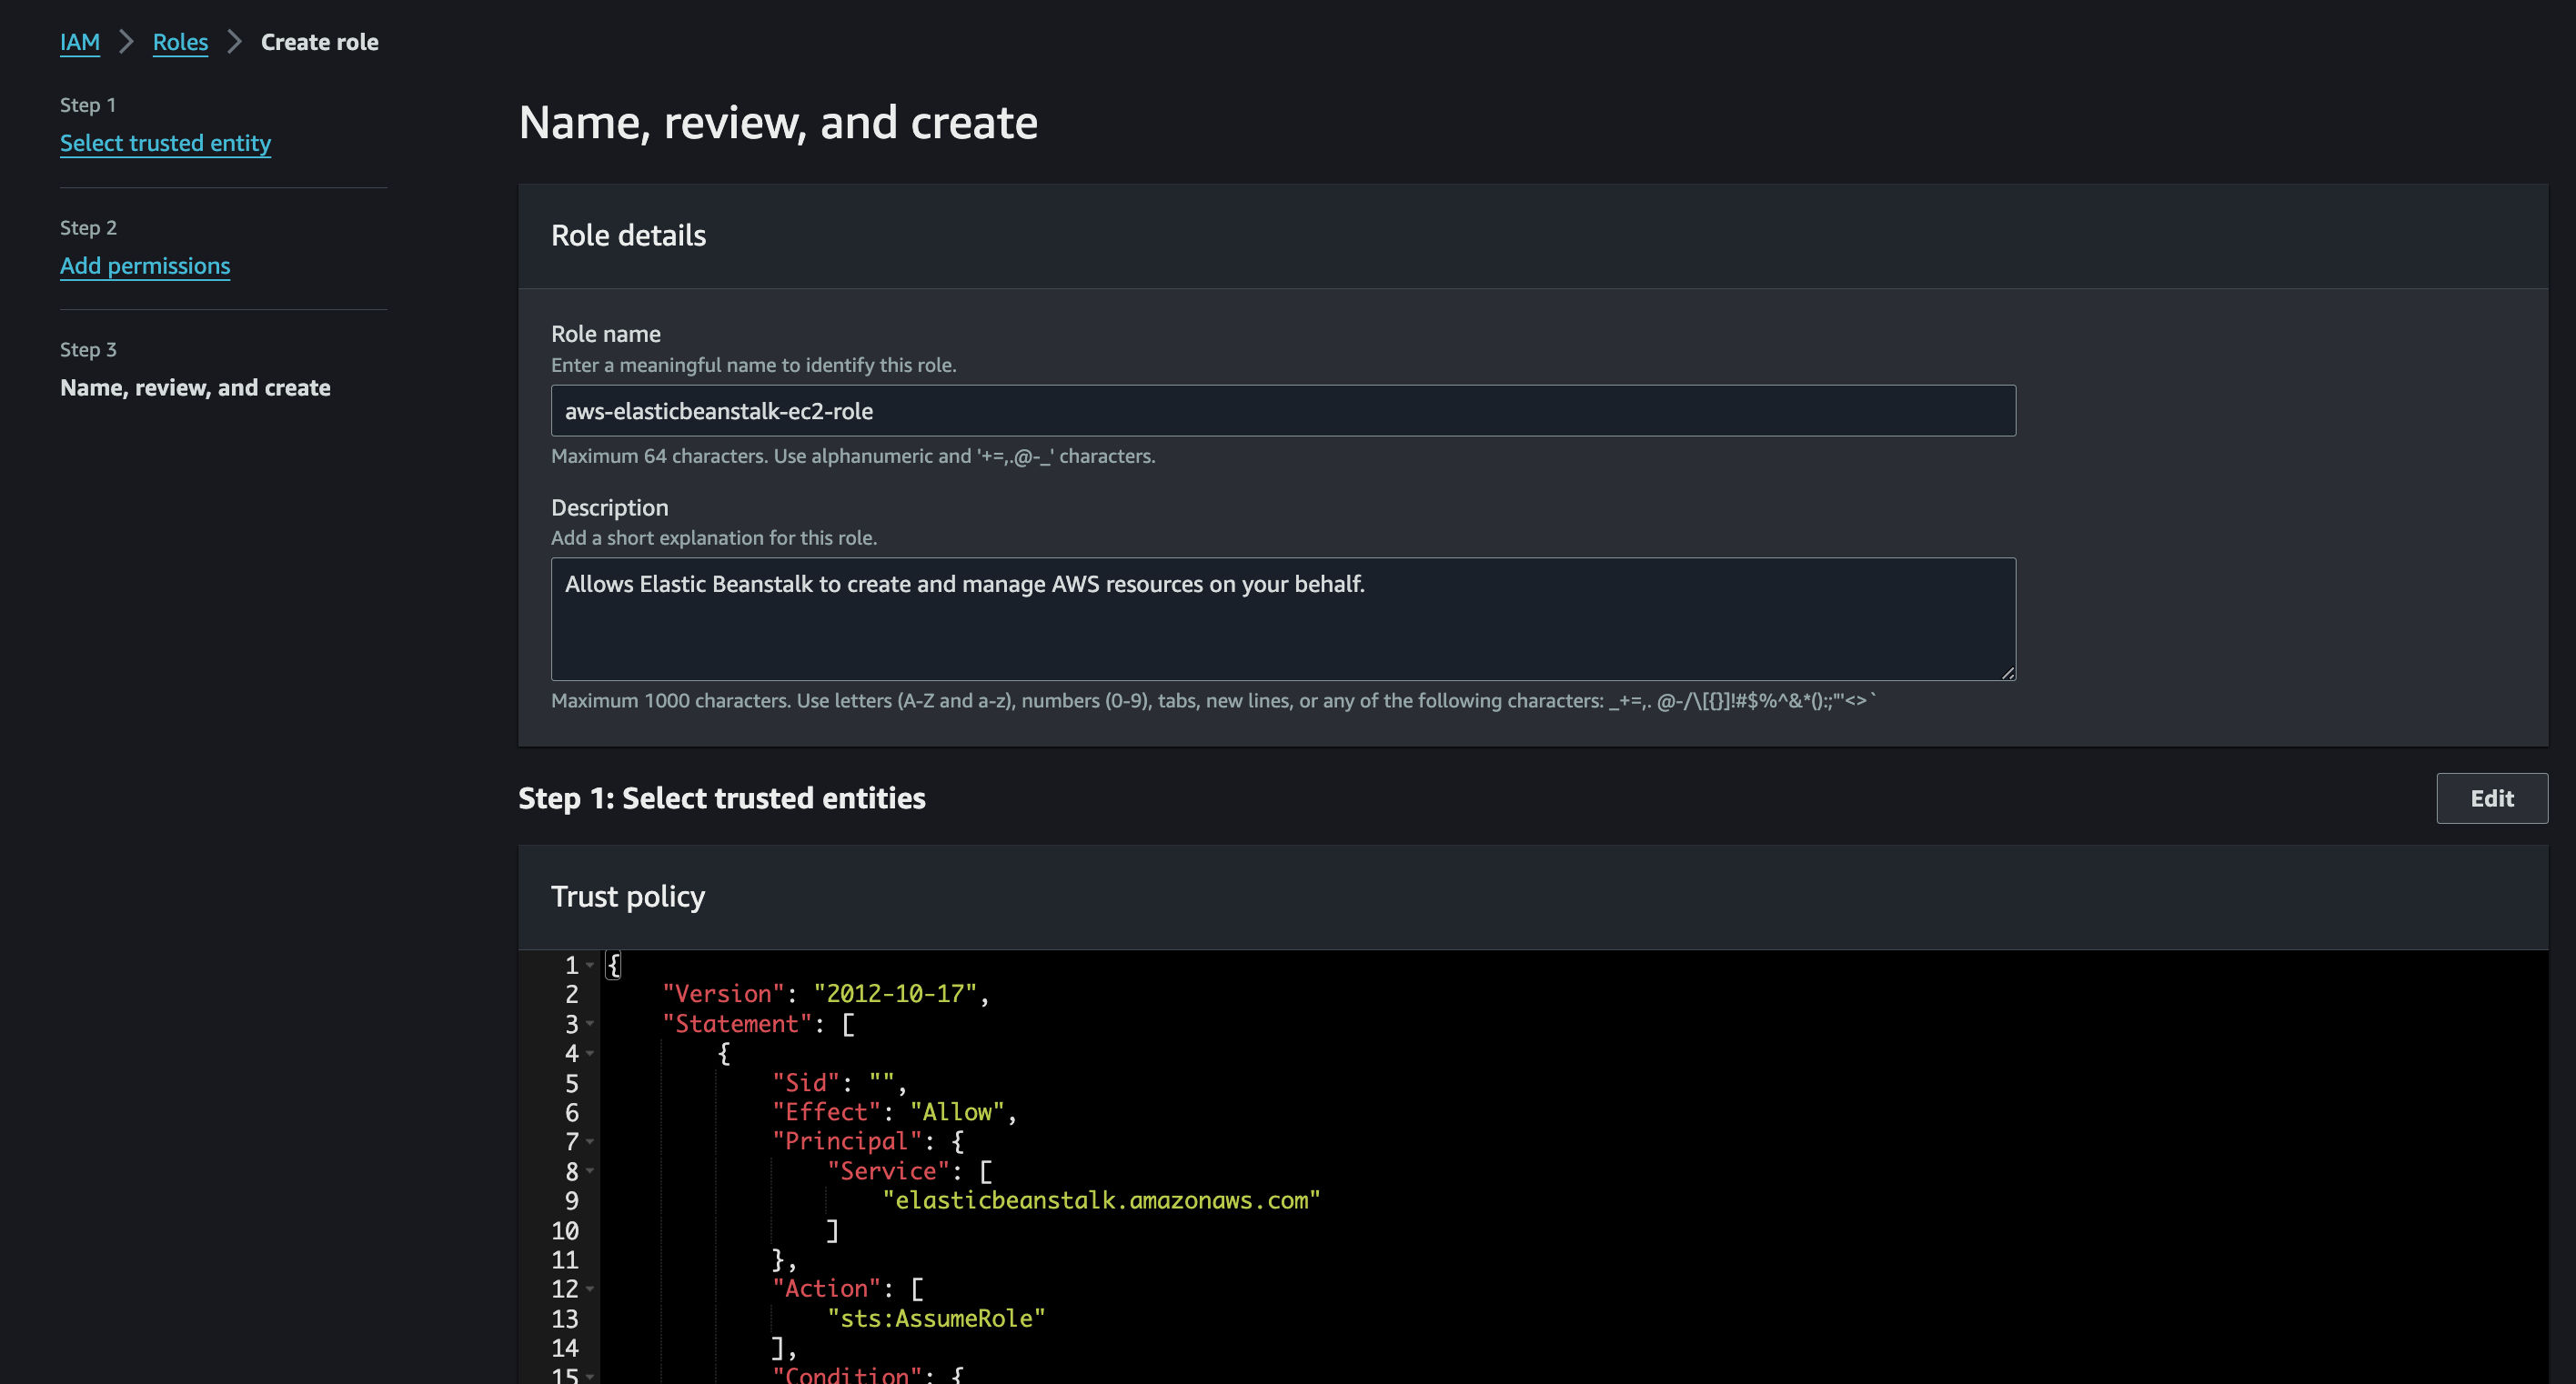
 - Select **AWS Service** and choose **Elastic Beanstalk** as the Service or use case.
 - Go by the default permissions set, and click **Next**.
 - Enter `aws-elasticbeanstalk-ec2-role` as the **Role name**.
 - Go back to the IAM Console, and click **Create role**.
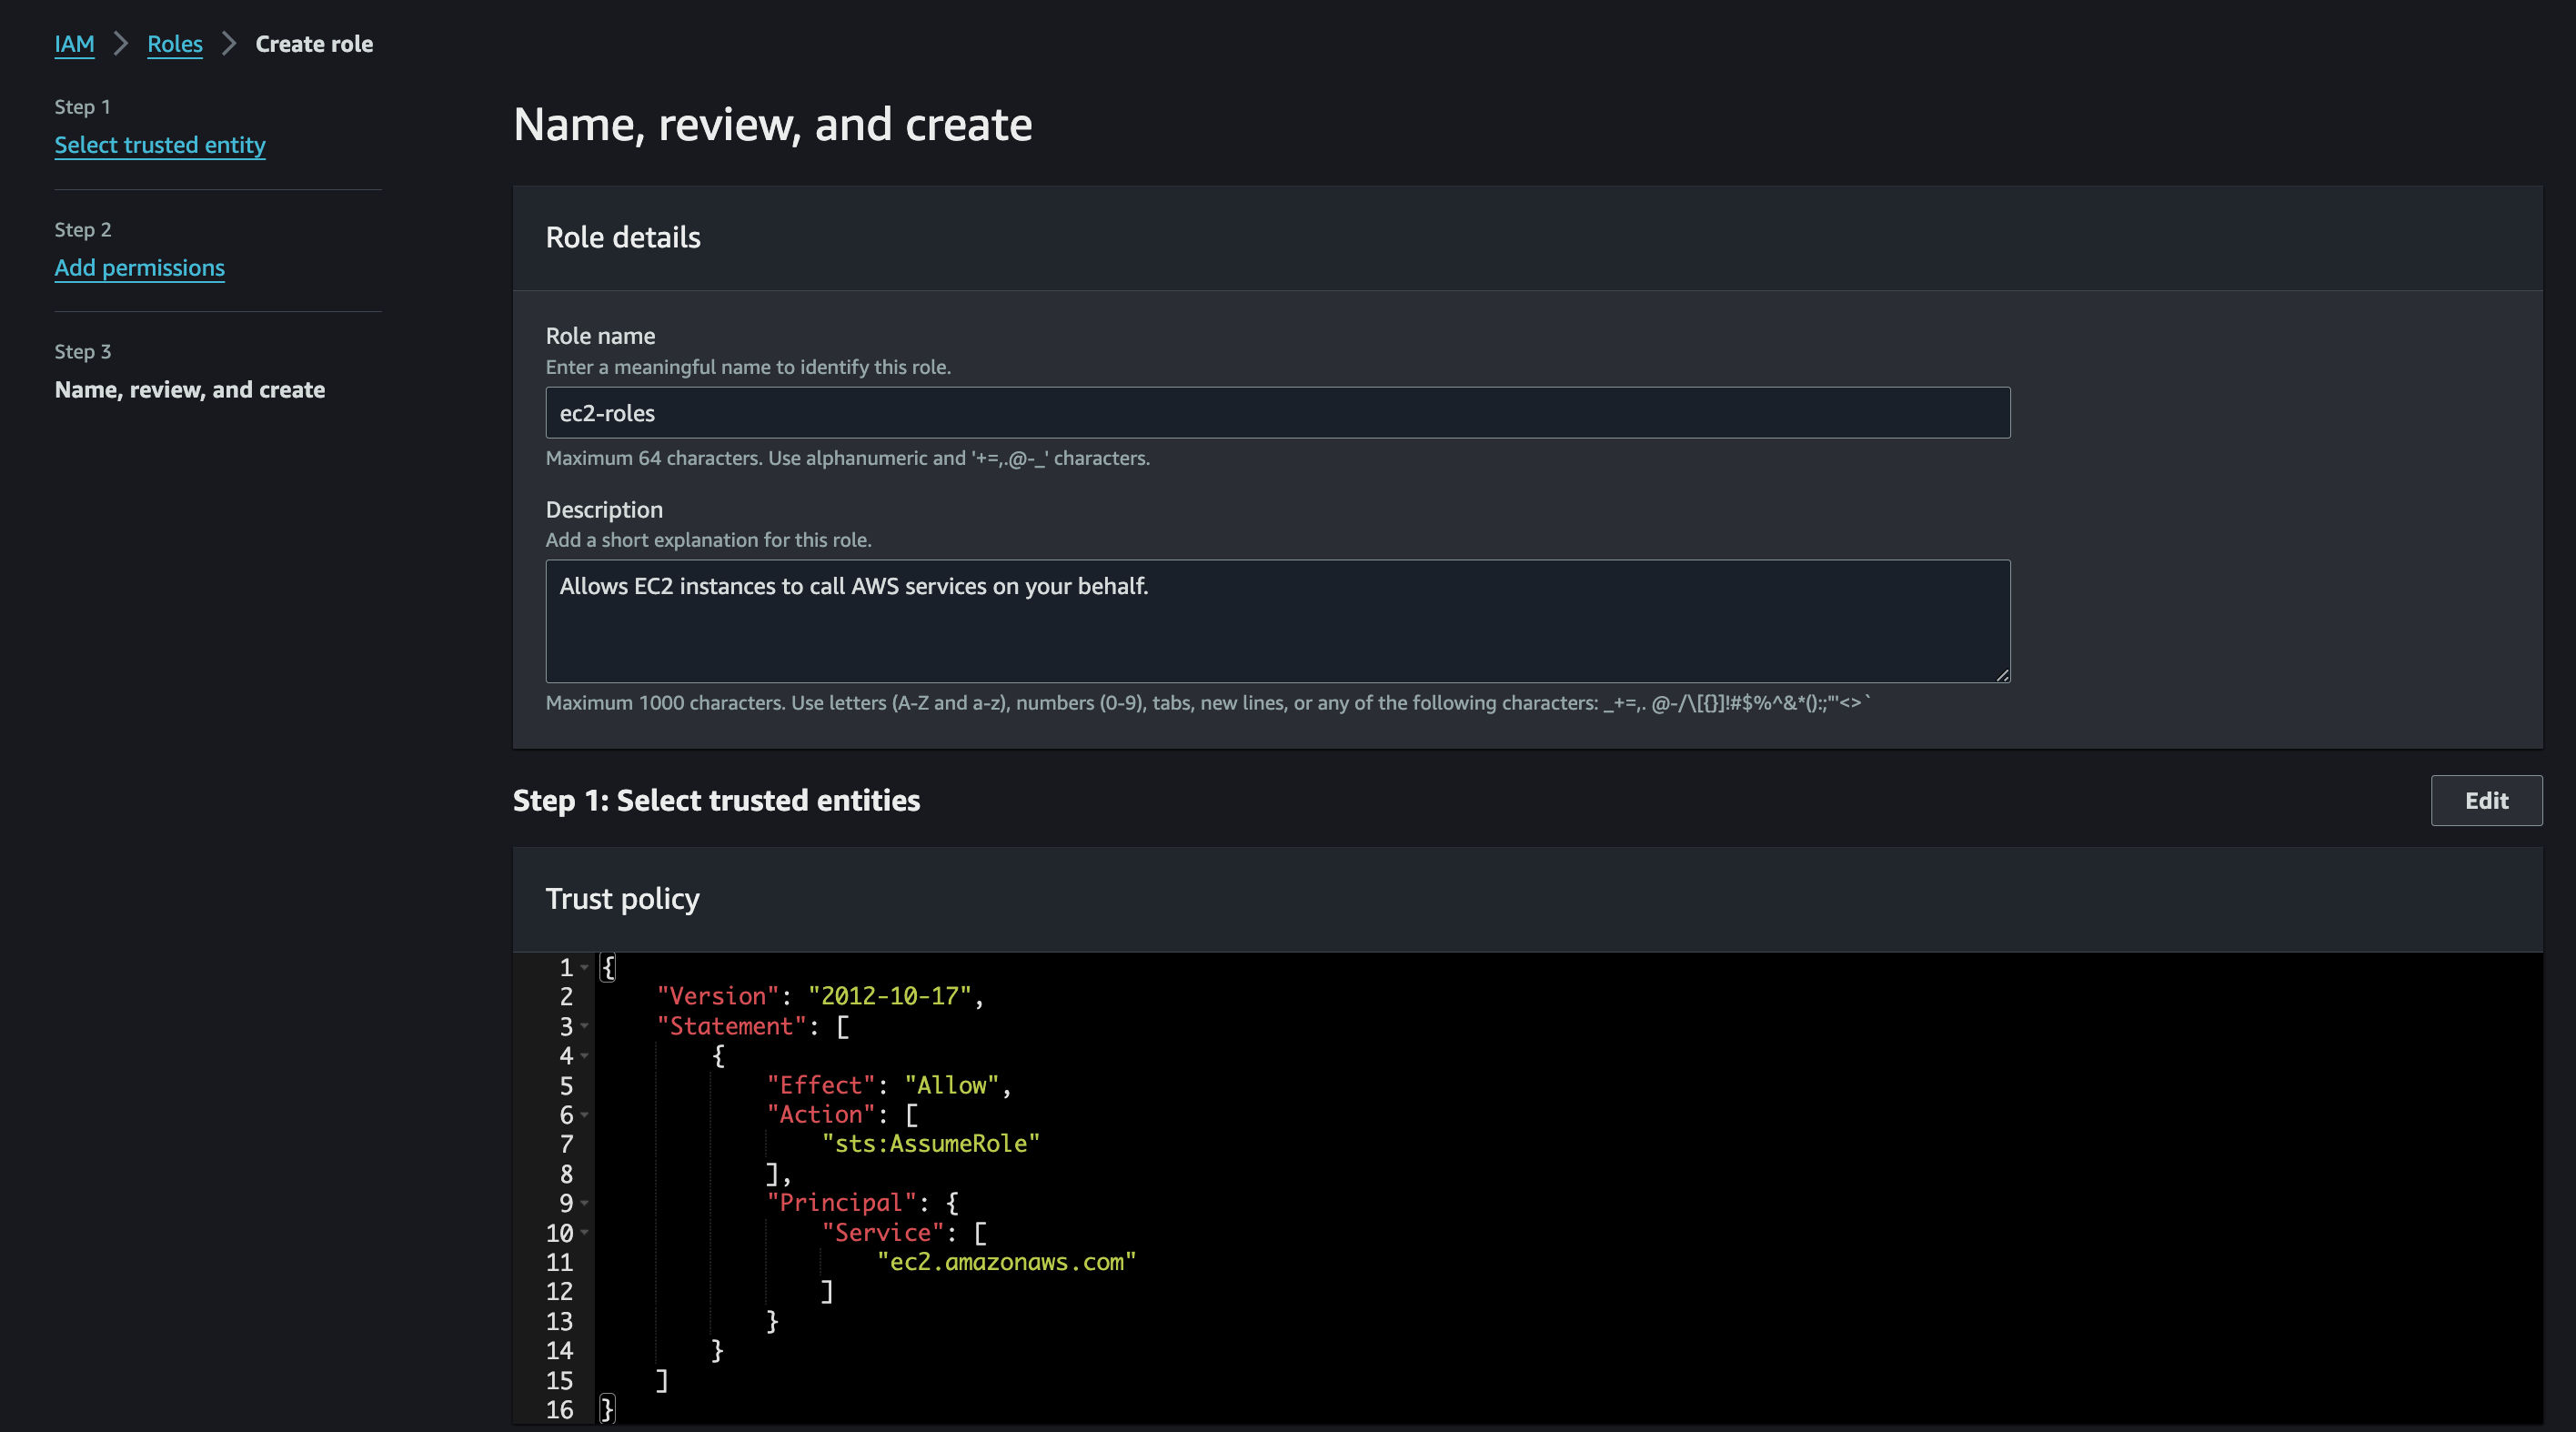
- Select **AWS Service** and choose **EC2** as the Service or use case.
- Go back to the IAM Console, and click **Create role**.
- Select **AWS Service** and choose **EC2** as the Service or use case.
 - Filter the large set of permissions policies, type **AWSElasticBeanstalk**, select the following:
- AWSElasticBeanstalkMulticontainerDocker
- AWSElasticBeanstalkWebTier
- AWSElasticBeanstalkWorkerTier
Then, click **Next**.
- Filter the large set of permissions policies, type **AWSElasticBeanstalk**, select the following:
- AWSElasticBeanstalkMulticontainerDocker
- AWSElasticBeanstalkWebTier
- AWSElasticBeanstalkWorkerTier
Then, click **Next**.
 - Enter `ec2-roles` as the **Role name**.
 and you are now done with setting up IAM Roles for your account. Let’s move on to deploying your Astro application to AWS Elastic Beanstalk.
## Deploy to AWS Elastic Beanstalk
The code is now ready to deploy to AWS Elastic Beanstalk. Use the following steps to deploy:
- Start by creating a GitHub repository containing your app's code.
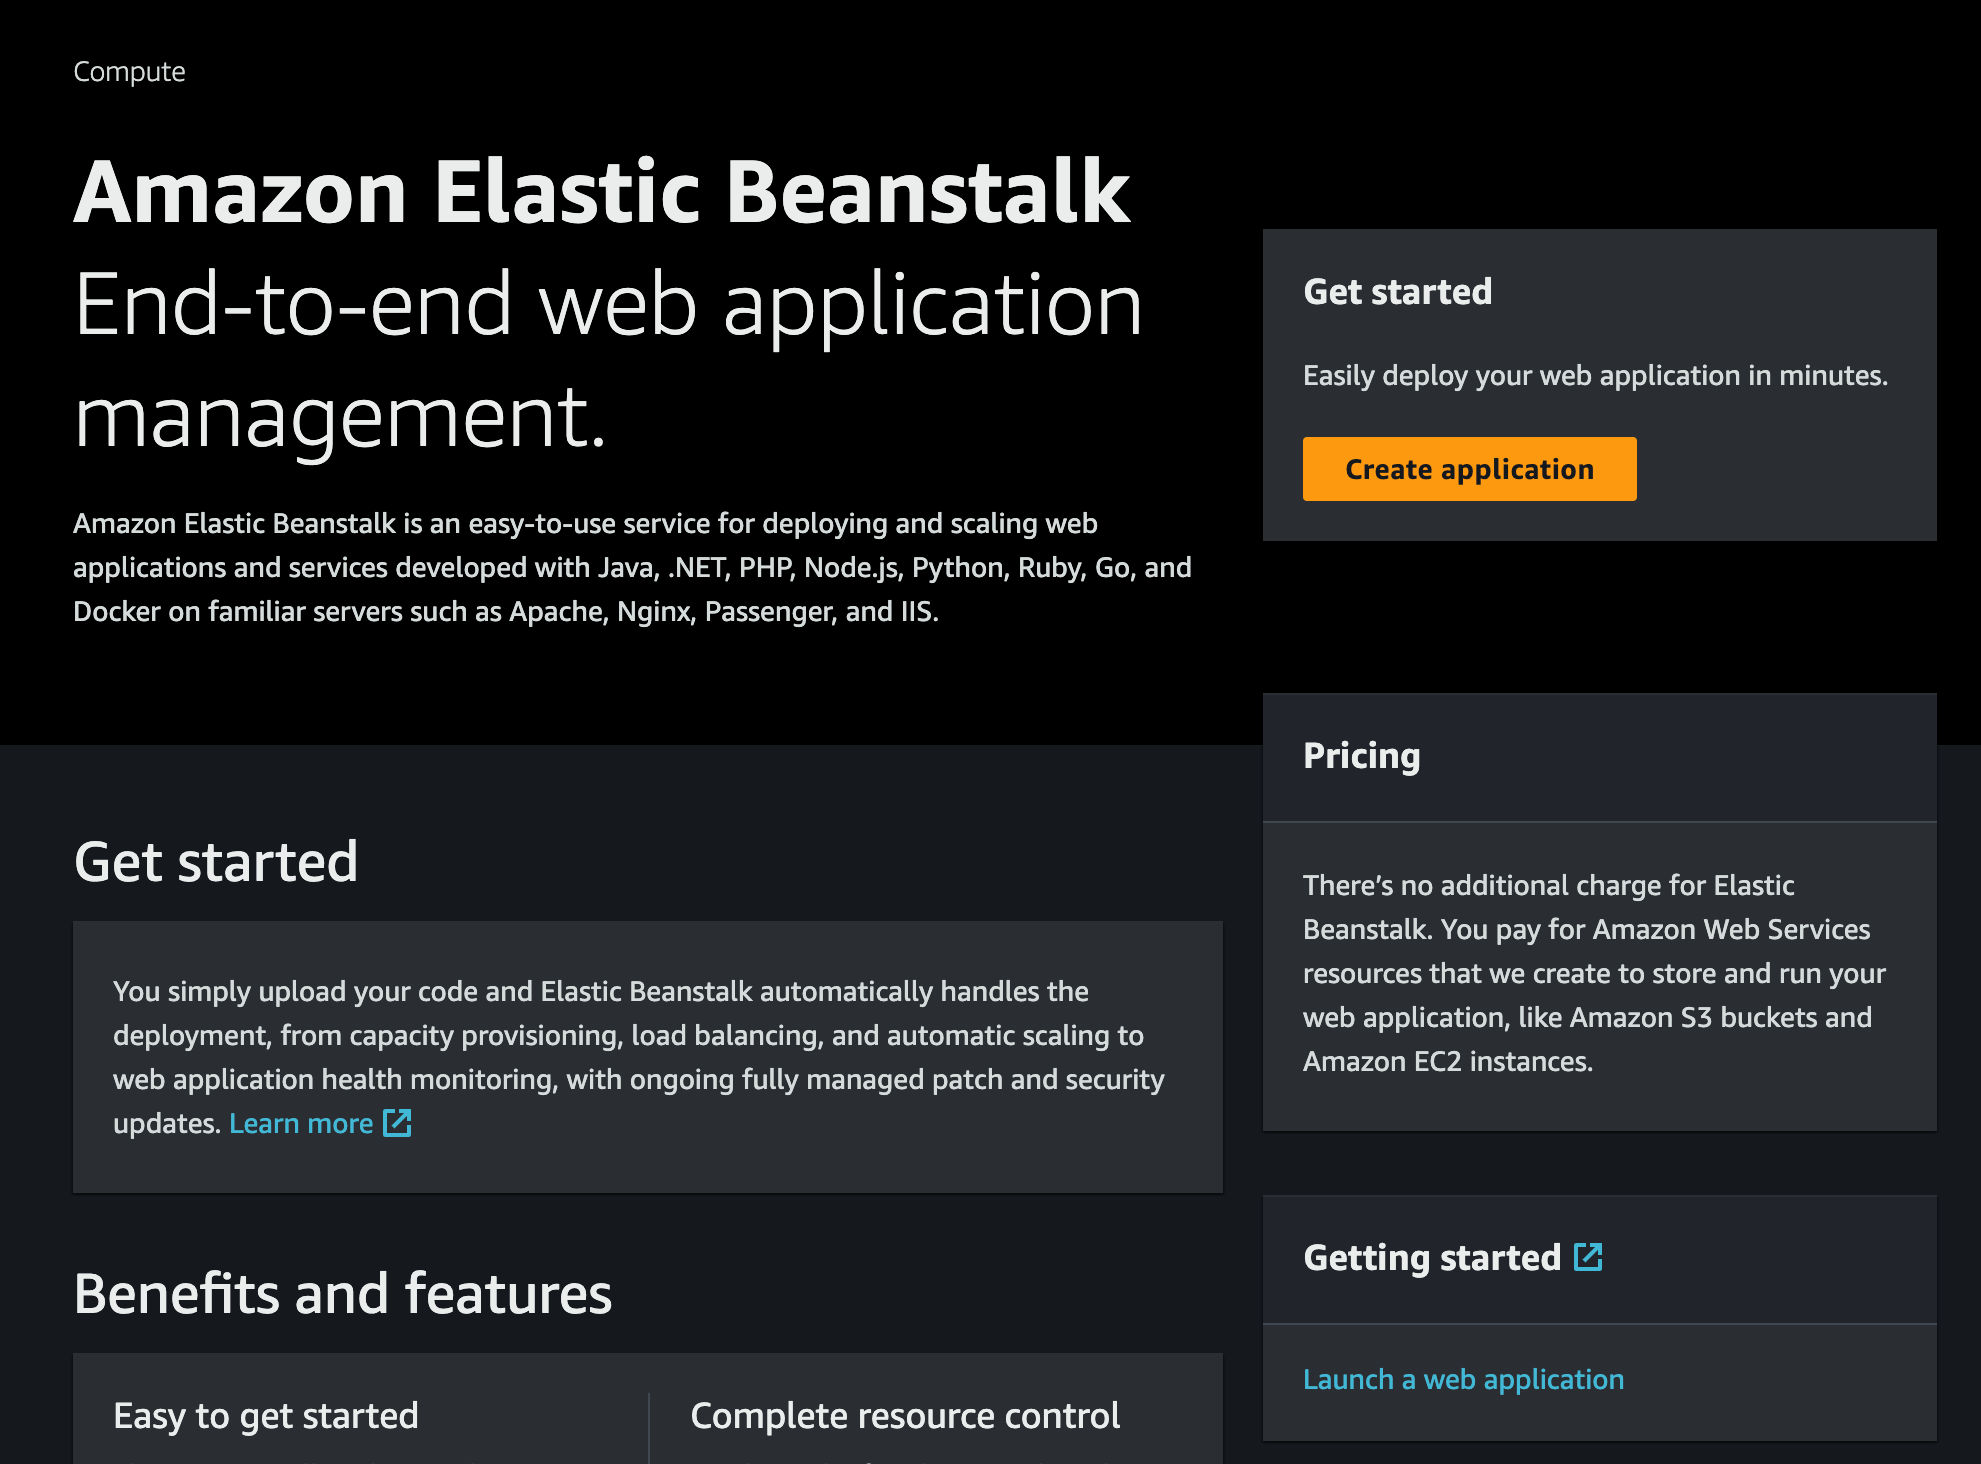
- Then, navigate to the AWS Elastic Beanstalk Dashboard and click on **Create application** under the **Get Started** section.
and you are now done with setting up IAM Roles for your account. Let’s move on to deploying your Astro application to AWS Elastic Beanstalk.
## Deploy to AWS Elastic Beanstalk
The code is now ready to deploy to AWS Elastic Beanstalk. Use the following steps to deploy:
- Start by creating a GitHub repository containing your app's code.
- Then, navigate to the AWS Elastic Beanstalk Dashboard and click on **Create application** under the **Get Started** section.
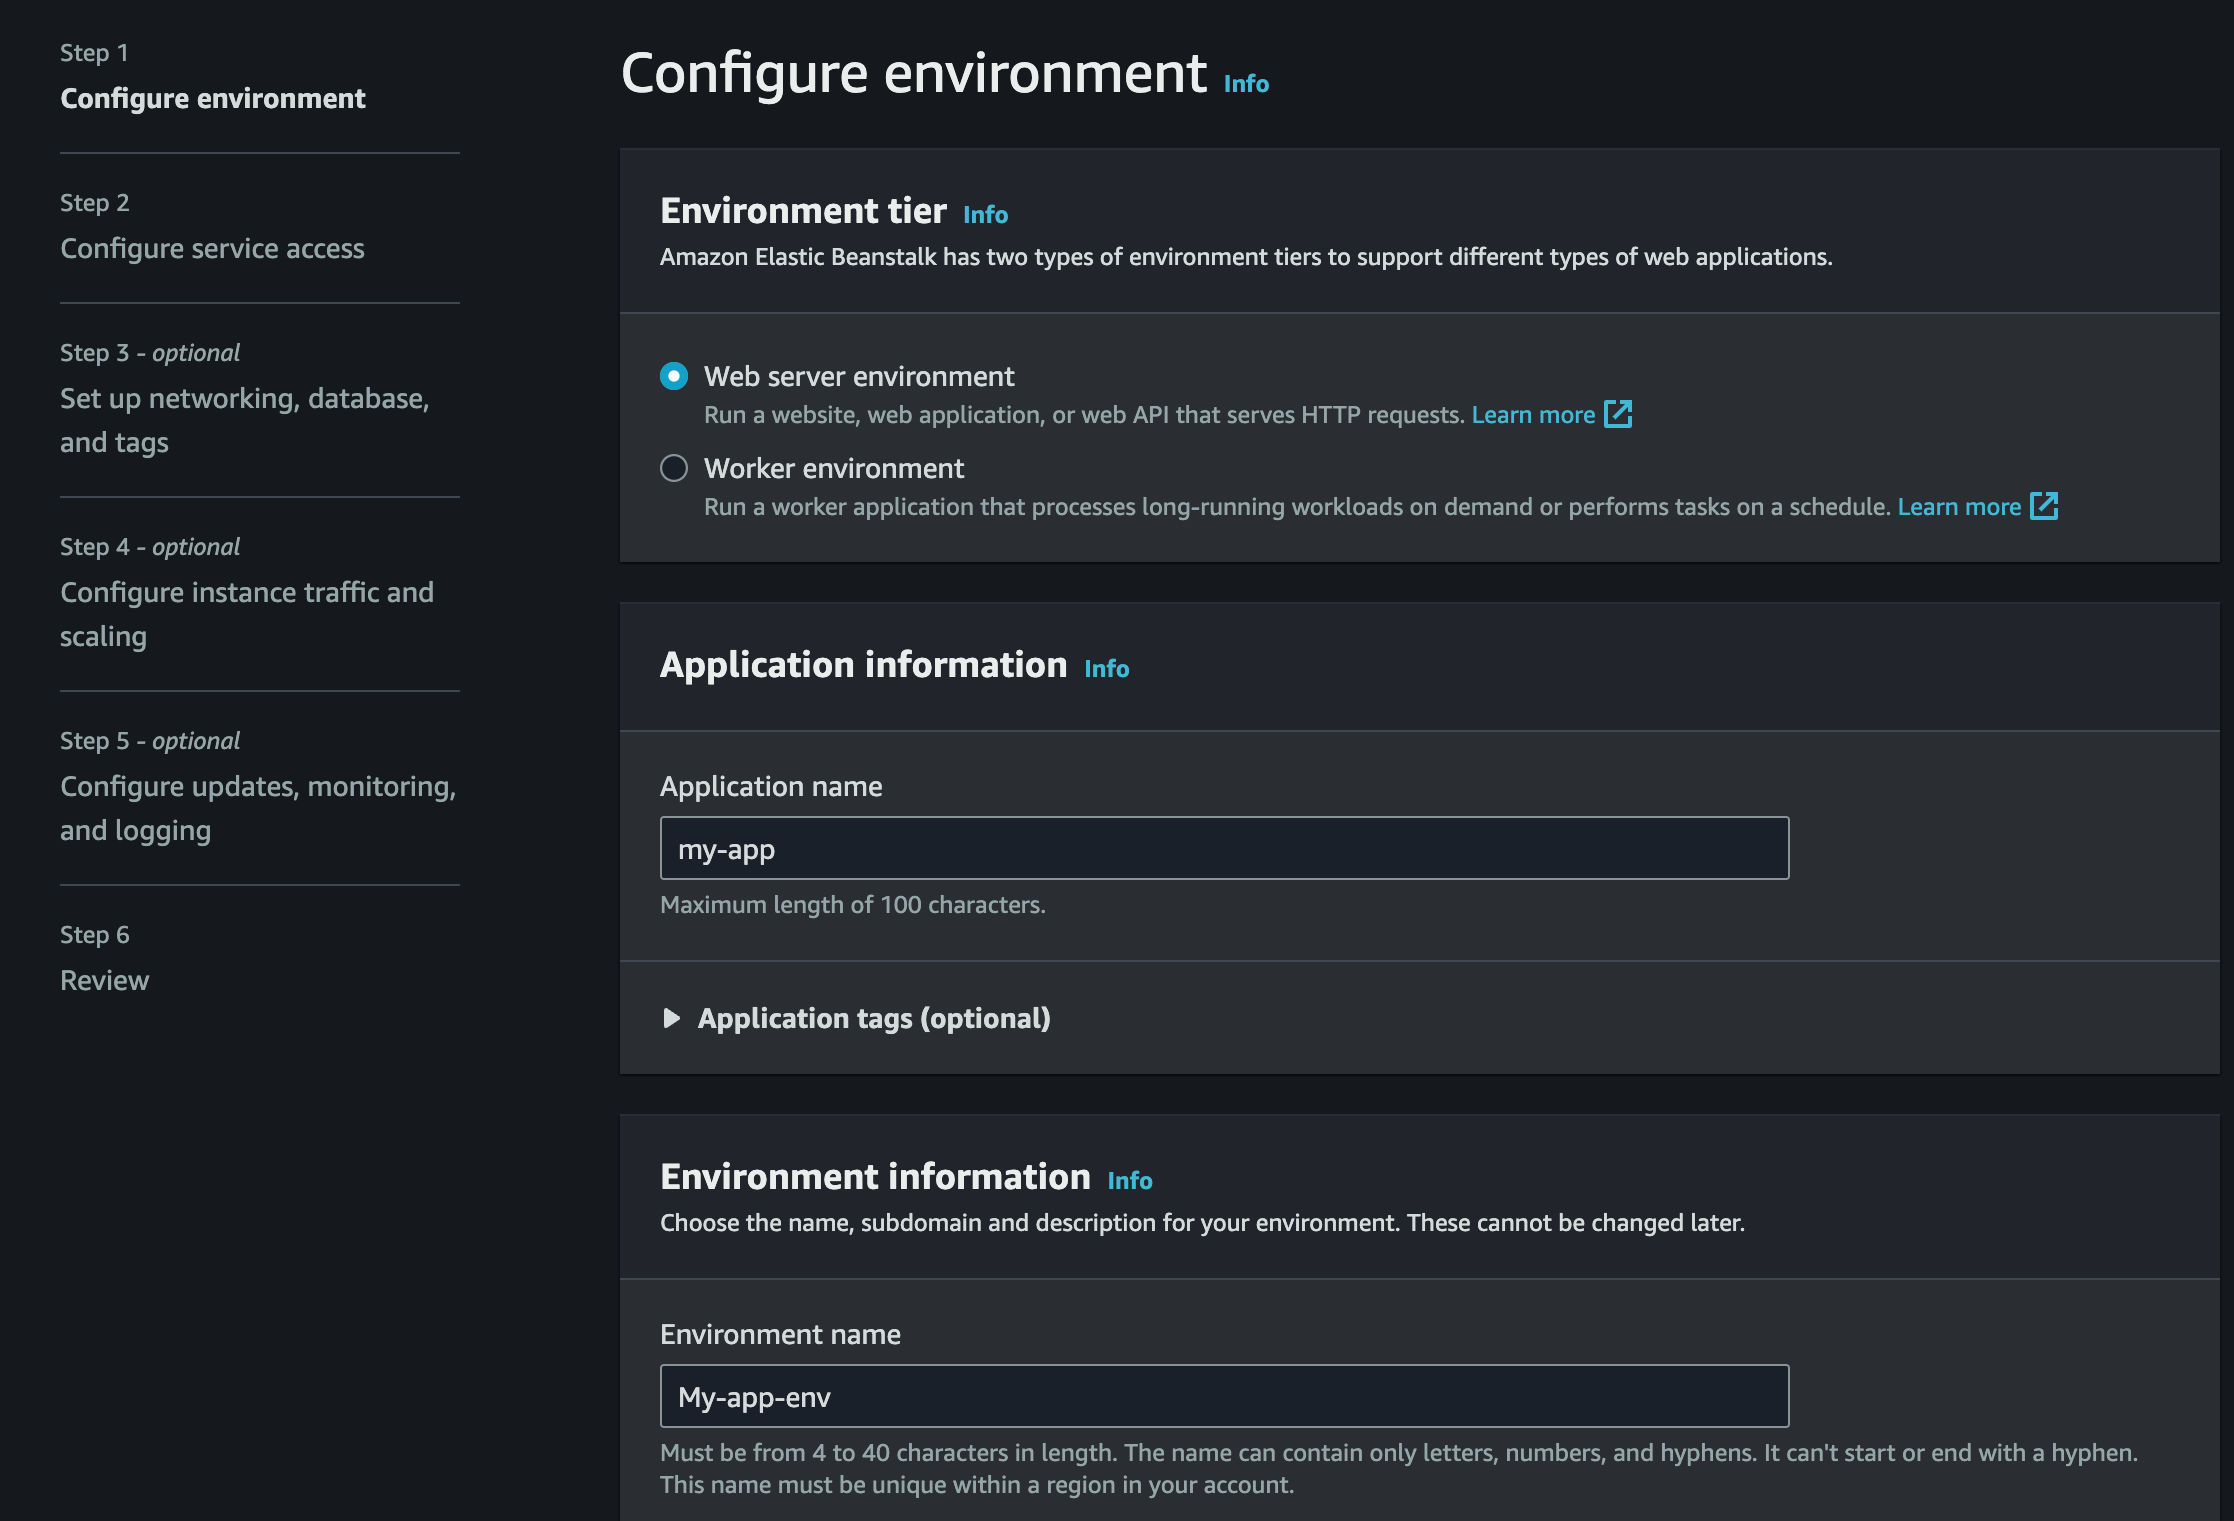
 - Give the application a name of your choice.
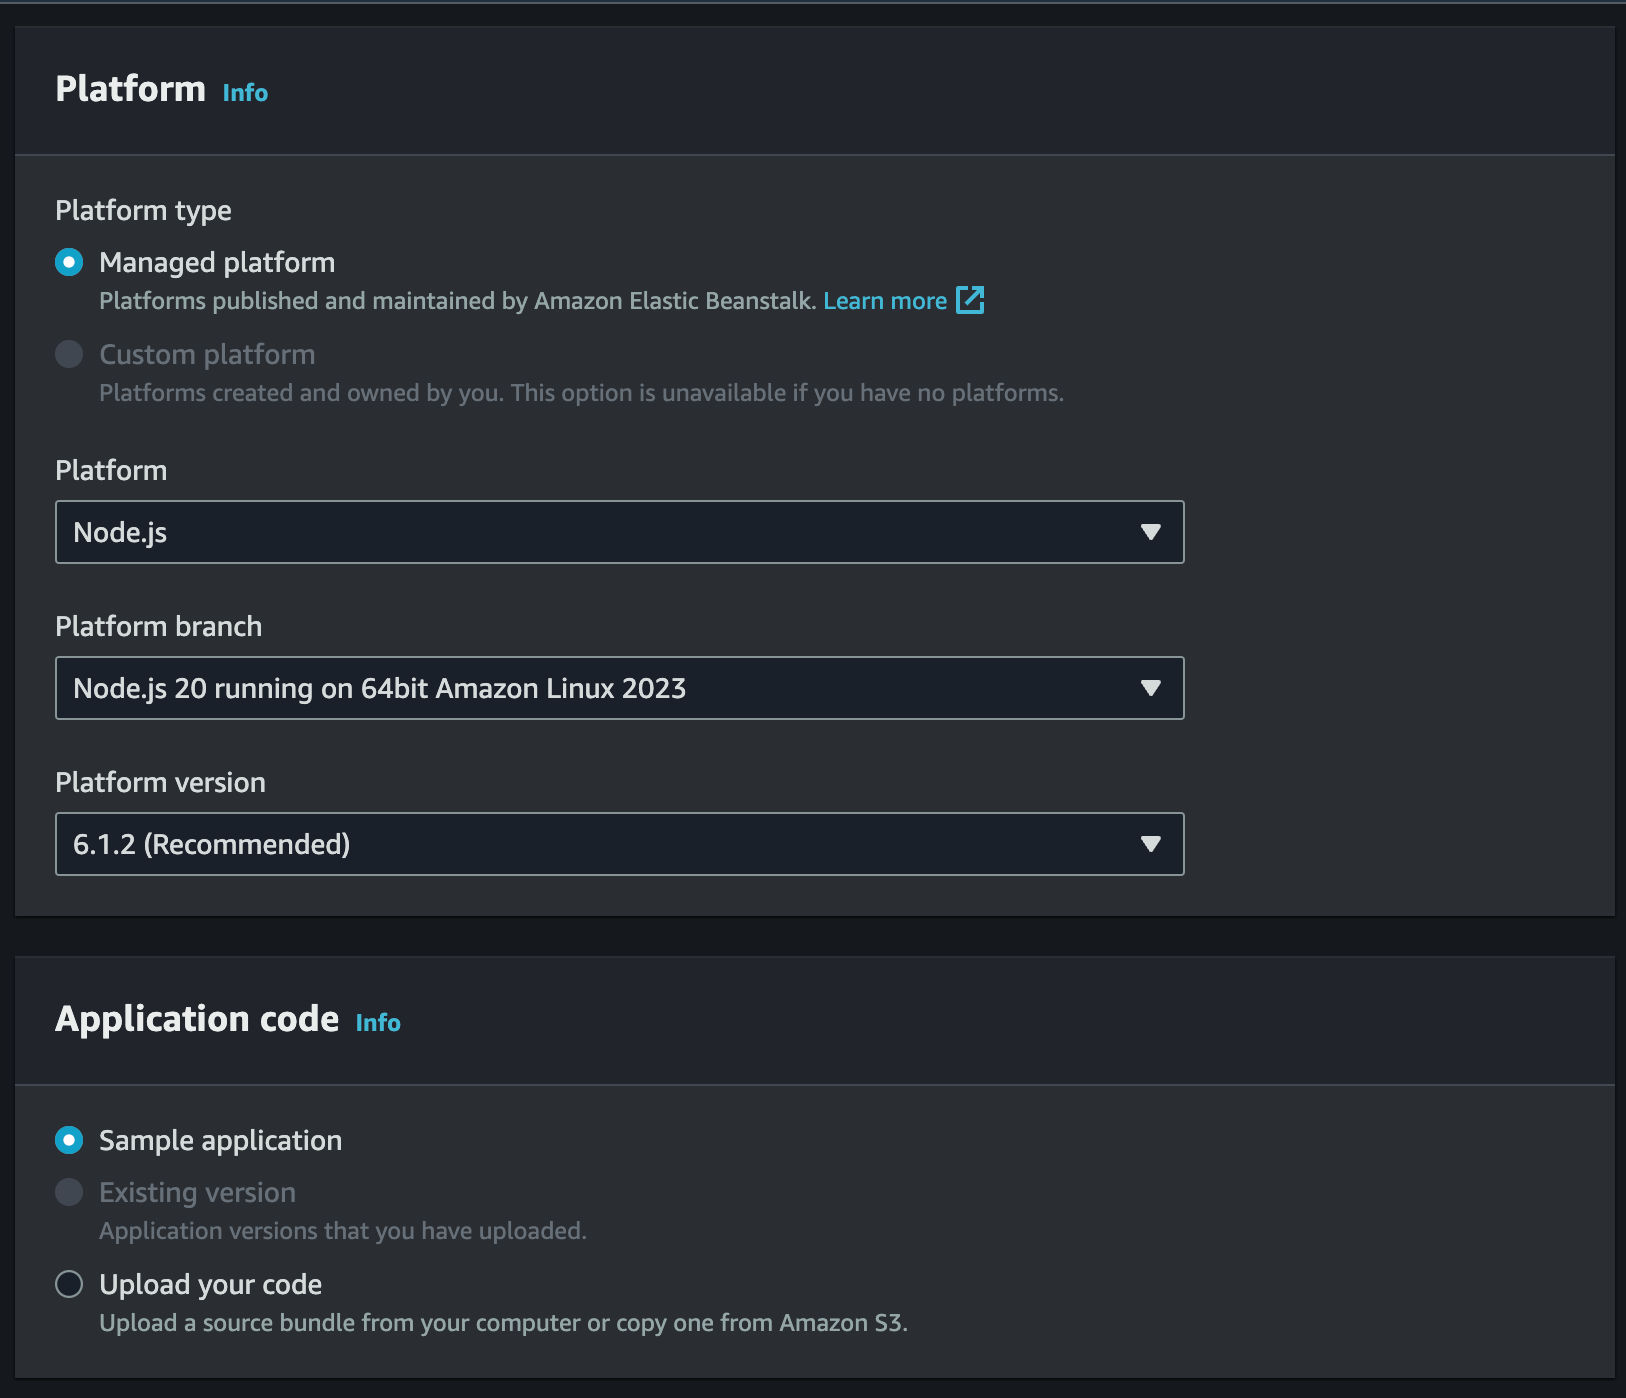
 - Select `Node.js` as the platform you are going to use, and click `Next`.
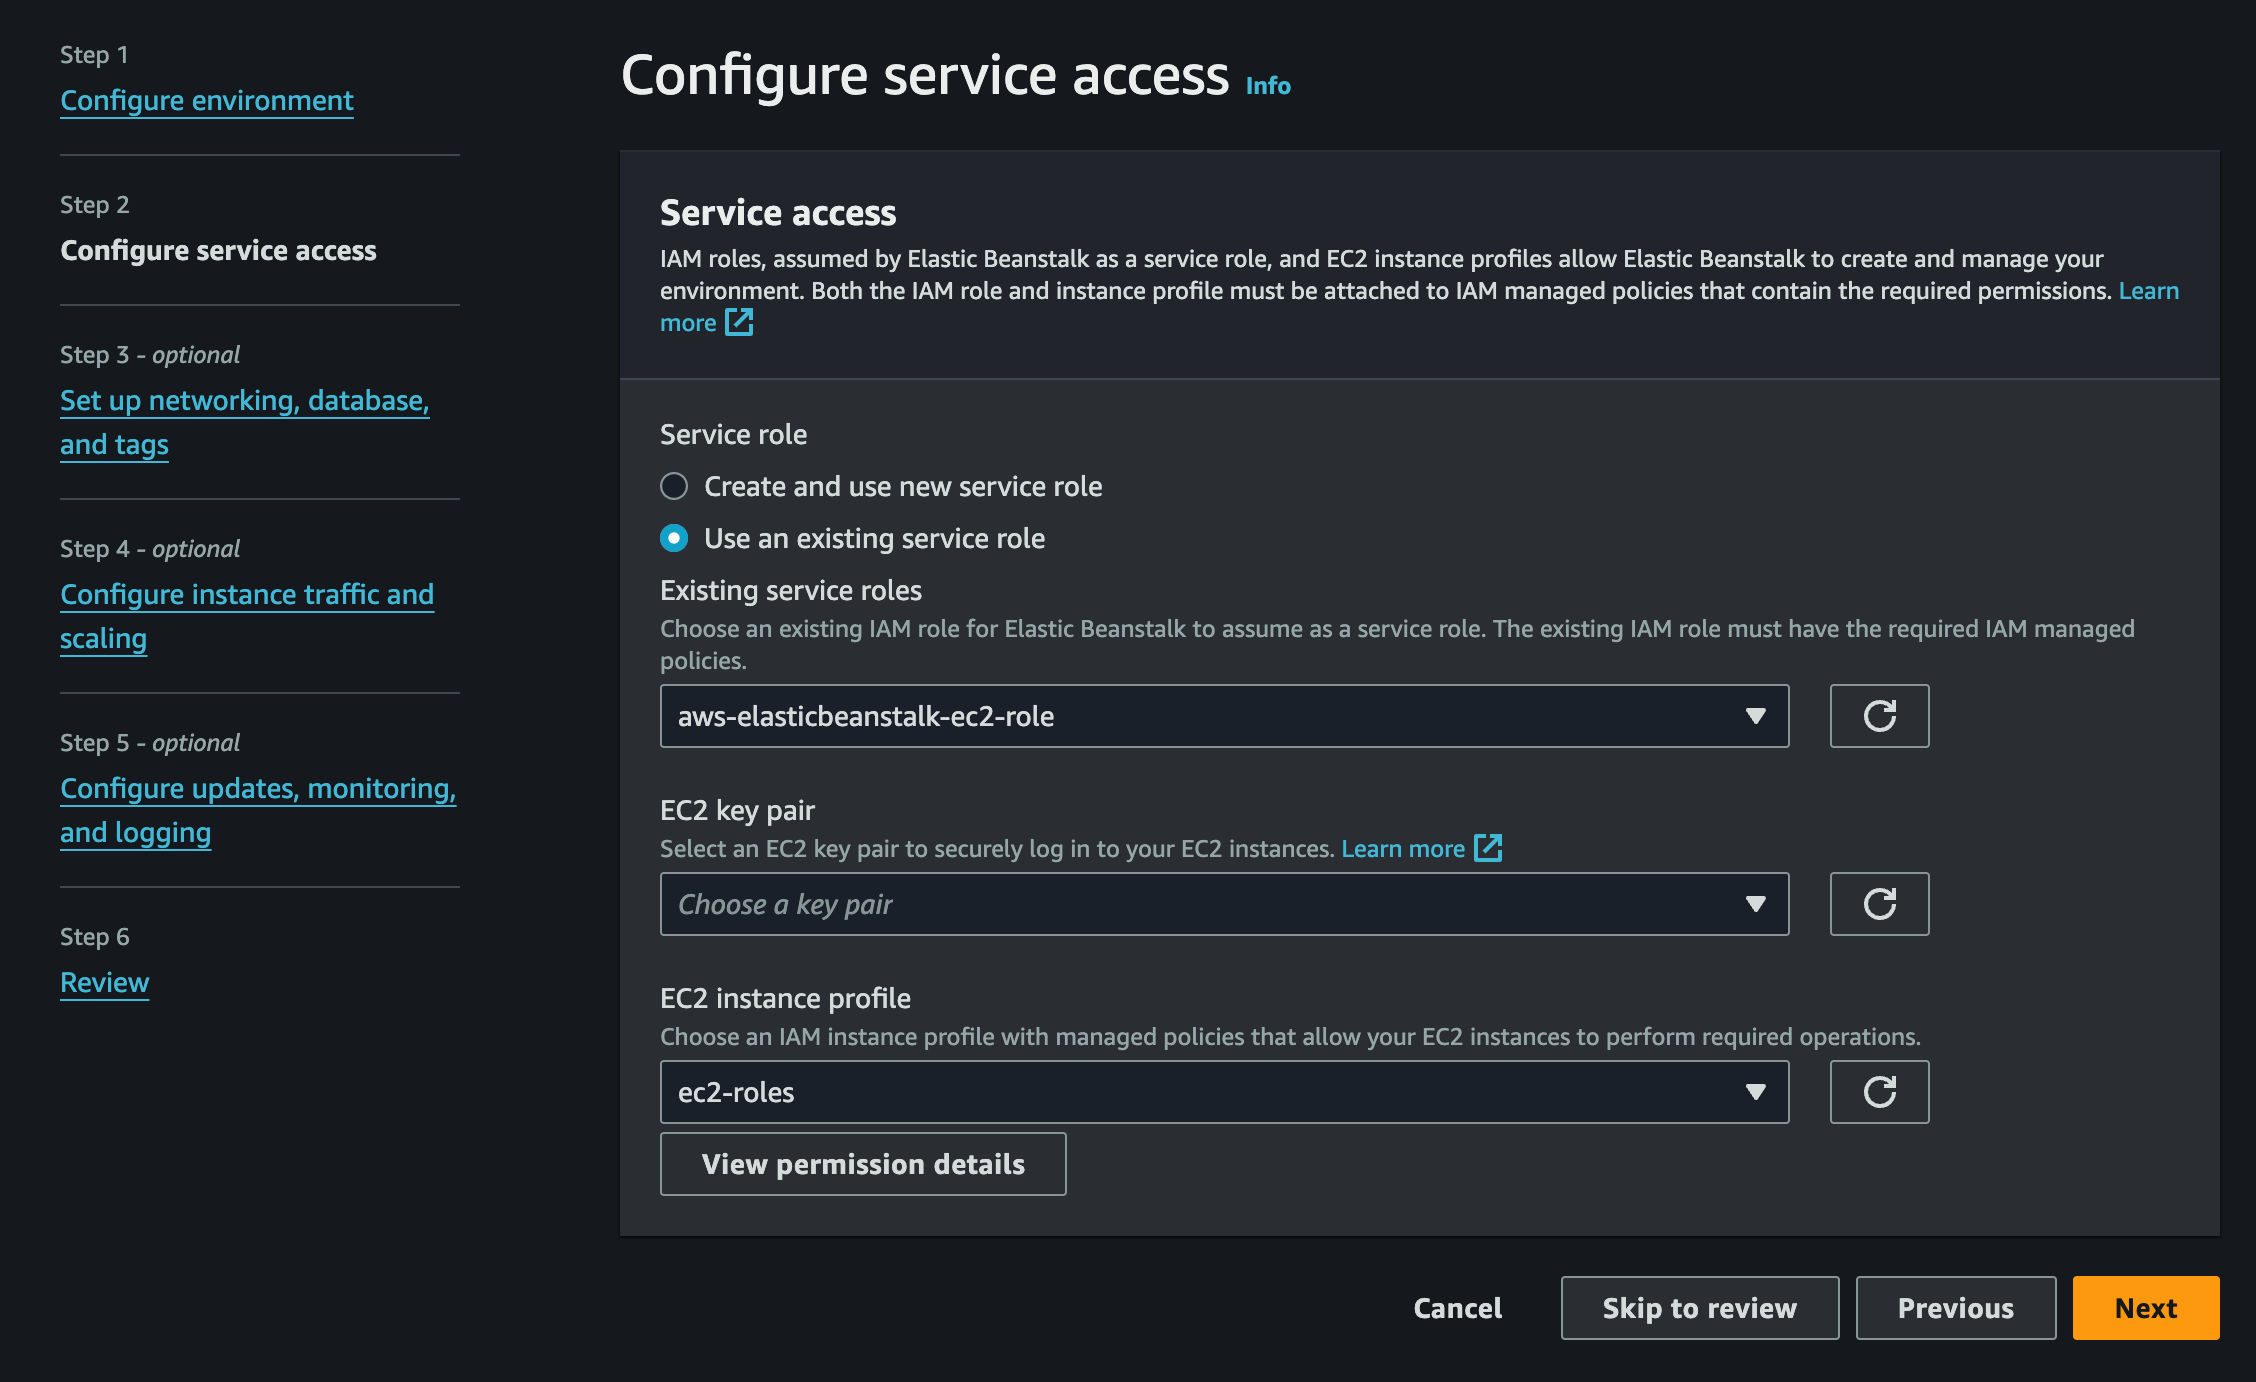
 - Select `Use an existing service role` to use the `aws-elasticbeanstalk-ec2-role` and `ec2-roles` you created earlier, and click `Next`.
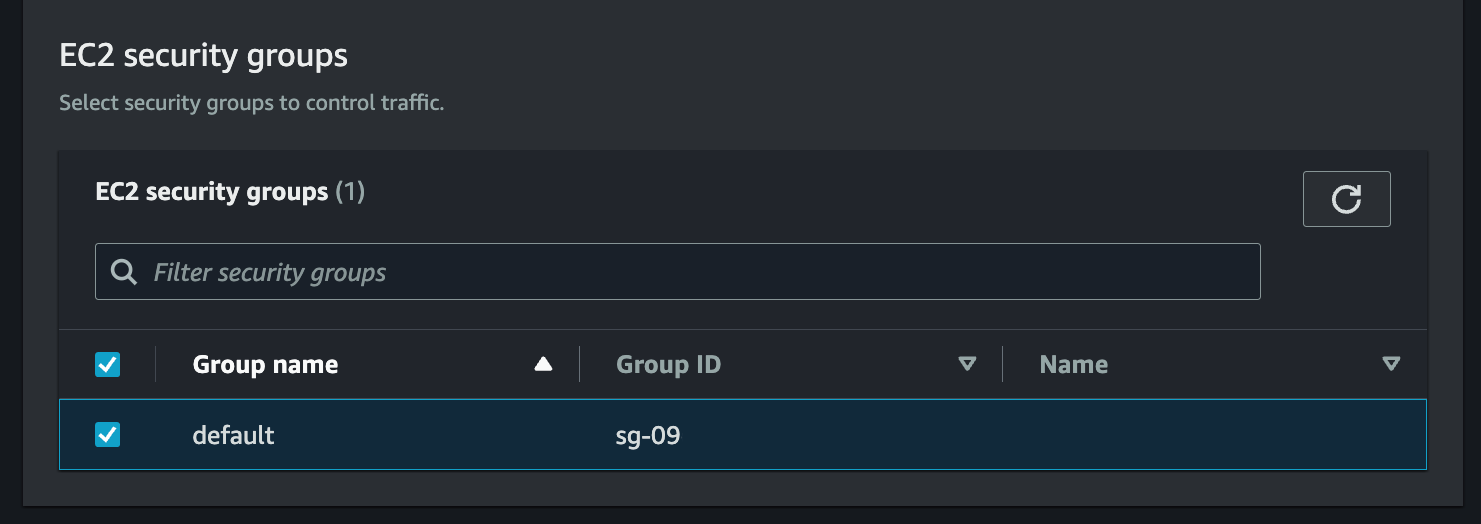
 - Select the default VPC, then enable public IP address and check all the subnets.
 - Scroll down to the **EC2 Security Groups** section and use the default one.
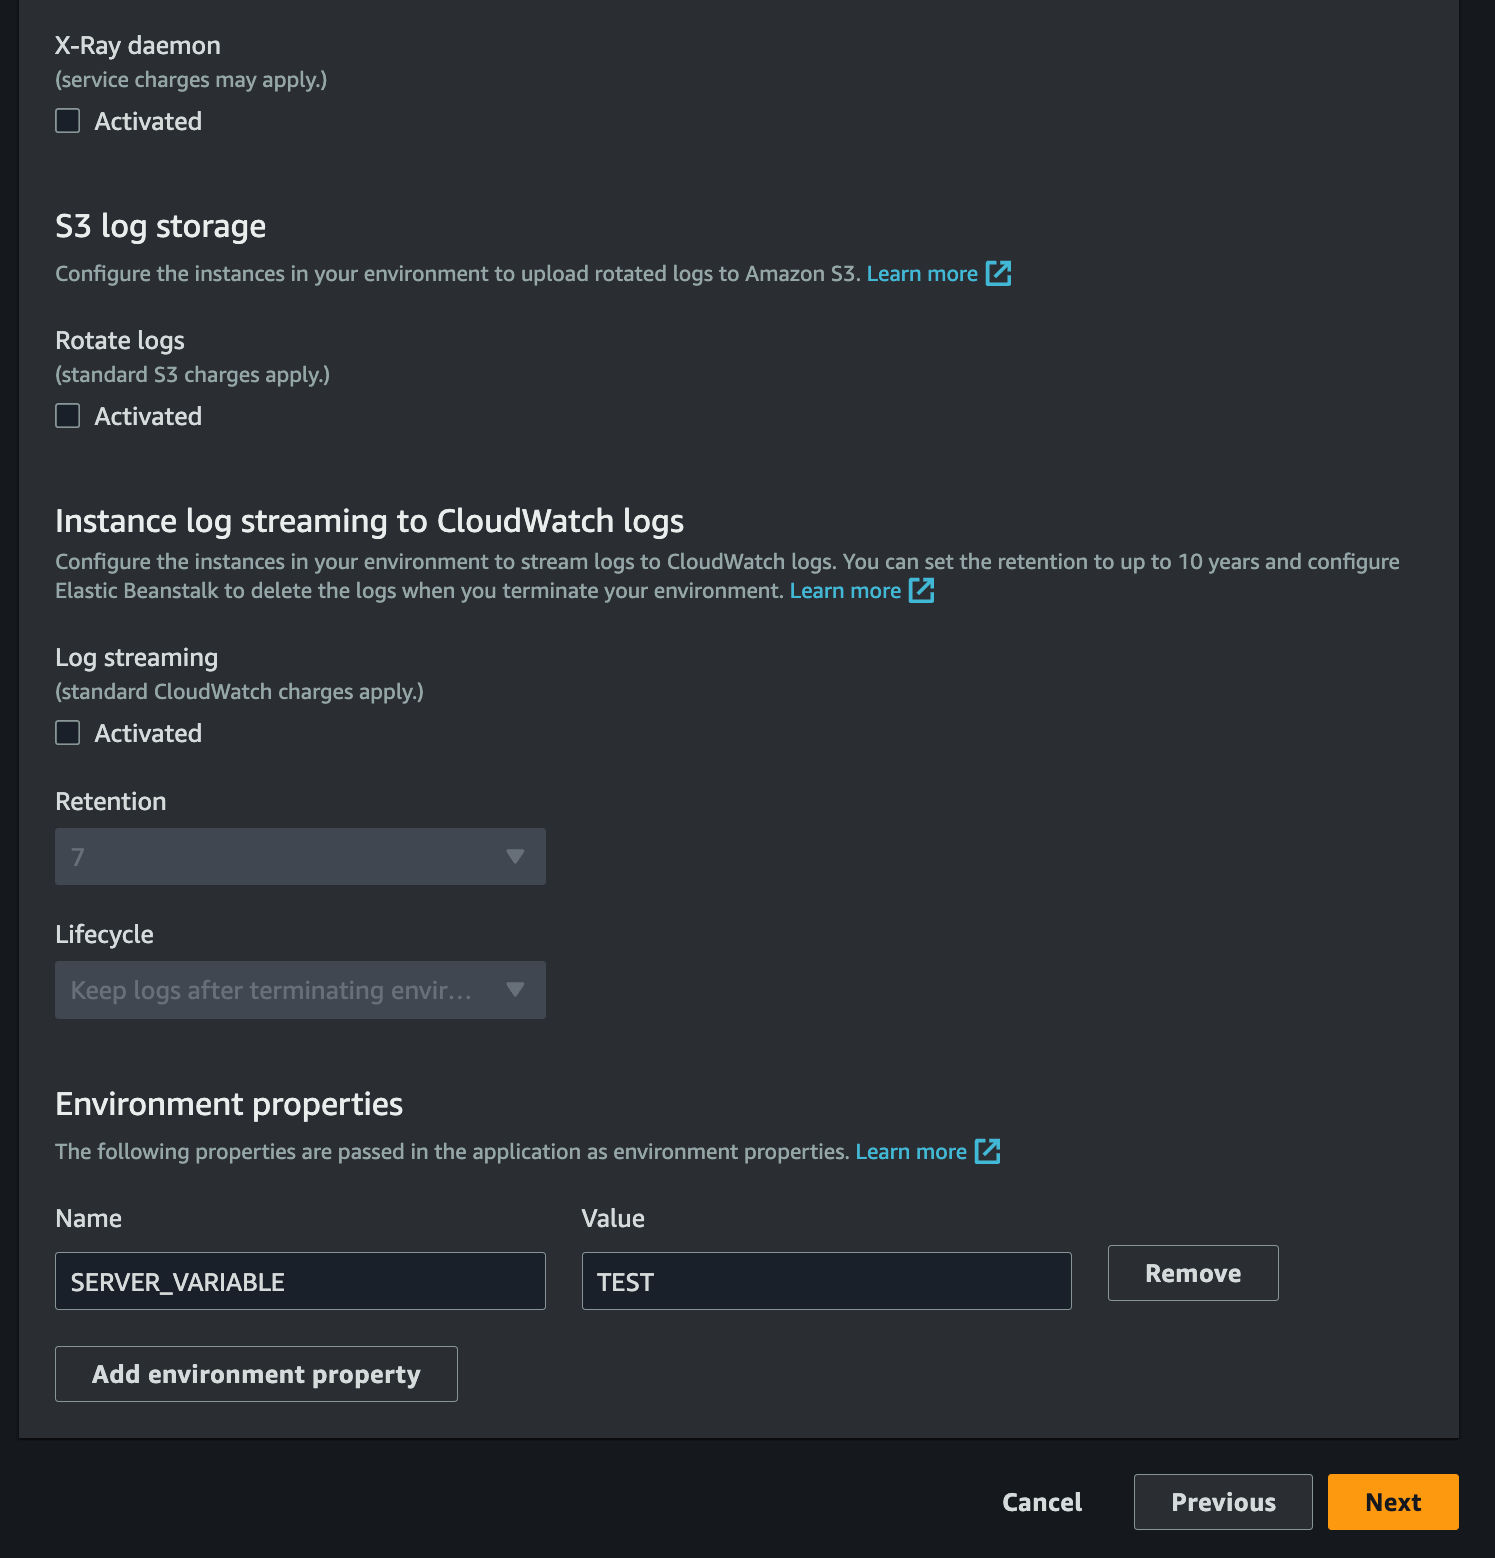
 - Scroll down to the **Environment properties** section, and add a key value pair to be used as an environment variable.
 - Say the environment variable to be accessed as `process.env.SERVER_VARIABLE` is **SERVER_VARIABLE** and its value is **TEST**.
 - Wait for the application to go live, and then click `Upload and Deploy` button at the top right corner.
 - Click `Choose file`, select the zip file you created earlier, and click `Deploy`.
 - Wait for the application to report its `Health` as **Ok**. Once all's good, click the URL below `Domain` to see your Astro application in action.
 ## Conclusion
Yay! You now have an Astro project that deploys to AWS Elastic Beanstalk.
If you have any questions or comments, feel free to reach out to me on [Twitter](https://twitter.com/direct_messages/create/rishi_raj_jain_).
## Conclusion
Yay! You now have an Astro project that deploys to AWS Elastic Beanstalk.
If you have any questions or comments, feel free to reach out to me on [Twitter](https://twitter.com/direct_messages/create/rishi_raj_jain_).