---
title: "Deploy Astro to Amazon ECS on AWS Fargate"
description: "How to deploy your Astro Server-Side Rendered (SSR) websites to Amazon ECS on AWS Fargate."
source: "https://www.launchfa.st/blog/deploy-astro-aws-fargate"
author: "Rishi Raj Jain"
created_at: 2024-03-29T00:00:00.000Z
updated_at: 2026-07-02T00:00:00.000Z
---
> **Site index for agents**
> Fetch https://www.launchfa.st/llms.txt to discover every page on this site.
> Every page is also available as Markdown by appending `.md` to its URL.
In this guide, you will learn how to deploy an Astro SSR project to Amazon ECS on AWS Fargate. You will go through the process of setting up a new Astro project, enabling server-side rendering using the Node.js adapter, and finally deploying it to Amazon ECS on AWS Fargate.
## Table Of Contents
- [Prerequisites](#prerequisites)
- [Create a new Astro application](#create-a-new-astro-application)
- [Getting Started with the Node.js Adapter for Astro](#getting-started-with-the-nodejs-adapter-for-astro)
- [Dockerize your Astro application](#dockerize-your-astro-application)
- [Create an Amazon Virtual Private Cloud (VPC)](#create-an-amazon-virtual-private-cloud-vpc)
- [Create Amazon ECR private repository](#create-amazon-ecr-private-repository)
- [Configure your IAM Roles](#configure-your-iam-roles)
- [Create an Amazon ECS task definition](#create-an-amazon-ecs-task-definition)
- [Create an Amazon ECS Cluster](#create-an-amazon-ecs-cluster)
- [Create an Amazon ECS Service](#create-an-amazon-ecs-service)
- [Create access keys for IAM users](#create-access-keys-for-iam-users)
- [Create GitHub Actions for Continuous Deployment (CD) Workflow](#create-github-actions-for-continuous-deployment-cd-workflow)
- [Conclusion](#conclusion)
## Prerequisites
You'll need the following:
- [Node.js 20](https://nodejs.org/en/blog/announcements/v20-release-announce) or later
- An [AWS](https://aws.amazon.com/free) account
## Create a new Astro application
Let’s get started by creating a new Astro project. Open your terminal and run the following command:
```bash
npm create astro@latest my-app
```
`npm create astro` is the recommended way to scaffold an Astro project quickly.
When prompted, choose:
- `Empty` when prompted on how to start the new project.
- `Yes` when prompted if you plan to write TypeScript.
- `Strict` when prompted how strict TypeScript should be.
- `Yes` when prompted to install dependencies.
- `Yes` when prompted to initialize a git repository.
Once that’s done, you can move into the project directory and start the app:
```bash
cd my-app
npm run dev
```
The app should be running on [localhost:4321](http://localhost:4321/).
Next, in your first terminal window, run the command below to install the necessary libraries and packages for building the application:
```bash
npm install dotenv
```
The libraries installed include:
- `dotenv`: A library for handling environment variables.
Once it is installed, you'll need to add it to your `astro.config.mjs` file. Open the file and add the following code:
```tsx title="astro.config.mjs" ins={1}
import 'dotenv/config';
import { defineConfig } from 'astro/config';
export default defineConfig({});
```
Let's move on to enable Server-Side Rendering by using the Node.js adapter.
## Getting Started with the Node.js Adapter for Astro
Before deploying your Astro project, you need to install the `@astrojs/node` adapter. This is easily done via the Astro CLI:
```bash
npm install @astrojs/node
```
The libraries installed include:
- `@astrojs/node`: An adapter that prepares Astro websites to be run as a Node.js server.
Once the adapter is installed, you'll need to add it to your `astro.config.mjs` file. Open the file and add the following code:
```tsx title="astro.config.mjs" ins={1,5-8}
import node from '@astrojs/node';
import { defineConfig } from 'astro/config';
export default defineConfig({
output: "server",
adapter: node({
mode: 'standalone'
}),
});
```
Let's move on to dockerizing your Astro application.
## Dockerize your Astro application
Deploying to Amazon ECS on AWS Fargate requires an AWS ECR repository to be created. Imagine ECR as a handler of Docker based deployments.
To dockerize your Astro application, you're going to create two files at the root of your Astro project:
- `.dockerignore`: The set of files that would not be included in your Docker image.
- `Dockerfile`: The set of instructions that would be executed while your Docker image builds.
Create the `.dockerignore` file at the root of your Astro project with following code:
```
# build output
dist/
# generated types
.astro/
# dependencies
node_modules/
# logs
npm-debug.log*
yarn-debug.log*
yarn-error.log*
pnpm-debug.log*
# environment variables
.env
.env.production
# macOS-specific files
.DS_Store
```
Create the `Dockerfile` file at the root of your Astro project with following code:
```bash
ARG NODE_VERSION=20.11.0
FROM node:${NODE_VERSION}-slim as base
WORKDIR /app
# Set production environment
ENV NODE_ENV="production"
# Throw-away build stage to reduce size of final image
FROM base as build
# Install packages needed to build node modules
RUN apt-get update -qq && \
apt-get install --no-install-recommends -y build-essential node-gyp pkg-config python-is-python3
# Install node modules
COPY --link package-lock.json package.json ./
RUN npm install
# Copy application code
COPY --link . .
# Build application
RUN npm run build
# Final stage for app image
FROM base
# Copy built application
COPY --from=build /app/node_modules /app/node_modules
COPY --from=build /app/dist /app/dist
ENV PORT=80
ENV HOST=0.0.0.0
# Start the server by default, this can be overwritten at runtime
EXPOSE 80
CMD [ "node", "./dist/server/entry.mjs" ]
```
The Dockerfile above defines the following set of actions:
- Sets up Node.js 20.11.0.
- Sets the environment to `production` with `NODE_ENV` environment variable.
- Installs the dependencies of your Astro project.
- Builds the application with `astro build`.
- Sets the `PORT` environment variable to `80` (default port on Amazon ECS).
- Sets the `HOST` environment variable to `0.0.0.0` to listen to all incoming requests on the host.
- Runs the production server with `node ./dist/server/entry.mjs` command.
Let's move on to creating an Amazon VPC to accept traffic to your Astro application when deployed.
## Create an Amazon Virtual Private Cloud (VPC)
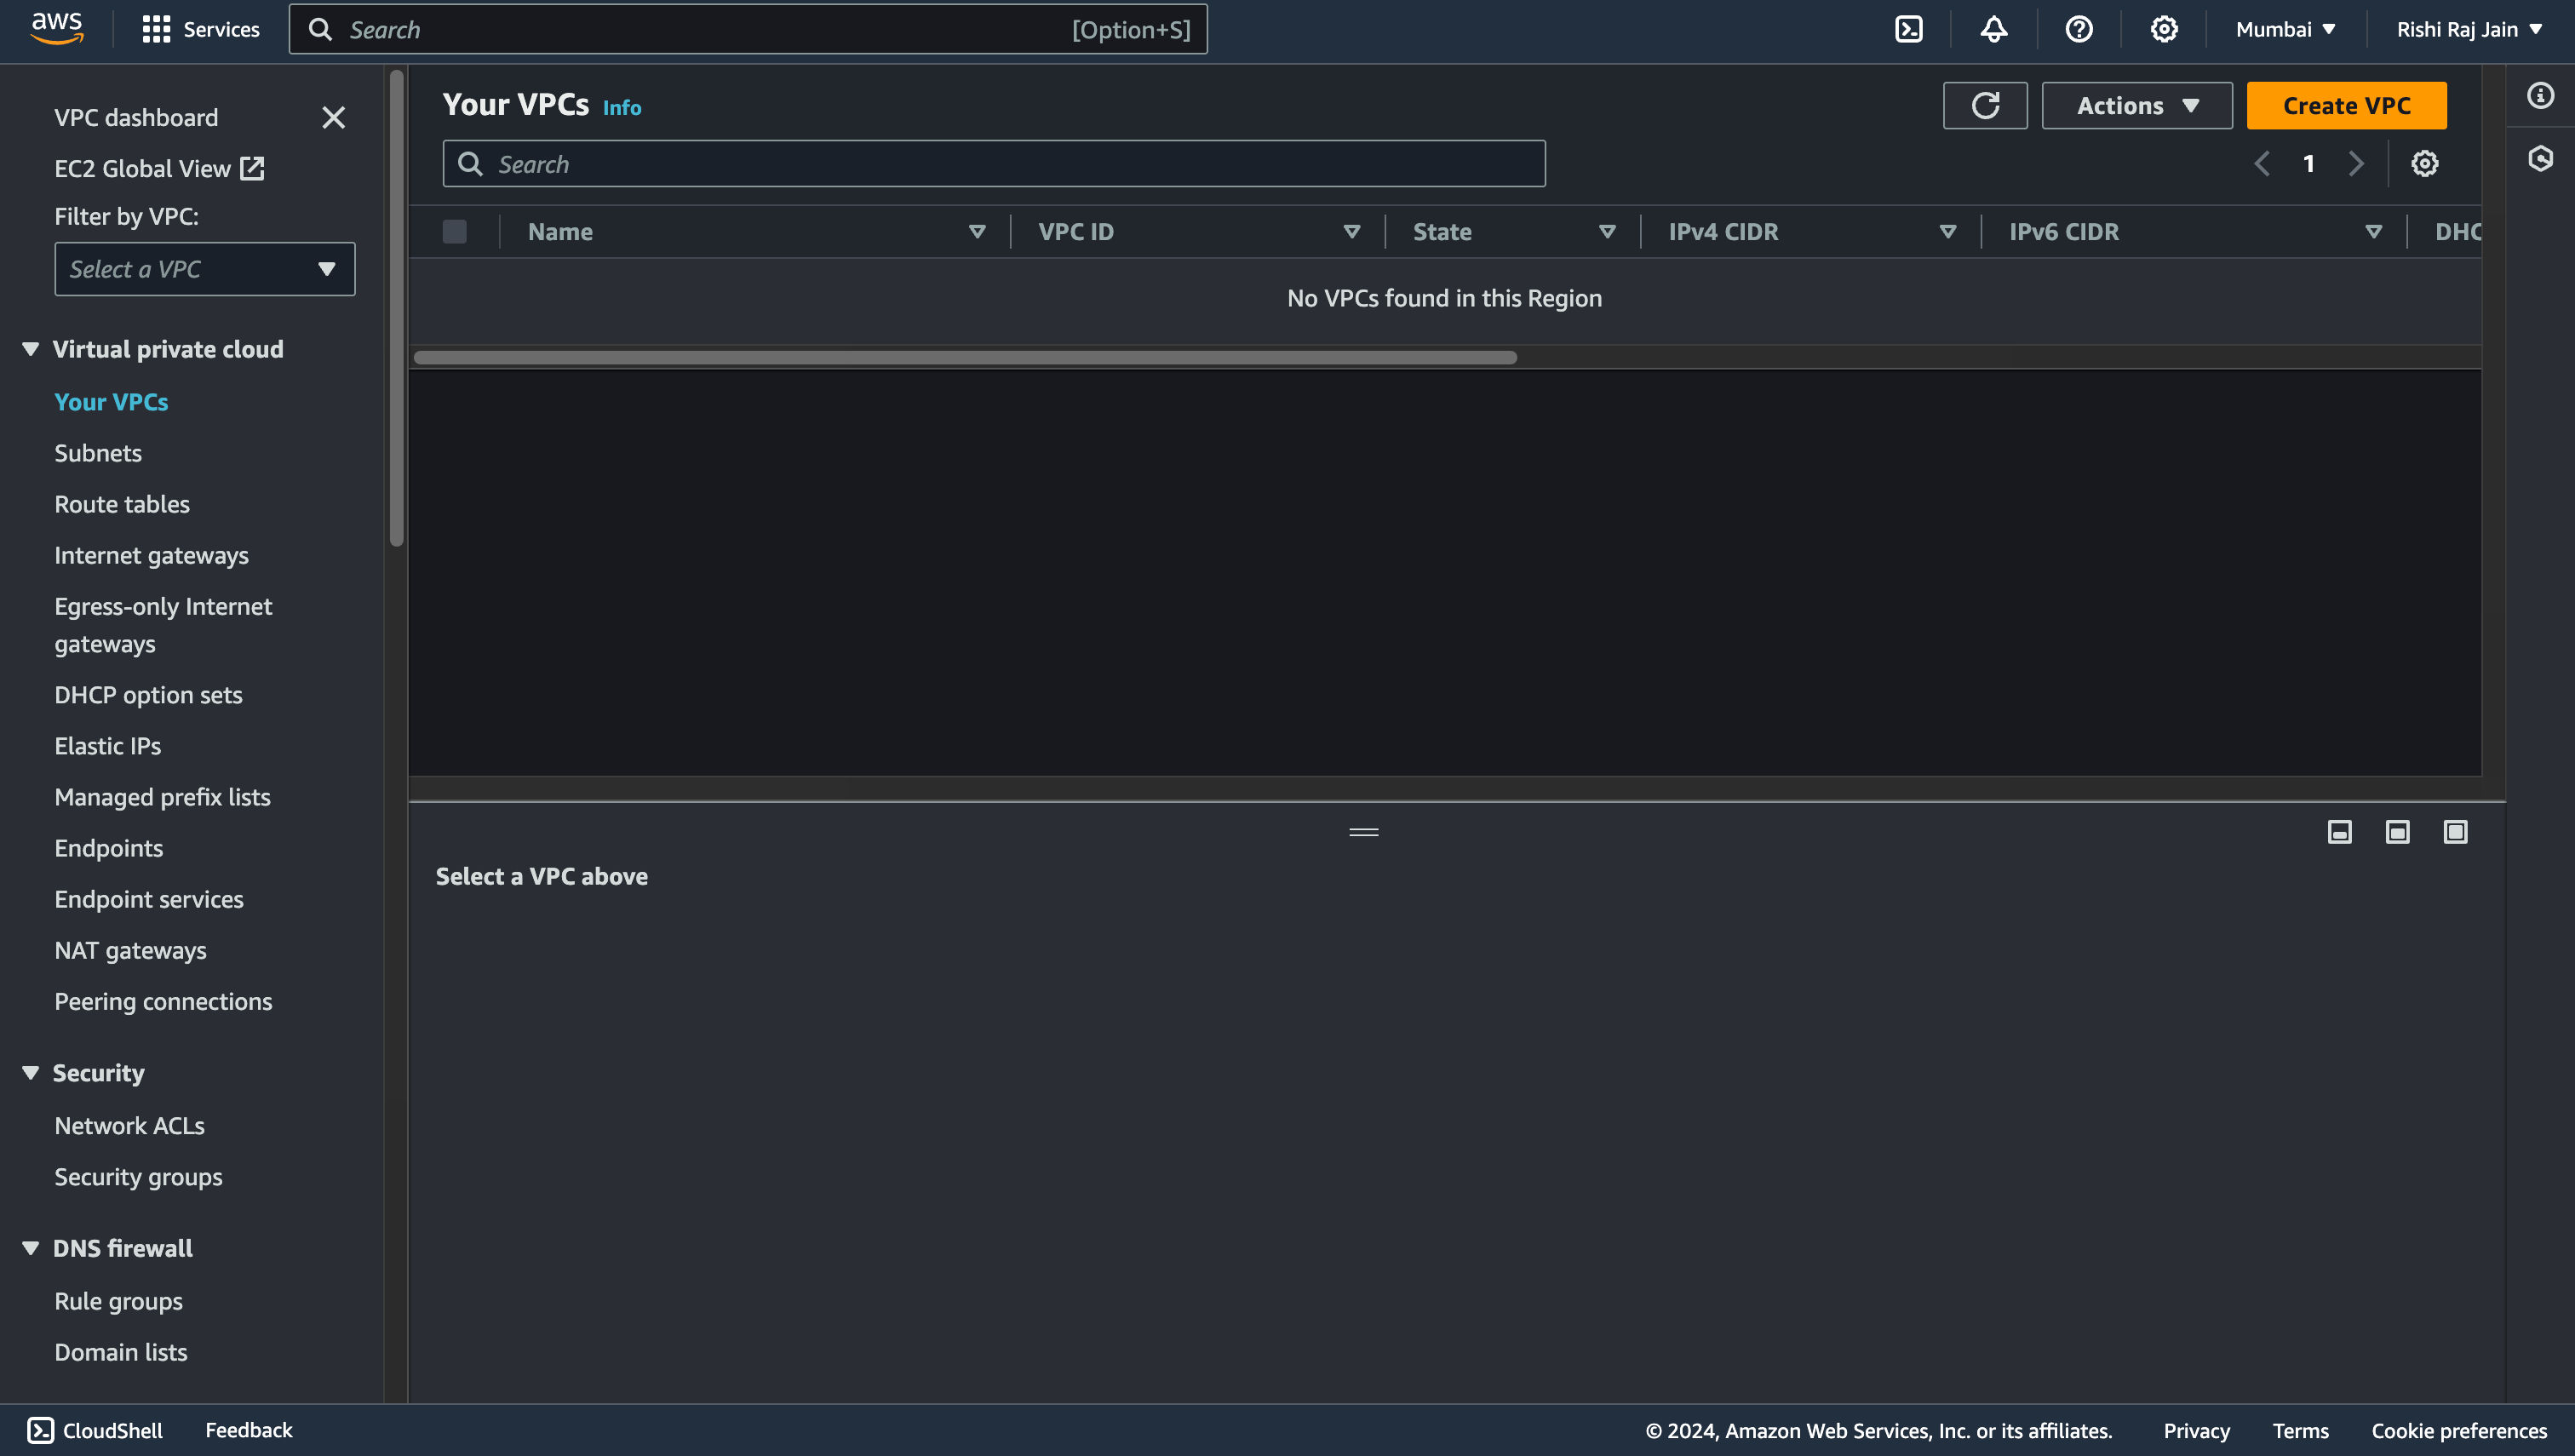
- Open the [Amazon VPC console](https://console.aws.amazon.com/vpc/). On the VPC dashboard, choose **Create VPC**.
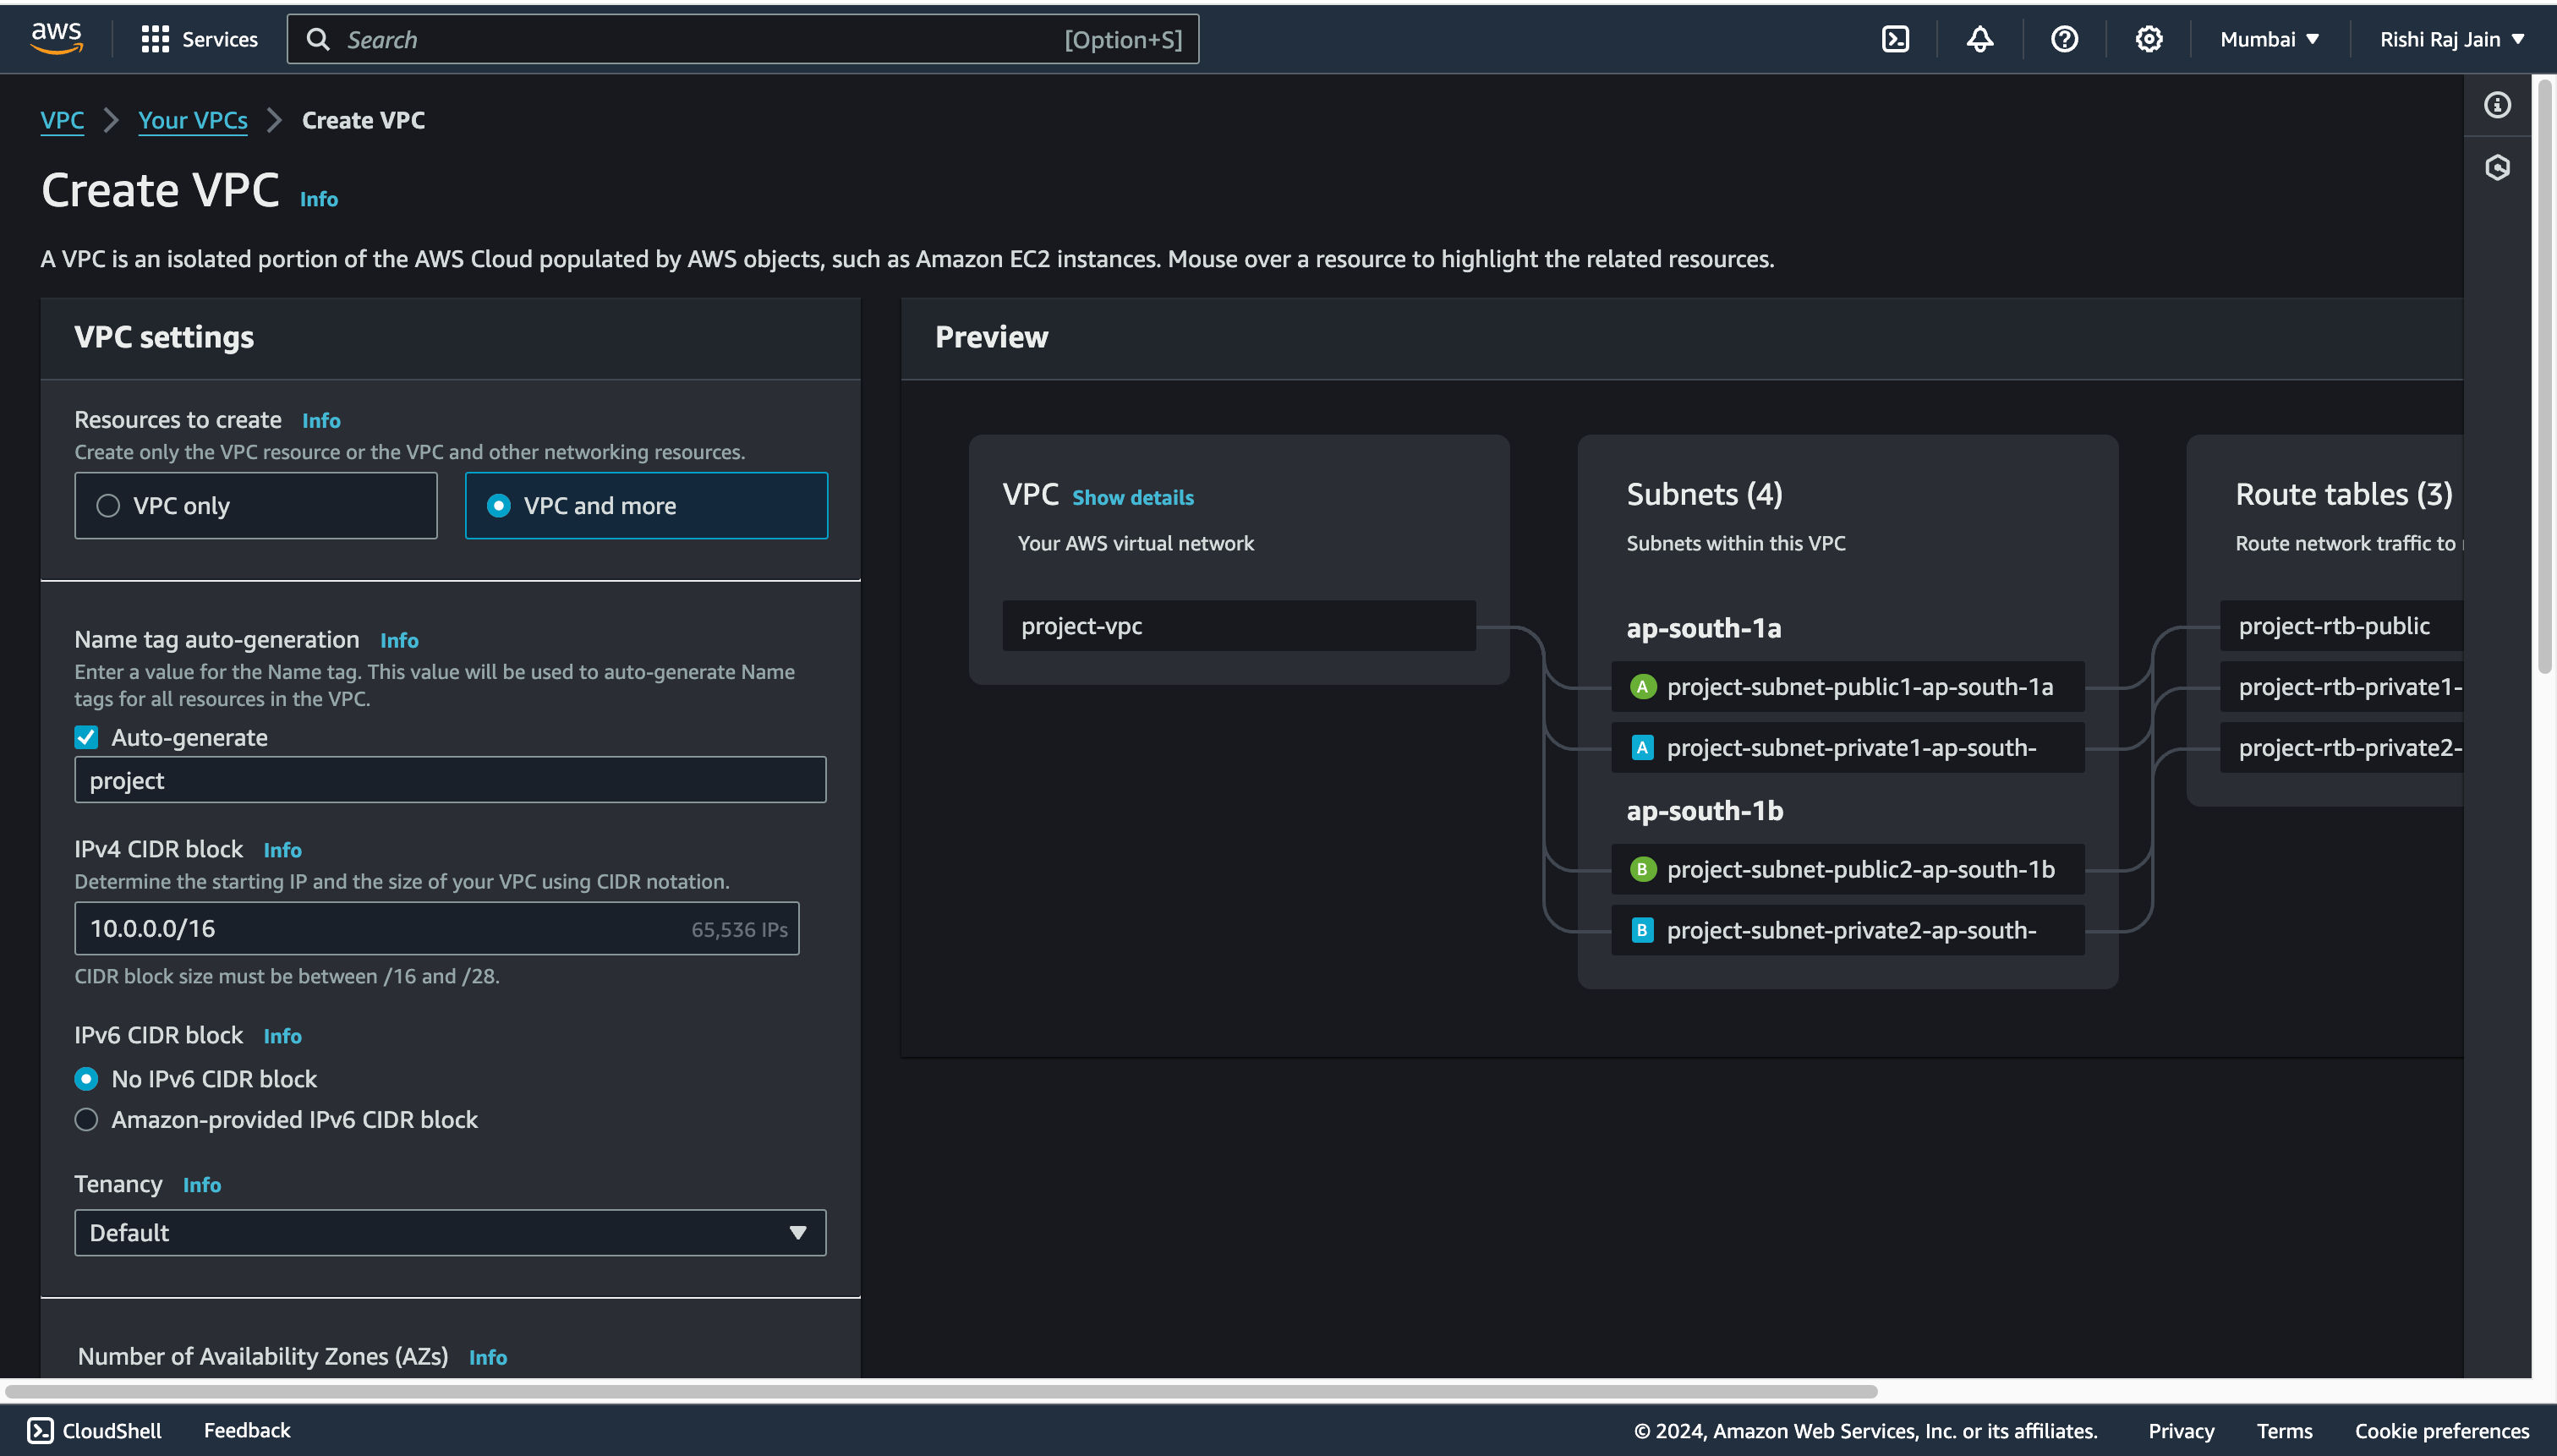
- Go with the default configuration setup by Amazon, and choose **Create VPC**.
and you are now done with setting up Amazon VPC for your account. Let's move on to creating an Amazon ECR image repository.
## Create Amazon ECR private repository
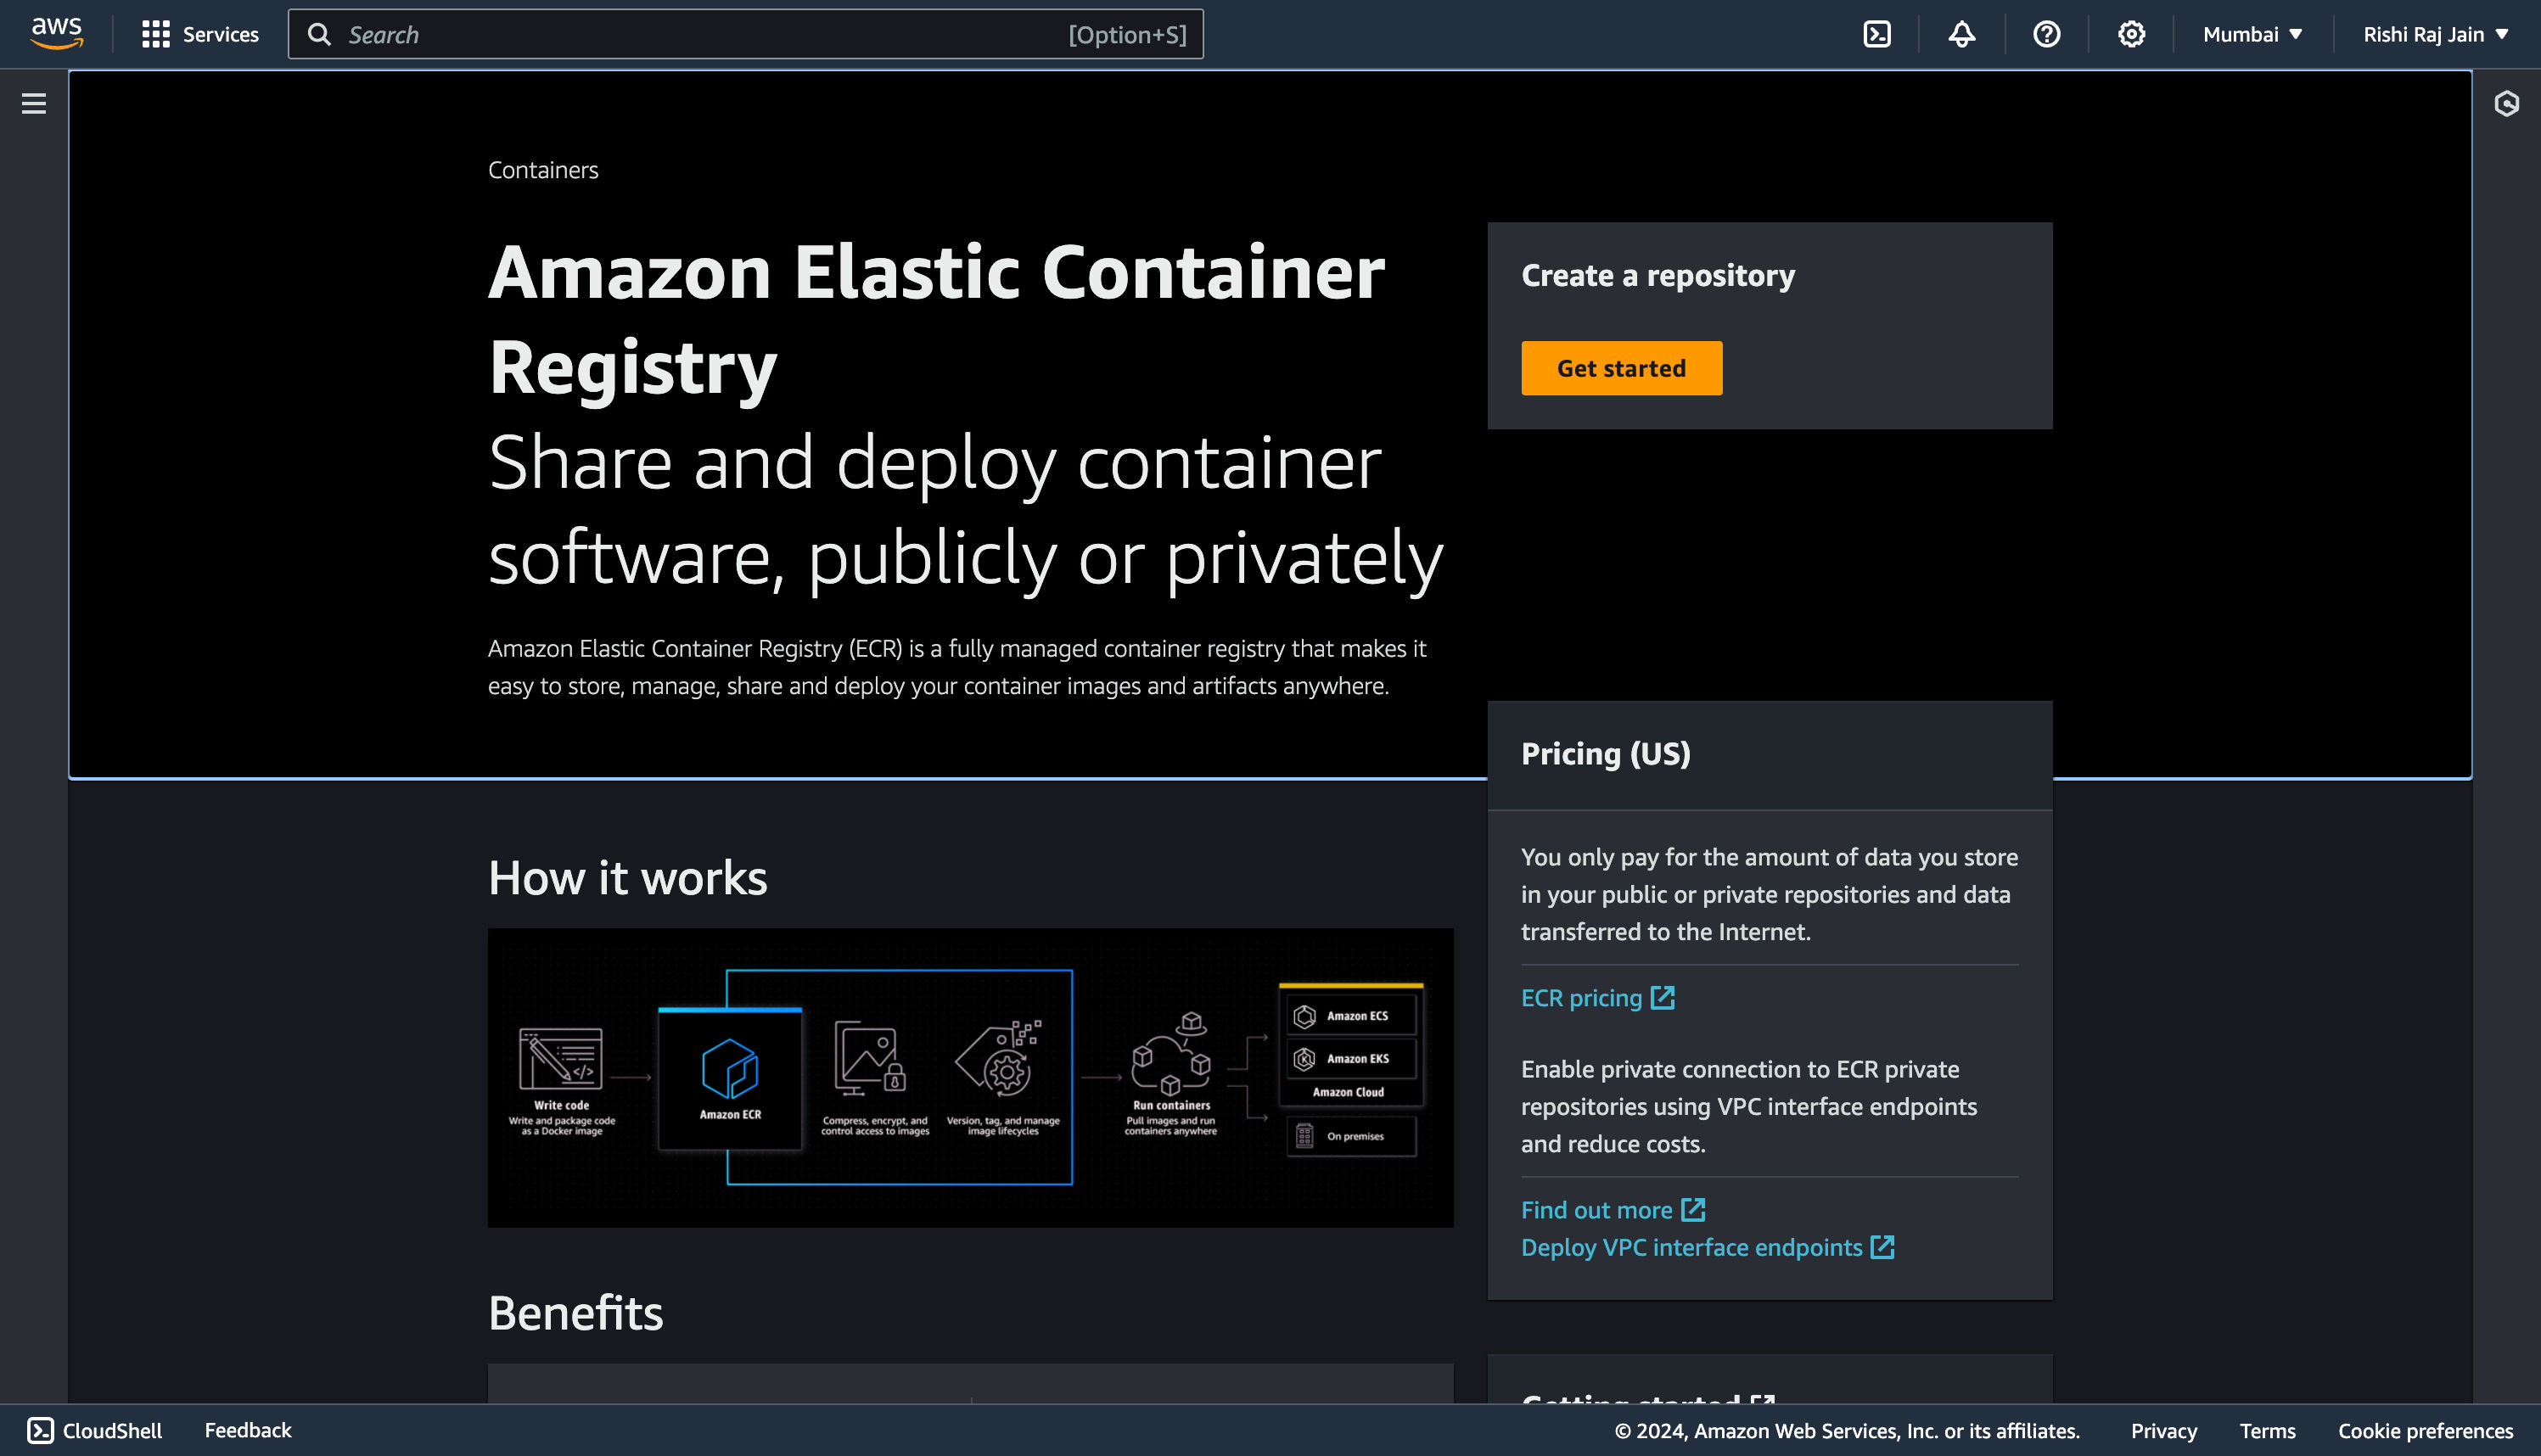
- Open the [Amazon ECR console](https://console.aws.amazon.com/ecr/repositories), and click **Get started**.
- Enter a repository name, say `astro-repo` for example. Scroll down and choose **Create repository**.
and you are now done with setting up an Amazon ECR repository.
Let’s move on to configuring IAM roles for your account.
## Configure your IAM Roles
- Open the [IAM console](https://console.aws.amazon.com/iam/), and click **Create role**.
- Select **AWS Service** and choose **Elastic Container Service** as the Service or use case.
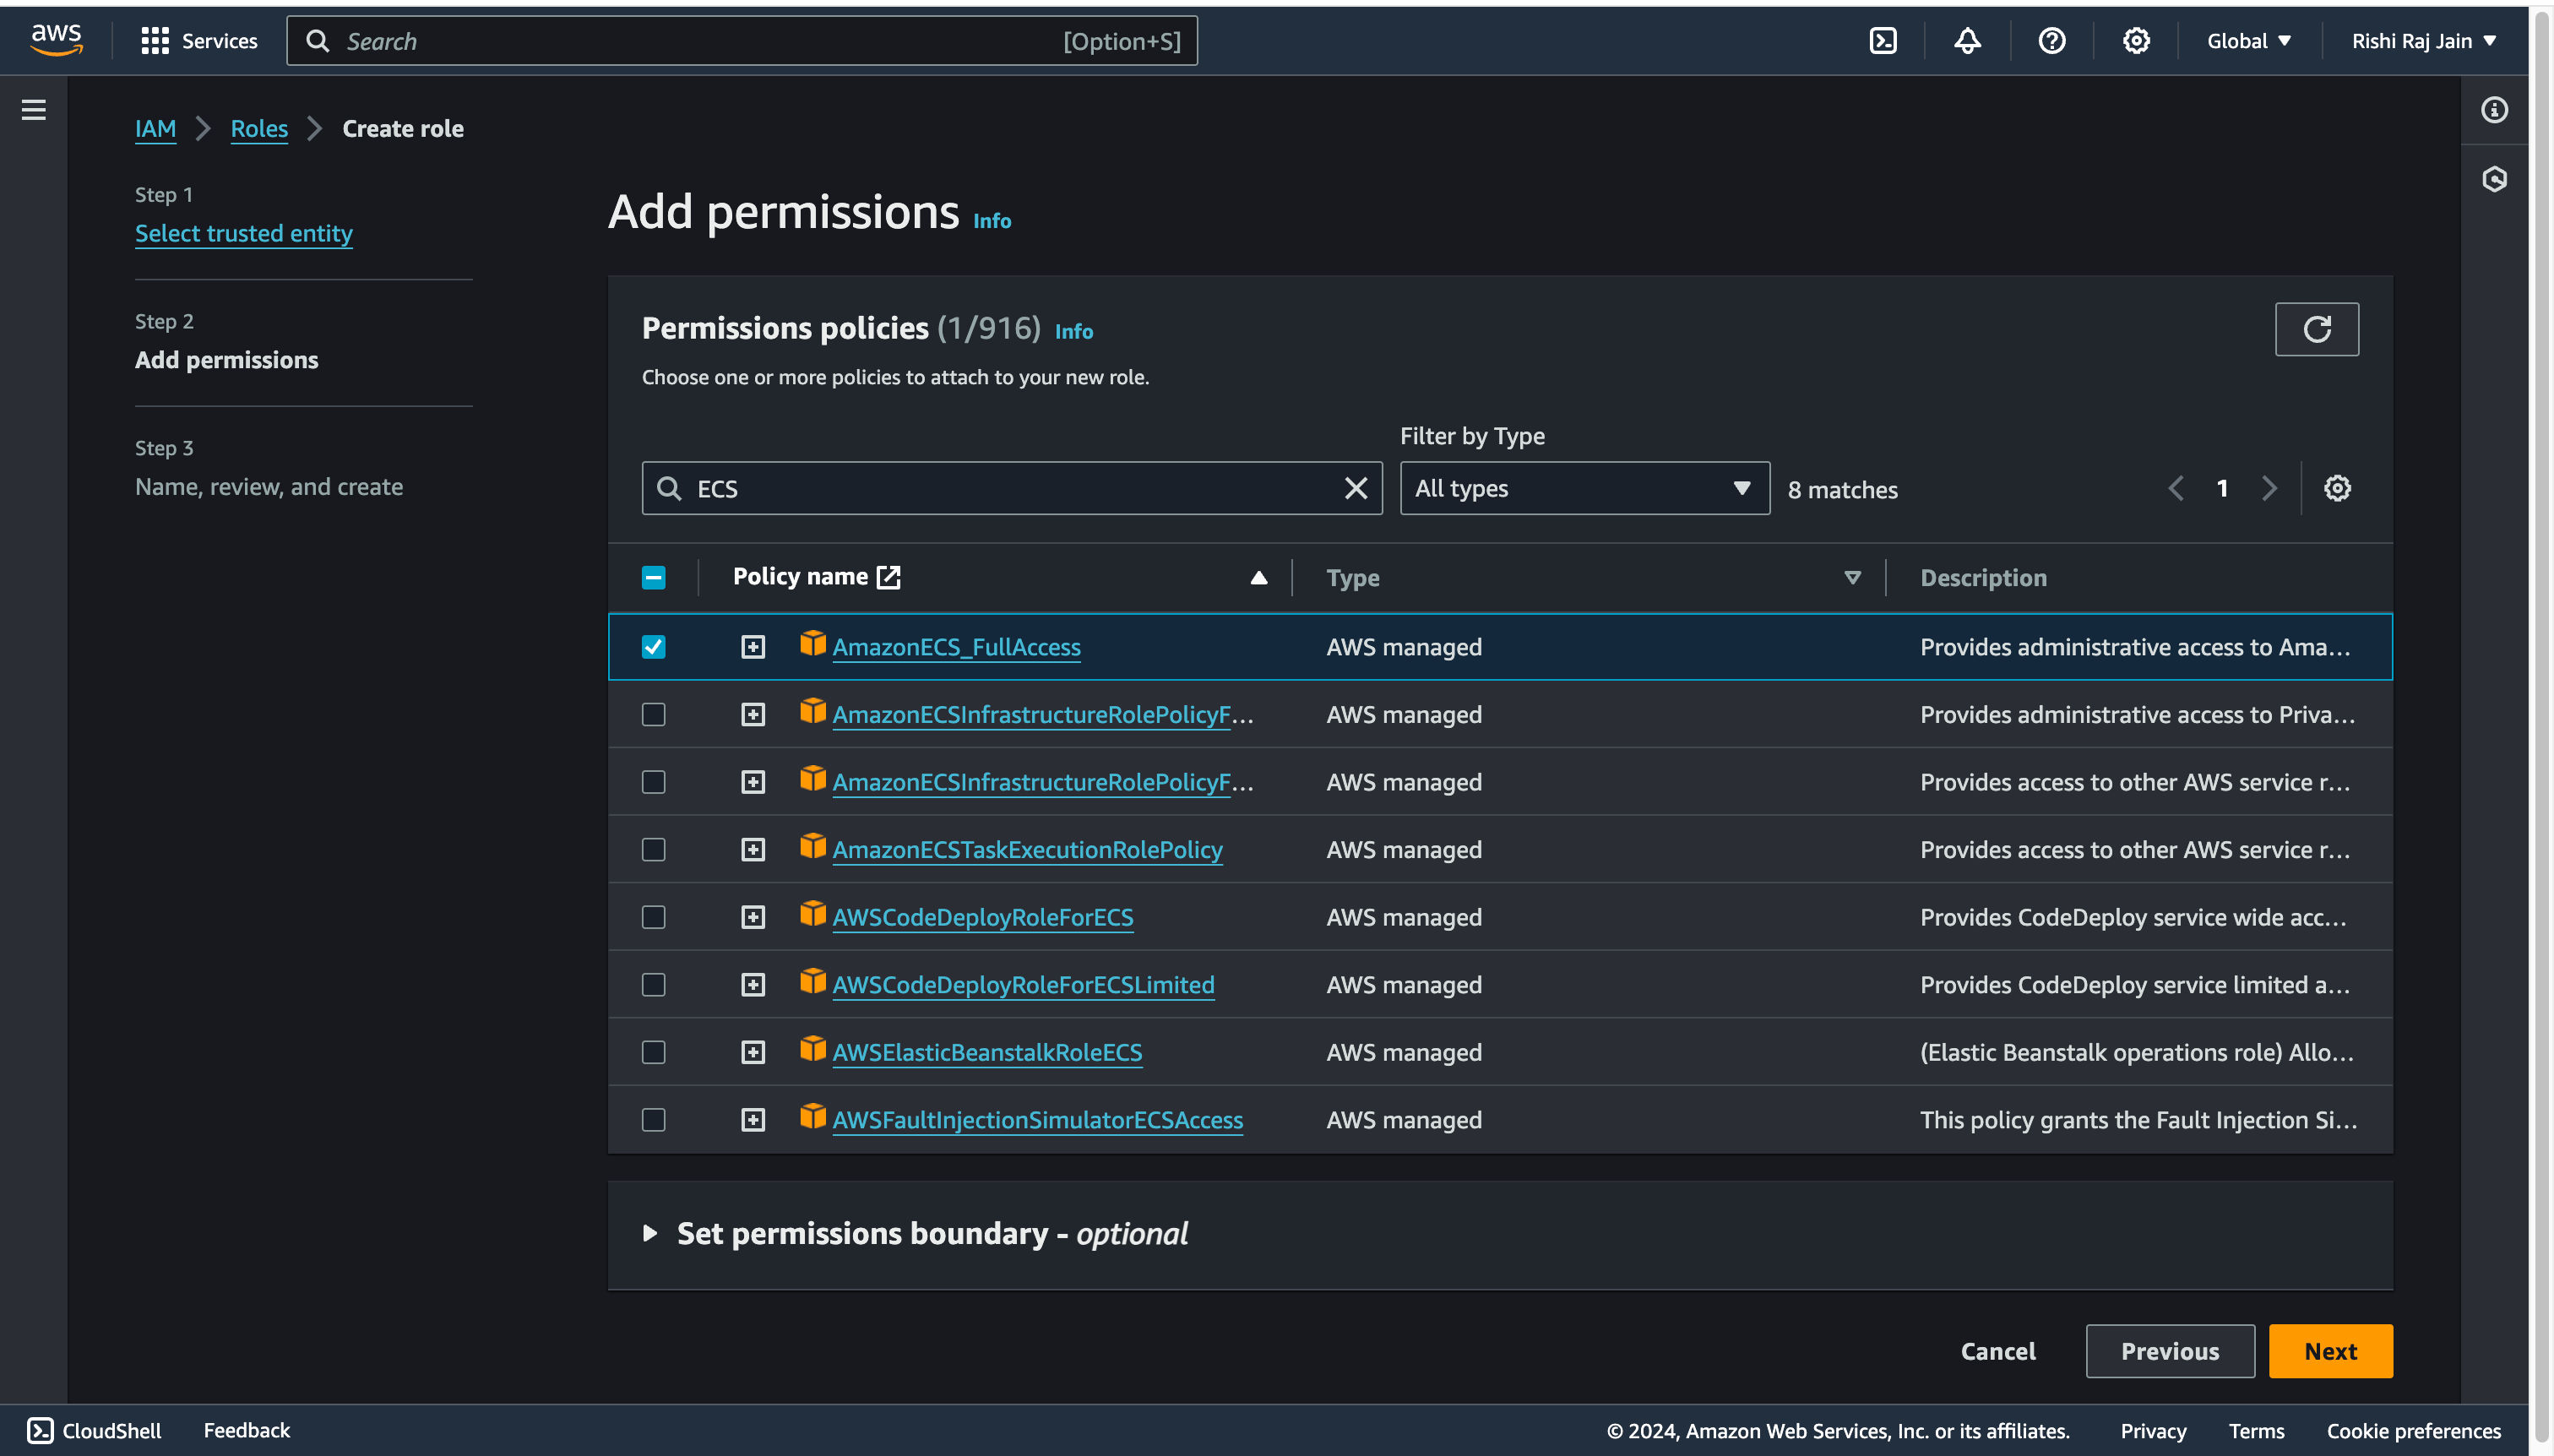
- Filter the large set of permissions policies, select **AmazonECS_FullAccess** only and click **Next**.
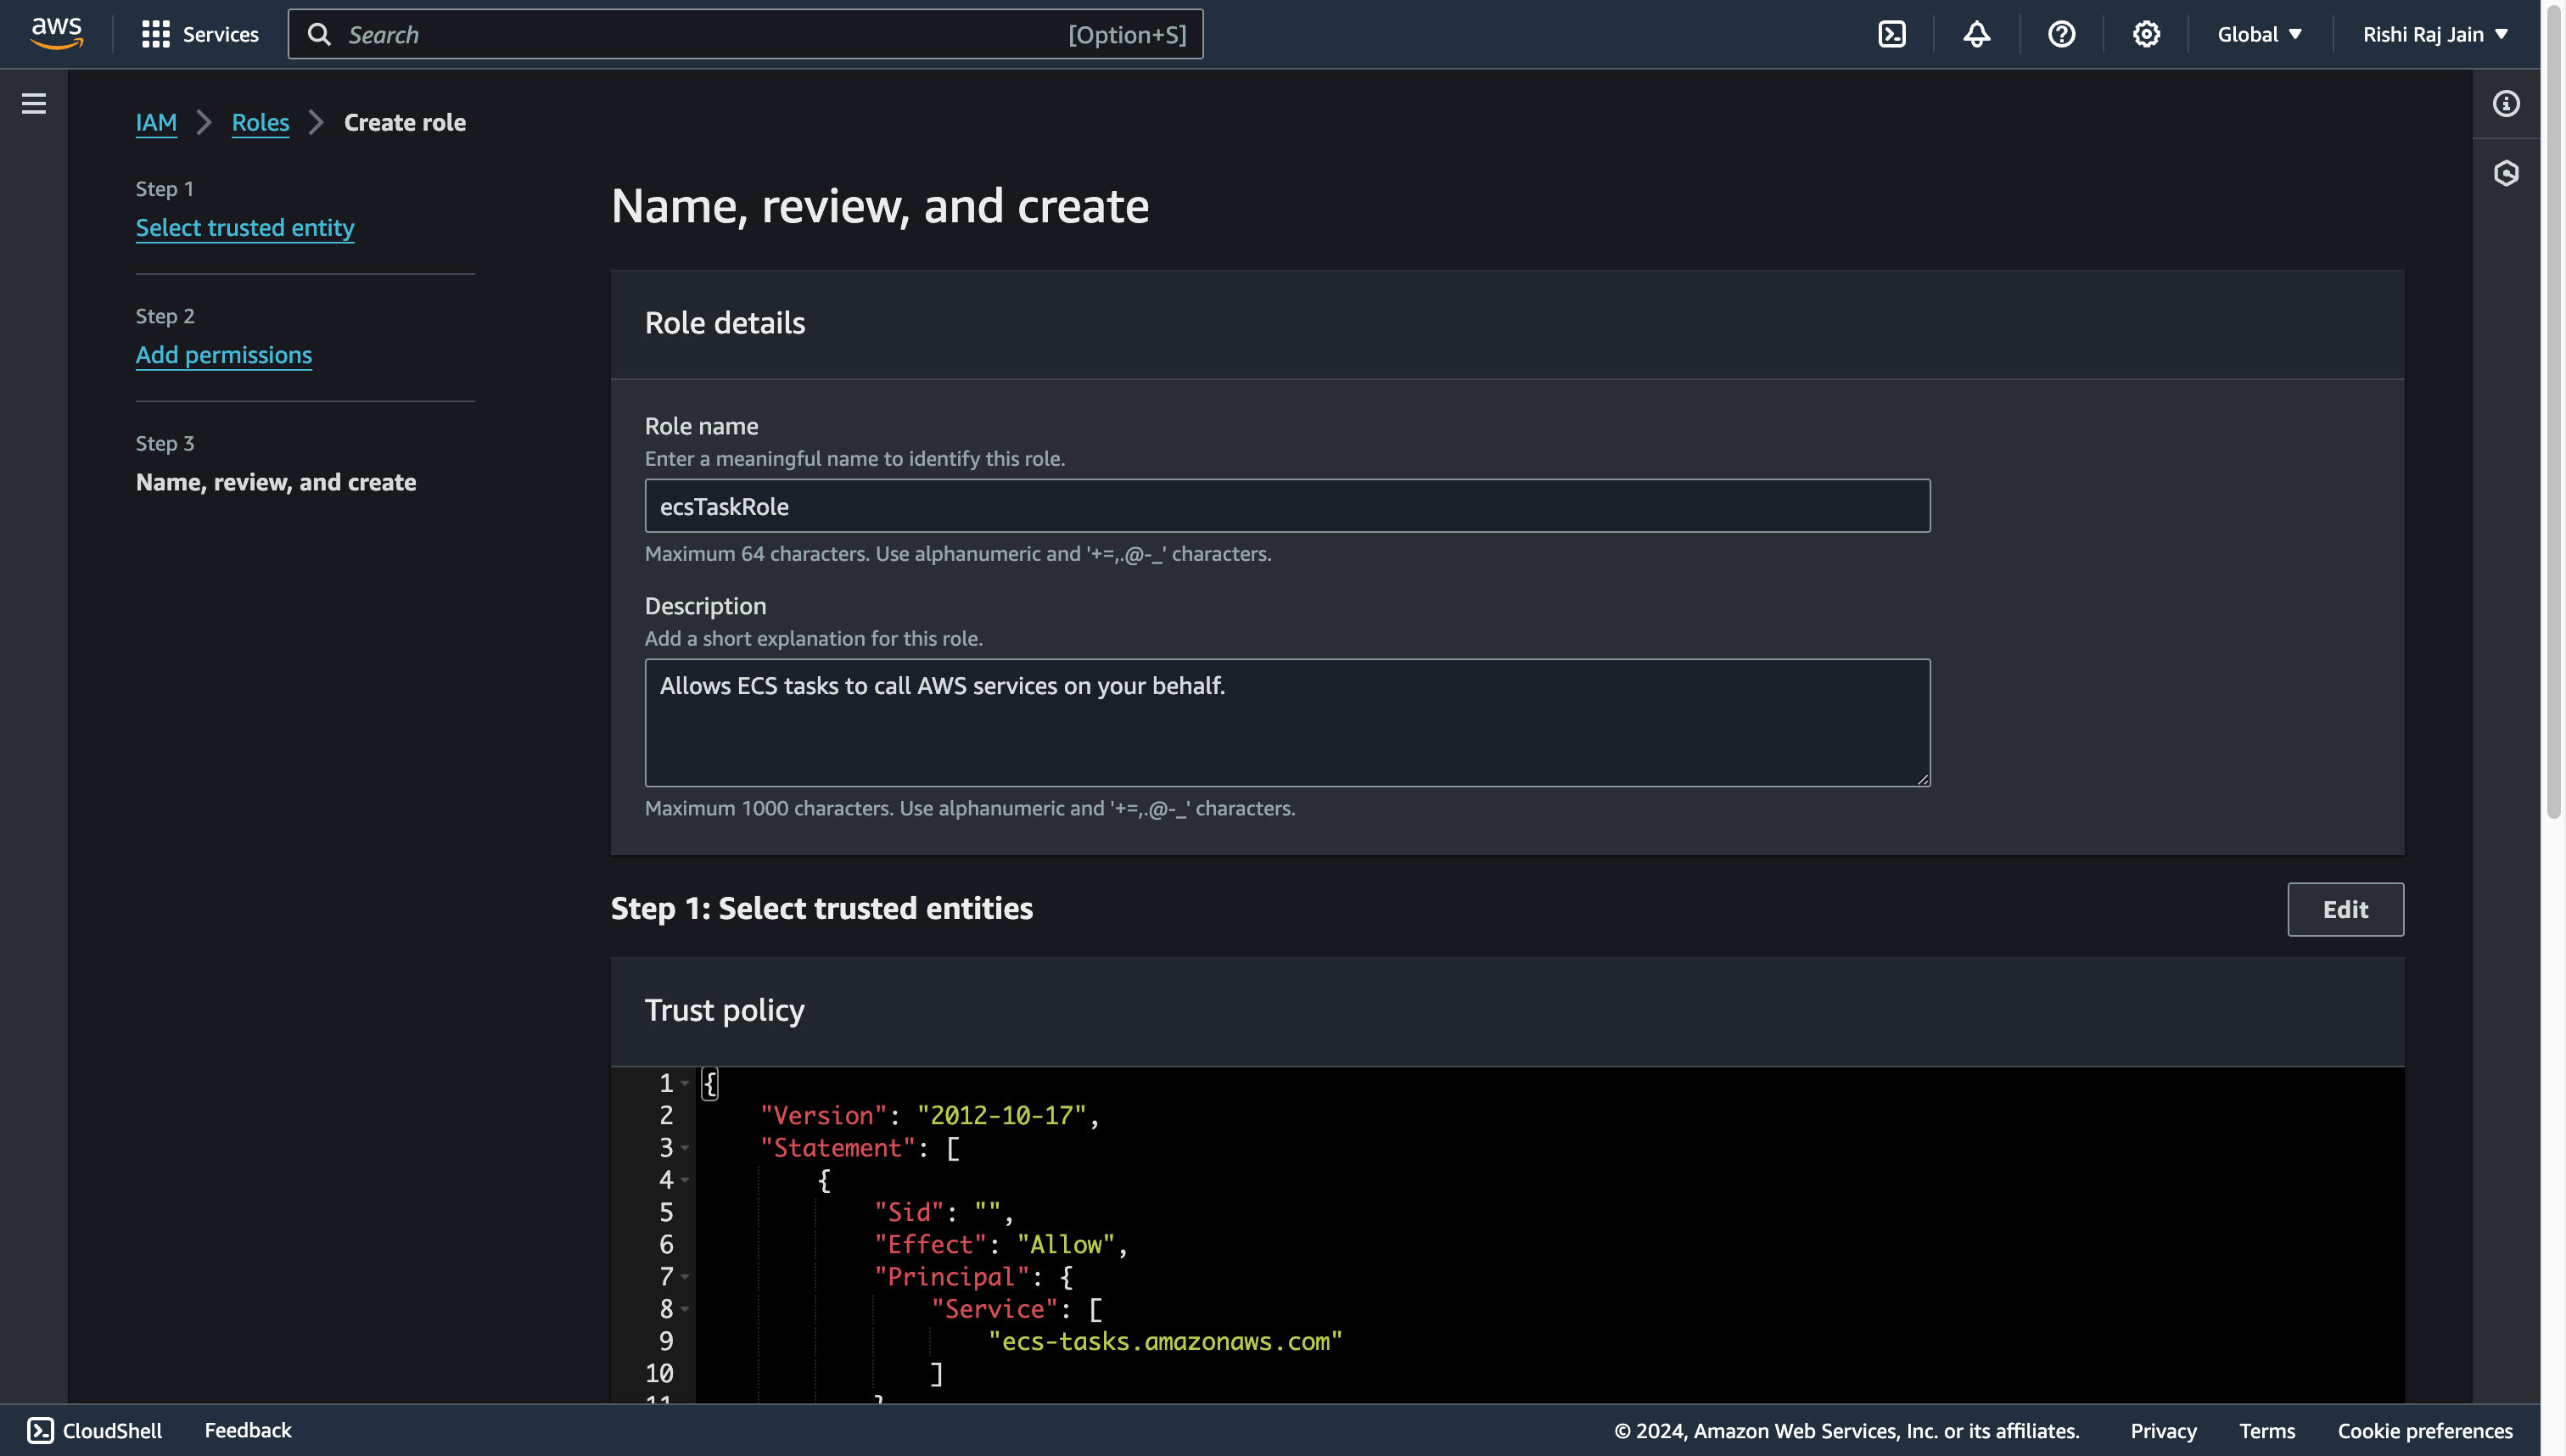
- Enter `ecsTaskRole` as the **Role name**.
- Go back to the IAM Console, and click **Create role**.
- Select **AWS Service** and choose **Elastic Container Service Task** as the Service or use case.
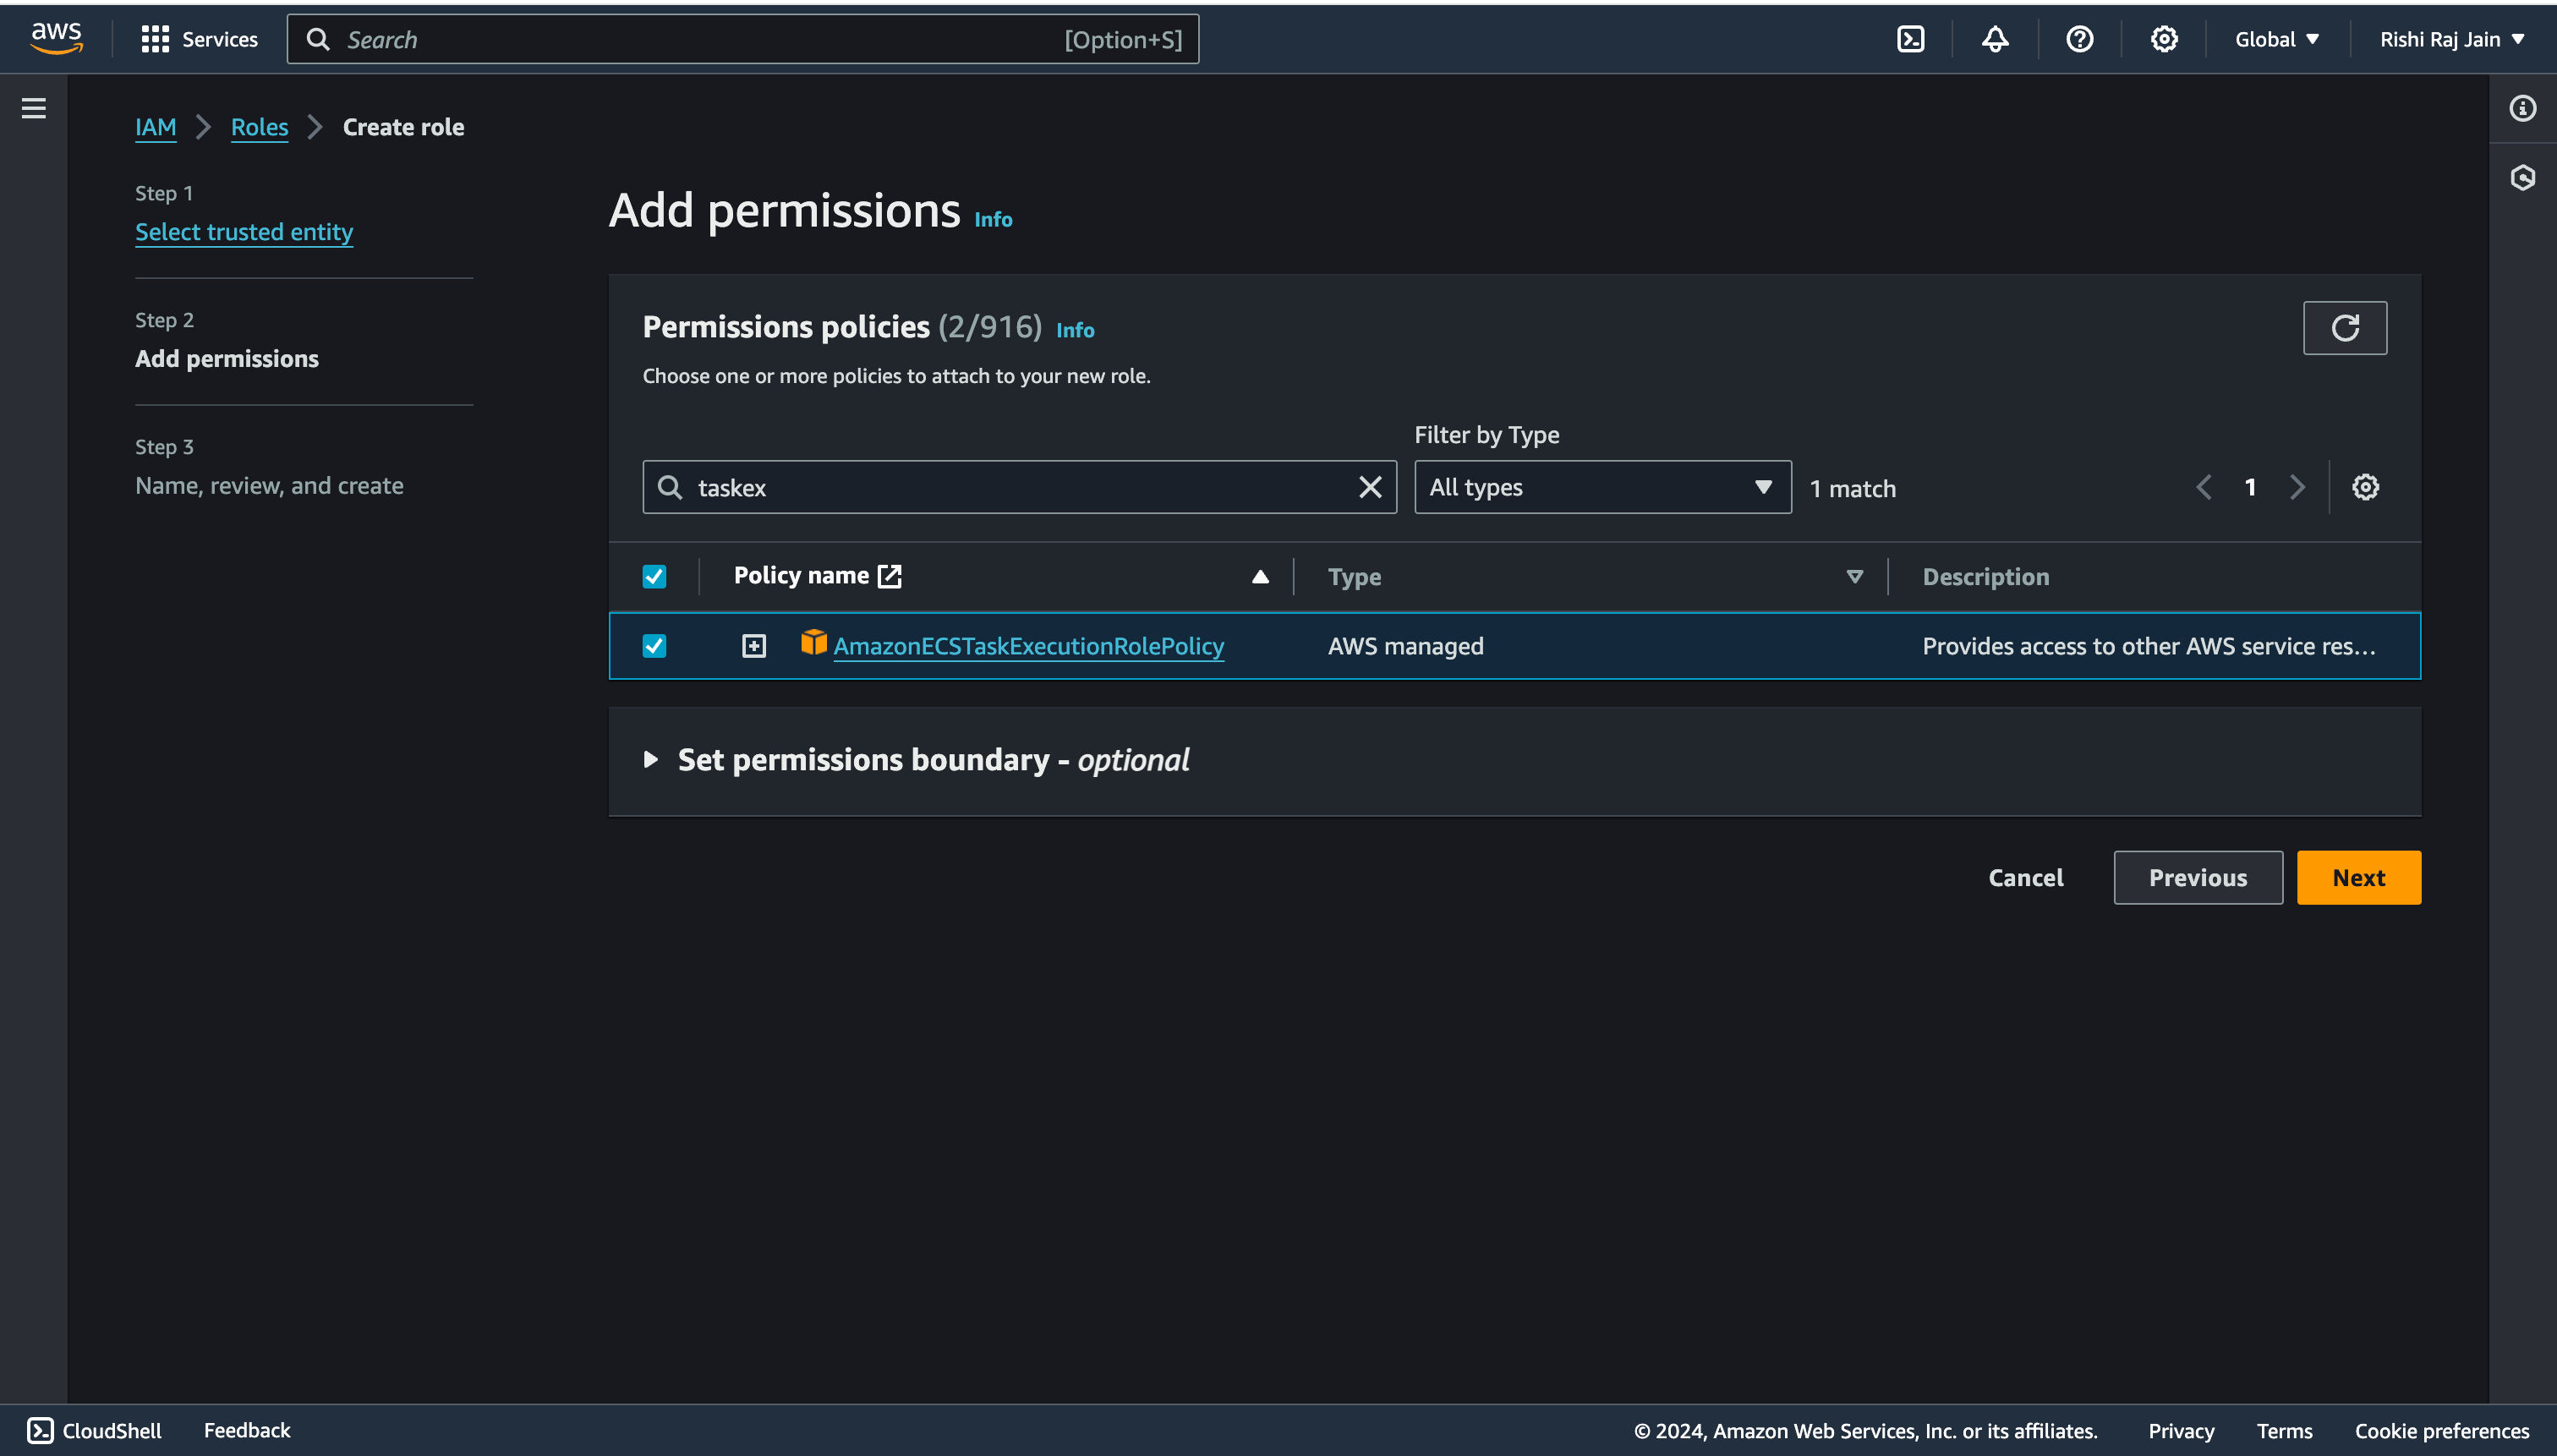
- Filter the large set of permissions policies, select **AmazonECSTaskExecutionRolePolicy** only and click **Next**.
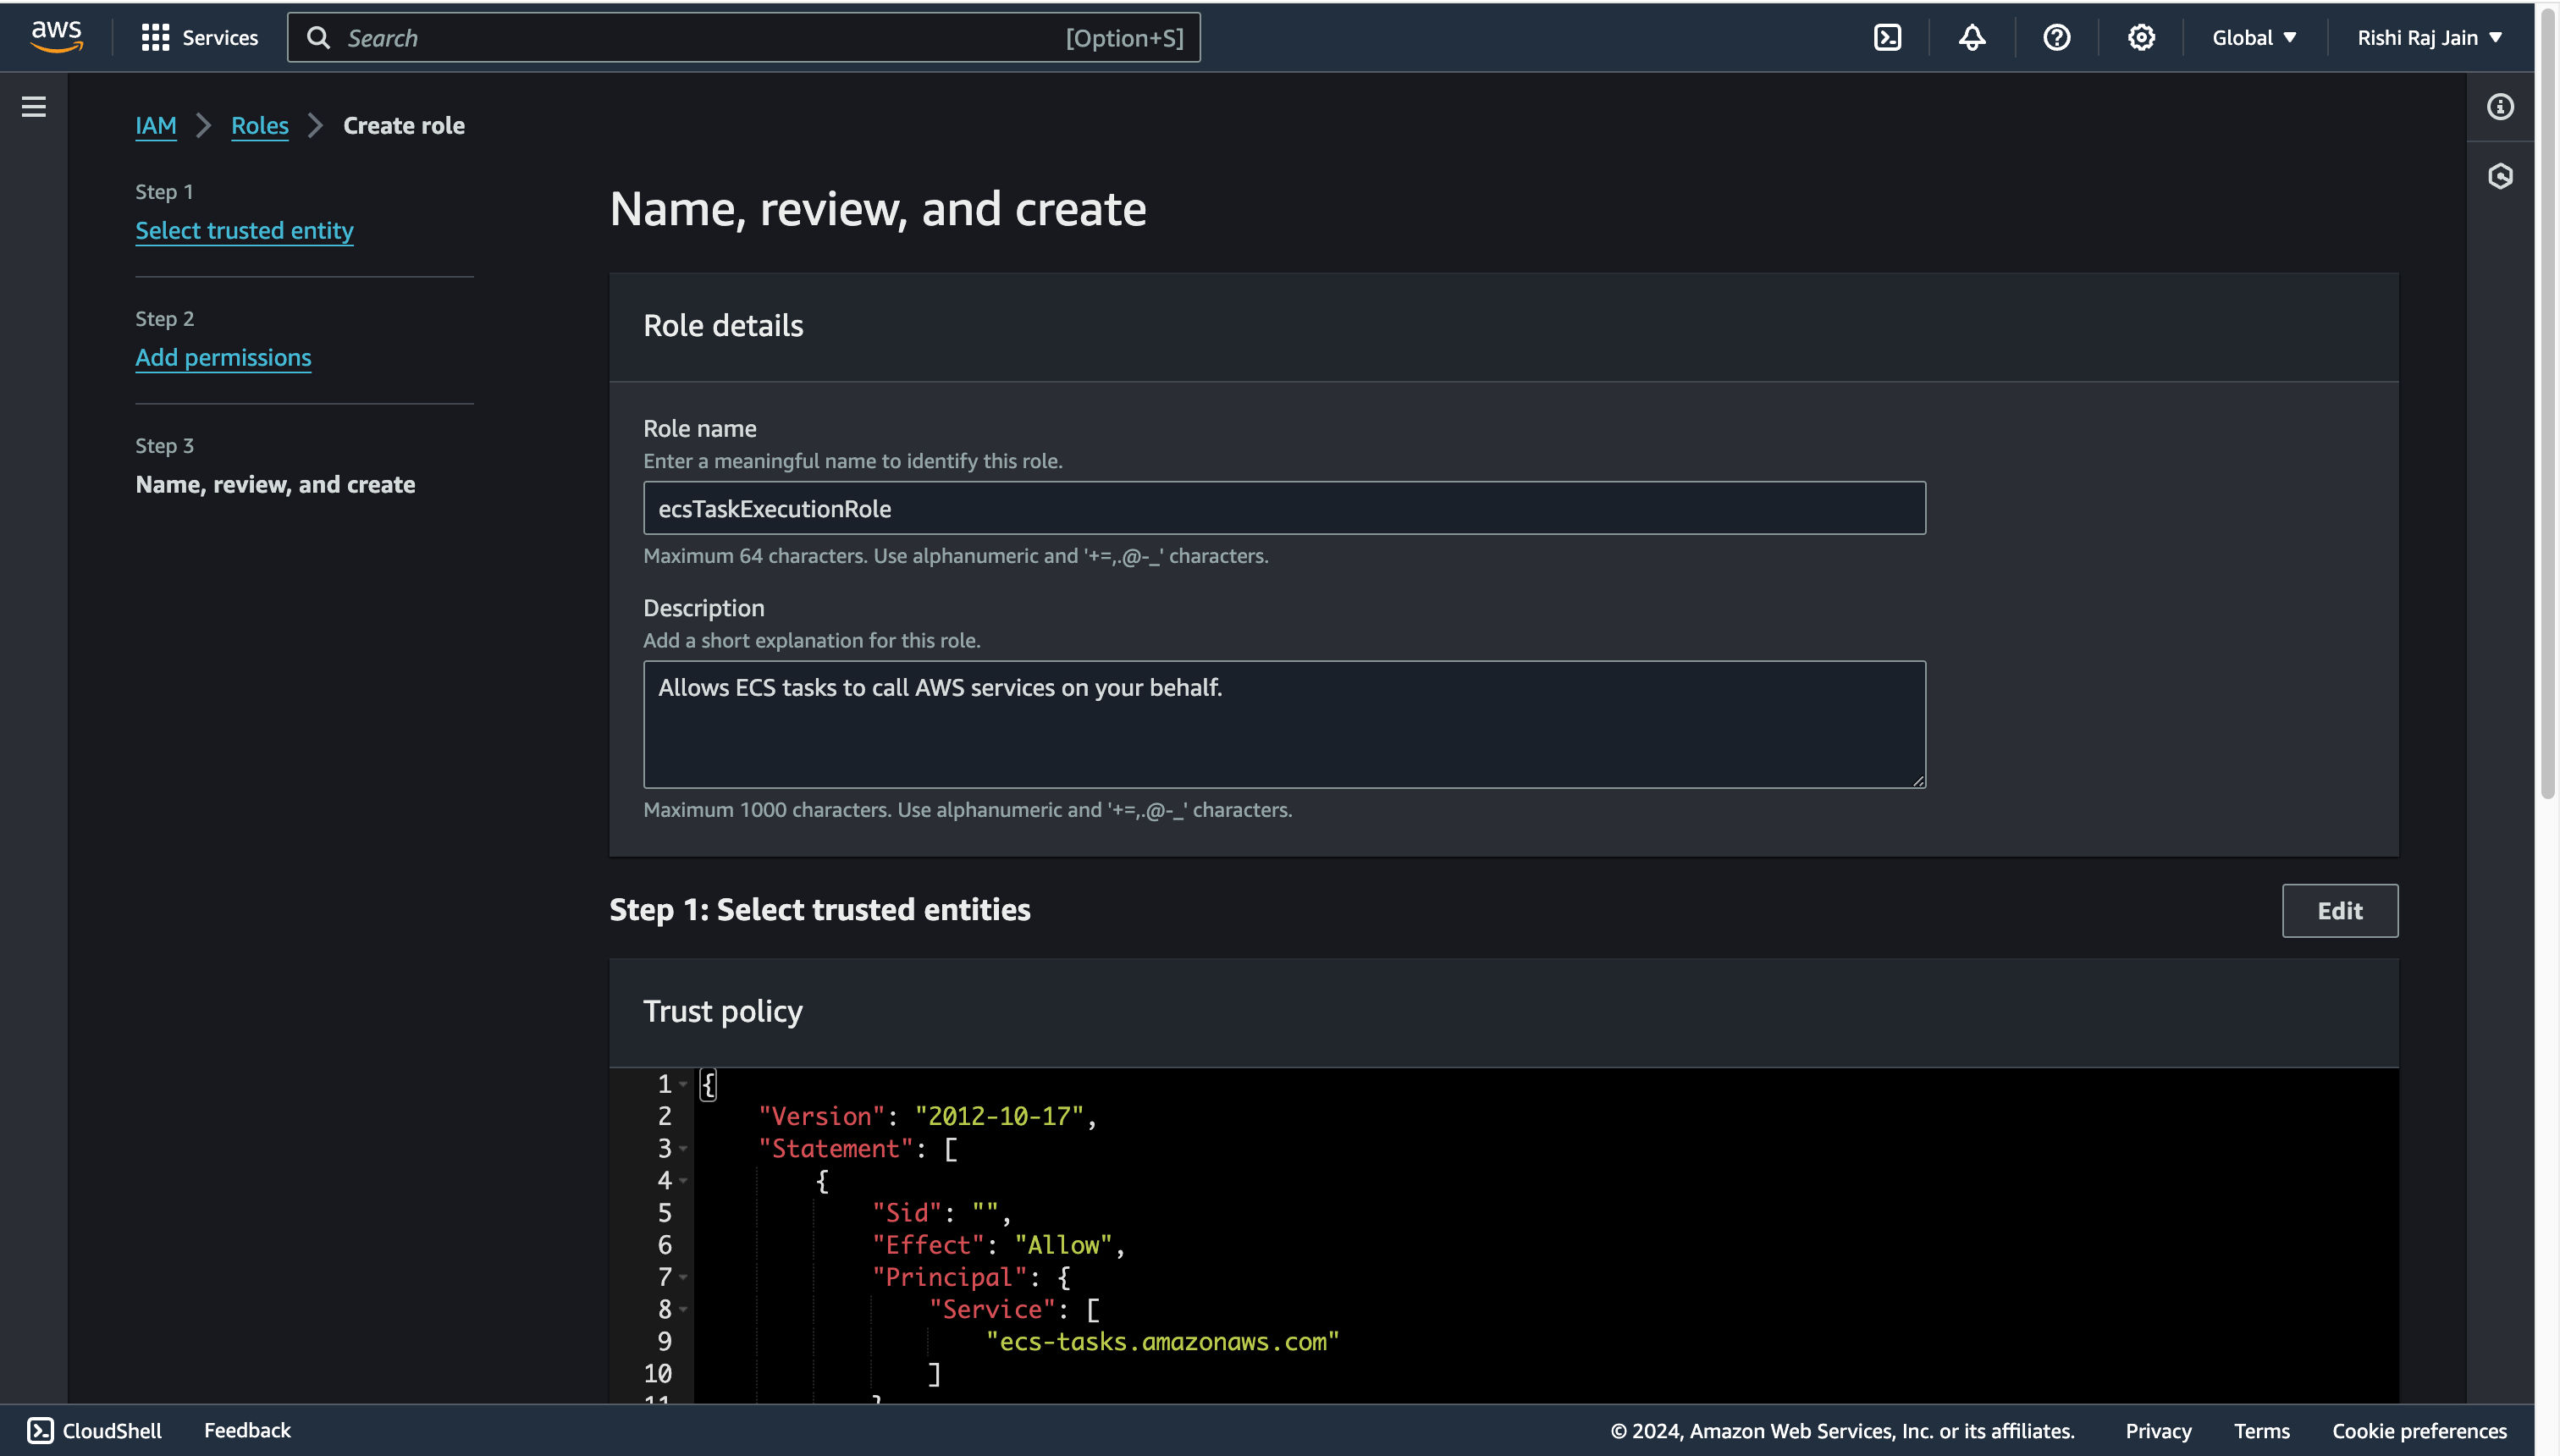
- Enter `ecsTaskExecutionRole` as the **Role name**.
and you are now done with setting up IAM Roles for your account. Let’s move on to creating an Amazon ECS task definition.
## Create an Amazon ECS task definition
- Open the [Amazon ECS Console](https://console.aws.amazon.com/ecs/v2) and choose **Task Definitions**. Further, select **Create new task definition with JSON**.
- Copy the following JSON in the field, and click **Create**.
```json
{
"containerDefinitions": [
{
"cpu": 256,
"memory": 512,
"portMappings": [
{
"containerPort": 80,
"hostPort": 80,
"protocol": "tcp"
}
],
"essential": true,
"name": "fargate-app",
"image": "2*.dkr.ecr.ap-south-1.amazonaws.com/repos-astro" // enter your own repo URI
}
],
"cpu": "1024",
"memory": "3072",
"family": "sample-fargate",
"networkMode": "awsvpc",
"taskRoleArn": "arn:aws:iam::2*:role/ecsTaskRole", // Enter your own account's role ID
"executionRoleArn": "arn:aws:iam::2*:role/ecsTaskExecutionRole" // Enter your own account's role ID
}
```
and you are now done with setting up an Amazon ECS task definition for your service. Let's move on to creating an Amazon ECS Cluster.
## Create an Amazon ECS Cluster
- Open [Amazon ECS Console](https://console.aws.amazon.com/ecs/v2) and click **Create cluster**.
- Enter name for your cluster, say `new-cluster` and choose **Create**.
and you are now done with setting up an Amazon ECS Cluster your service.
Let's move on to creating an Amazon ECS Service.
## Create an Amazon ECS Service
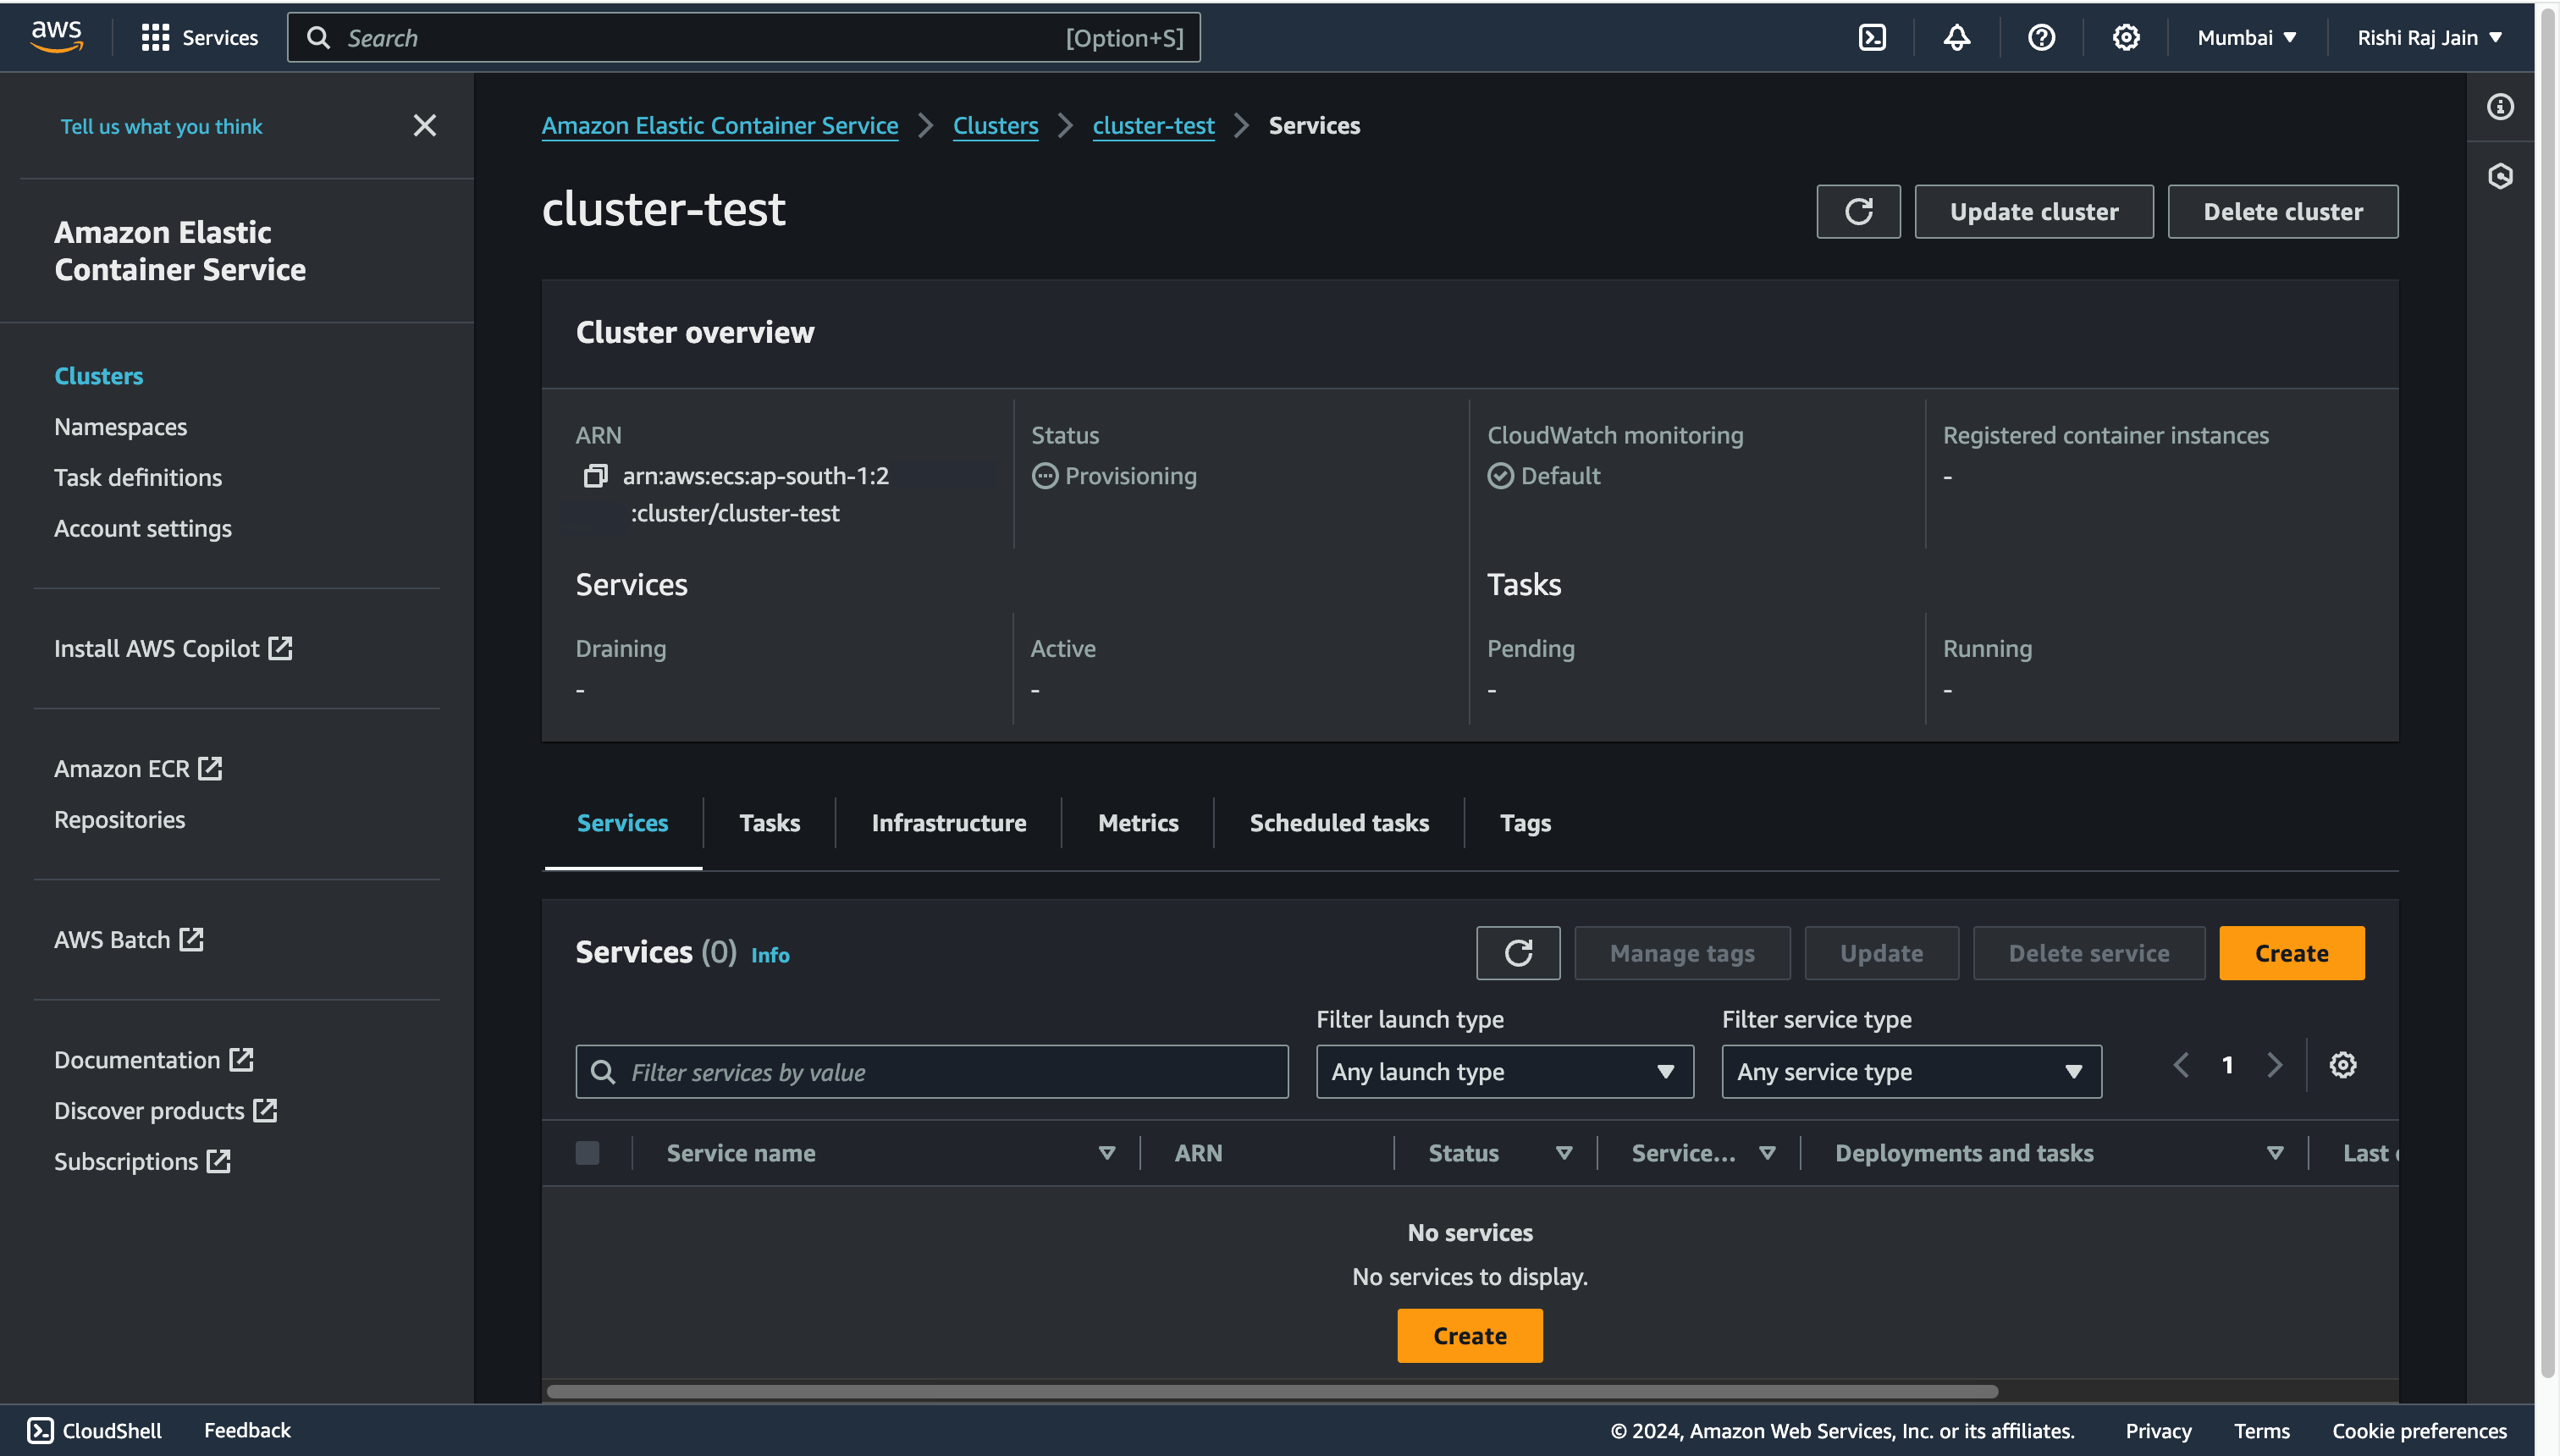
- Click on the Cluster created in the section earlier, and click on **Create** in the Services section.
- Enter name for your service, say `service-test`, and expand the **Networking** section.
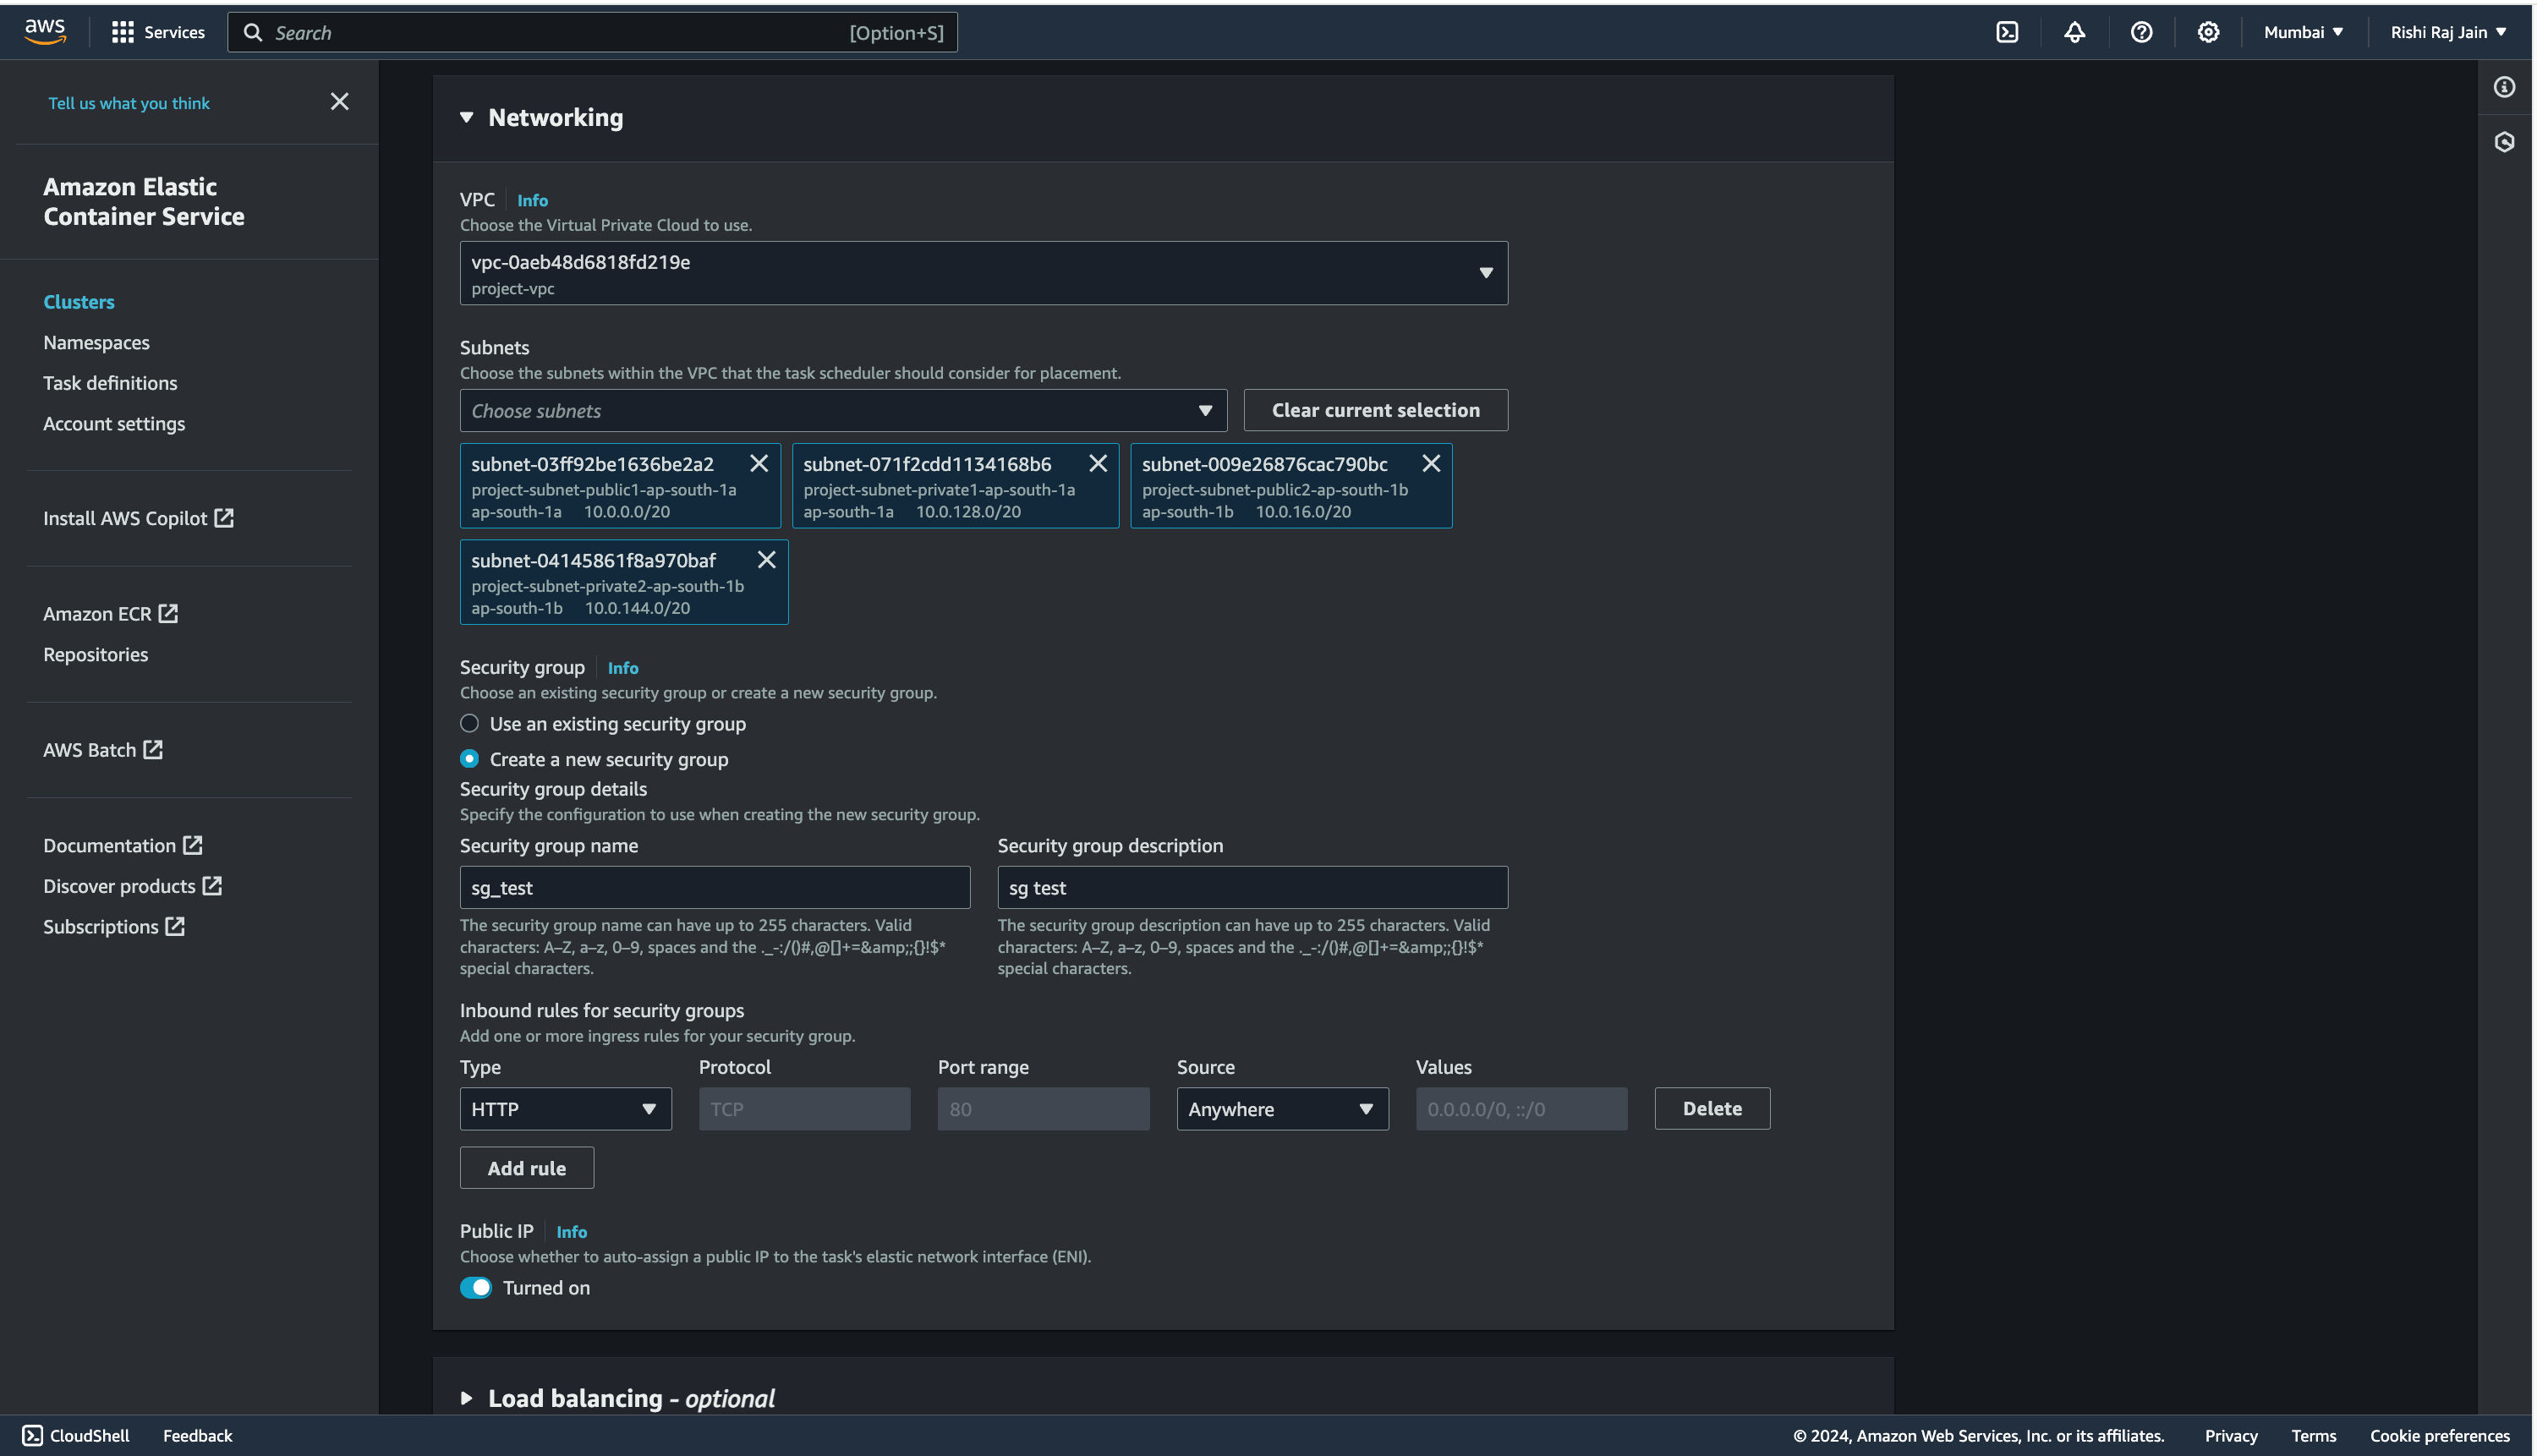
- Select the **VPC** created earlier (or the default one). Select **Create a new security group** option and enter the following details for it:
- Security group name: `sg_test`
- Security group description: `sg test`
- Inbound rules for security groups:
- Type: `HTTP`
- Source: `Anywhere`
and you are now done with creating an ECS Service in your ECS Cluster. Let's move on to creating access keys for IAM users for your account.
## Create access keys for IAM users
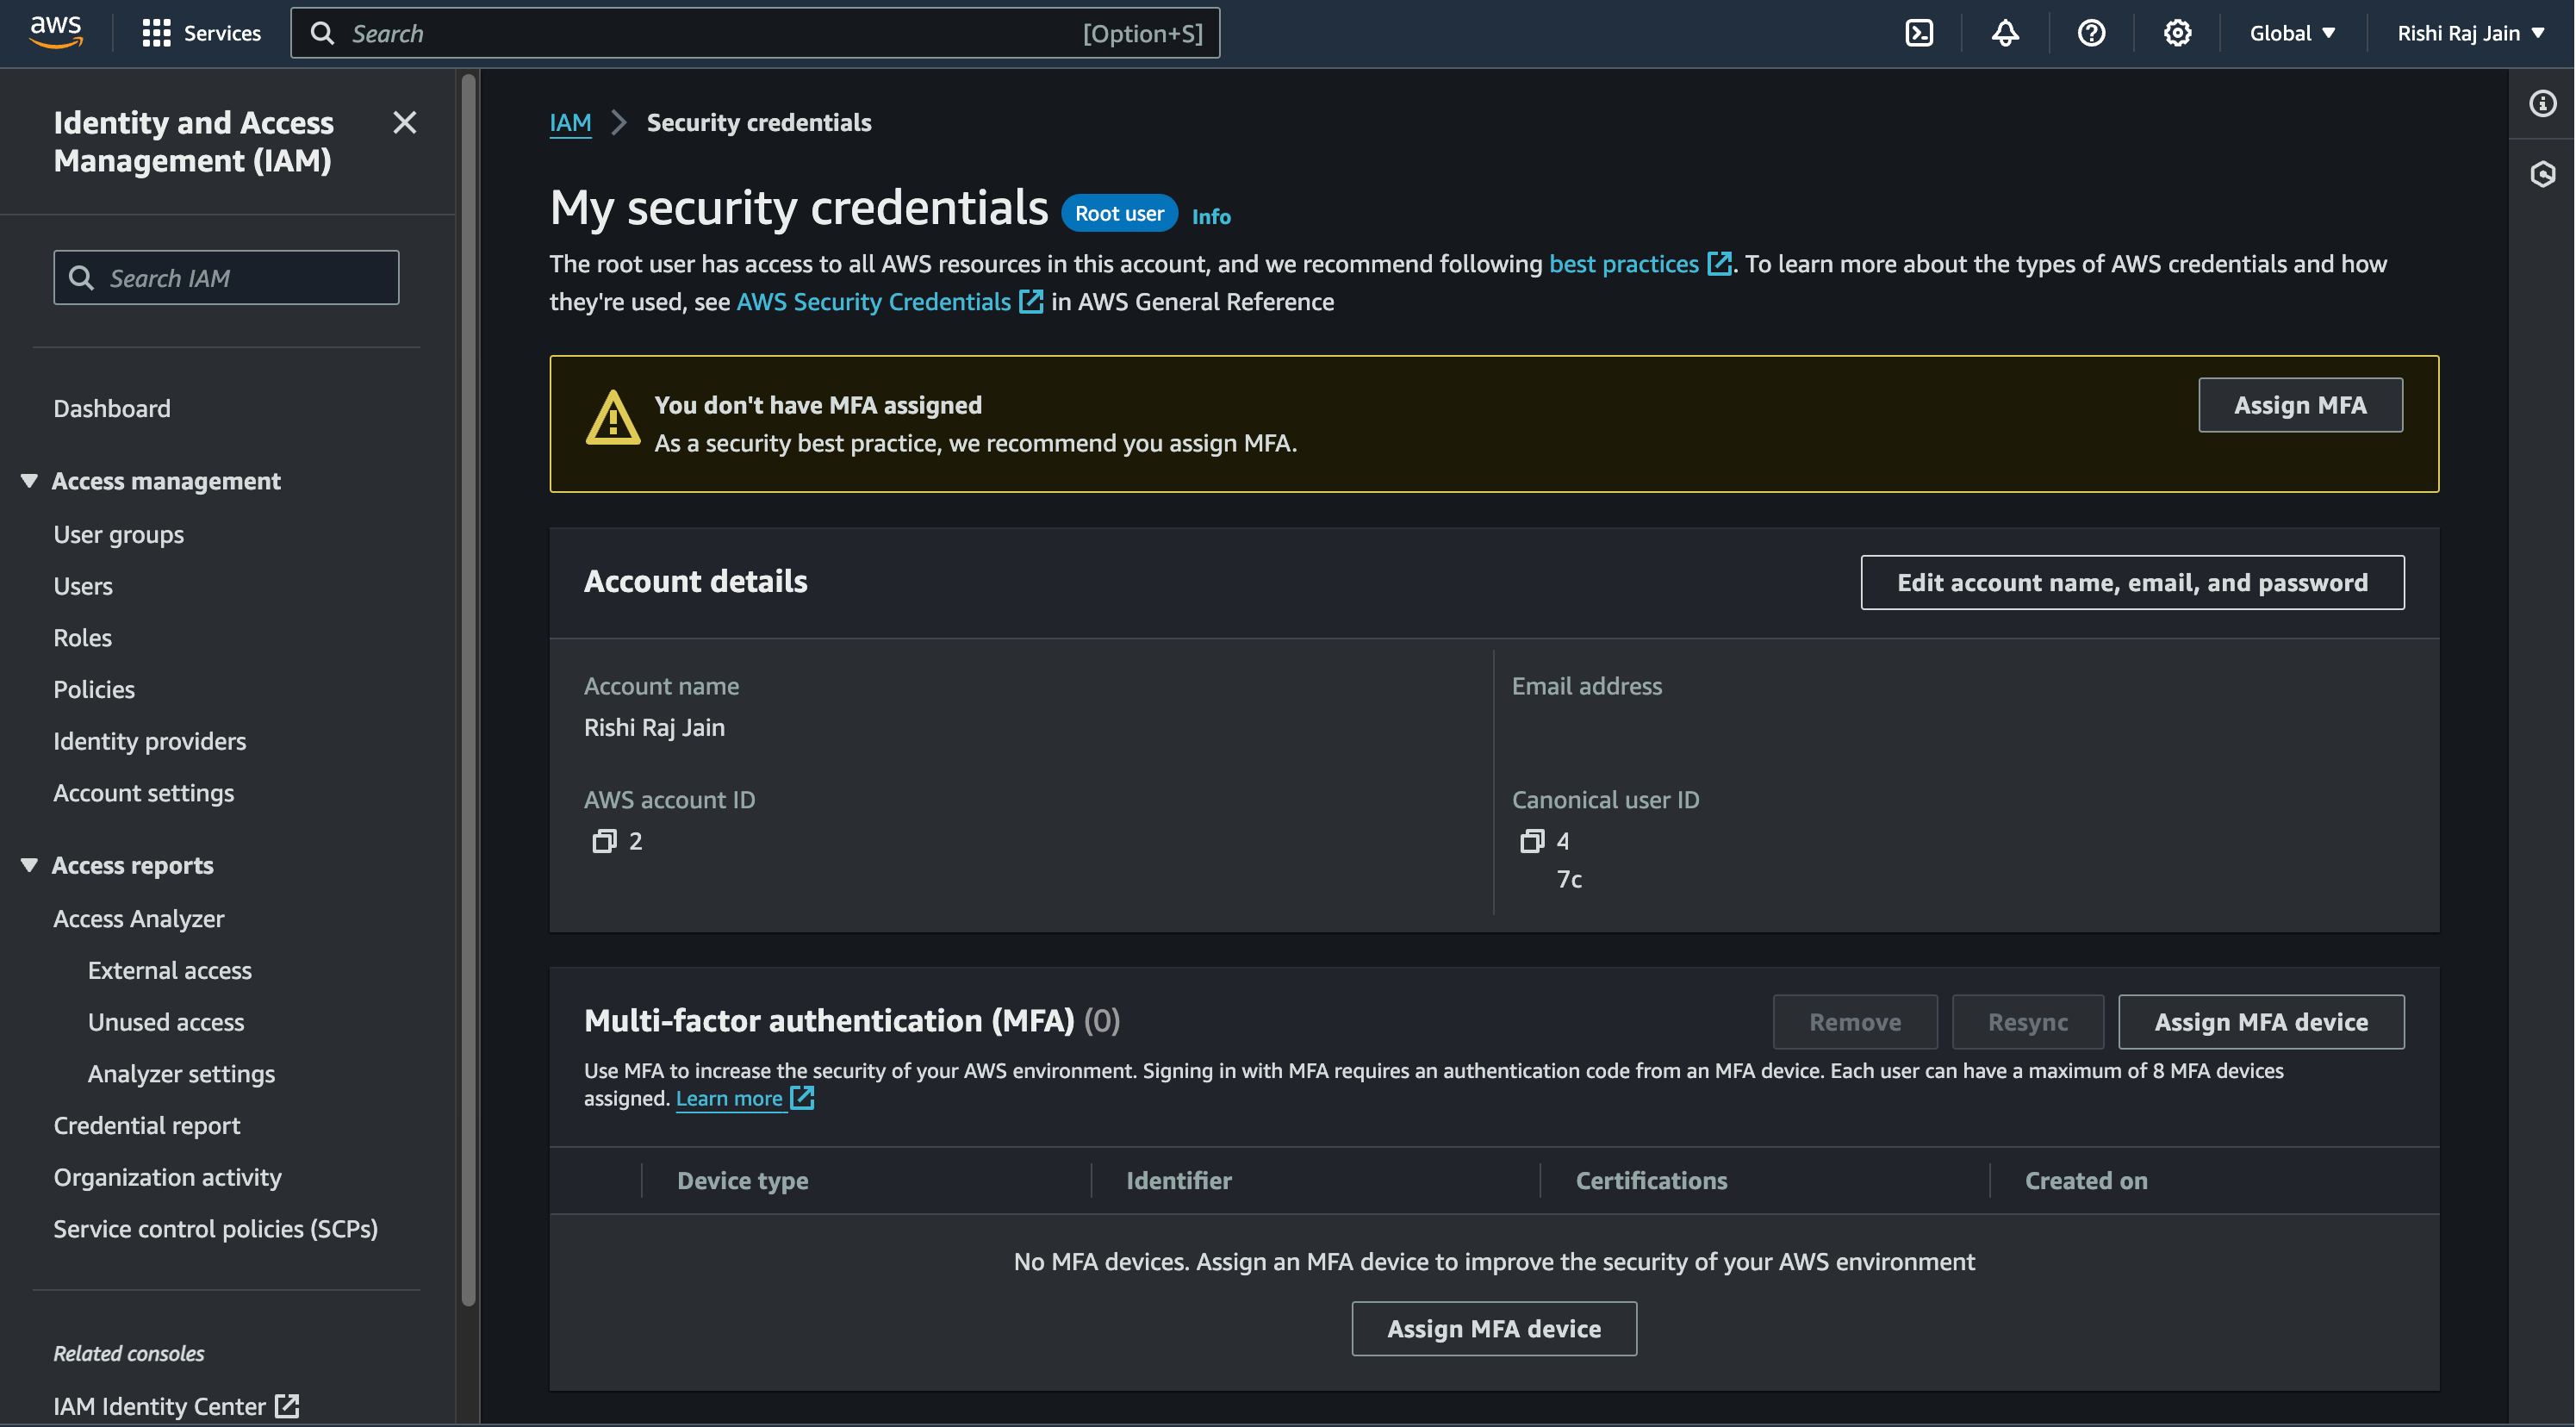
- In the navigation bar on the upper right in your AWS account, choose your user name, and then choose **Security credentials**.
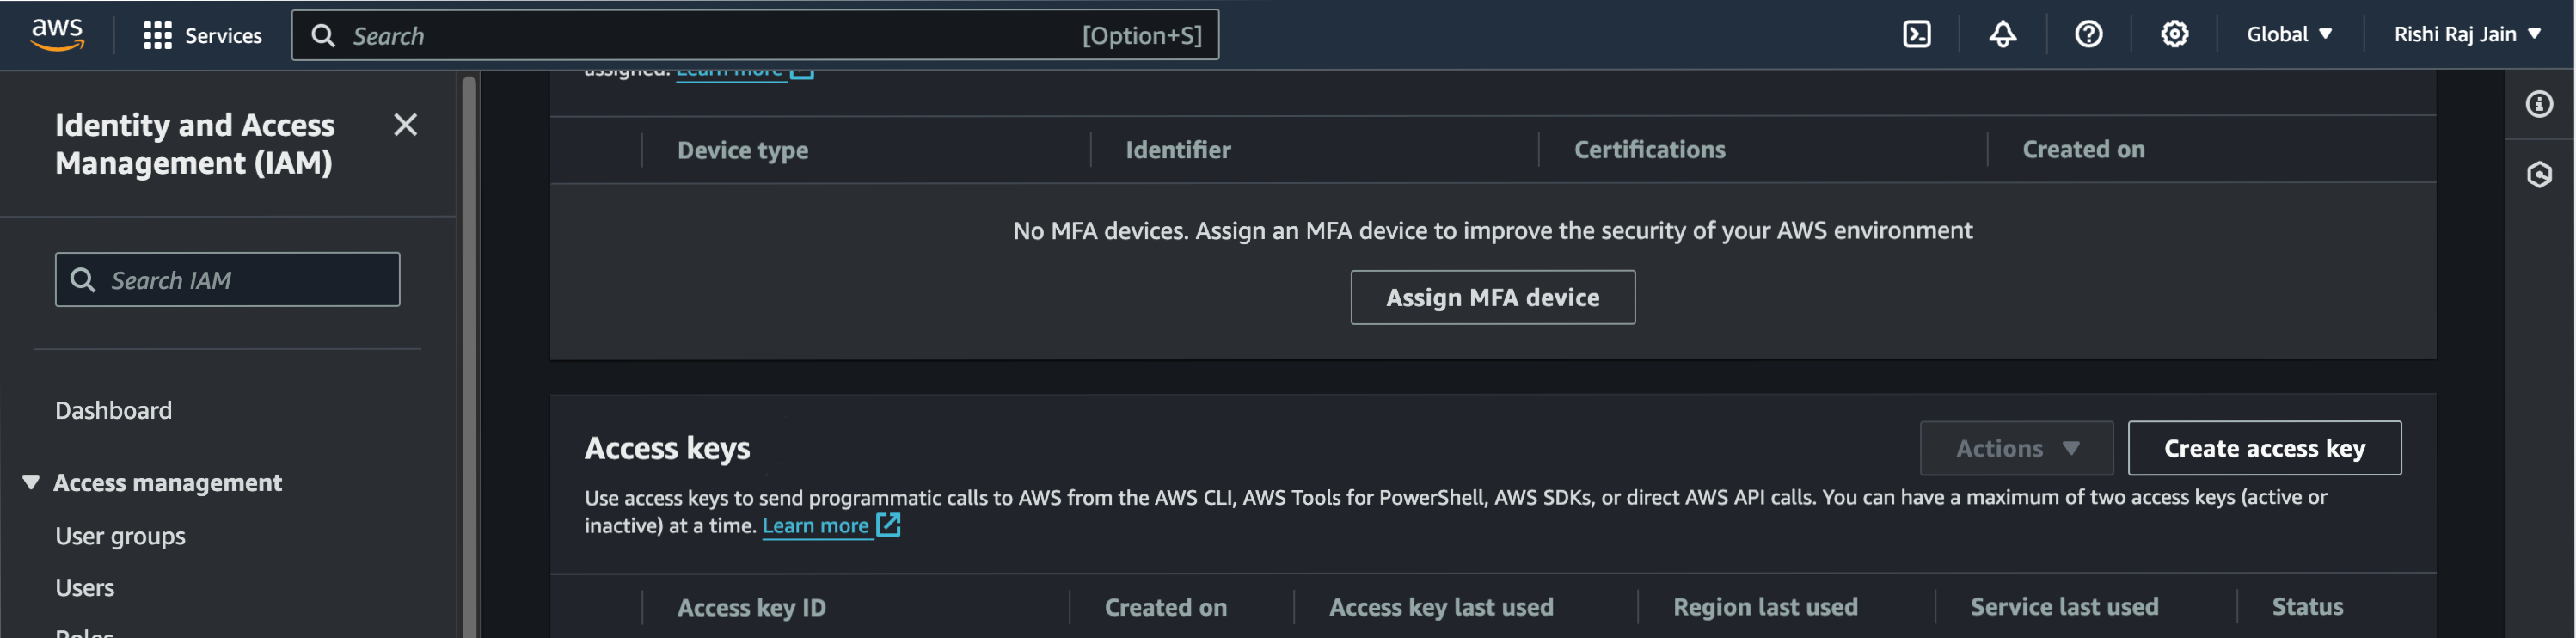
- Scroll down to **Access keys** and click on **Create access key**.
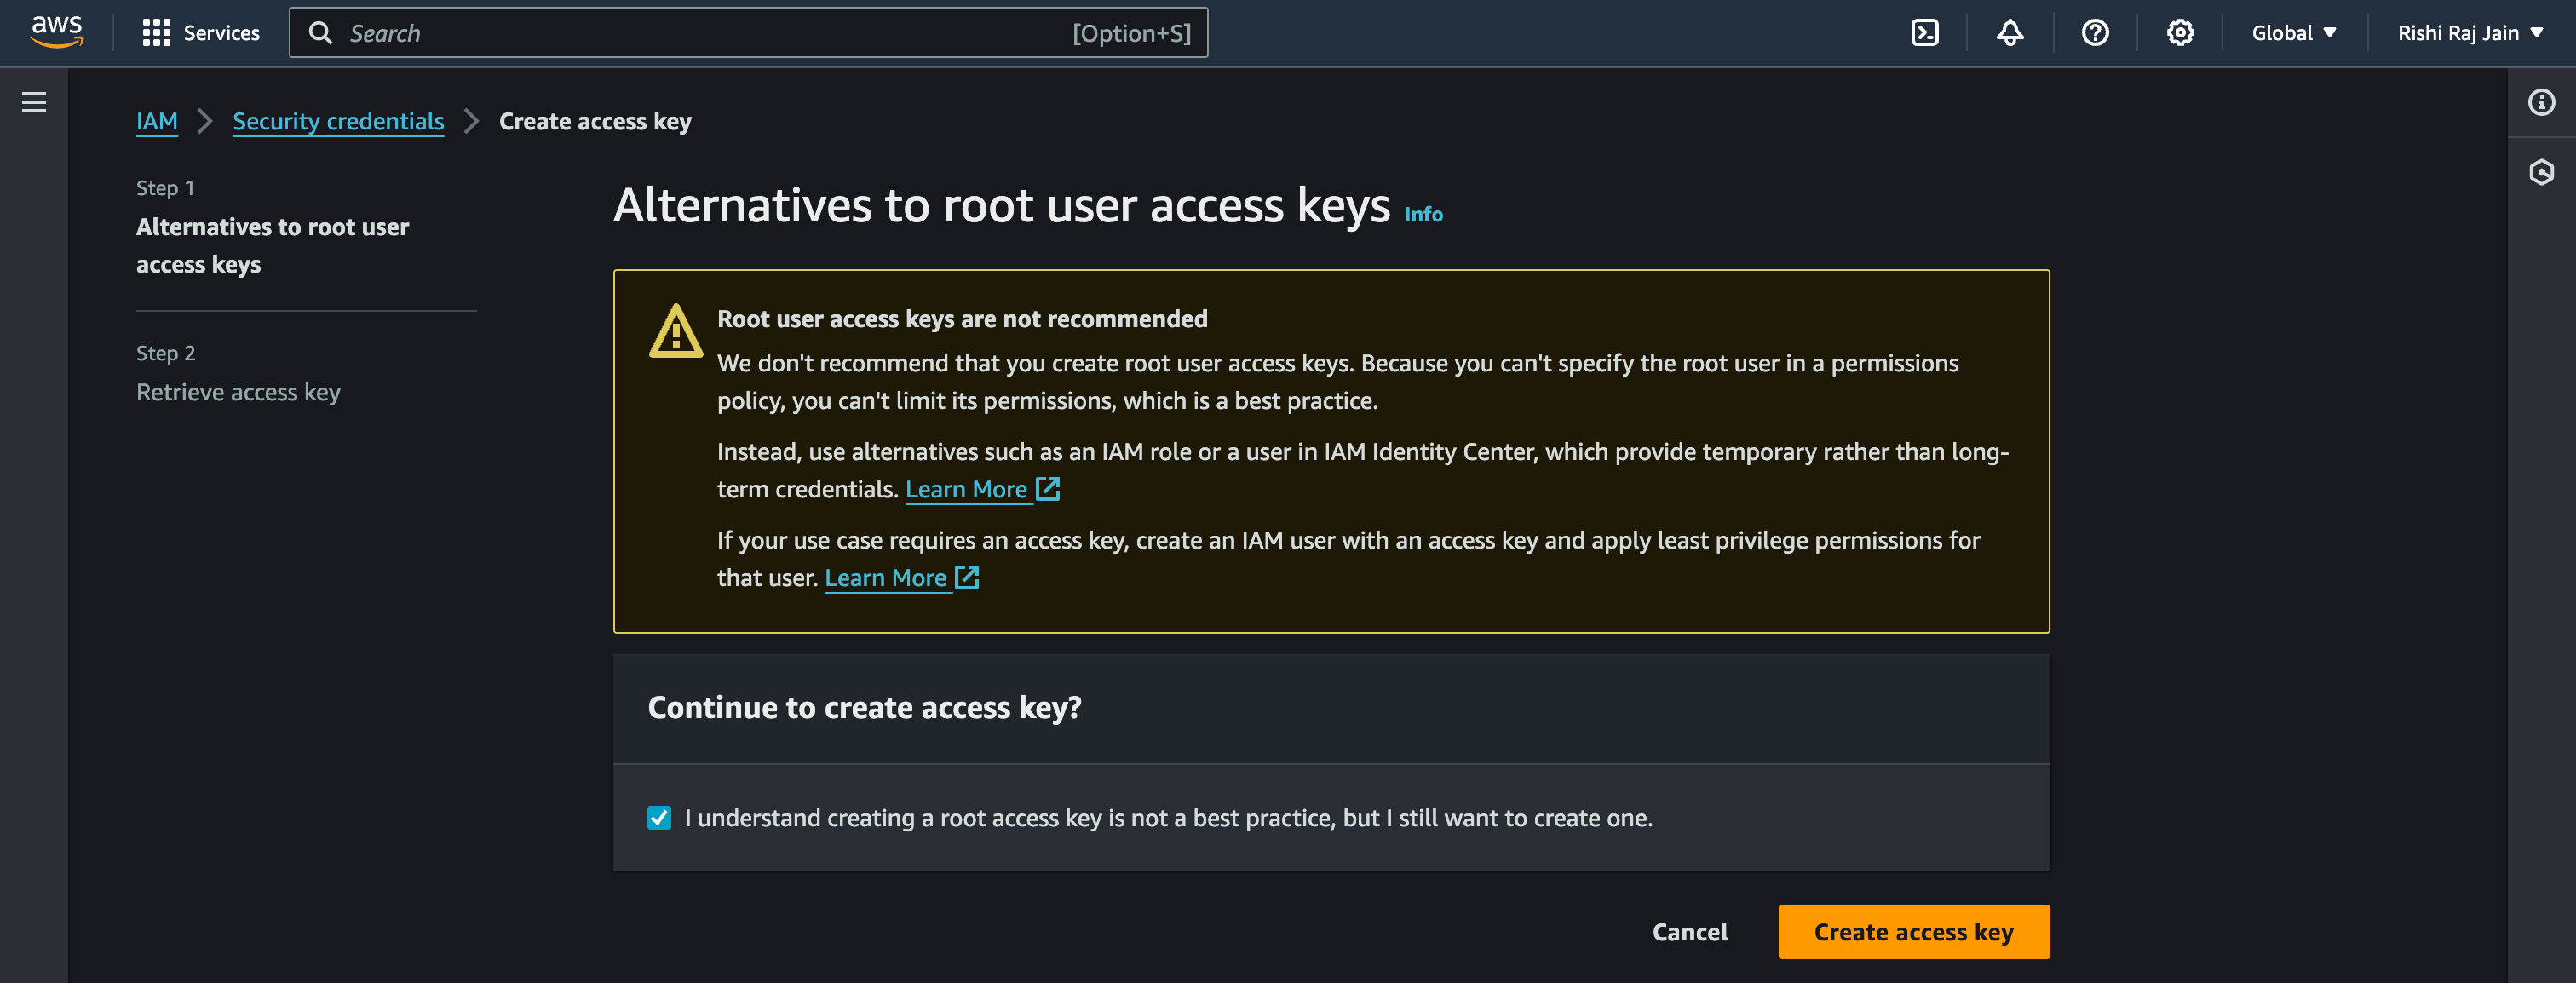
- Again, click on **Create access key**.
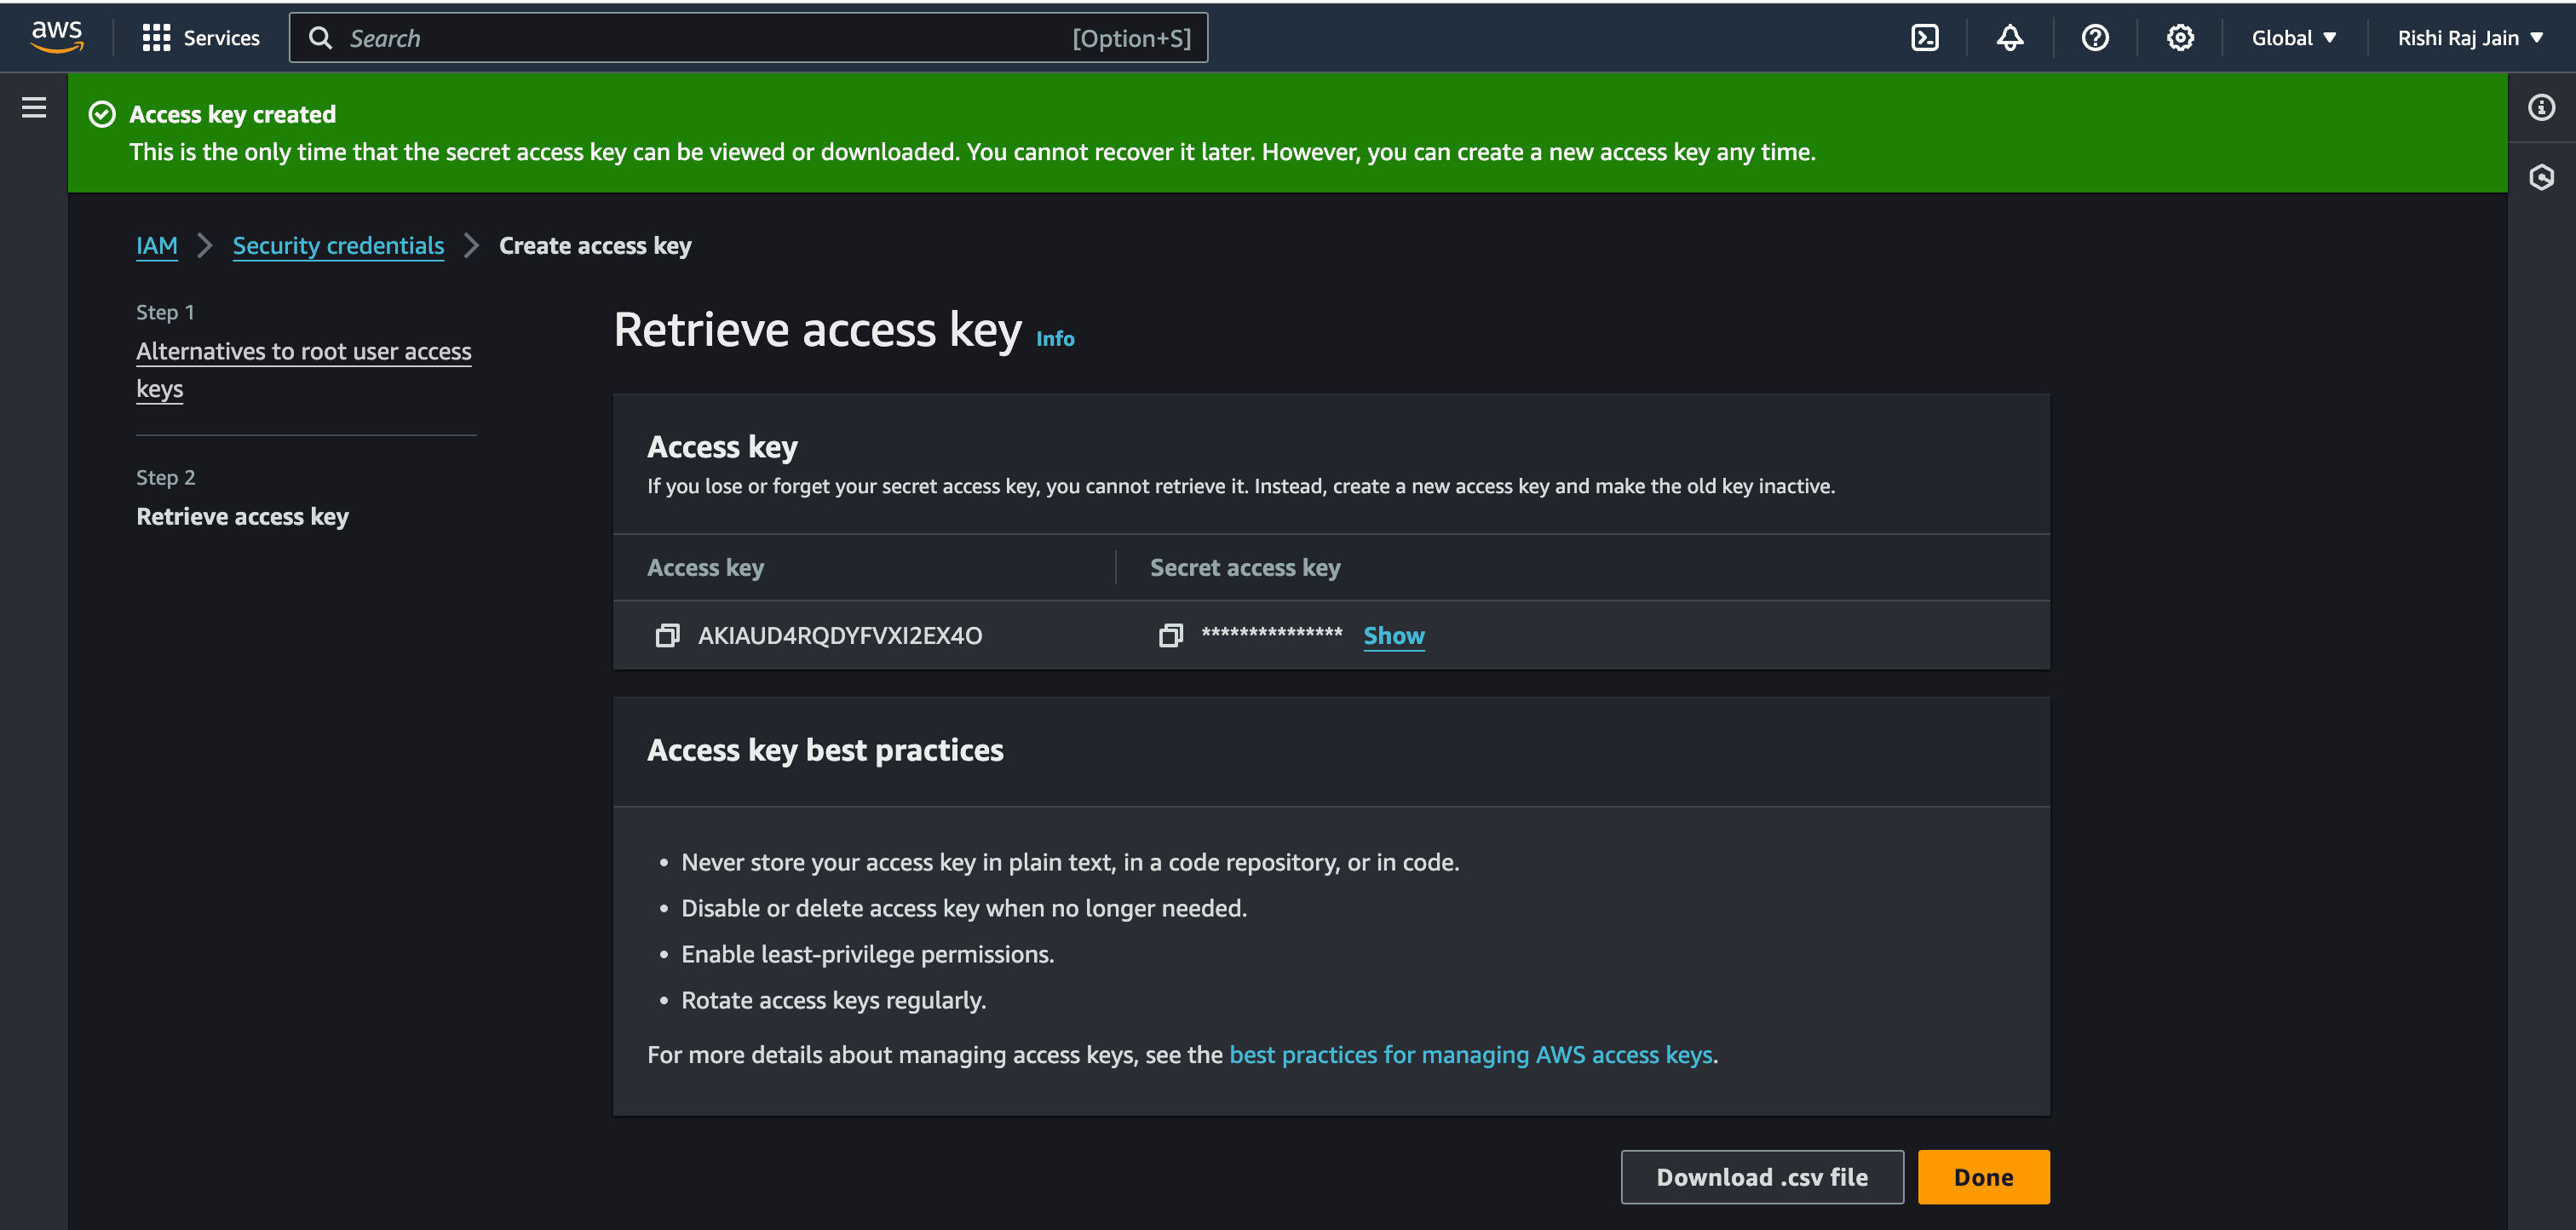
- Copy the **Access key** and **Secret access key** generated to be used as `AWS_ACCESS_KEY_ID` and `AWS_ACCESS_KEY_SECRET` respectively.
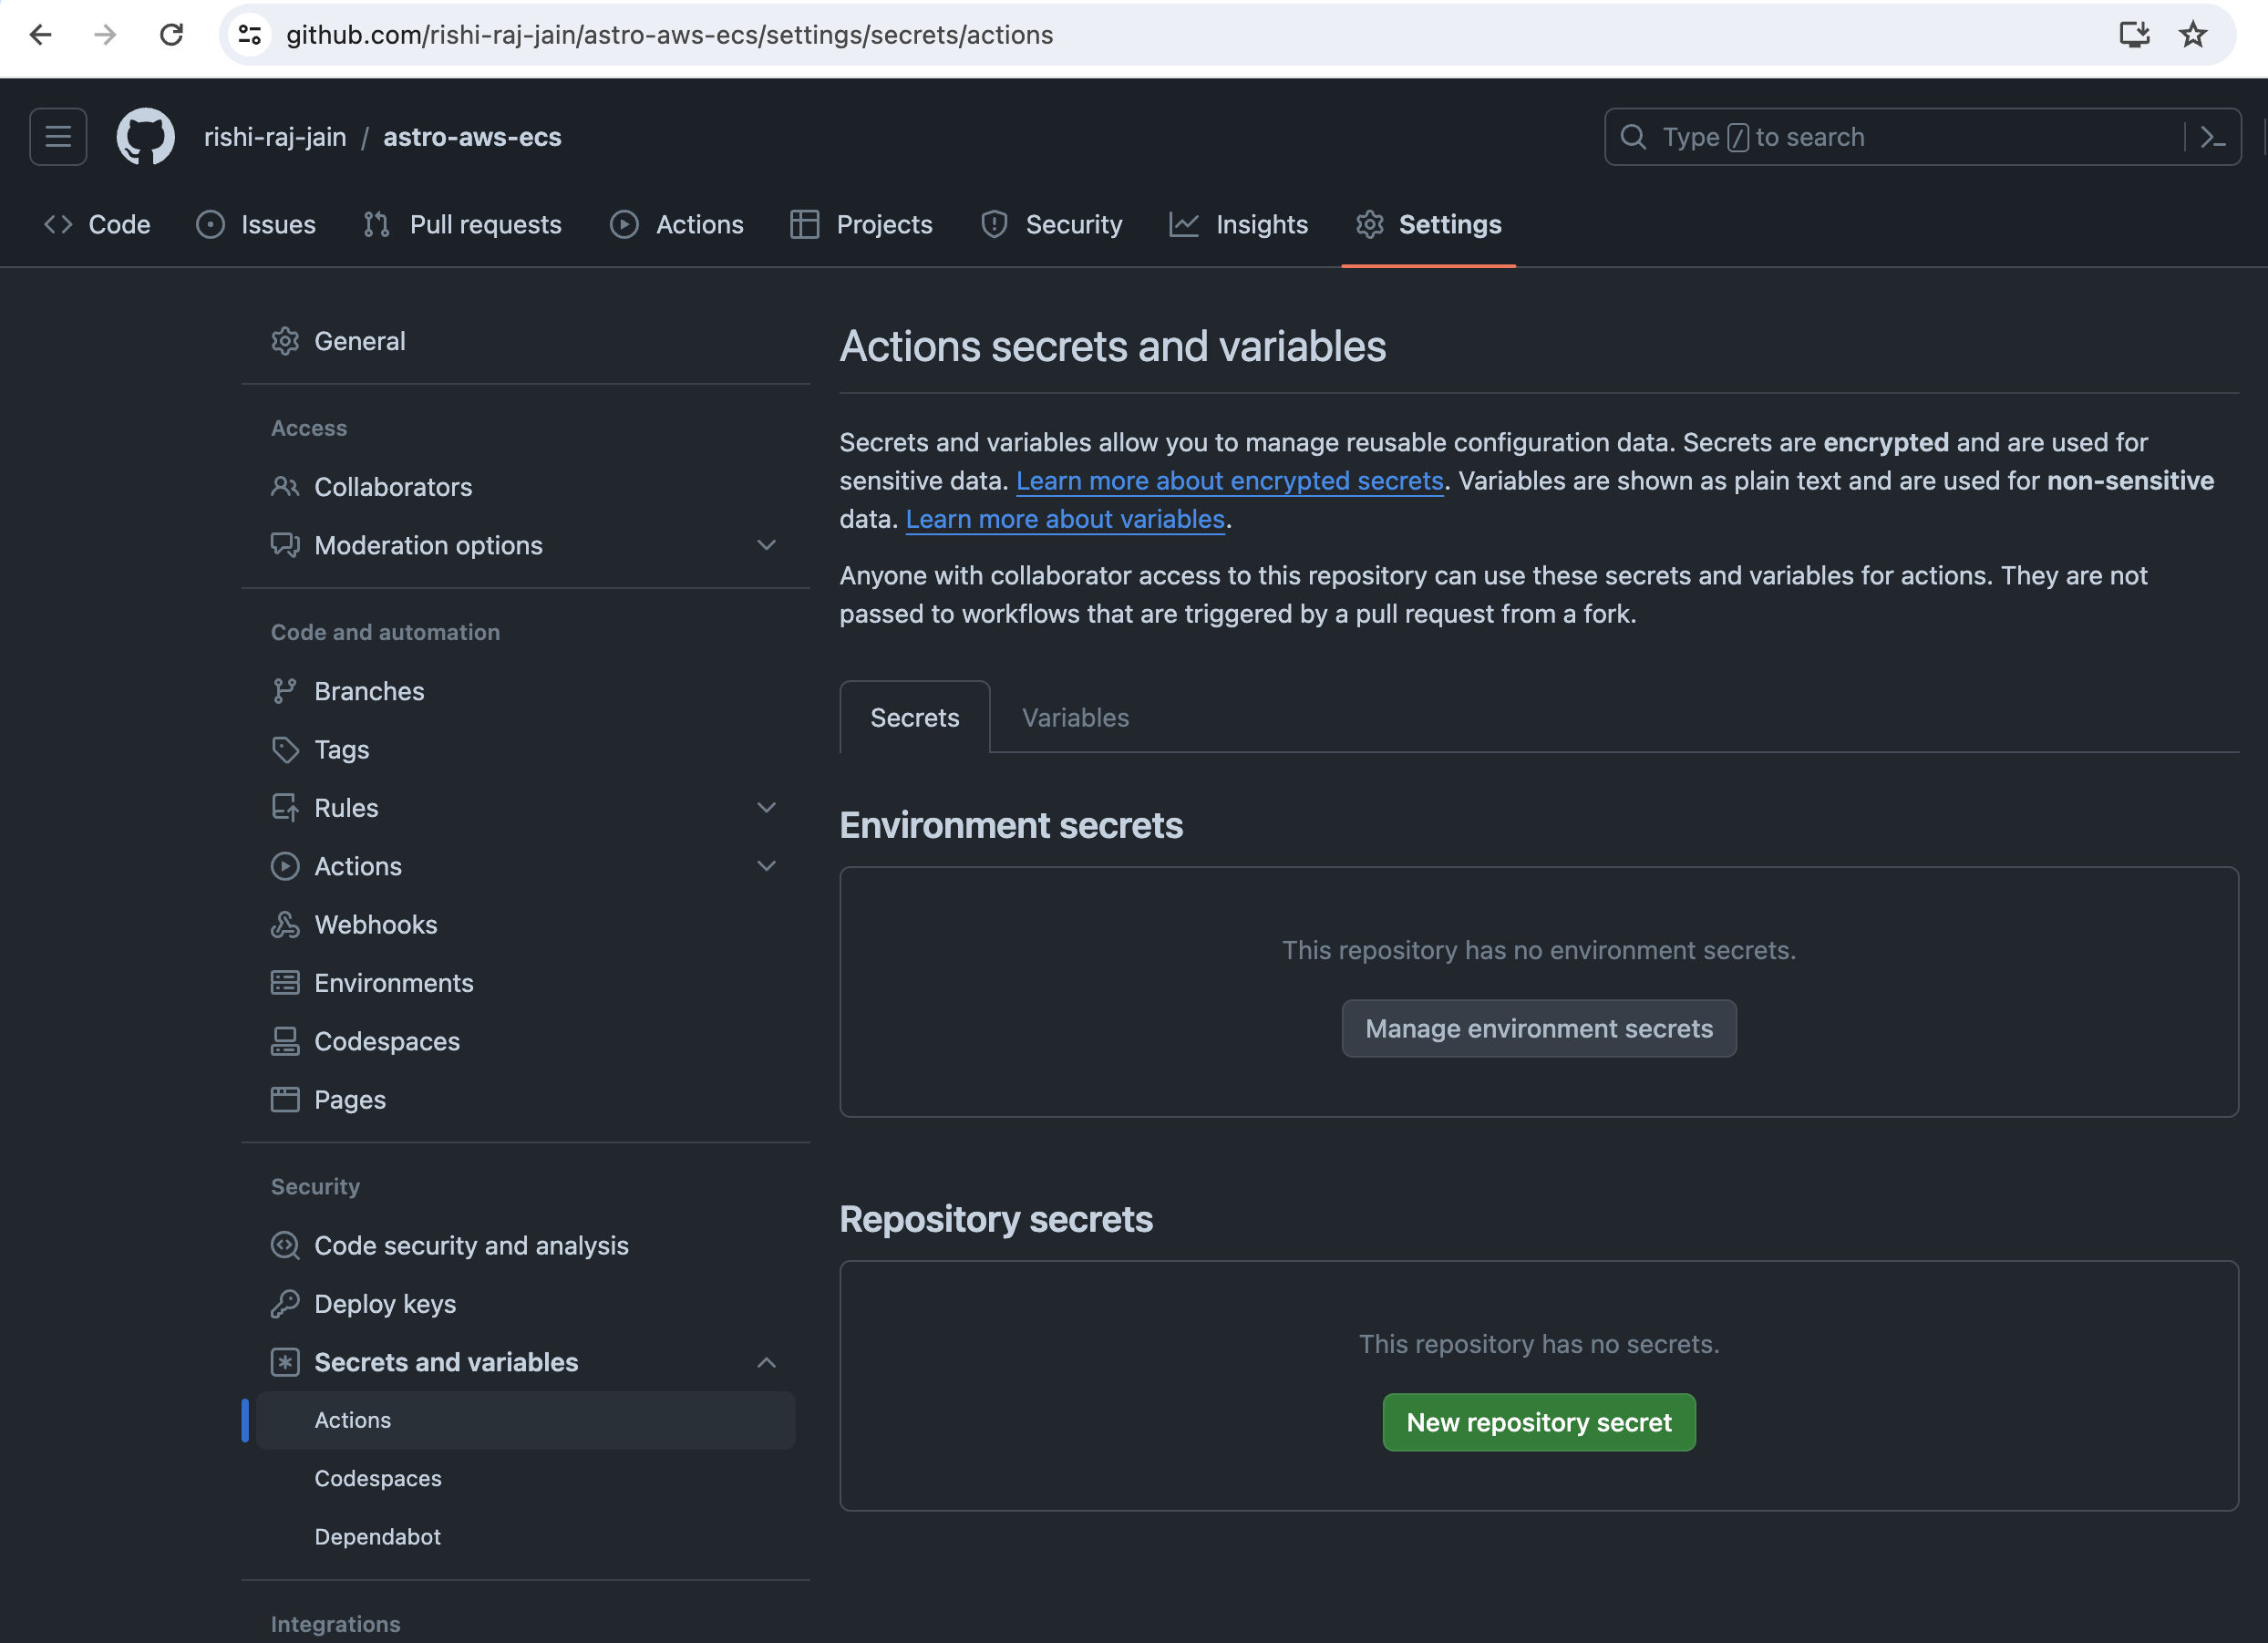
- Now, go to your GitHub repository's Settings, click on **Secrets and Variables**. Further, click on **New repository secret**.
- Enter **AWS_ACCESS_KEY_ID** as the value obtained earlier.
- Enter **AWS_ACCESS_KEY_SECRET** as the value obtained earlier.
Let's move on to configuring GitHub Workflows for continuous deployments.
## Create GitHub Actions for Continuous Deployment (CD) Workflow
To automate deployments of your Astro application, you are going to use [GitHub Actions](https://github.com/features/actions).
- Create a `.github/workflows/fargate.yml` with the following code:
```yml
name: Deploy to Amazon ECS on AWS Fargate
on:
push:
branches:
- master
workflow_dispatch:
env:
AWS_REGION: us-west-1 # enter your deployment region
ECS_SERVICE: service-test # enter your ECS service name
ECS_CLUSTER: new-cluster # enter your ECS cluster name
CONTAINER_NAME: fargate-app # enter your container name used in the task definition
ECR_REPOSITORY: astro-repo # enter your ECS repo name
ECS_TASK_DEFINITION: ./task-definition.json
jobs:
deploy:
name: Deploy
runs-on: ubuntu-latest
environment: production
steps:
- name: Checkout
uses: actions/checkout@v4
- name: Configure AWS credentials
uses: aws-actions/configure-aws-credentials@v4
with:
aws-region: ${{ env.AWS_REGION }}
aws-access-key-id: ${{ secrets.AWS_ACCESS_KEY_ID }}
aws-secret-access-key: ${{ secrets.AWS_SECRET_ACCESS_KEY }}
- name: Login to Amazon ECR
id: login-ecr
uses: aws-actions/amazon-ecr-login@v1
- name: Build, tag, and push image to Amazon ECR
id: build-image
env:
IMAGE_TAG: ${{ github.sha }}
ECR_REGISTRY: ${{ steps.login-ecr.outputs.registry }}
run: |
# Build a docker container and
# push it to ECR so that it can
# be deployed to ECS.
docker build -t $ECR_REGISTRY/$ECR_REPOSITORY:$IMAGE_TAG .
docker push $ECR_REGISTRY/$ECR_REPOSITORY:$IMAGE_TAG
echo "image=$ECR_REGISTRY/$ECR_REPOSITORY:$IMAGE_TAG" >> $GITHUB_OUTPUT
- name: Fill in the new image ID in the Amazon ECS task definition
id: task-def
uses: aws-actions/amazon-ecs-render-task-definition@v1
with:
container-name: ${{ env.CONTAINER_NAME }}
image: ${{ steps.build-image.outputs.image }}
task-definition: ${{ env.ECS_TASK_DEFINITION }}
- name: Deploy Amazon ECS task definition
uses: aws-actions/amazon-ecs-deploy-task-definition@v1
with:
service: ${{ env.ECS_SERVICE }}
cluster: ${{ env.ECS_CLUSTER }}
wait-for-service-stability: true
task-definition: ${{ steps.task-def.outputs.task-definition }}
```
The workflow above does the following:
- Allows itself to be triggered manually or when a git push is done to the master branch.
- Sets global environment variables as your AWS setup variables (we obtained earlier during set up) for only when it's being executed.
- Takes care of building and pushing the Docker image to Amazon ECR.
- Takes care of loading the updated (if) task definition to Amazon ECS.
Now, push the added workflow file to your GitHub repo and follow the steps below to trigger the deployment:
- Go to your GitHub repository's **Actions** tab.
- Select **Deploy to Amazon ECS** workflow.
- Click **Run workflow**.
- Once the action is completed, open [ECS Console](https://console.aws.amazon.com/ecs/v2) and select your service.
- Click on **Tasks** tab.
- Click on the completed Task id.
- Click **open address** to open your deployment.
- You will now be able to see the index route of your Astro application.
## References
- https://www.linkedin.com/pulse/exploring-deployment-nodejs-application-aws-ecs-fargate-vibhor-jain-phvfc/
## Conclusion
Yay! You now have an Astro project that automatically deploys to Amazon ECS on AWS Fargate upon Git push.
If you have any questions or comments, feel free to reach out to me on [Twitter](https://twitter.com/direct_messages/create/rishi_raj_jain_).
 In this guide, you will learn how to deploy an Astro SSR project to Amazon ECS on AWS Fargate. You will go through the process of setting up a new Astro project, enabling server-side rendering using the Node.js adapter, and finally deploying it to Amazon ECS on AWS Fargate.
## Table Of Contents
- [Prerequisites](#prerequisites)
- [Create a new Astro application](#create-a-new-astro-application)
- [Getting Started with the Node.js Adapter for Astro](#getting-started-with-the-nodejs-adapter-for-astro)
- [Dockerize your Astro application](#dockerize-your-astro-application)
- [Create an Amazon Virtual Private Cloud (VPC)](#create-an-amazon-virtual-private-cloud-vpc)
- [Create Amazon ECR private repository](#create-amazon-ecr-private-repository)
- [Configure your IAM Roles](#configure-your-iam-roles)
- [Create an Amazon ECS task definition](#create-an-amazon-ecs-task-definition)
- [Create an Amazon ECS Cluster](#create-an-amazon-ecs-cluster)
- [Create an Amazon ECS Service](#create-an-amazon-ecs-service)
- [Create access keys for IAM users](#create-access-keys-for-iam-users)
- [Create GitHub Actions for Continuous Deployment (CD) Workflow](#create-github-actions-for-continuous-deployment-cd-workflow)
- [Conclusion](#conclusion)
## Prerequisites
You'll need the following:
- [Node.js 20](https://nodejs.org/en/blog/announcements/v20-release-announce) or later
- An [AWS](https://aws.amazon.com/free) account
## Create a new Astro application
Let’s get started by creating a new Astro project. Open your terminal and run the following command:
```bash
npm create astro@latest my-app
```
`npm create astro` is the recommended way to scaffold an Astro project quickly.
When prompted, choose:
- `Empty` when prompted on how to start the new project.
- `Yes` when prompted if you plan to write TypeScript.
- `Strict` when prompted how strict TypeScript should be.
- `Yes` when prompted to install dependencies.
- `Yes` when prompted to initialize a git repository.
Once that’s done, you can move into the project directory and start the app:
```bash
cd my-app
npm run dev
```
The app should be running on [localhost:4321](http://localhost:4321/).
Next, in your first terminal window, run the command below to install the necessary libraries and packages for building the application:
```bash
npm install dotenv
```
The libraries installed include:
- `dotenv`: A library for handling environment variables.
Once it is installed, you'll need to add it to your `astro.config.mjs` file. Open the file and add the following code:
```tsx title="astro.config.mjs" ins={1}
import 'dotenv/config';
import { defineConfig } from 'astro/config';
export default defineConfig({});
```
Let's move on to enable Server-Side Rendering by using the Node.js adapter.
## Getting Started with the Node.js Adapter for Astro
Before deploying your Astro project, you need to install the `@astrojs/node` adapter. This is easily done via the Astro CLI:
```bash
npm install @astrojs/node
```
The libraries installed include:
- `@astrojs/node`: An adapter that prepares Astro websites to be run as a Node.js server.
Once the adapter is installed, you'll need to add it to your `astro.config.mjs` file. Open the file and add the following code:
```tsx title="astro.config.mjs" ins={1,5-8}
import node from '@astrojs/node';
import { defineConfig } from 'astro/config';
export default defineConfig({
output: "server",
adapter: node({
mode: 'standalone'
}),
});
```
Let's move on to dockerizing your Astro application.
## Dockerize your Astro application
Deploying to Amazon ECS on AWS Fargate requires an AWS ECR repository to be created. Imagine ECR as a handler of Docker based deployments.
To dockerize your Astro application, you're going to create two files at the root of your Astro project:
- `.dockerignore`: The set of files that would not be included in your Docker image.
- `Dockerfile`: The set of instructions that would be executed while your Docker image builds.
Create the `.dockerignore` file at the root of your Astro project with following code:
```
# build output
dist/
# generated types
.astro/
# dependencies
node_modules/
# logs
npm-debug.log*
yarn-debug.log*
yarn-error.log*
pnpm-debug.log*
# environment variables
.env
.env.production
# macOS-specific files
.DS_Store
```
Create the `Dockerfile` file at the root of your Astro project with following code:
```bash
ARG NODE_VERSION=20.11.0
FROM node:${NODE_VERSION}-slim as base
WORKDIR /app
# Set production environment
ENV NODE_ENV="production"
# Throw-away build stage to reduce size of final image
FROM base as build
# Install packages needed to build node modules
RUN apt-get update -qq && \
apt-get install --no-install-recommends -y build-essential node-gyp pkg-config python-is-python3
# Install node modules
COPY --link package-lock.json package.json ./
RUN npm install
# Copy application code
COPY --link . .
# Build application
RUN npm run build
# Final stage for app image
FROM base
# Copy built application
COPY --from=build /app/node_modules /app/node_modules
COPY --from=build /app/dist /app/dist
ENV PORT=80
ENV HOST=0.0.0.0
# Start the server by default, this can be overwritten at runtime
EXPOSE 80
CMD [ "node", "./dist/server/entry.mjs" ]
```
The Dockerfile above defines the following set of actions:
- Sets up Node.js 20.11.0.
- Sets the environment to `production` with `NODE_ENV` environment variable.
- Installs the dependencies of your Astro project.
- Builds the application with `astro build`.
- Sets the `PORT` environment variable to `80` (default port on Amazon ECS).
- Sets the `HOST` environment variable to `0.0.0.0` to listen to all incoming requests on the host.
- Runs the production server with `node ./dist/server/entry.mjs` command.
Let's move on to creating an Amazon VPC to accept traffic to your Astro application when deployed.
## Create an Amazon Virtual Private Cloud (VPC)
- Open the [Amazon VPC console](https://console.aws.amazon.com/vpc/). On the VPC dashboard, choose **Create VPC**.
In this guide, you will learn how to deploy an Astro SSR project to Amazon ECS on AWS Fargate. You will go through the process of setting up a new Astro project, enabling server-side rendering using the Node.js adapter, and finally deploying it to Amazon ECS on AWS Fargate.
## Table Of Contents
- [Prerequisites](#prerequisites)
- [Create a new Astro application](#create-a-new-astro-application)
- [Getting Started with the Node.js Adapter for Astro](#getting-started-with-the-nodejs-adapter-for-astro)
- [Dockerize your Astro application](#dockerize-your-astro-application)
- [Create an Amazon Virtual Private Cloud (VPC)](#create-an-amazon-virtual-private-cloud-vpc)
- [Create Amazon ECR private repository](#create-amazon-ecr-private-repository)
- [Configure your IAM Roles](#configure-your-iam-roles)
- [Create an Amazon ECS task definition](#create-an-amazon-ecs-task-definition)
- [Create an Amazon ECS Cluster](#create-an-amazon-ecs-cluster)
- [Create an Amazon ECS Service](#create-an-amazon-ecs-service)
- [Create access keys for IAM users](#create-access-keys-for-iam-users)
- [Create GitHub Actions for Continuous Deployment (CD) Workflow](#create-github-actions-for-continuous-deployment-cd-workflow)
- [Conclusion](#conclusion)
## Prerequisites
You'll need the following:
- [Node.js 20](https://nodejs.org/en/blog/announcements/v20-release-announce) or later
- An [AWS](https://aws.amazon.com/free) account
## Create a new Astro application
Let’s get started by creating a new Astro project. Open your terminal and run the following command:
```bash
npm create astro@latest my-app
```
`npm create astro` is the recommended way to scaffold an Astro project quickly.
When prompted, choose:
- `Empty` when prompted on how to start the new project.
- `Yes` when prompted if you plan to write TypeScript.
- `Strict` when prompted how strict TypeScript should be.
- `Yes` when prompted to install dependencies.
- `Yes` when prompted to initialize a git repository.
Once that’s done, you can move into the project directory and start the app:
```bash
cd my-app
npm run dev
```
The app should be running on [localhost:4321](http://localhost:4321/).
Next, in your first terminal window, run the command below to install the necessary libraries and packages for building the application:
```bash
npm install dotenv
```
The libraries installed include:
- `dotenv`: A library for handling environment variables.
Once it is installed, you'll need to add it to your `astro.config.mjs` file. Open the file and add the following code:
```tsx title="astro.config.mjs" ins={1}
import 'dotenv/config';
import { defineConfig } from 'astro/config';
export default defineConfig({});
```
Let's move on to enable Server-Side Rendering by using the Node.js adapter.
## Getting Started with the Node.js Adapter for Astro
Before deploying your Astro project, you need to install the `@astrojs/node` adapter. This is easily done via the Astro CLI:
```bash
npm install @astrojs/node
```
The libraries installed include:
- `@astrojs/node`: An adapter that prepares Astro websites to be run as a Node.js server.
Once the adapter is installed, you'll need to add it to your `astro.config.mjs` file. Open the file and add the following code:
```tsx title="astro.config.mjs" ins={1,5-8}
import node from '@astrojs/node';
import { defineConfig } from 'astro/config';
export default defineConfig({
output: "server",
adapter: node({
mode: 'standalone'
}),
});
```
Let's move on to dockerizing your Astro application.
## Dockerize your Astro application
Deploying to Amazon ECS on AWS Fargate requires an AWS ECR repository to be created. Imagine ECR as a handler of Docker based deployments.
To dockerize your Astro application, you're going to create two files at the root of your Astro project:
- `.dockerignore`: The set of files that would not be included in your Docker image.
- `Dockerfile`: The set of instructions that would be executed while your Docker image builds.
Create the `.dockerignore` file at the root of your Astro project with following code:
```
# build output
dist/
# generated types
.astro/
# dependencies
node_modules/
# logs
npm-debug.log*
yarn-debug.log*
yarn-error.log*
pnpm-debug.log*
# environment variables
.env
.env.production
# macOS-specific files
.DS_Store
```
Create the `Dockerfile` file at the root of your Astro project with following code:
```bash
ARG NODE_VERSION=20.11.0
FROM node:${NODE_VERSION}-slim as base
WORKDIR /app
# Set production environment
ENV NODE_ENV="production"
# Throw-away build stage to reduce size of final image
FROM base as build
# Install packages needed to build node modules
RUN apt-get update -qq && \
apt-get install --no-install-recommends -y build-essential node-gyp pkg-config python-is-python3
# Install node modules
COPY --link package-lock.json package.json ./
RUN npm install
# Copy application code
COPY --link . .
# Build application
RUN npm run build
# Final stage for app image
FROM base
# Copy built application
COPY --from=build /app/node_modules /app/node_modules
COPY --from=build /app/dist /app/dist
ENV PORT=80
ENV HOST=0.0.0.0
# Start the server by default, this can be overwritten at runtime
EXPOSE 80
CMD [ "node", "./dist/server/entry.mjs" ]
```
The Dockerfile above defines the following set of actions:
- Sets up Node.js 20.11.0.
- Sets the environment to `production` with `NODE_ENV` environment variable.
- Installs the dependencies of your Astro project.
- Builds the application with `astro build`.
- Sets the `PORT` environment variable to `80` (default port on Amazon ECS).
- Sets the `HOST` environment variable to `0.0.0.0` to listen to all incoming requests on the host.
- Runs the production server with `node ./dist/server/entry.mjs` command.
Let's move on to creating an Amazon VPC to accept traffic to your Astro application when deployed.
## Create an Amazon Virtual Private Cloud (VPC)
- Open the [Amazon VPC console](https://console.aws.amazon.com/vpc/). On the VPC dashboard, choose **Create VPC**.
 - Go with the default configuration setup by Amazon, and choose **Create VPC**.
 and you are now done with setting up Amazon VPC for your account. Let's move on to creating an Amazon ECR image repository.
## Create Amazon ECR private repository
- Open the [Amazon ECR console](https://console.aws.amazon.com/ecr/repositories), and click **Get started**.
and you are now done with setting up Amazon VPC for your account. Let's move on to creating an Amazon ECR image repository.
## Create Amazon ECR private repository
- Open the [Amazon ECR console](https://console.aws.amazon.com/ecr/repositories), and click **Get started**.
 - Enter a repository name, say `astro-repo` for example. Scroll down and choose **Create repository**.
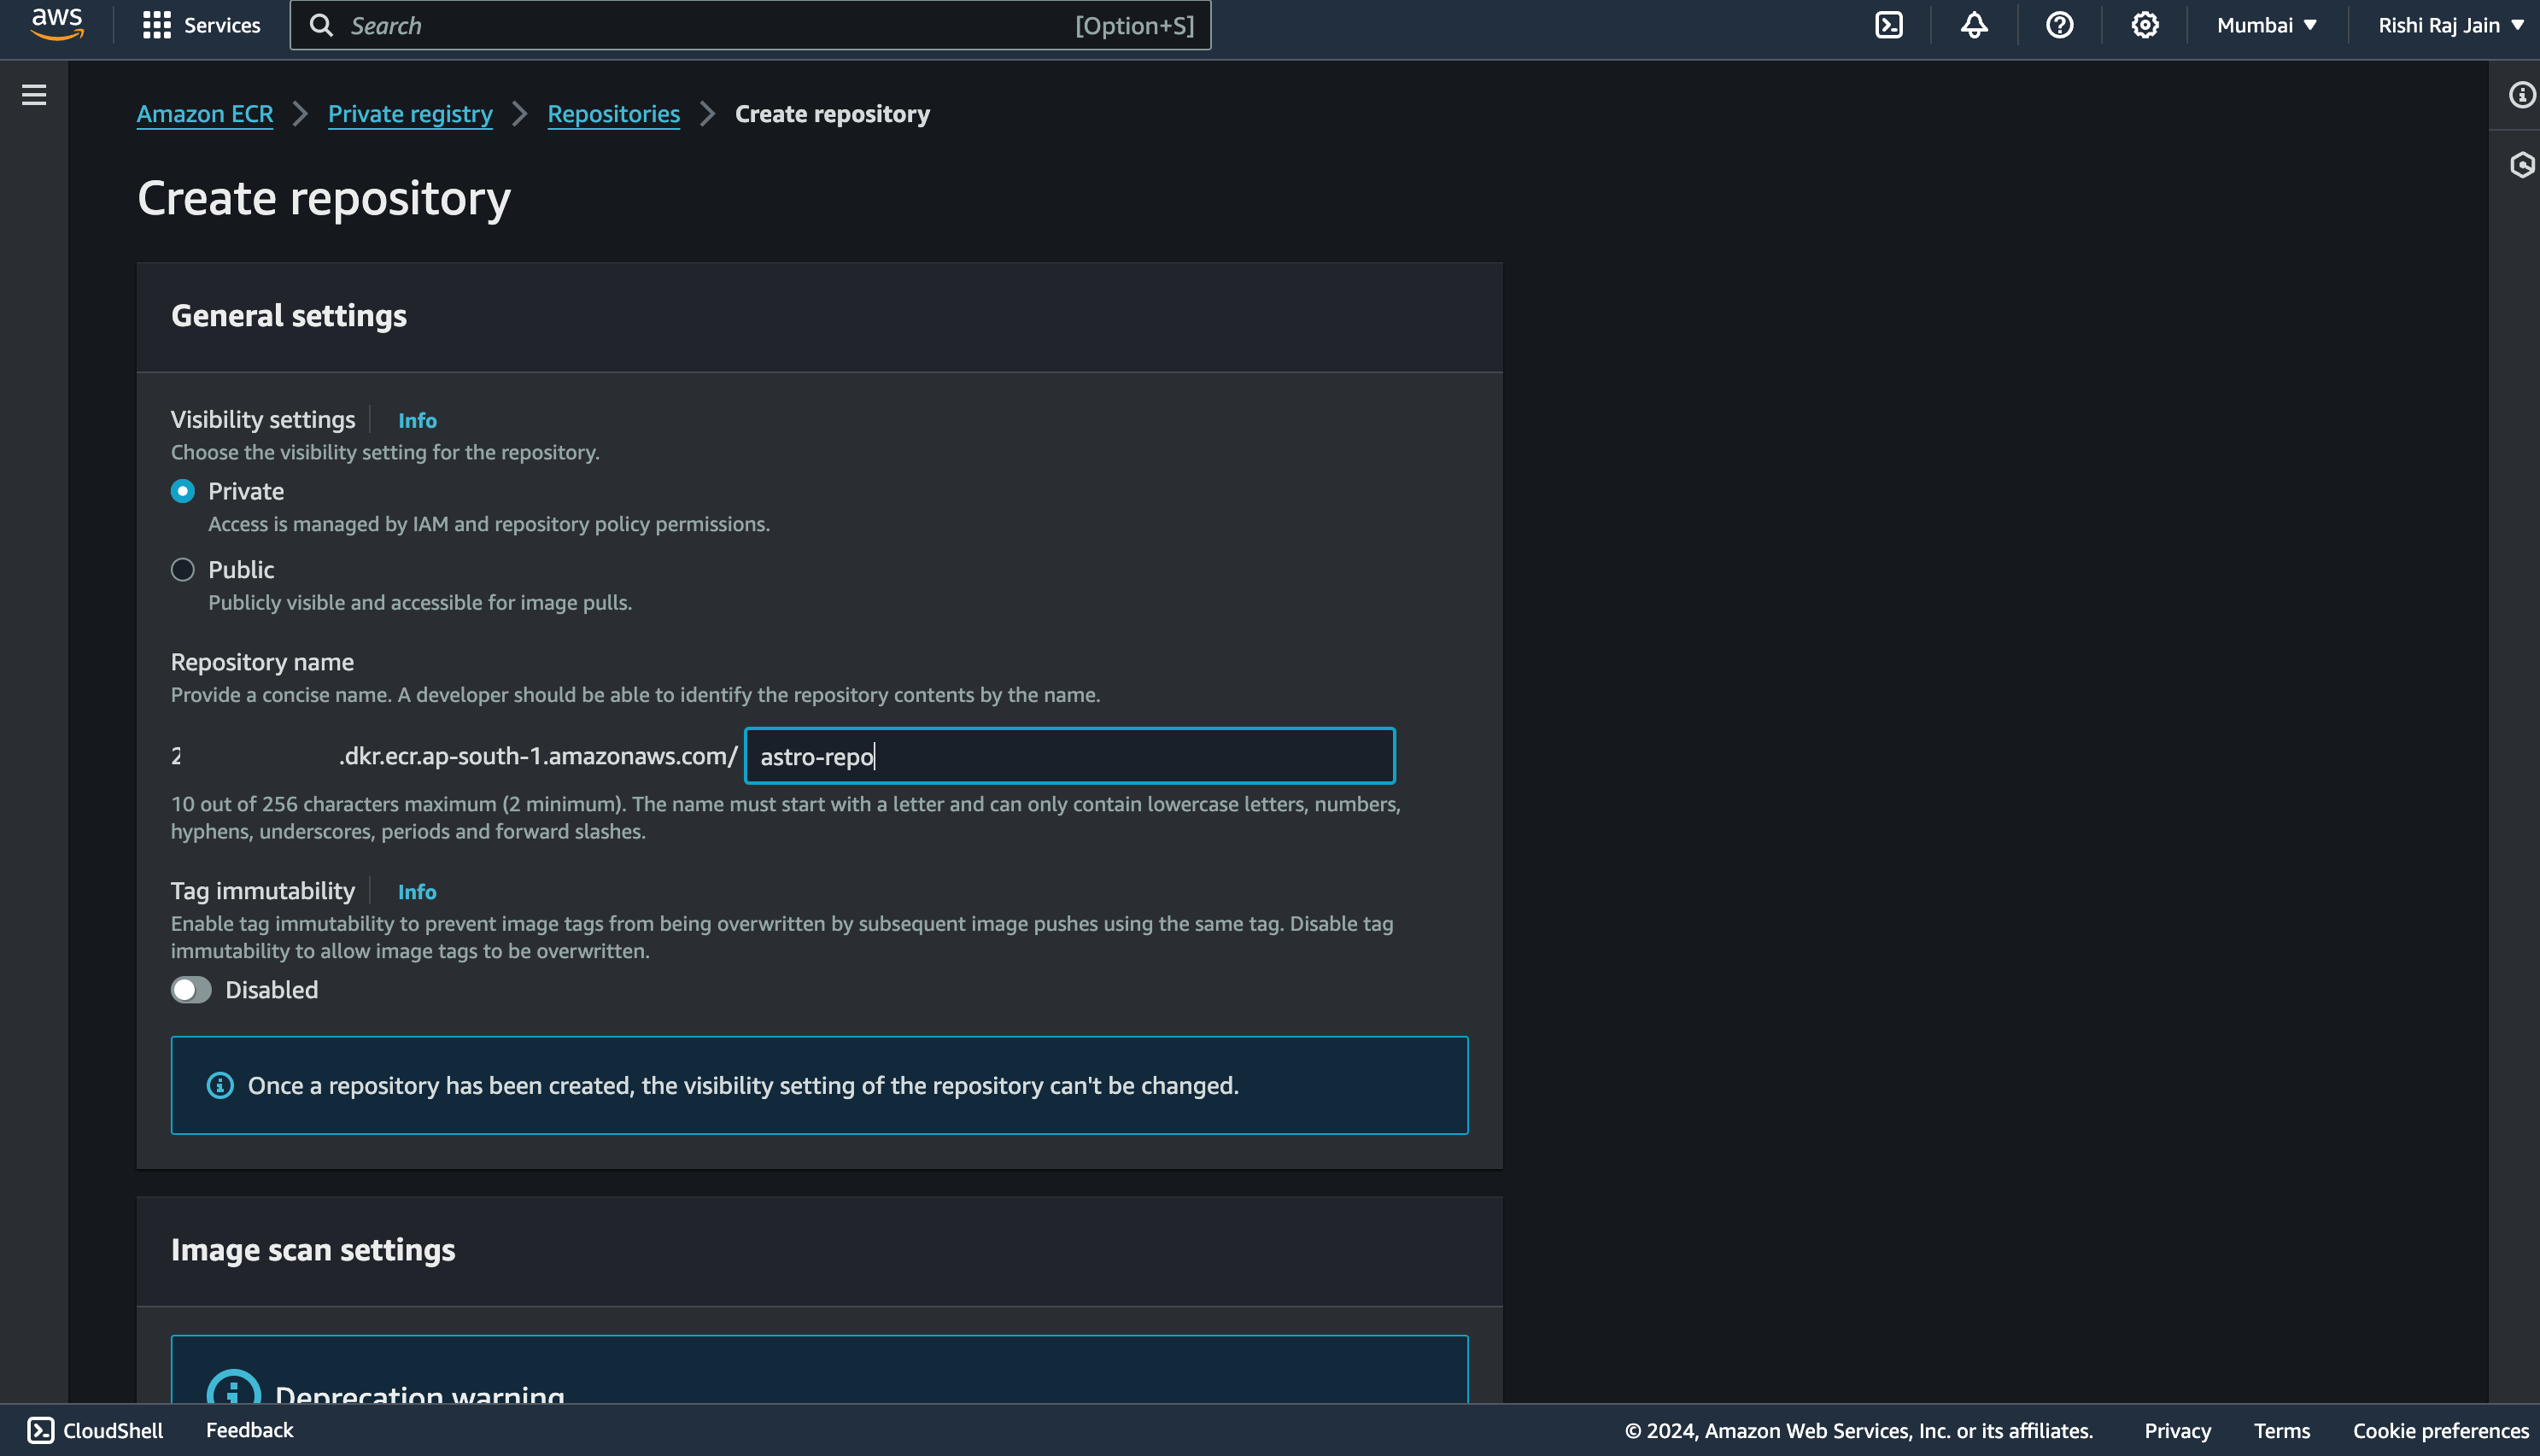 and you are now done with setting up an Amazon ECR repository.
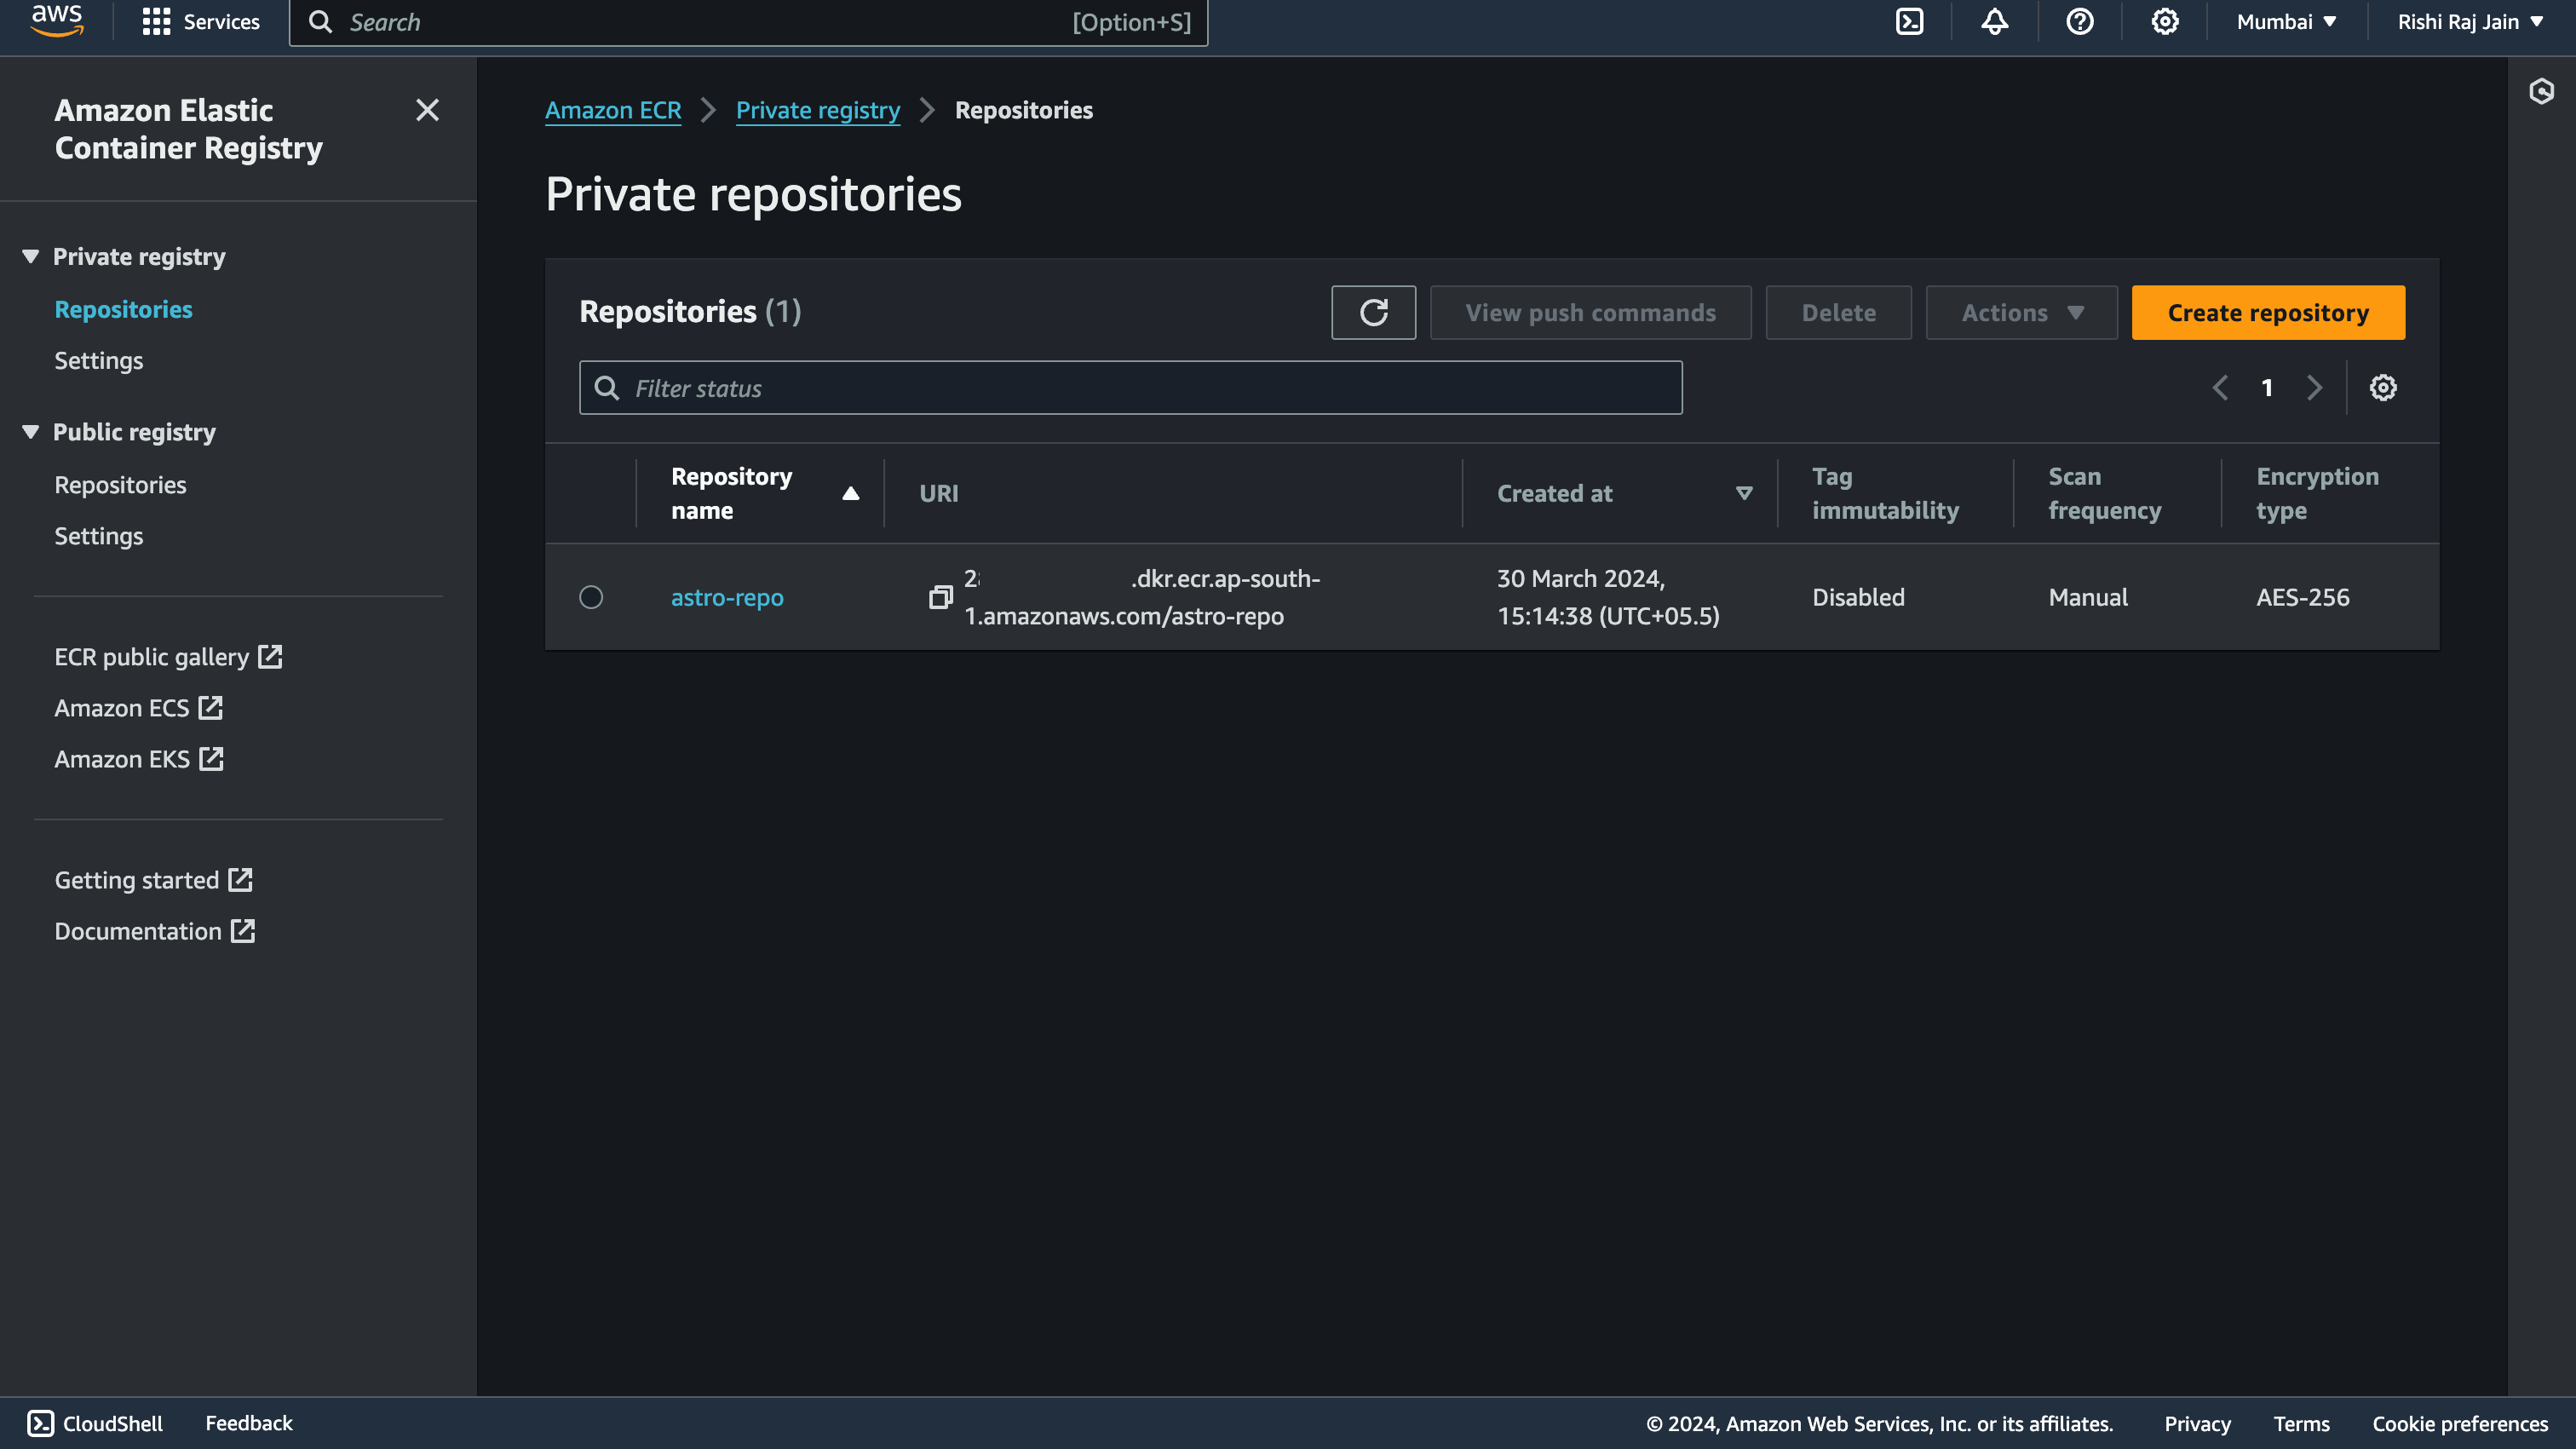 Let’s move on to configuring IAM roles for your account.
## Configure your IAM Roles
- Open the [IAM console](https://console.aws.amazon.com/iam/), and click **Create role**.
Let’s move on to configuring IAM roles for your account.
## Configure your IAM Roles
- Open the [IAM console](https://console.aws.amazon.com/iam/), and click **Create role**.
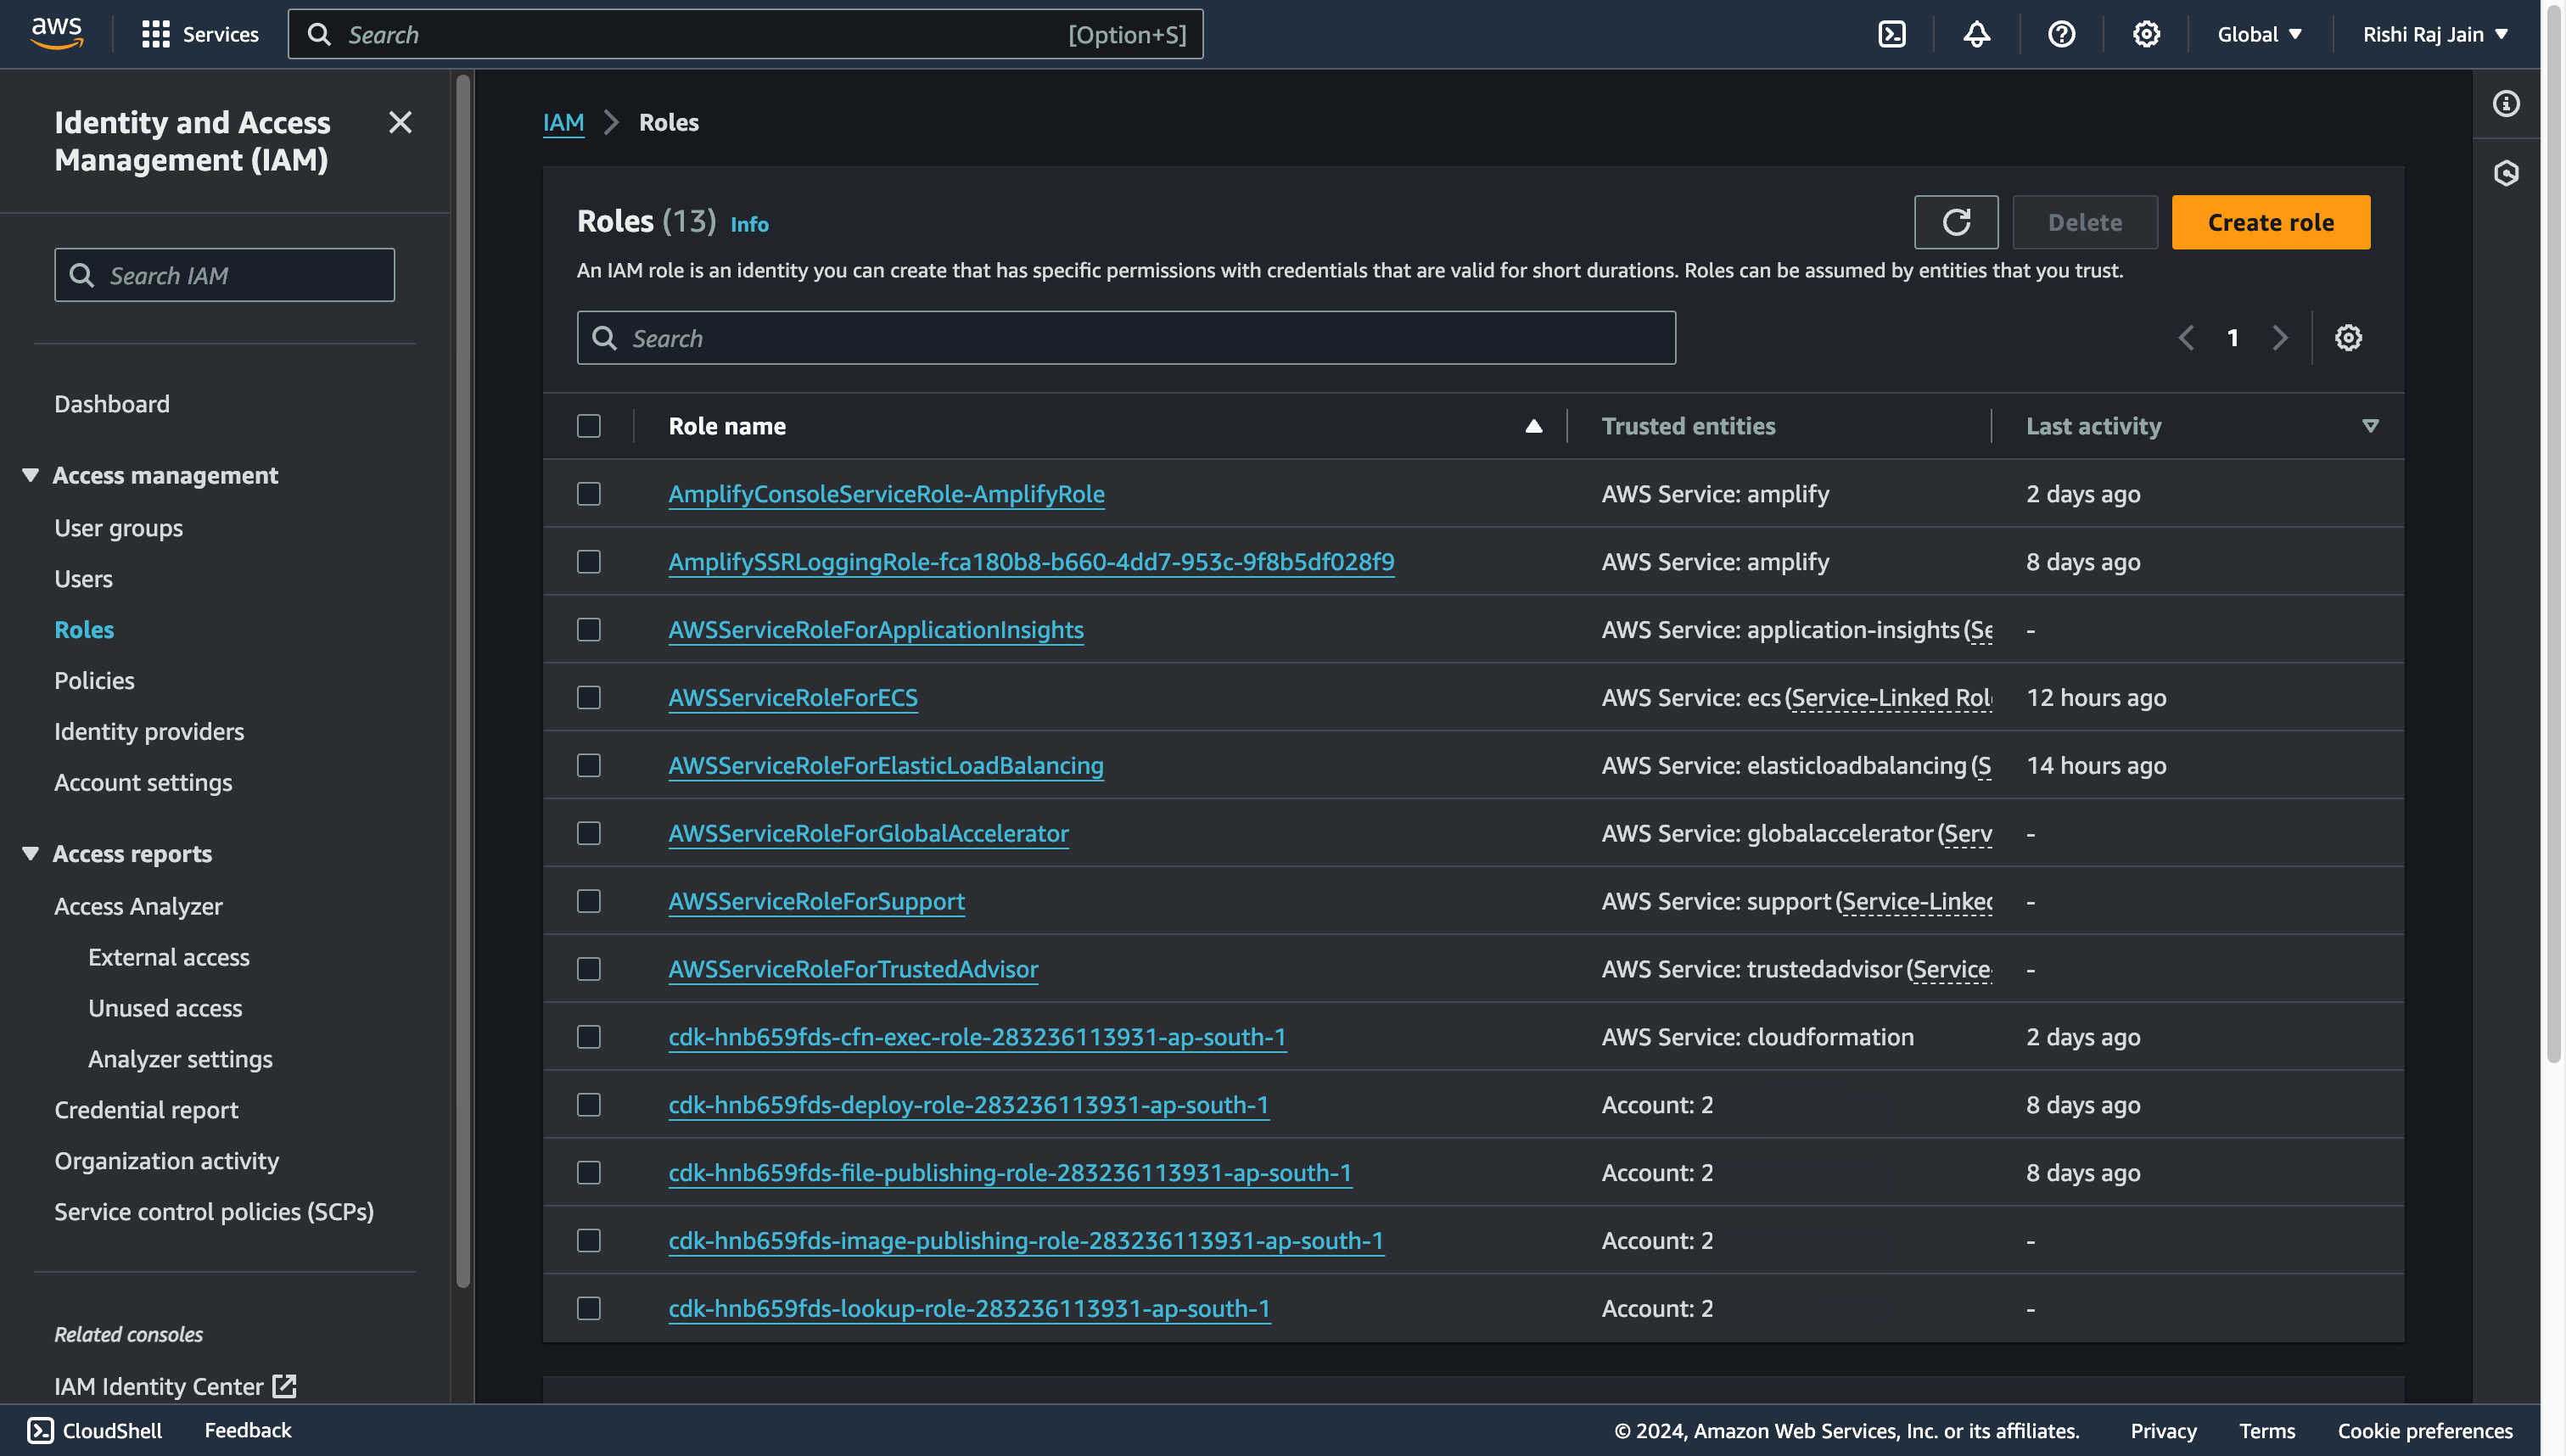 - Select **AWS Service** and choose **Elastic Container Service** as the Service or use case.
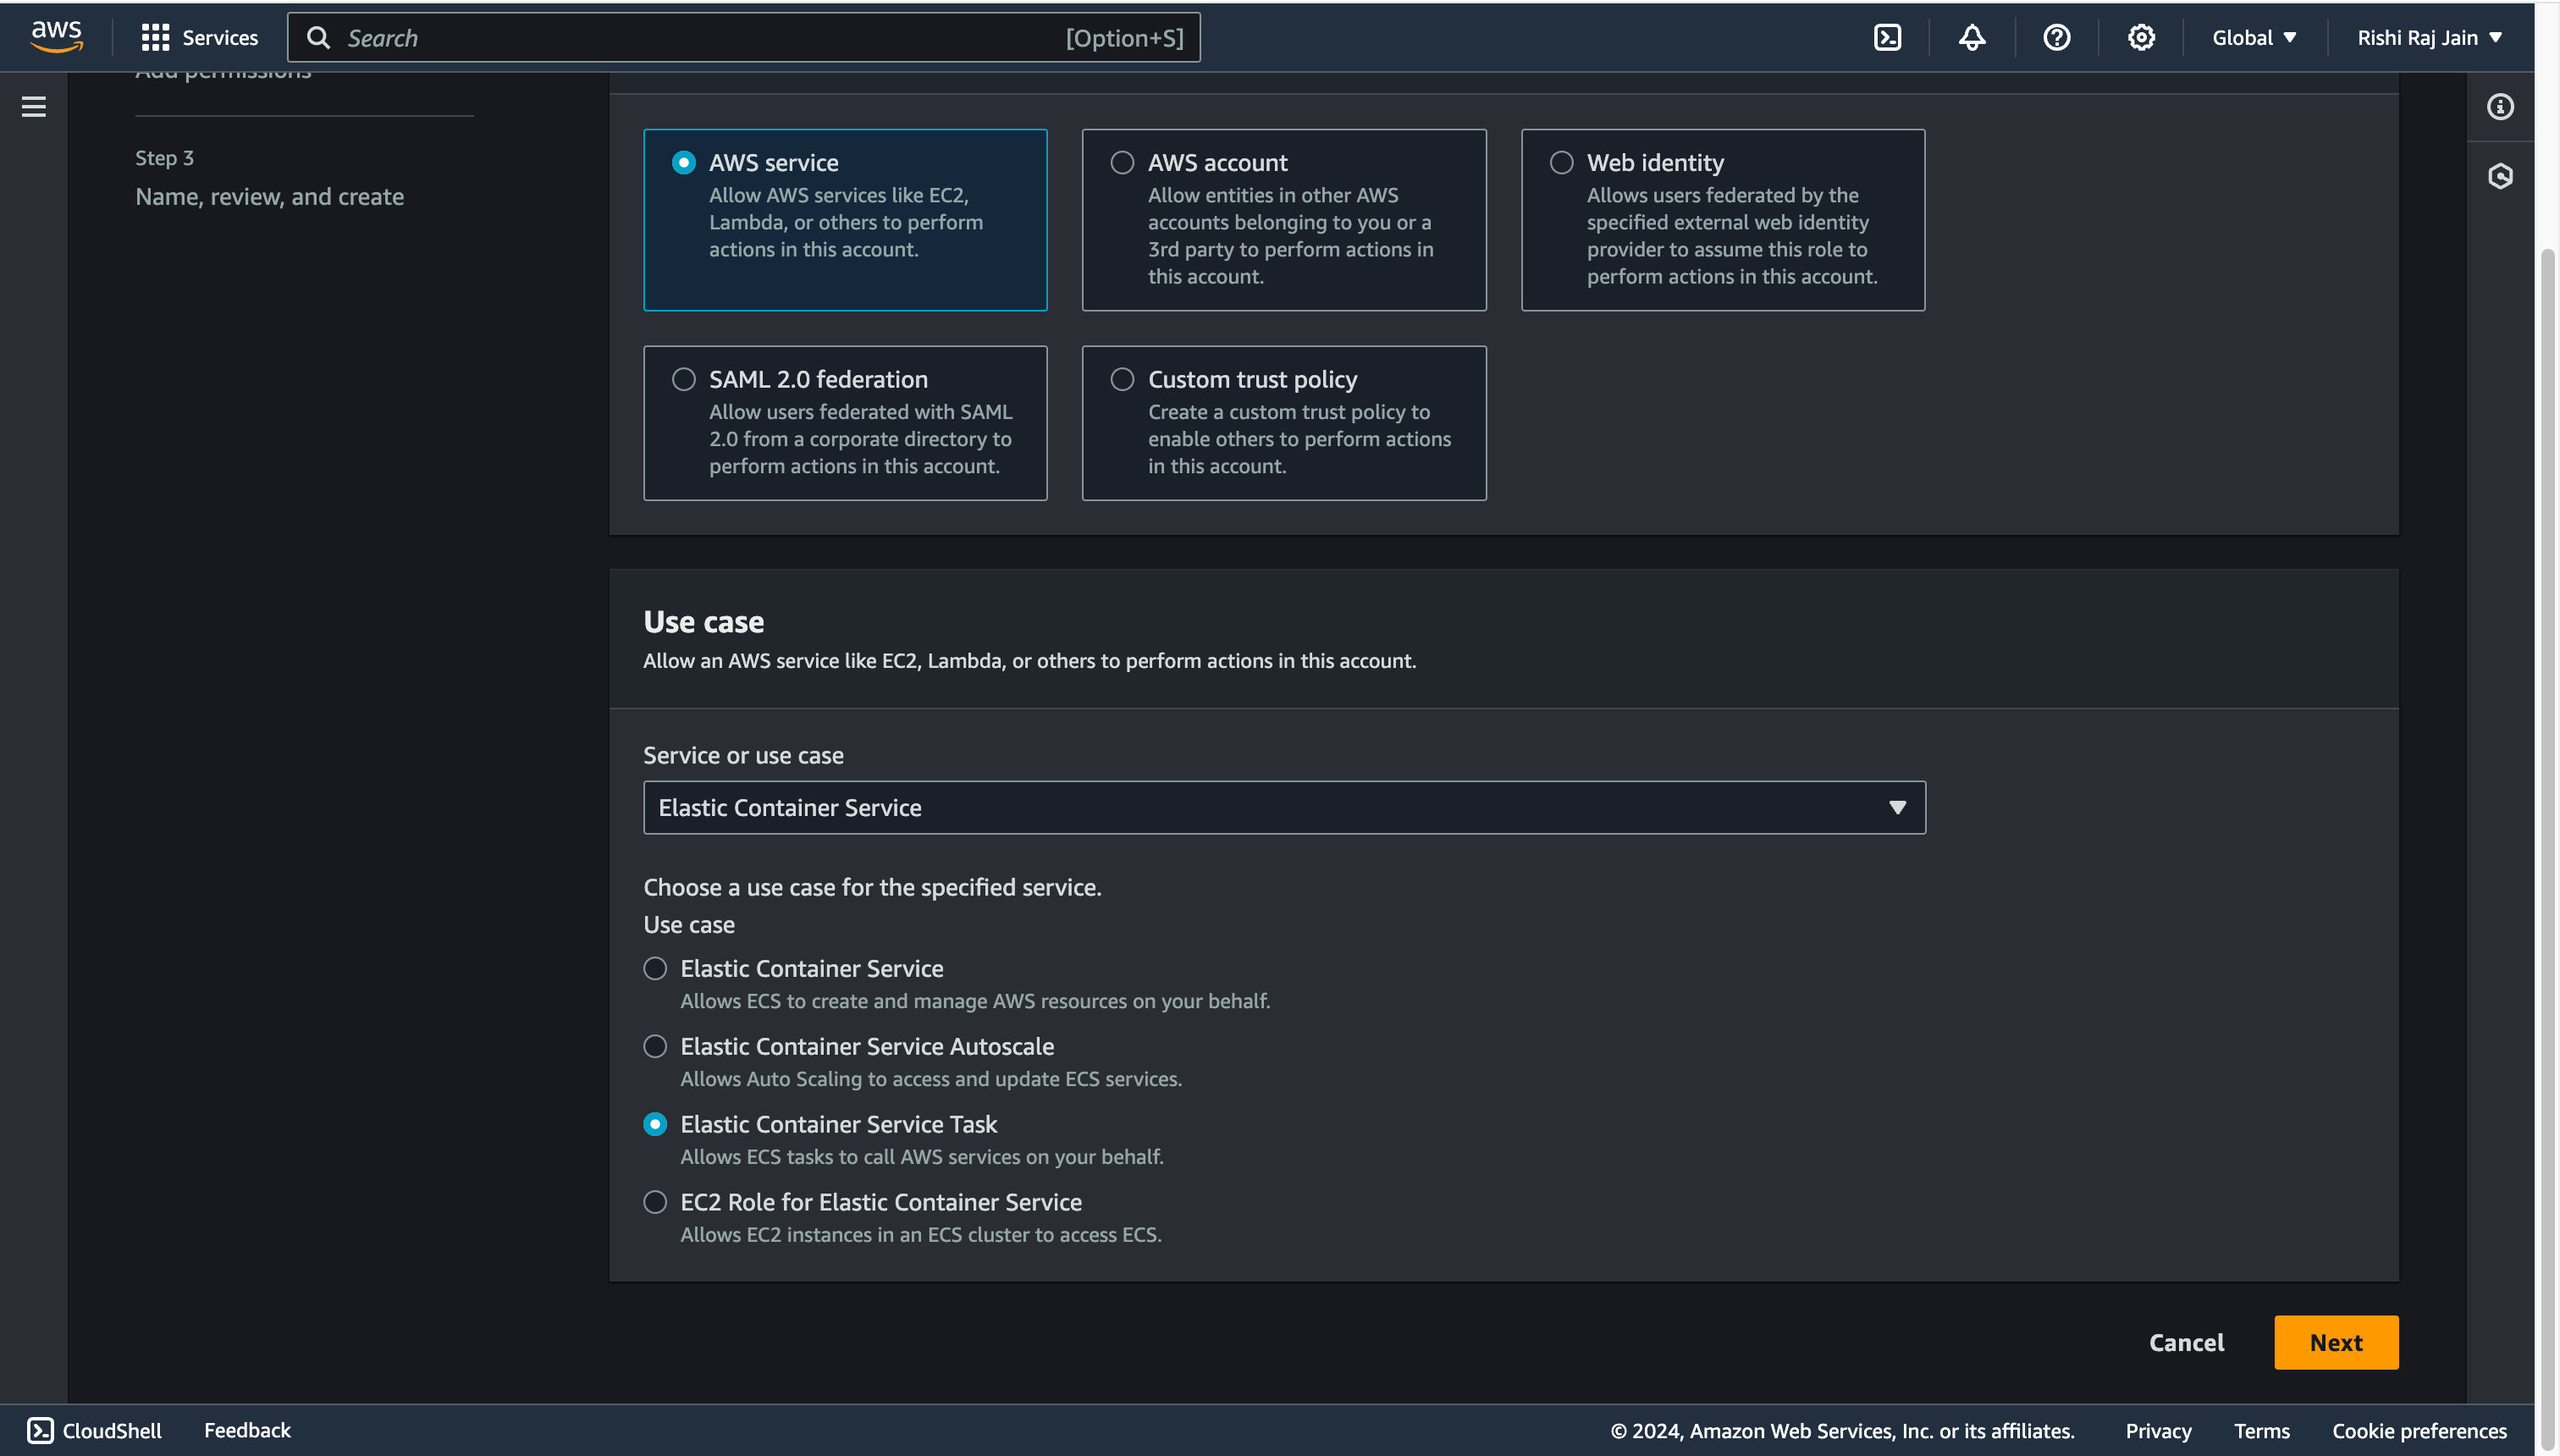 - Filter the large set of permissions policies, select **AmazonECS_FullAccess** only and click **Next**.
 - Enter `ecsTaskRole` as the **Role name**.
 - Go back to the IAM Console, and click **Create role**.
 - Enter `ecsTaskExecutionRole` as the **Role name**.
 and you are now done with setting up IAM Roles for your account. Let’s move on to creating an Amazon ECS task definition.
## Create an Amazon ECS task definition
- Open the [Amazon ECS Console](https://console.aws.amazon.com/ecs/v2) and choose **Task Definitions**. Further, select **Create new task definition with JSON**.
and you are now done with setting up IAM Roles for your account. Let’s move on to creating an Amazon ECS task definition.
## Create an Amazon ECS task definition
- Open the [Amazon ECS Console](https://console.aws.amazon.com/ecs/v2) and choose **Task Definitions**. Further, select **Create new task definition with JSON**.
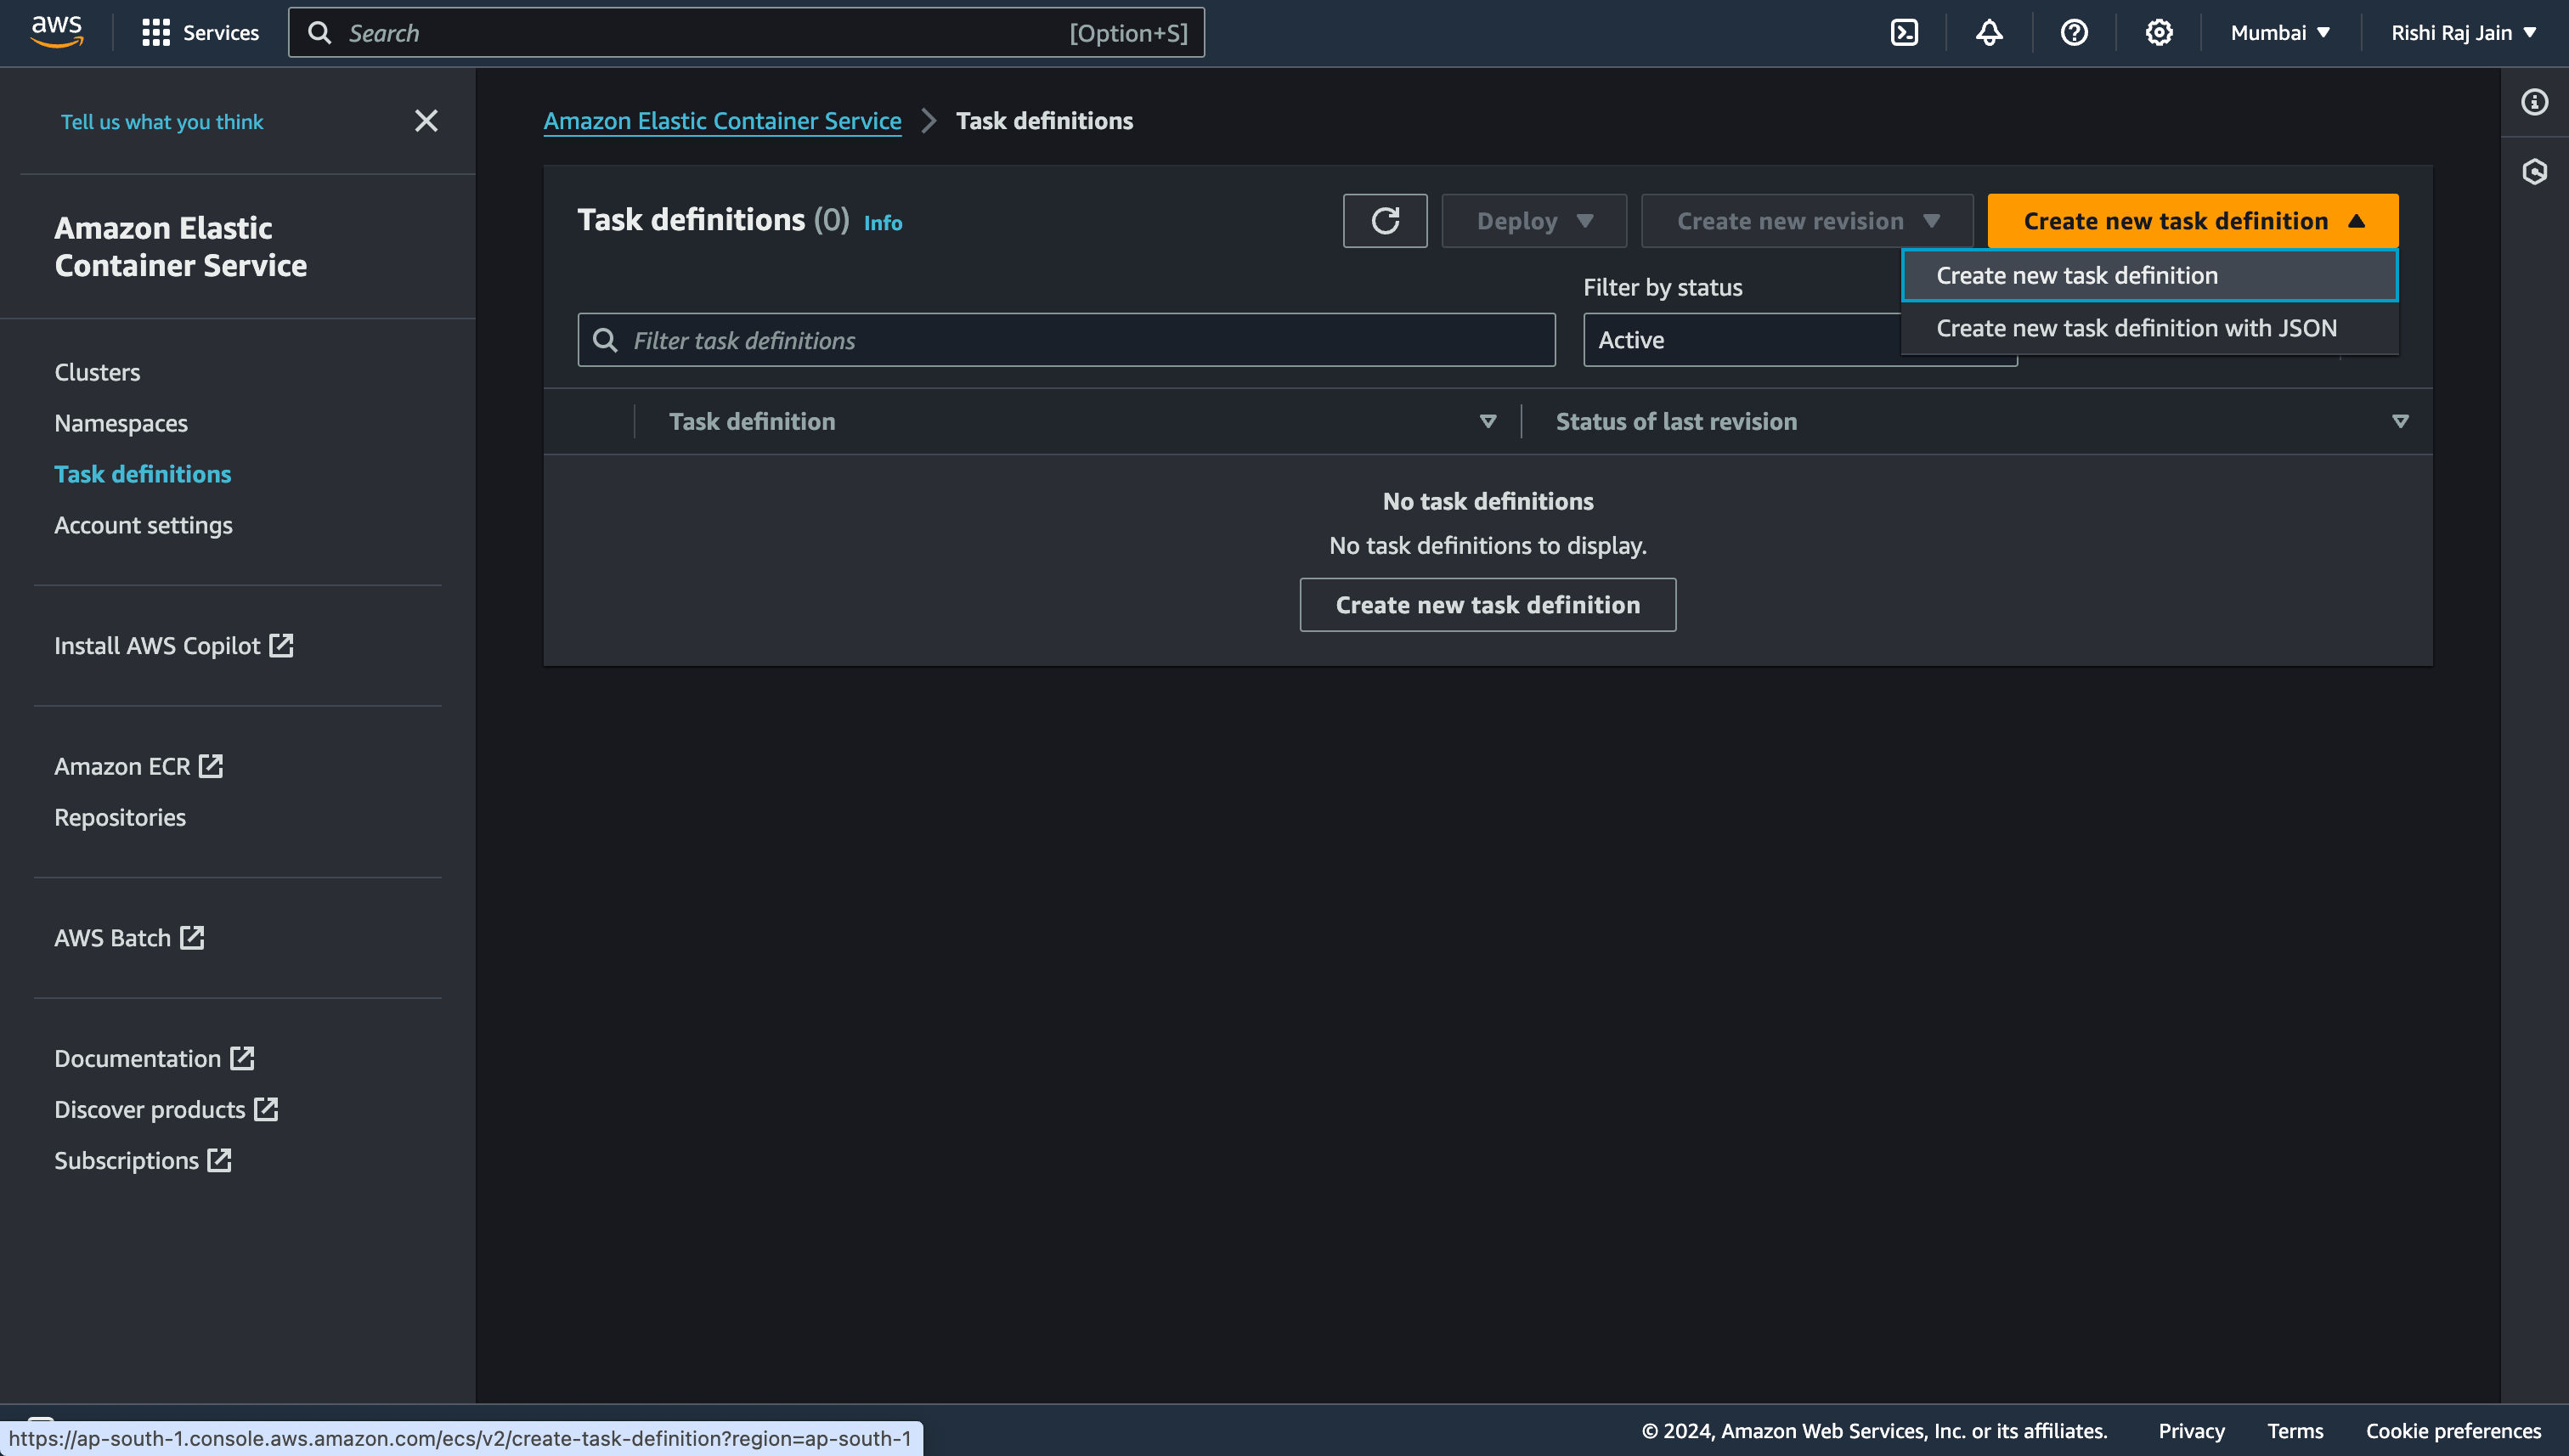 - Copy the following JSON in the field, and click **Create**.
```json
{
"containerDefinitions": [
{
"cpu": 256,
"memory": 512,
"portMappings": [
{
"containerPort": 80,
"hostPort": 80,
"protocol": "tcp"
}
],
"essential": true,
"name": "fargate-app",
"image": "2*.dkr.ecr.ap-south-1.amazonaws.com/repos-astro" // enter your own repo URI
}
],
"cpu": "1024",
"memory": "3072",
"family": "sample-fargate",
"networkMode": "awsvpc",
"taskRoleArn": "arn:aws:iam::2*:role/ecsTaskRole", // Enter your own account's role ID
"executionRoleArn": "arn:aws:iam::2*:role/ecsTaskExecutionRole" // Enter your own account's role ID
}
```
- Copy the following JSON in the field, and click **Create**.
```json
{
"containerDefinitions": [
{
"cpu": 256,
"memory": 512,
"portMappings": [
{
"containerPort": 80,
"hostPort": 80,
"protocol": "tcp"
}
],
"essential": true,
"name": "fargate-app",
"image": "2*.dkr.ecr.ap-south-1.amazonaws.com/repos-astro" // enter your own repo URI
}
],
"cpu": "1024",
"memory": "3072",
"family": "sample-fargate",
"networkMode": "awsvpc",
"taskRoleArn": "arn:aws:iam::2*:role/ecsTaskRole", // Enter your own account's role ID
"executionRoleArn": "arn:aws:iam::2*:role/ecsTaskExecutionRole" // Enter your own account's role ID
}
```
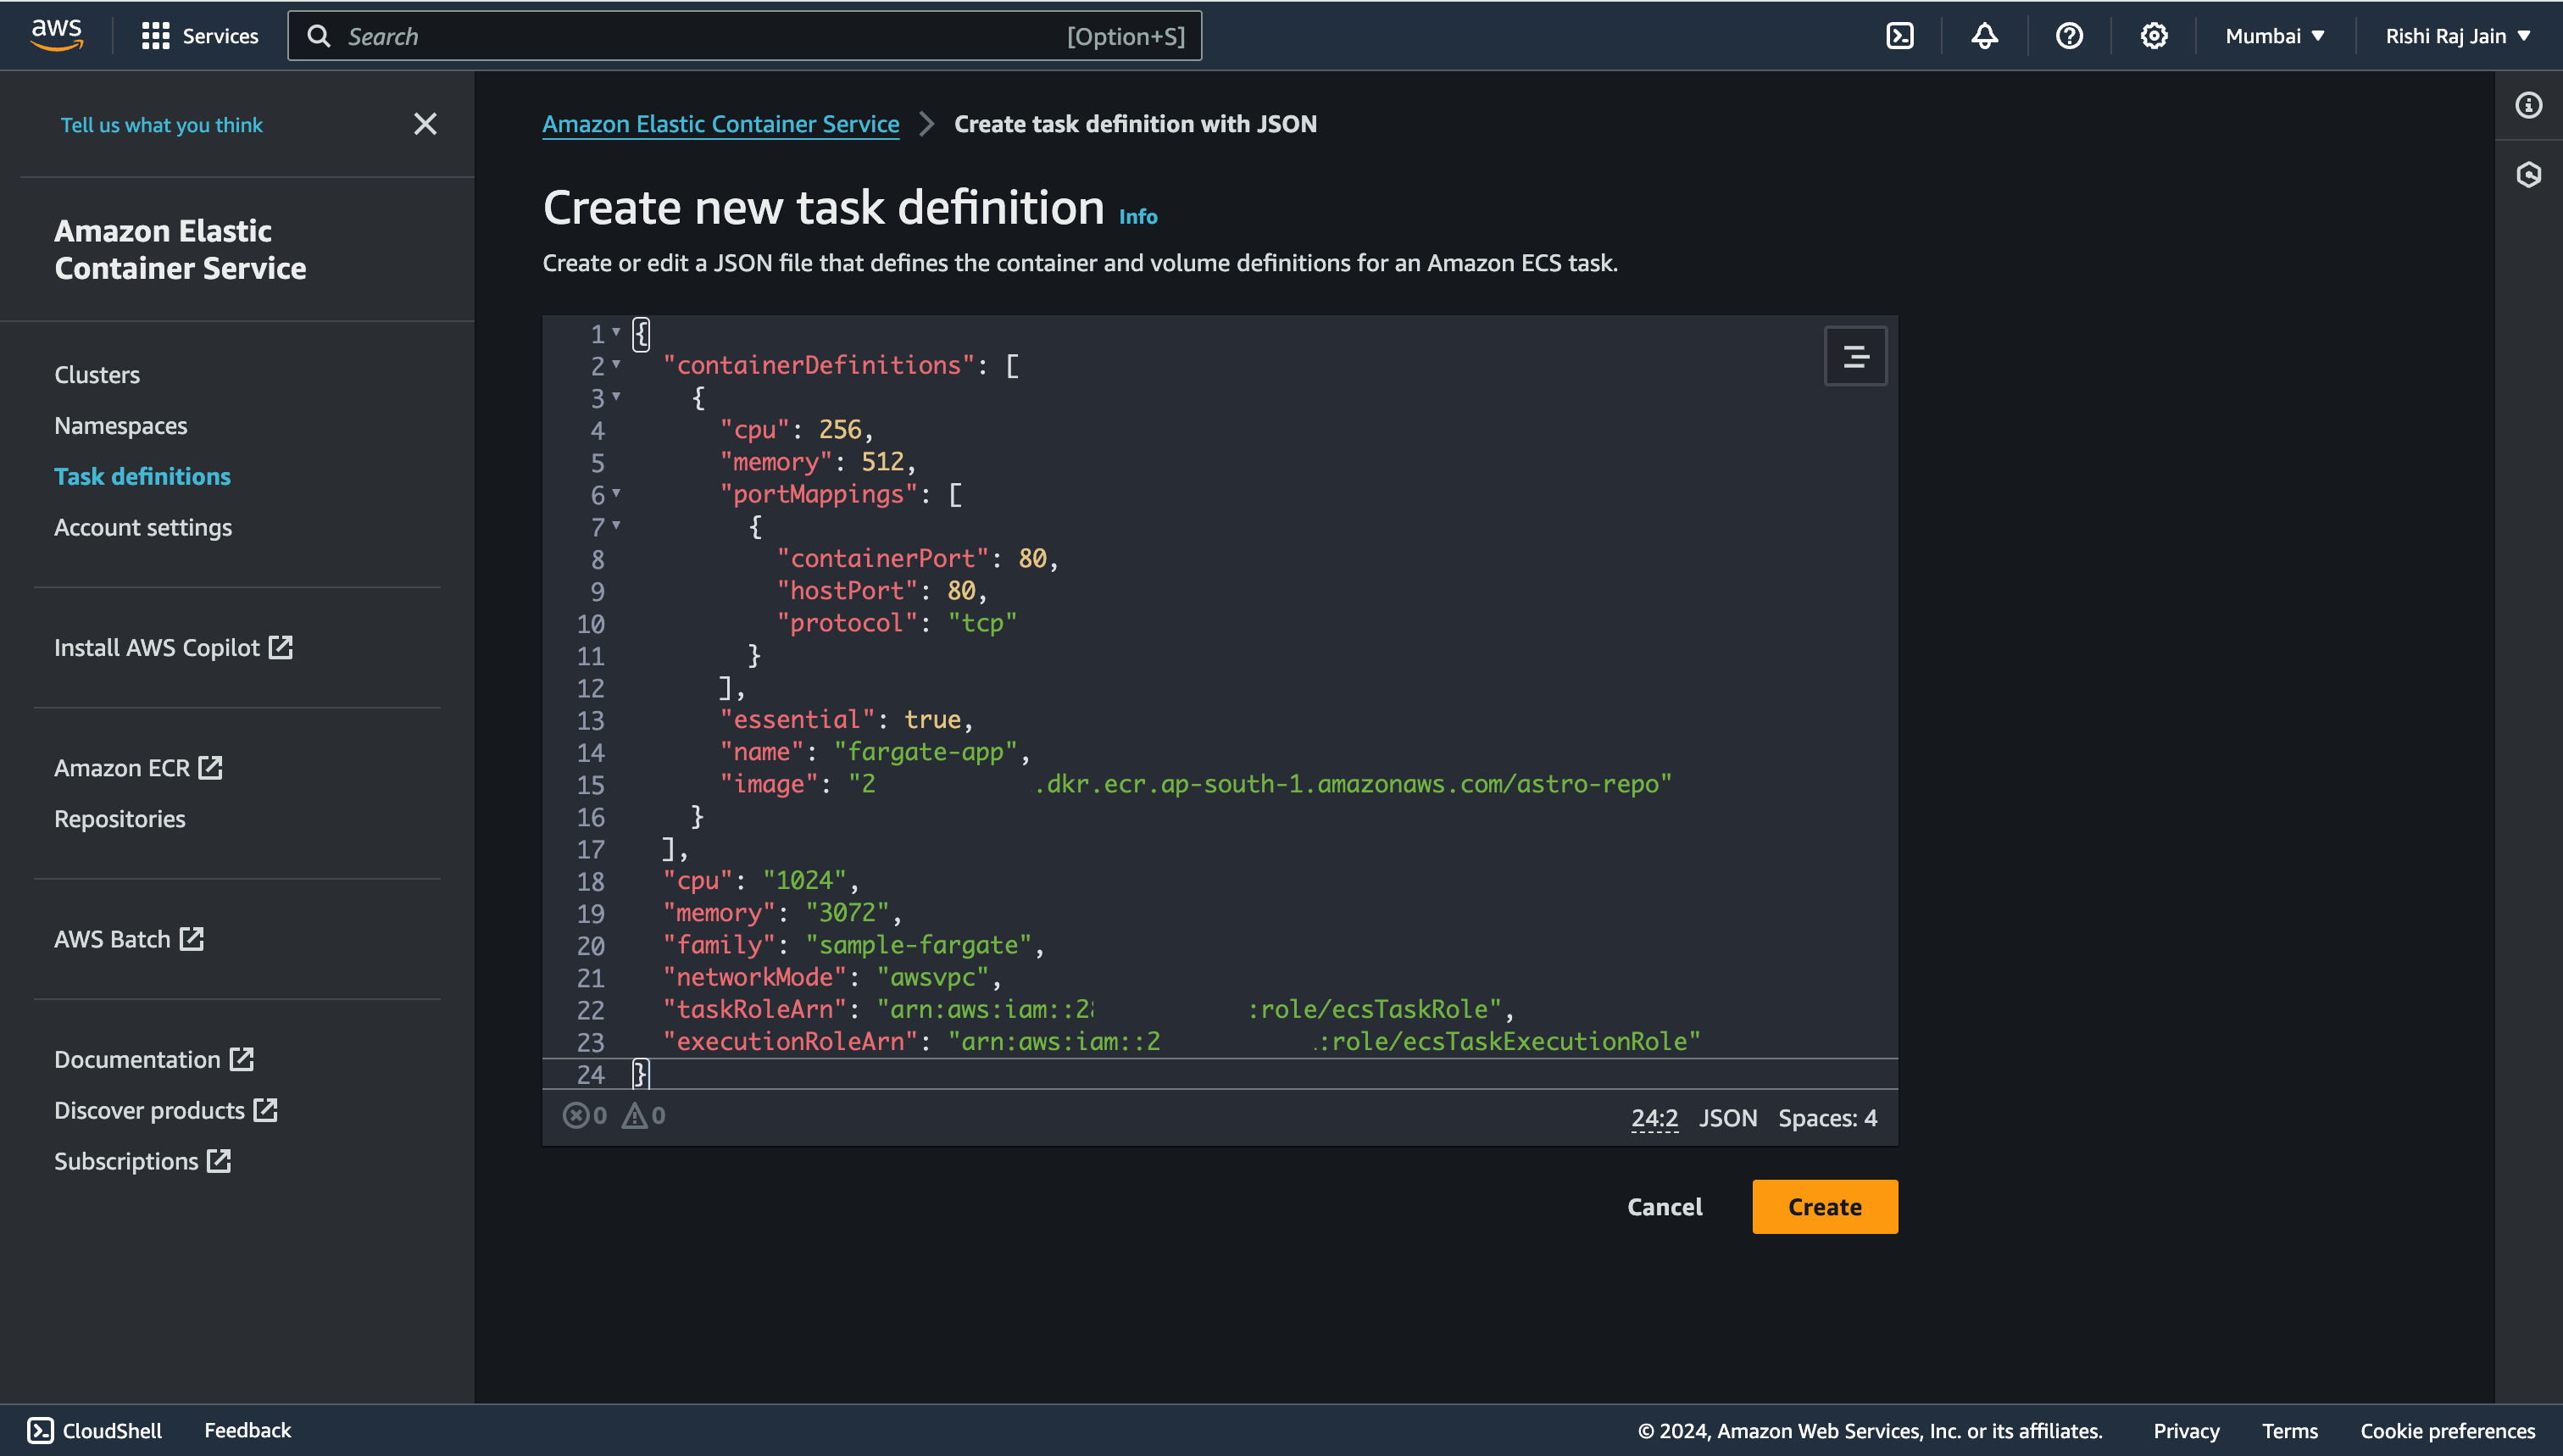 and you are now done with setting up an Amazon ECS task definition for your service. Let's move on to creating an Amazon ECS Cluster.
## Create an Amazon ECS Cluster
- Open [Amazon ECS Console](https://console.aws.amazon.com/ecs/v2) and click **Create cluster**.
and you are now done with setting up an Amazon ECS task definition for your service. Let's move on to creating an Amazon ECS Cluster.
## Create an Amazon ECS Cluster
- Open [Amazon ECS Console](https://console.aws.amazon.com/ecs/v2) and click **Create cluster**.
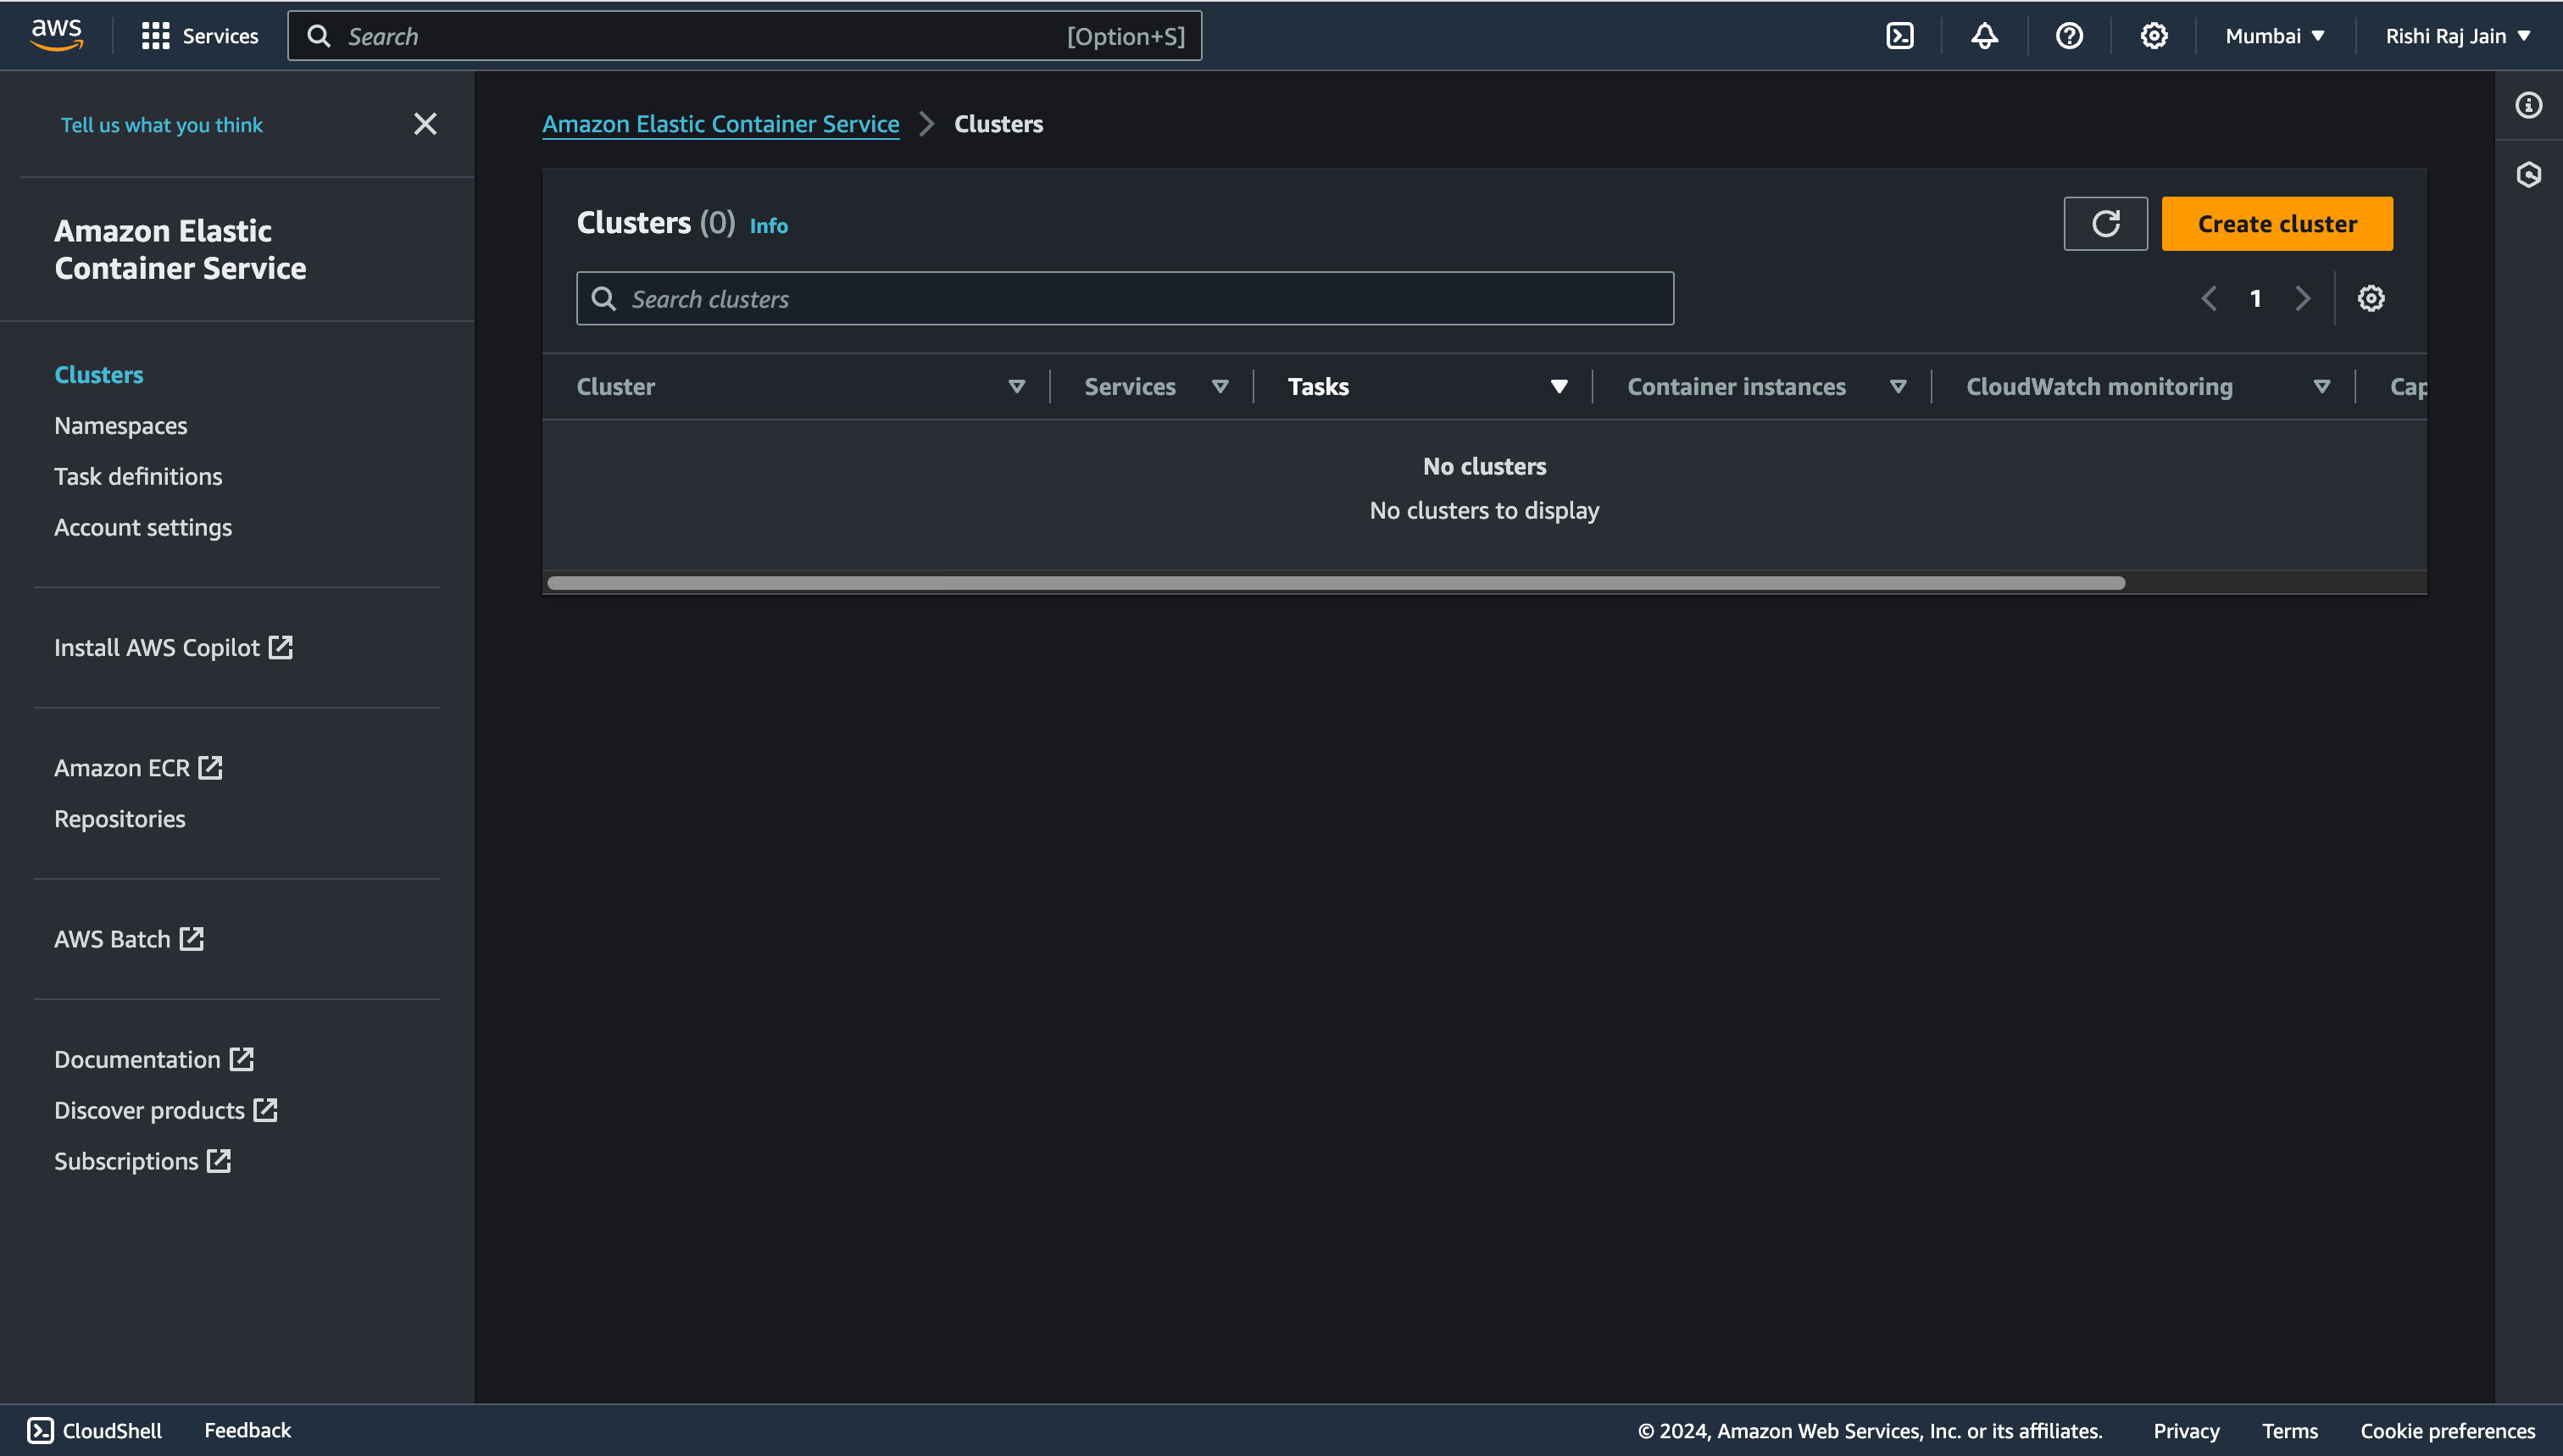 - Enter name for your cluster, say `new-cluster` and choose **Create**.
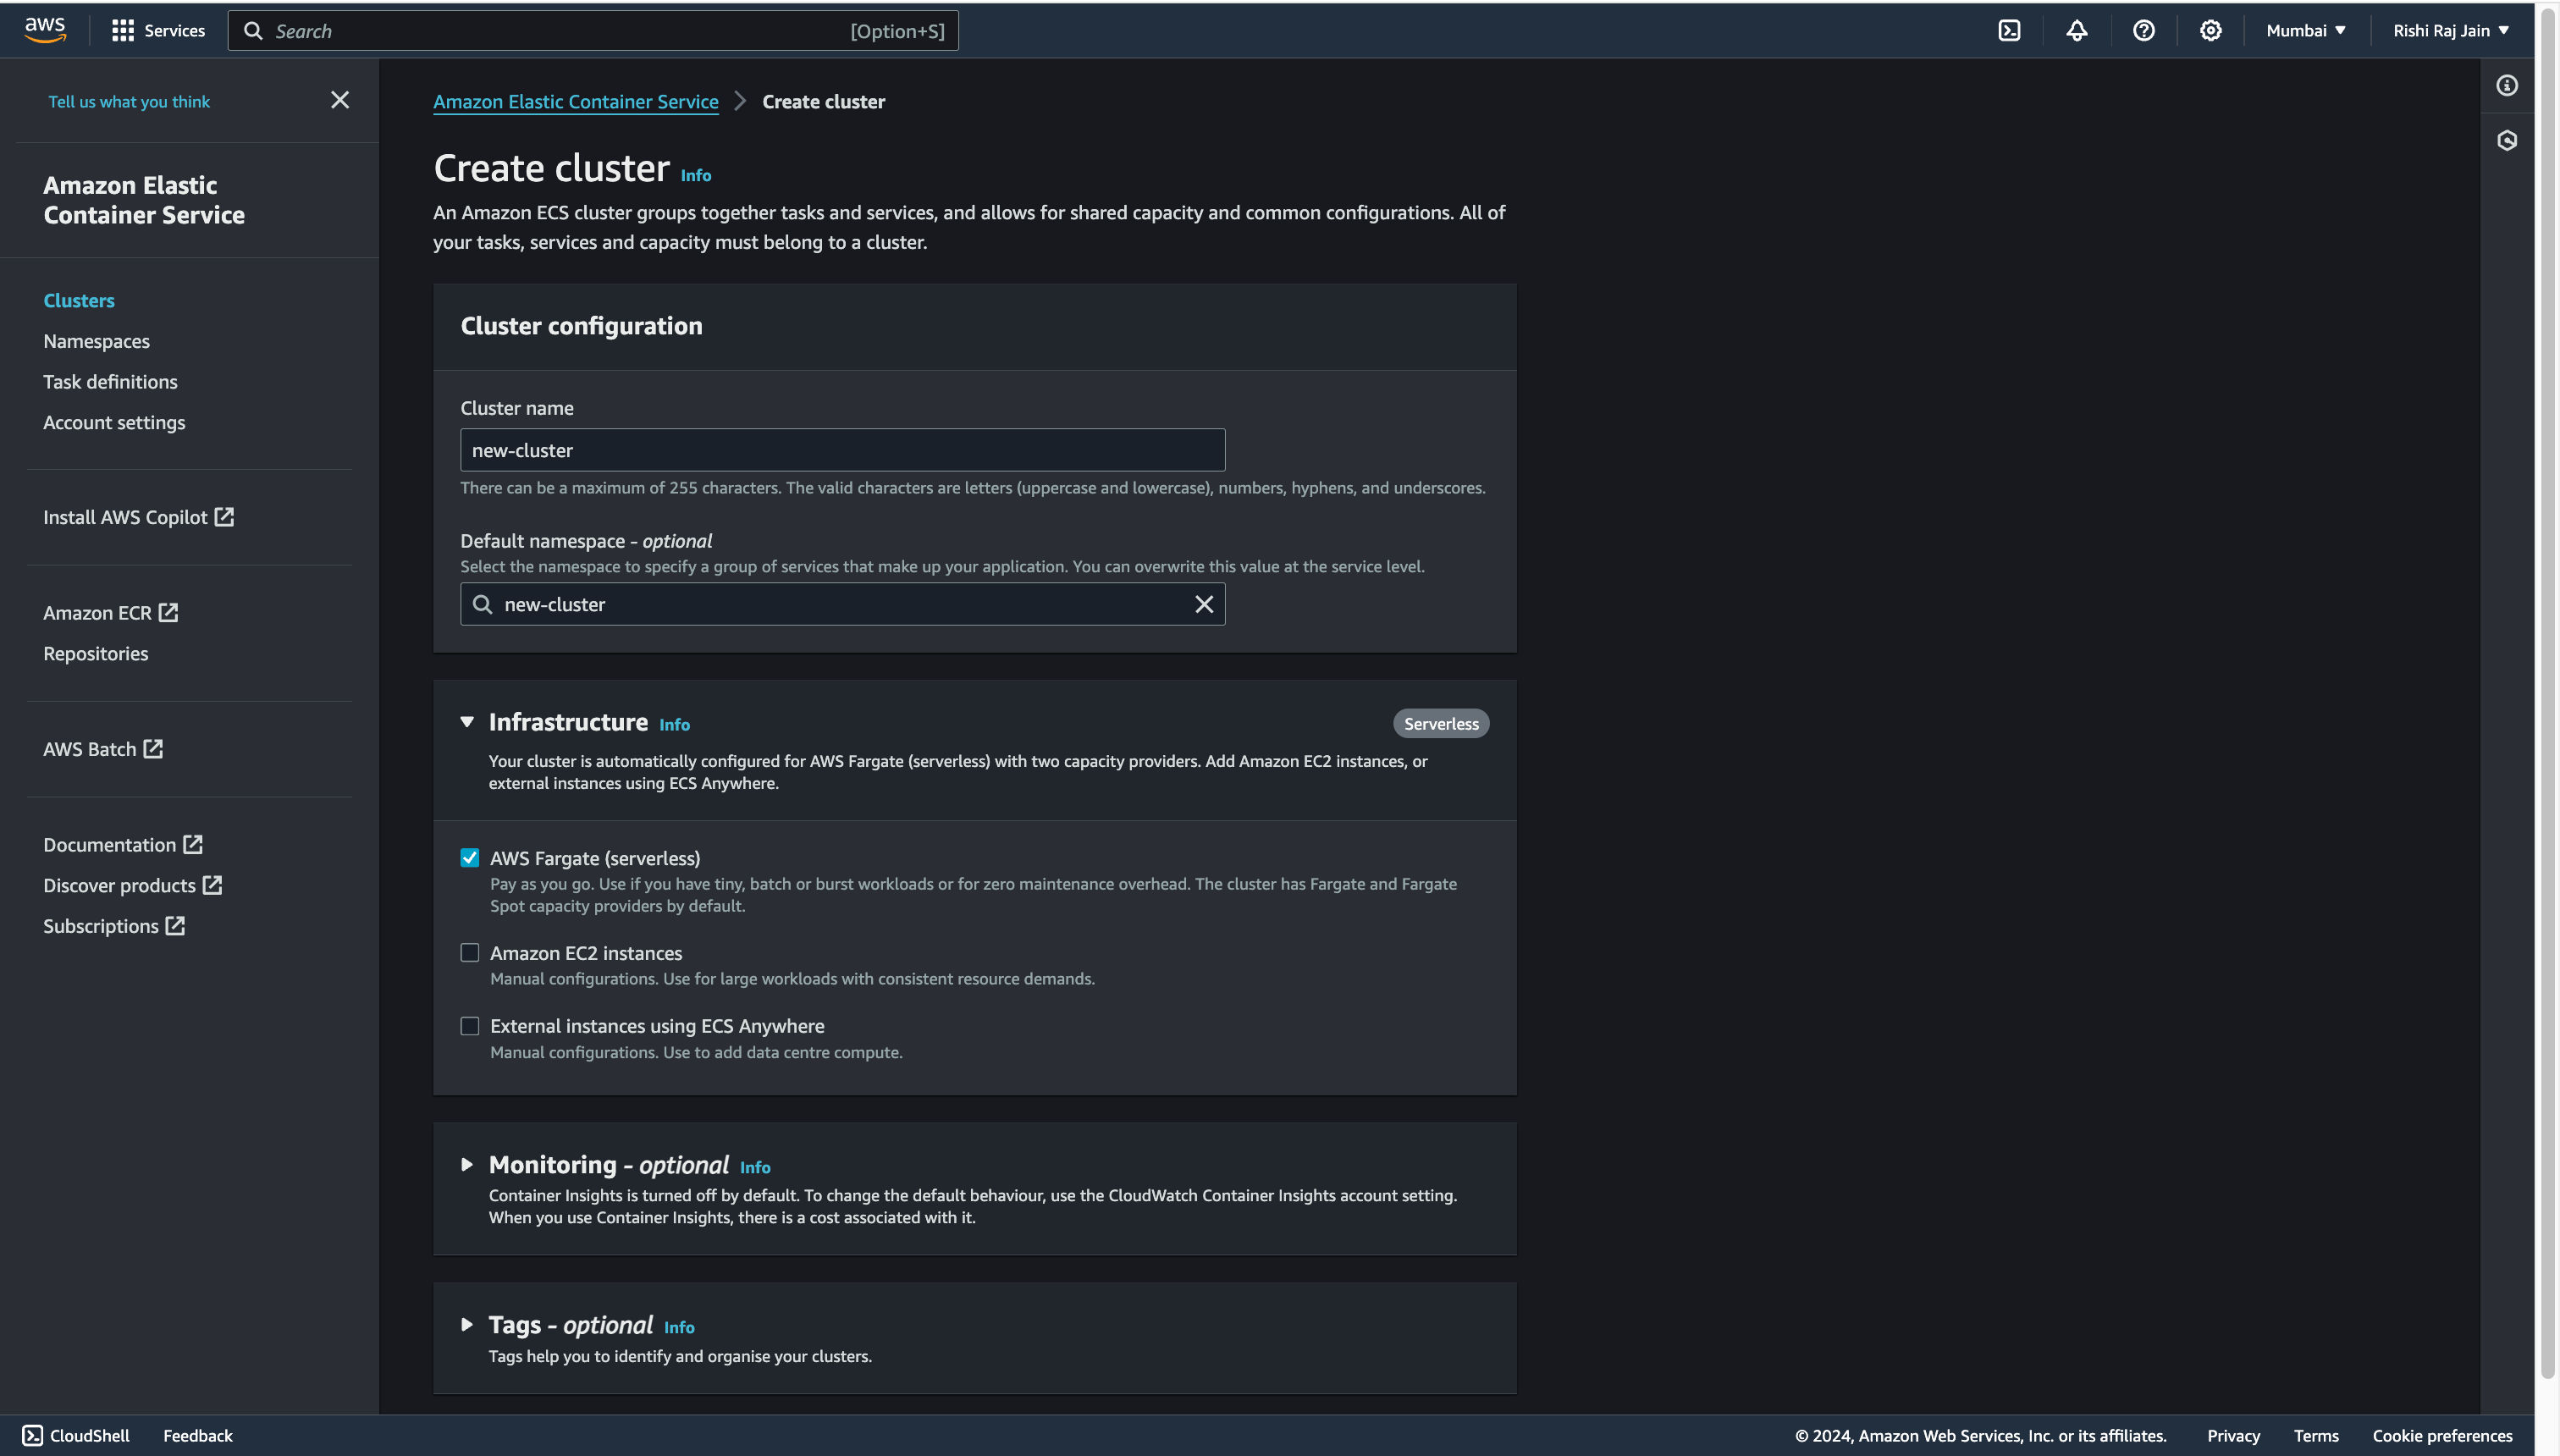 and you are now done with setting up an Amazon ECS Cluster your service.
 Let's move on to creating an Amazon ECS Service.
## Create an Amazon ECS Service
- Click on the Cluster created in the section earlier, and click on **Create** in the Services section.
Let's move on to creating an Amazon ECS Service.
## Create an Amazon ECS Service
- Click on the Cluster created in the section earlier, and click on **Create** in the Services section.
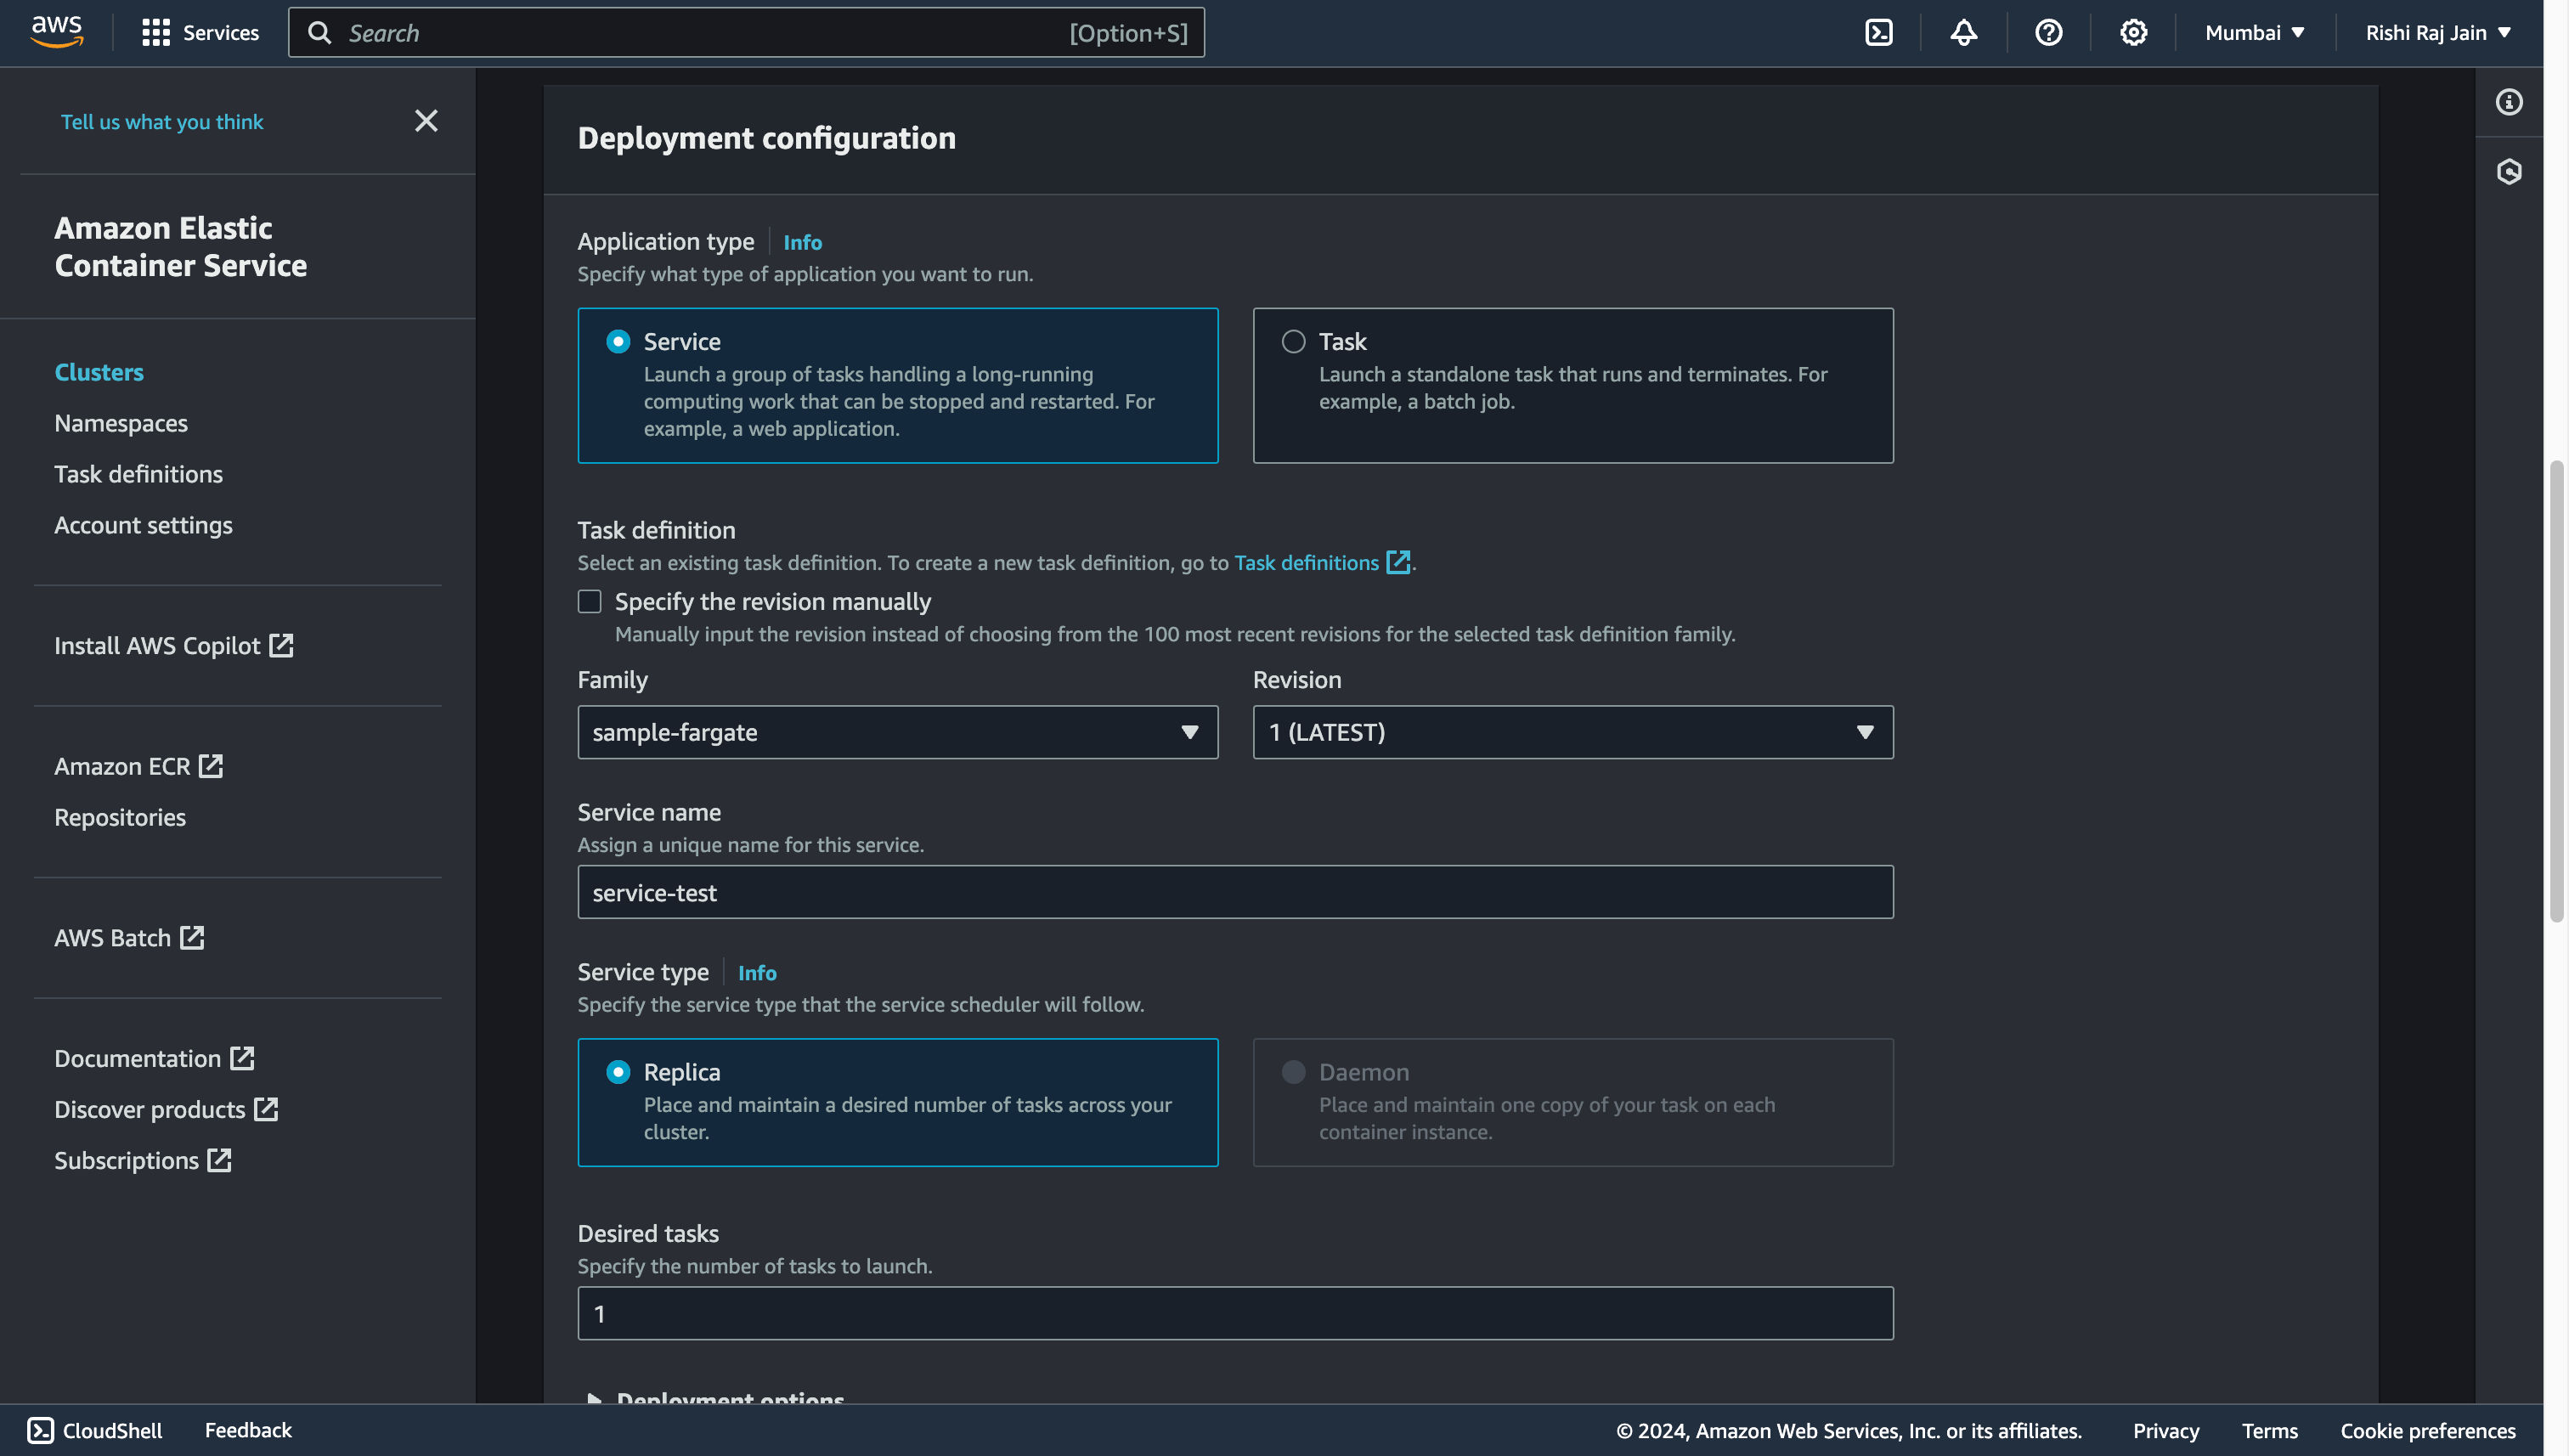 - Select the **VPC** created earlier (or the default one). Select **Create a new security group** option and enter the following details for it:
- Security group name: `sg_test`
- Security group description: `sg test`
- Inbound rules for security groups:
- Type: `HTTP`
- Source: `Anywhere`
- Select the **VPC** created earlier (or the default one). Select **Create a new security group** option and enter the following details for it:
- Security group name: `sg_test`
- Security group description: `sg test`
- Inbound rules for security groups:
- Type: `HTTP`
- Source: `Anywhere`
 and you are now done with creating an ECS Service in your ECS Cluster. Let's move on to creating access keys for IAM users for your account.
## Create access keys for IAM users
- In the navigation bar on the upper right in your AWS account, choose your user name, and then choose **Security credentials**.
and you are now done with creating an ECS Service in your ECS Cluster. Let's move on to creating access keys for IAM users for your account.
## Create access keys for IAM users
- In the navigation bar on the upper right in your AWS account, choose your user name, and then choose **Security credentials**.
 - Scroll down to **Access keys** and click on **Create access key**.
 - Again, click on **Create access key**.
 - Copy the **Access key** and **Secret access key** generated to be used as `AWS_ACCESS_KEY_ID` and `AWS_ACCESS_KEY_SECRET` respectively.
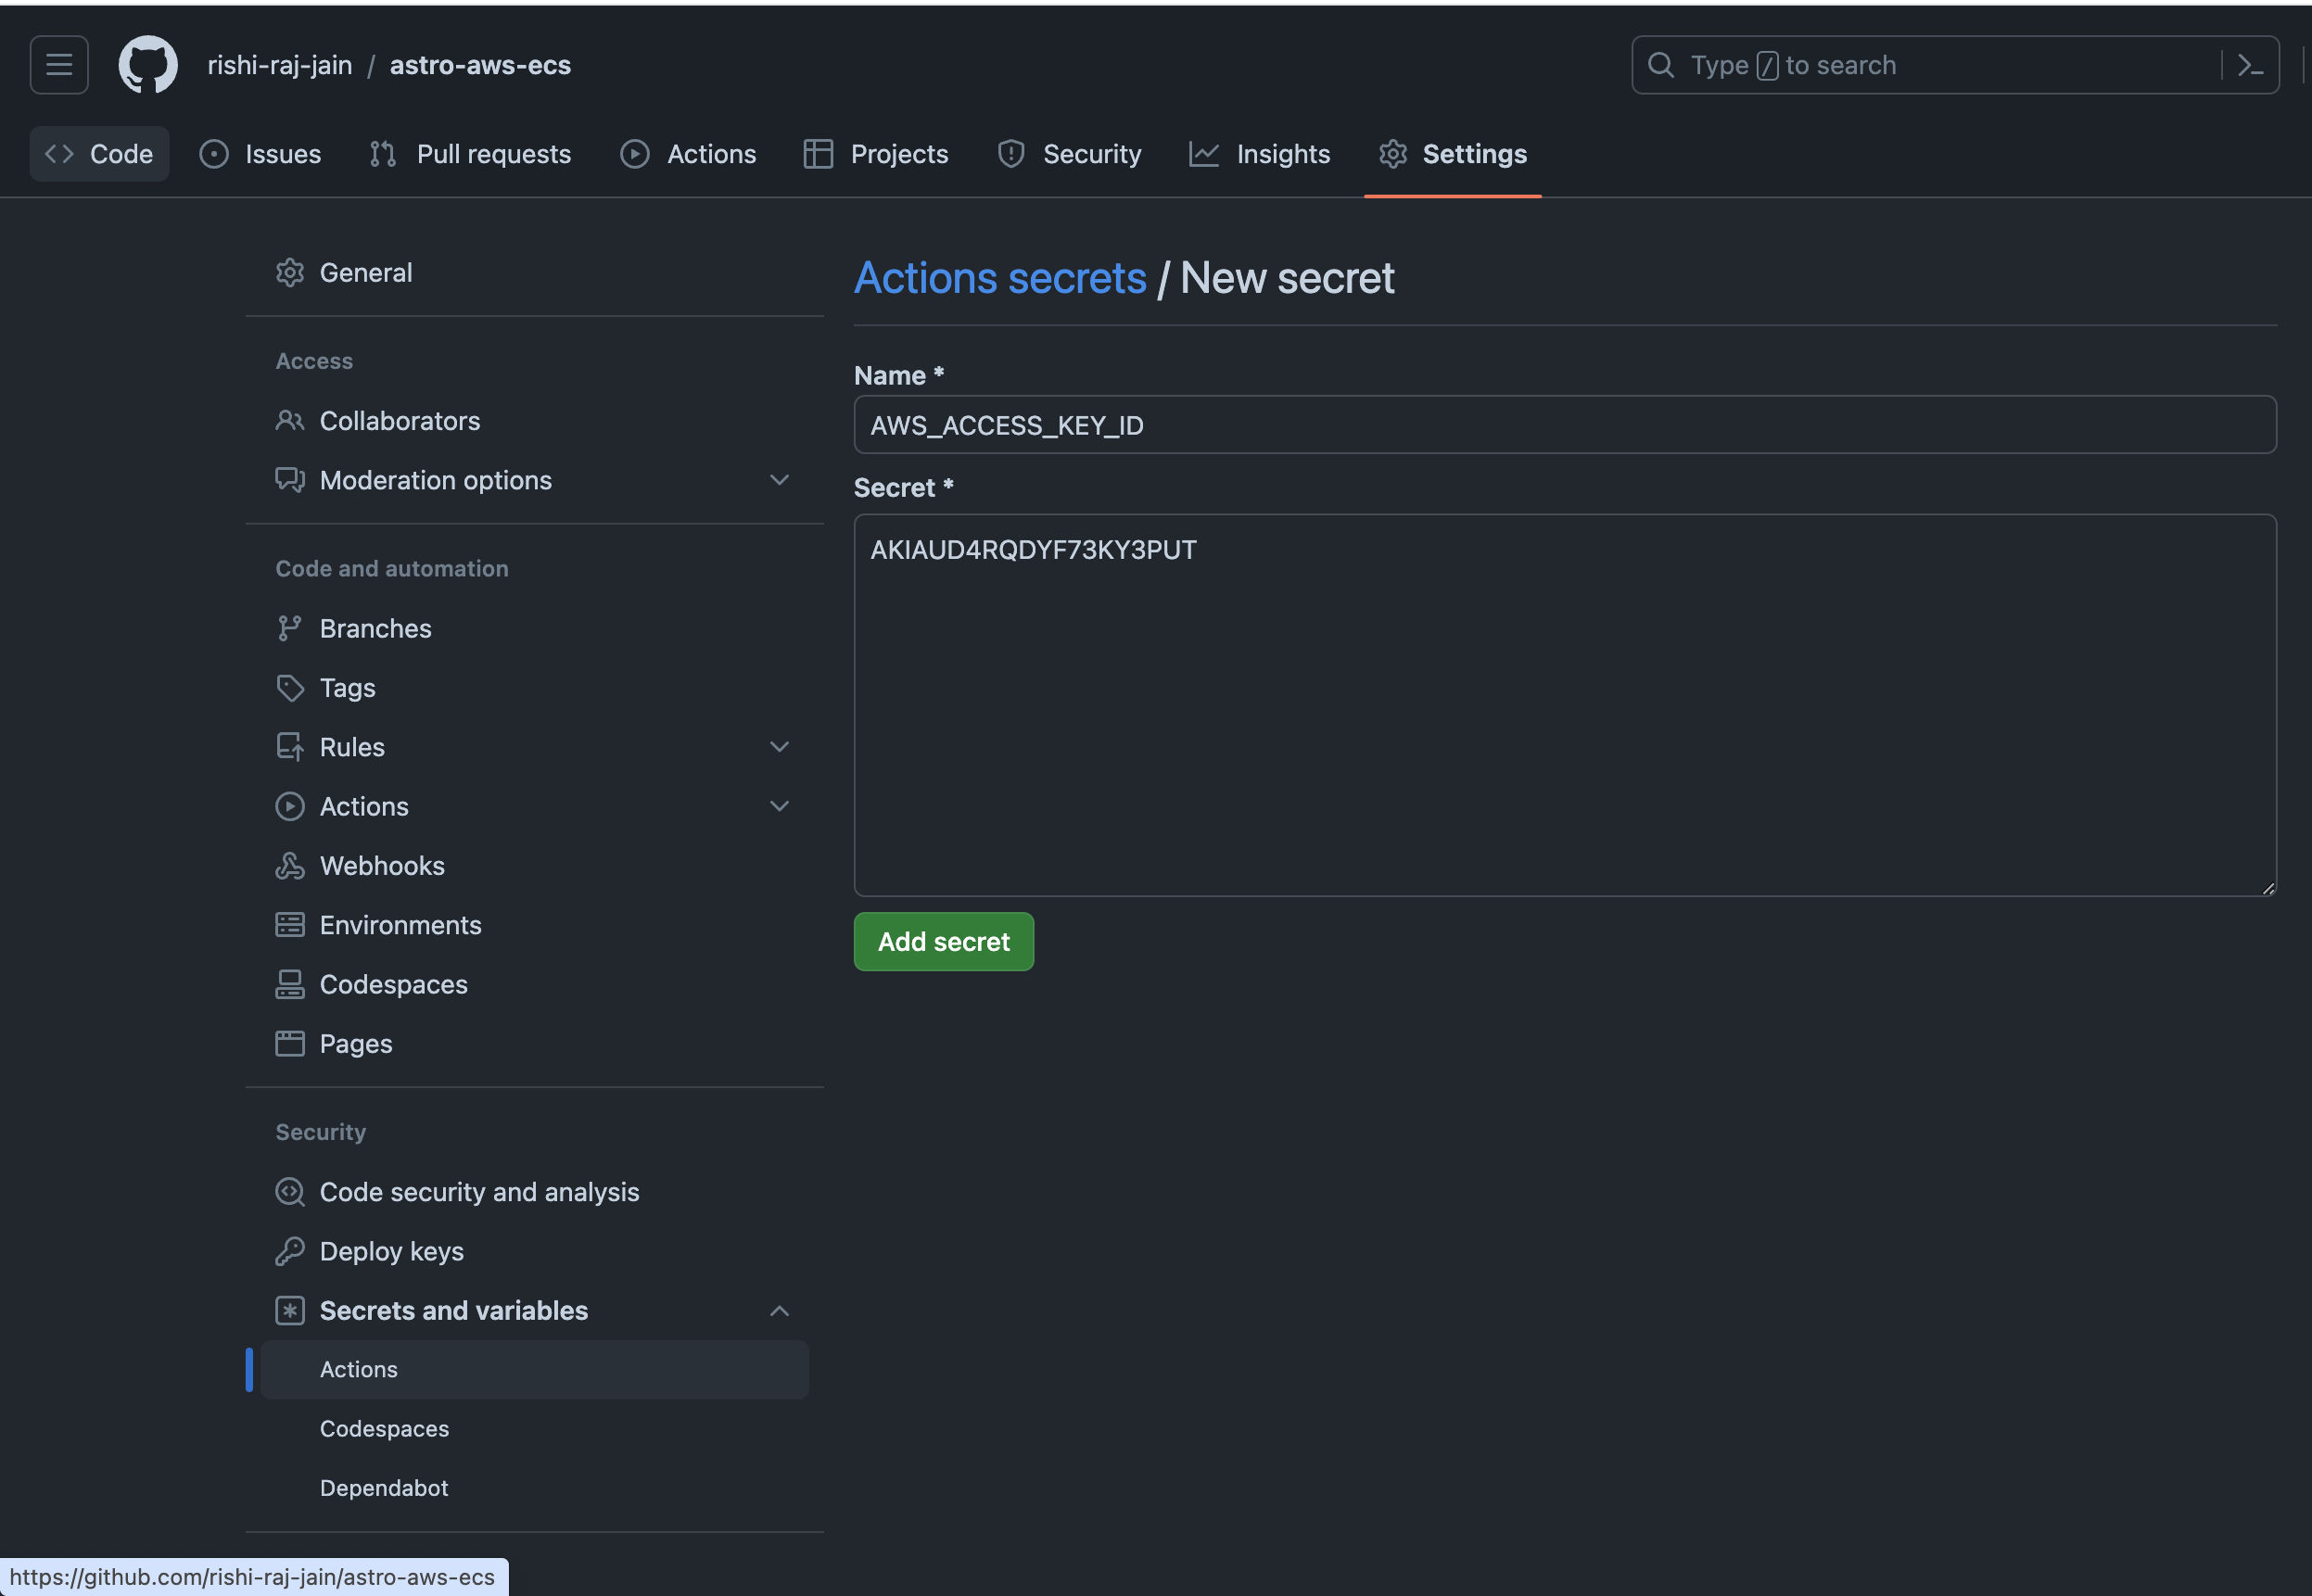
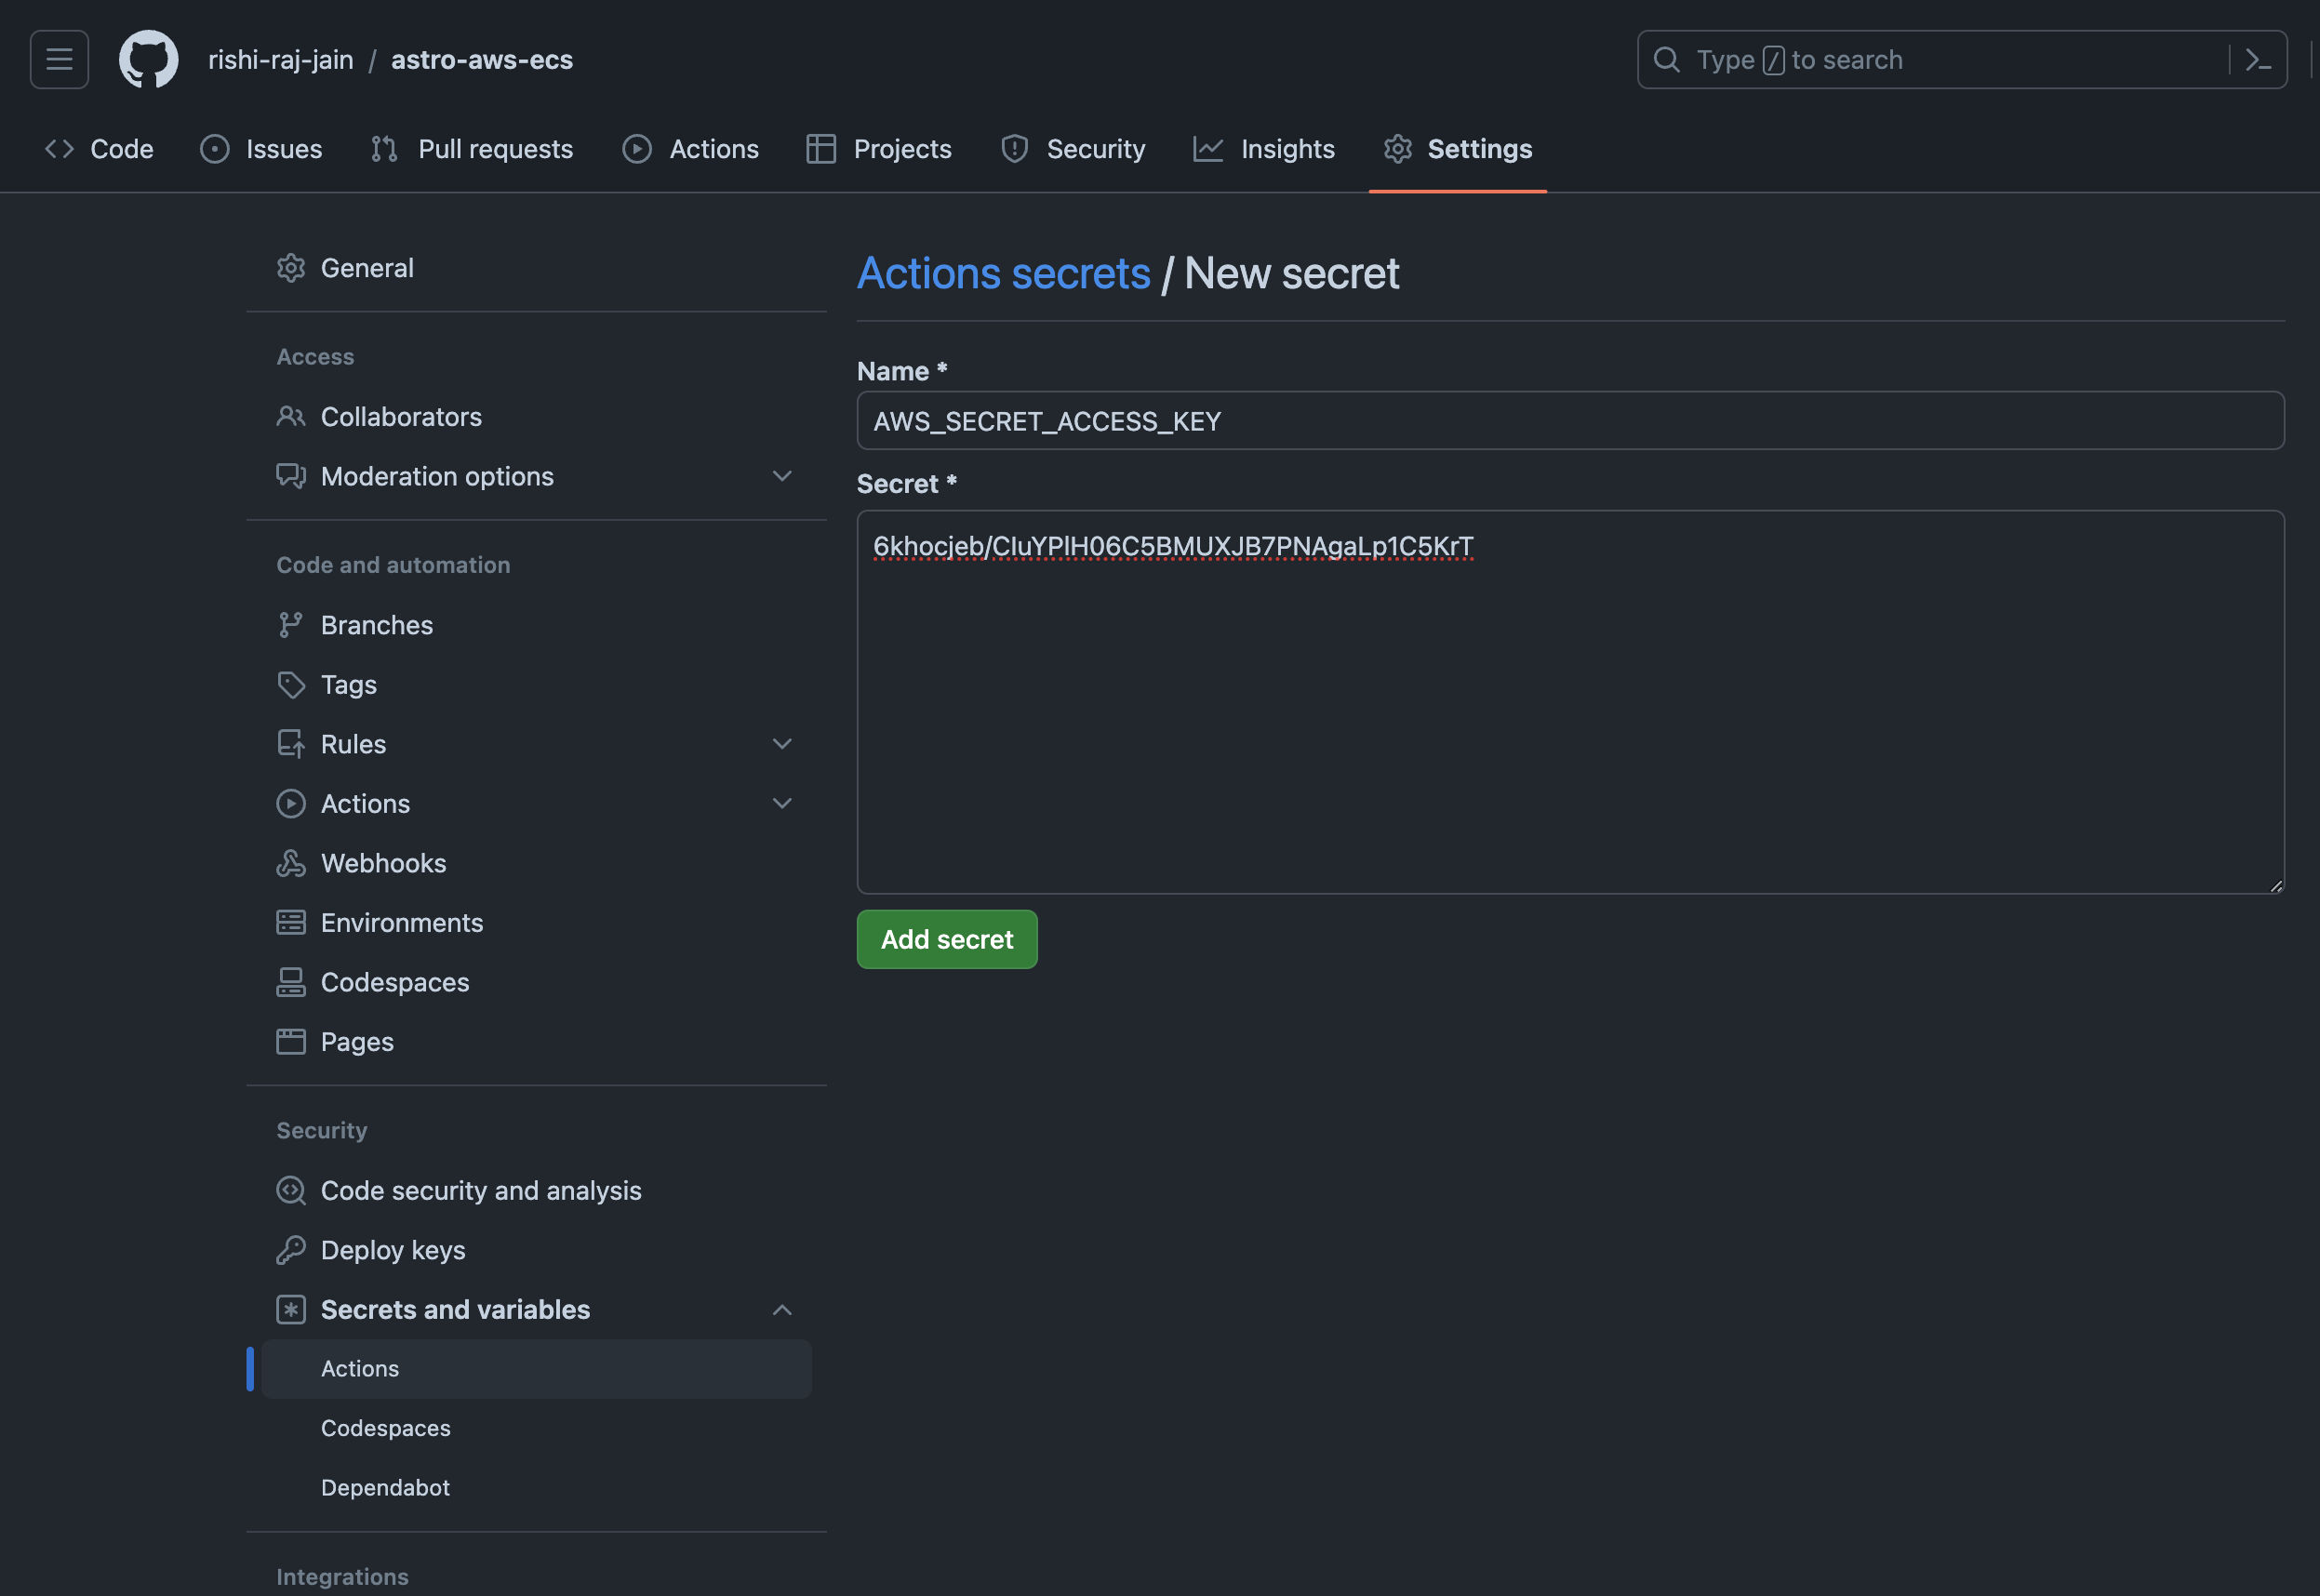
 - Now, go to your GitHub repository's Settings, click on **Secrets and Variables**. Further, click on **New repository secret**.
 - Enter **AWS_ACCESS_KEY_ID** as the value obtained earlier.
 - Enter **AWS_ACCESS_KEY_SECRET** as the value obtained earlier.
 Let's move on to configuring GitHub Workflows for continuous deployments.
## Create GitHub Actions for Continuous Deployment (CD) Workflow
To automate deployments of your Astro application, you are going to use [GitHub Actions](https://github.com/features/actions).
- Create a `.github/workflows/fargate.yml` with the following code:
```yml
name: Deploy to Amazon ECS on AWS Fargate
on:
push:
branches:
- master
workflow_dispatch:
env:
AWS_REGION: us-west-1 # enter your deployment region
ECS_SERVICE: service-test # enter your ECS service name
ECS_CLUSTER: new-cluster # enter your ECS cluster name
CONTAINER_NAME: fargate-app # enter your container name used in the task definition
ECR_REPOSITORY: astro-repo # enter your ECS repo name
ECS_TASK_DEFINITION: ./task-definition.json
jobs:
deploy:
name: Deploy
runs-on: ubuntu-latest
environment: production
steps:
- name: Checkout
uses: actions/checkout@v4
- name: Configure AWS credentials
uses: aws-actions/configure-aws-credentials@v4
with:
aws-region: ${{ env.AWS_REGION }}
aws-access-key-id: ${{ secrets.AWS_ACCESS_KEY_ID }}
aws-secret-access-key: ${{ secrets.AWS_SECRET_ACCESS_KEY }}
- name: Login to Amazon ECR
id: login-ecr
uses: aws-actions/amazon-ecr-login@v1
- name: Build, tag, and push image to Amazon ECR
id: build-image
env:
IMAGE_TAG: ${{ github.sha }}
ECR_REGISTRY: ${{ steps.login-ecr.outputs.registry }}
run: |
# Build a docker container and
# push it to ECR so that it can
# be deployed to ECS.
docker build -t $ECR_REGISTRY/$ECR_REPOSITORY:$IMAGE_TAG .
docker push $ECR_REGISTRY/$ECR_REPOSITORY:$IMAGE_TAG
echo "image=$ECR_REGISTRY/$ECR_REPOSITORY:$IMAGE_TAG" >> $GITHUB_OUTPUT
- name: Fill in the new image ID in the Amazon ECS task definition
id: task-def
uses: aws-actions/amazon-ecs-render-task-definition@v1
with:
container-name: ${{ env.CONTAINER_NAME }}
image: ${{ steps.build-image.outputs.image }}
task-definition: ${{ env.ECS_TASK_DEFINITION }}
- name: Deploy Amazon ECS task definition
uses: aws-actions/amazon-ecs-deploy-task-definition@v1
with:
service: ${{ env.ECS_SERVICE }}
cluster: ${{ env.ECS_CLUSTER }}
wait-for-service-stability: true
task-definition: ${{ steps.task-def.outputs.task-definition }}
```
The workflow above does the following:
- Allows itself to be triggered manually or when a git push is done to the master branch.
- Sets global environment variables as your AWS setup variables (we obtained earlier during set up) for only when it's being executed.
- Takes care of building and pushing the Docker image to Amazon ECR.
- Takes care of loading the updated (if) task definition to Amazon ECS.
Now, push the added workflow file to your GitHub repo and follow the steps below to trigger the deployment:
- Go to your GitHub repository's **Actions** tab.
- Select **Deploy to Amazon ECS** workflow.
- Click **Run workflow**.
- Once the action is completed, open [ECS Console](https://console.aws.amazon.com/ecs/v2) and select your service.
Let's move on to configuring GitHub Workflows for continuous deployments.
## Create GitHub Actions for Continuous Deployment (CD) Workflow
To automate deployments of your Astro application, you are going to use [GitHub Actions](https://github.com/features/actions).
- Create a `.github/workflows/fargate.yml` with the following code:
```yml
name: Deploy to Amazon ECS on AWS Fargate
on:
push:
branches:
- master
workflow_dispatch:
env:
AWS_REGION: us-west-1 # enter your deployment region
ECS_SERVICE: service-test # enter your ECS service name
ECS_CLUSTER: new-cluster # enter your ECS cluster name
CONTAINER_NAME: fargate-app # enter your container name used in the task definition
ECR_REPOSITORY: astro-repo # enter your ECS repo name
ECS_TASK_DEFINITION: ./task-definition.json
jobs:
deploy:
name: Deploy
runs-on: ubuntu-latest
environment: production
steps:
- name: Checkout
uses: actions/checkout@v4
- name: Configure AWS credentials
uses: aws-actions/configure-aws-credentials@v4
with:
aws-region: ${{ env.AWS_REGION }}
aws-access-key-id: ${{ secrets.AWS_ACCESS_KEY_ID }}
aws-secret-access-key: ${{ secrets.AWS_SECRET_ACCESS_KEY }}
- name: Login to Amazon ECR
id: login-ecr
uses: aws-actions/amazon-ecr-login@v1
- name: Build, tag, and push image to Amazon ECR
id: build-image
env:
IMAGE_TAG: ${{ github.sha }}
ECR_REGISTRY: ${{ steps.login-ecr.outputs.registry }}
run: |
# Build a docker container and
# push it to ECR so that it can
# be deployed to ECS.
docker build -t $ECR_REGISTRY/$ECR_REPOSITORY:$IMAGE_TAG .
docker push $ECR_REGISTRY/$ECR_REPOSITORY:$IMAGE_TAG
echo "image=$ECR_REGISTRY/$ECR_REPOSITORY:$IMAGE_TAG" >> $GITHUB_OUTPUT
- name: Fill in the new image ID in the Amazon ECS task definition
id: task-def
uses: aws-actions/amazon-ecs-render-task-definition@v1
with:
container-name: ${{ env.CONTAINER_NAME }}
image: ${{ steps.build-image.outputs.image }}
task-definition: ${{ env.ECS_TASK_DEFINITION }}
- name: Deploy Amazon ECS task definition
uses: aws-actions/amazon-ecs-deploy-task-definition@v1
with:
service: ${{ env.ECS_SERVICE }}
cluster: ${{ env.ECS_CLUSTER }}
wait-for-service-stability: true
task-definition: ${{ steps.task-def.outputs.task-definition }}
```
The workflow above does the following:
- Allows itself to be triggered manually or when a git push is done to the master branch.
- Sets global environment variables as your AWS setup variables (we obtained earlier during set up) for only when it's being executed.
- Takes care of building and pushing the Docker image to Amazon ECR.
- Takes care of loading the updated (if) task definition to Amazon ECS.
Now, push the added workflow file to your GitHub repo and follow the steps below to trigger the deployment:
- Go to your GitHub repository's **Actions** tab.
- Select **Deploy to Amazon ECS** workflow.
- Click **Run workflow**.
- Once the action is completed, open [ECS Console](https://console.aws.amazon.com/ecs/v2) and select your service.
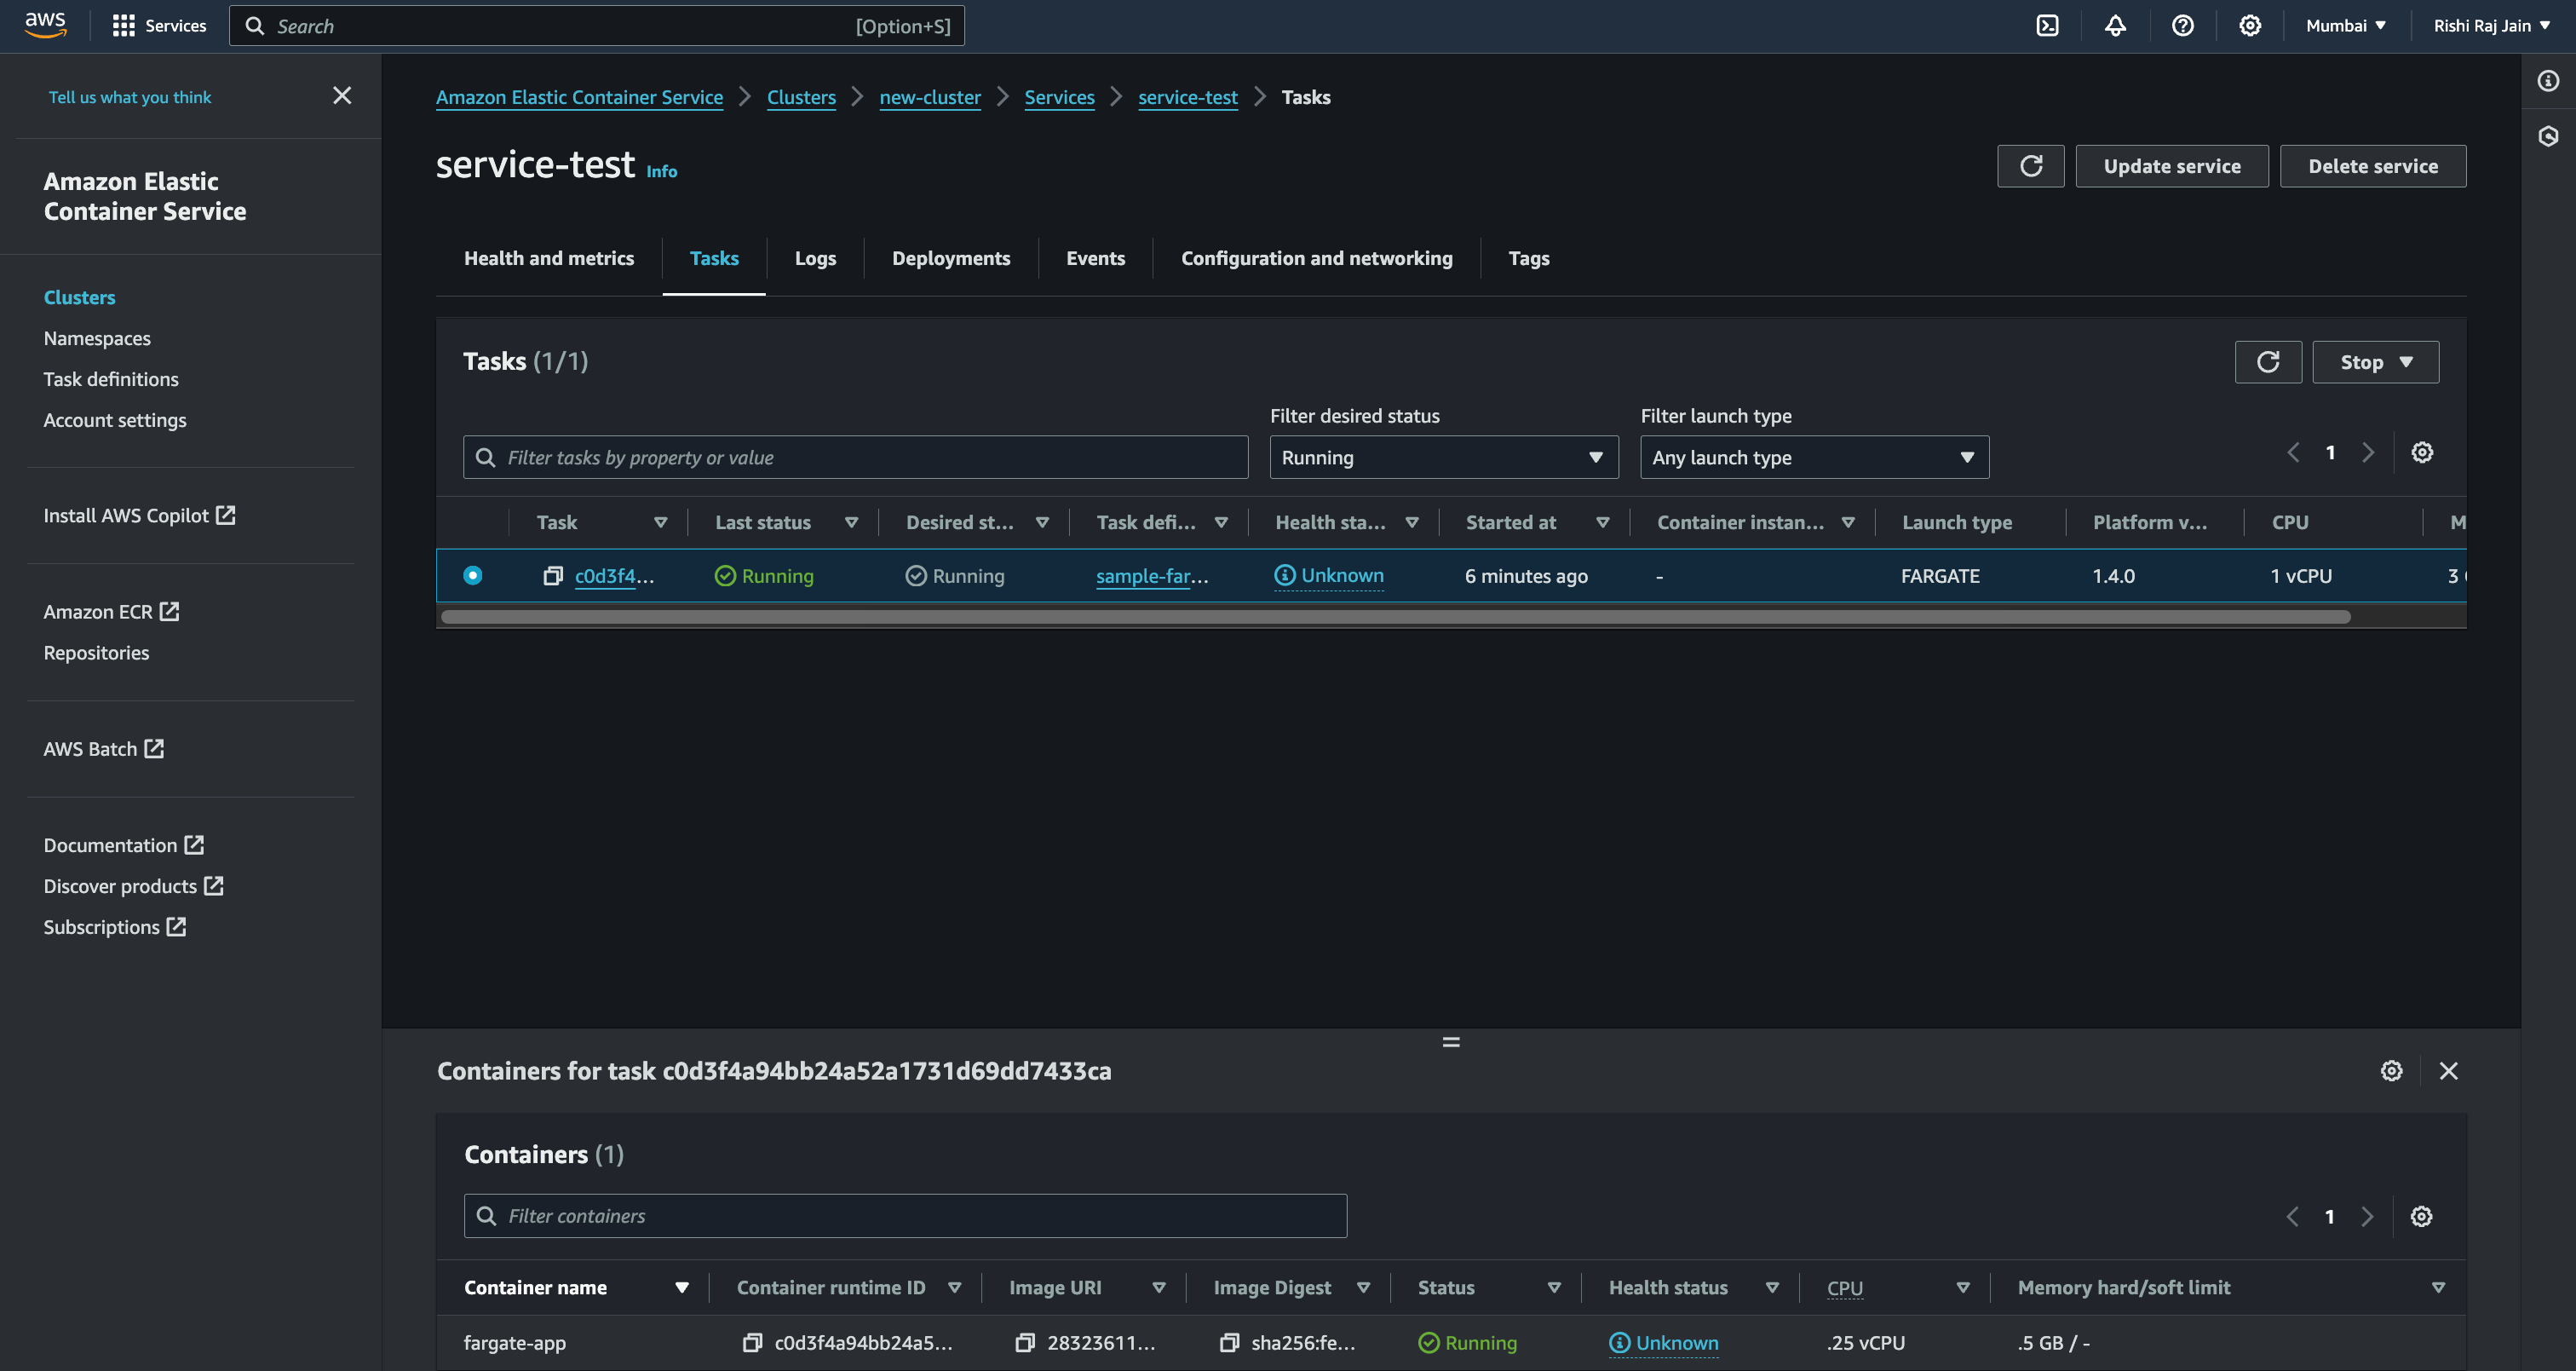
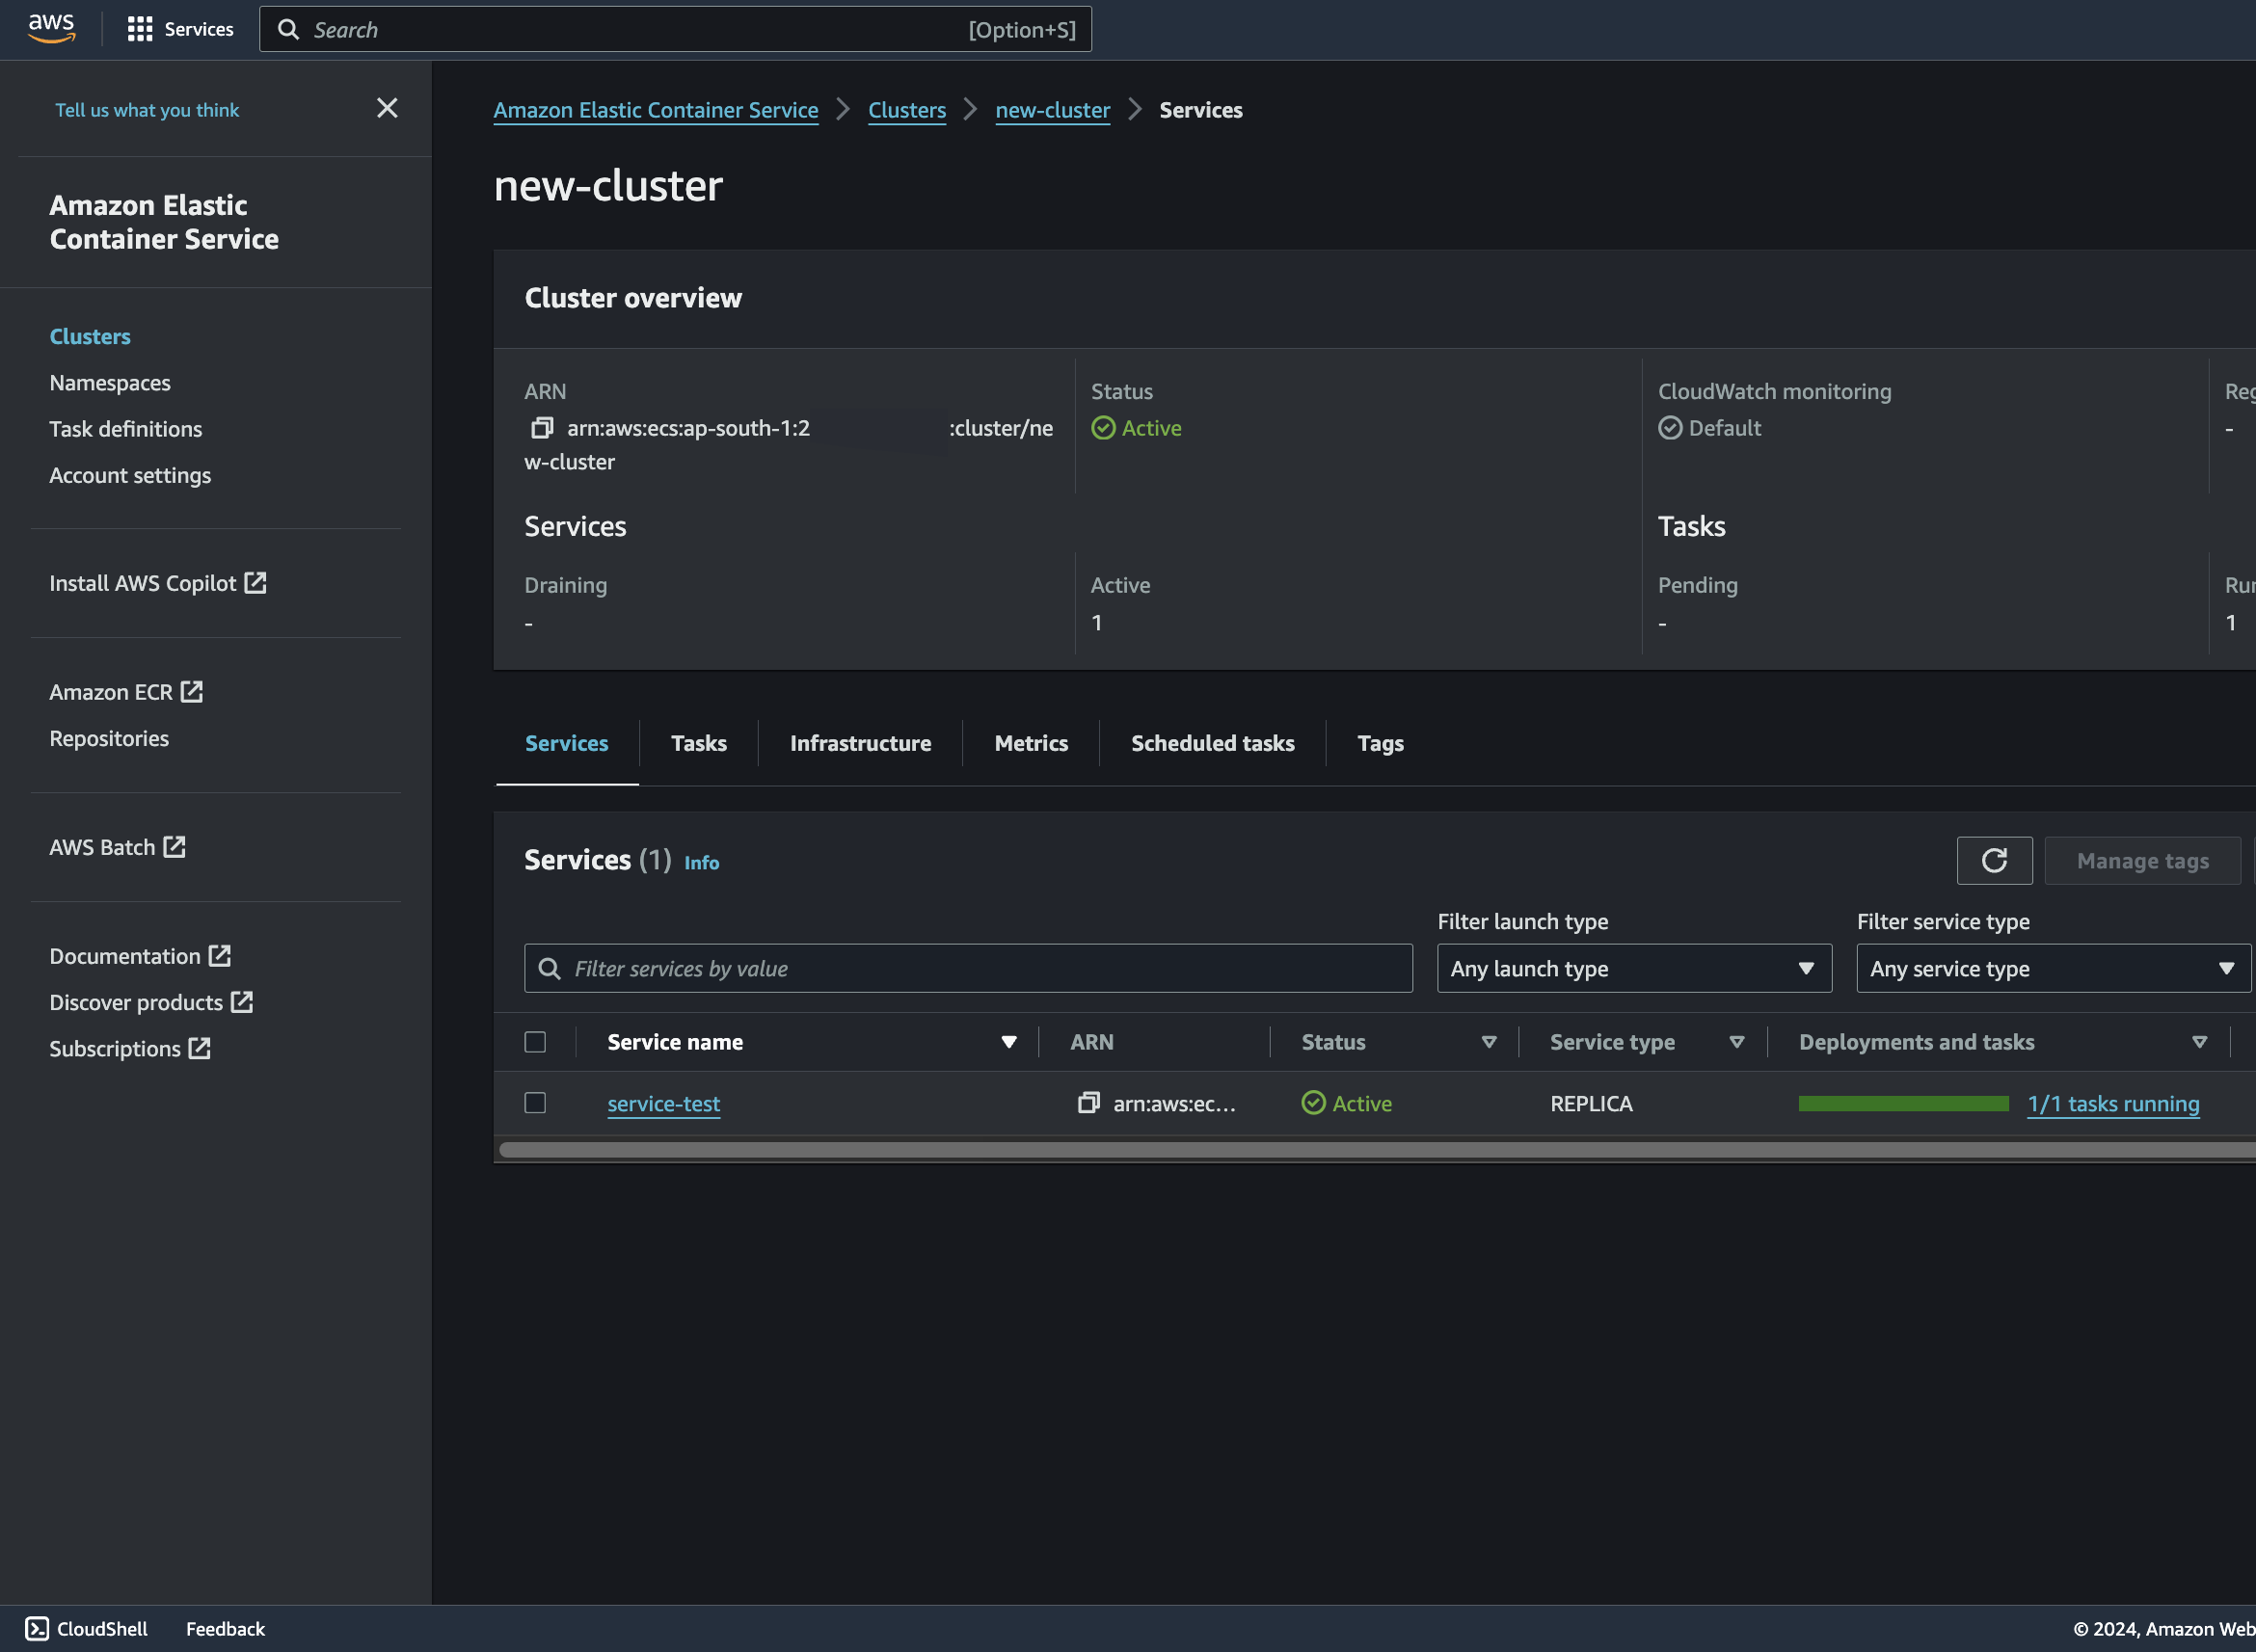 - Click on **Tasks** tab.
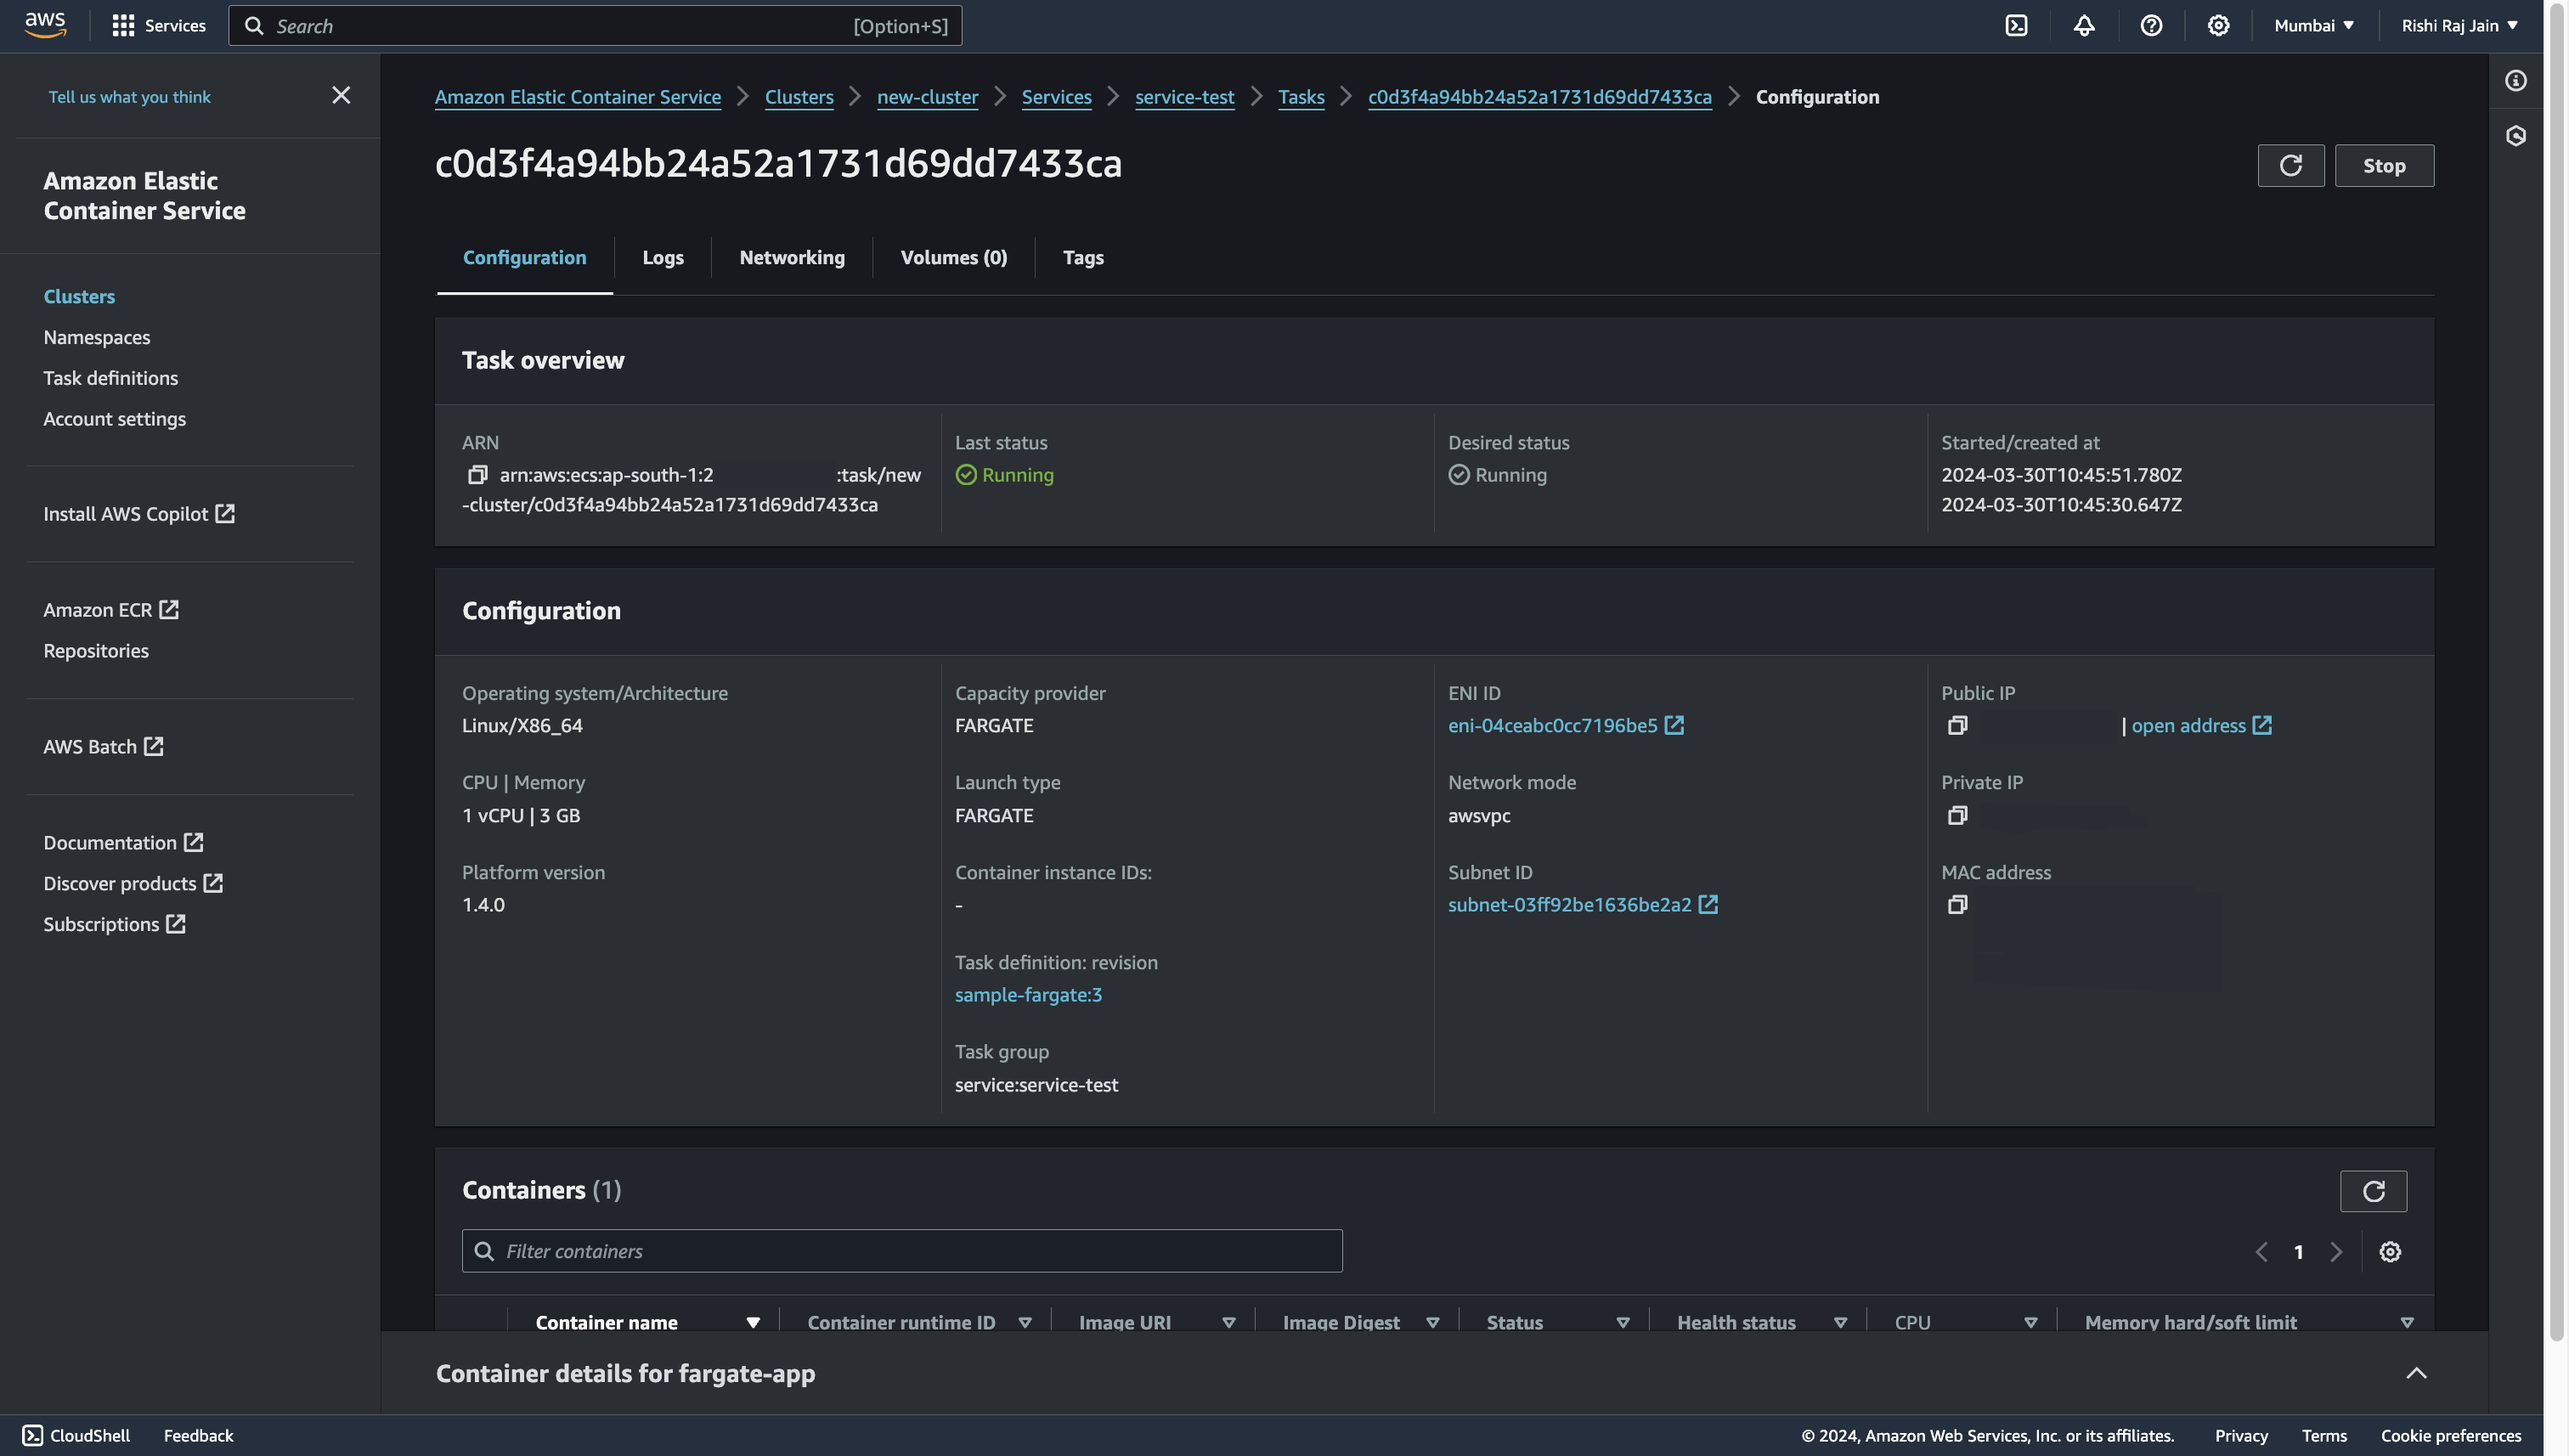
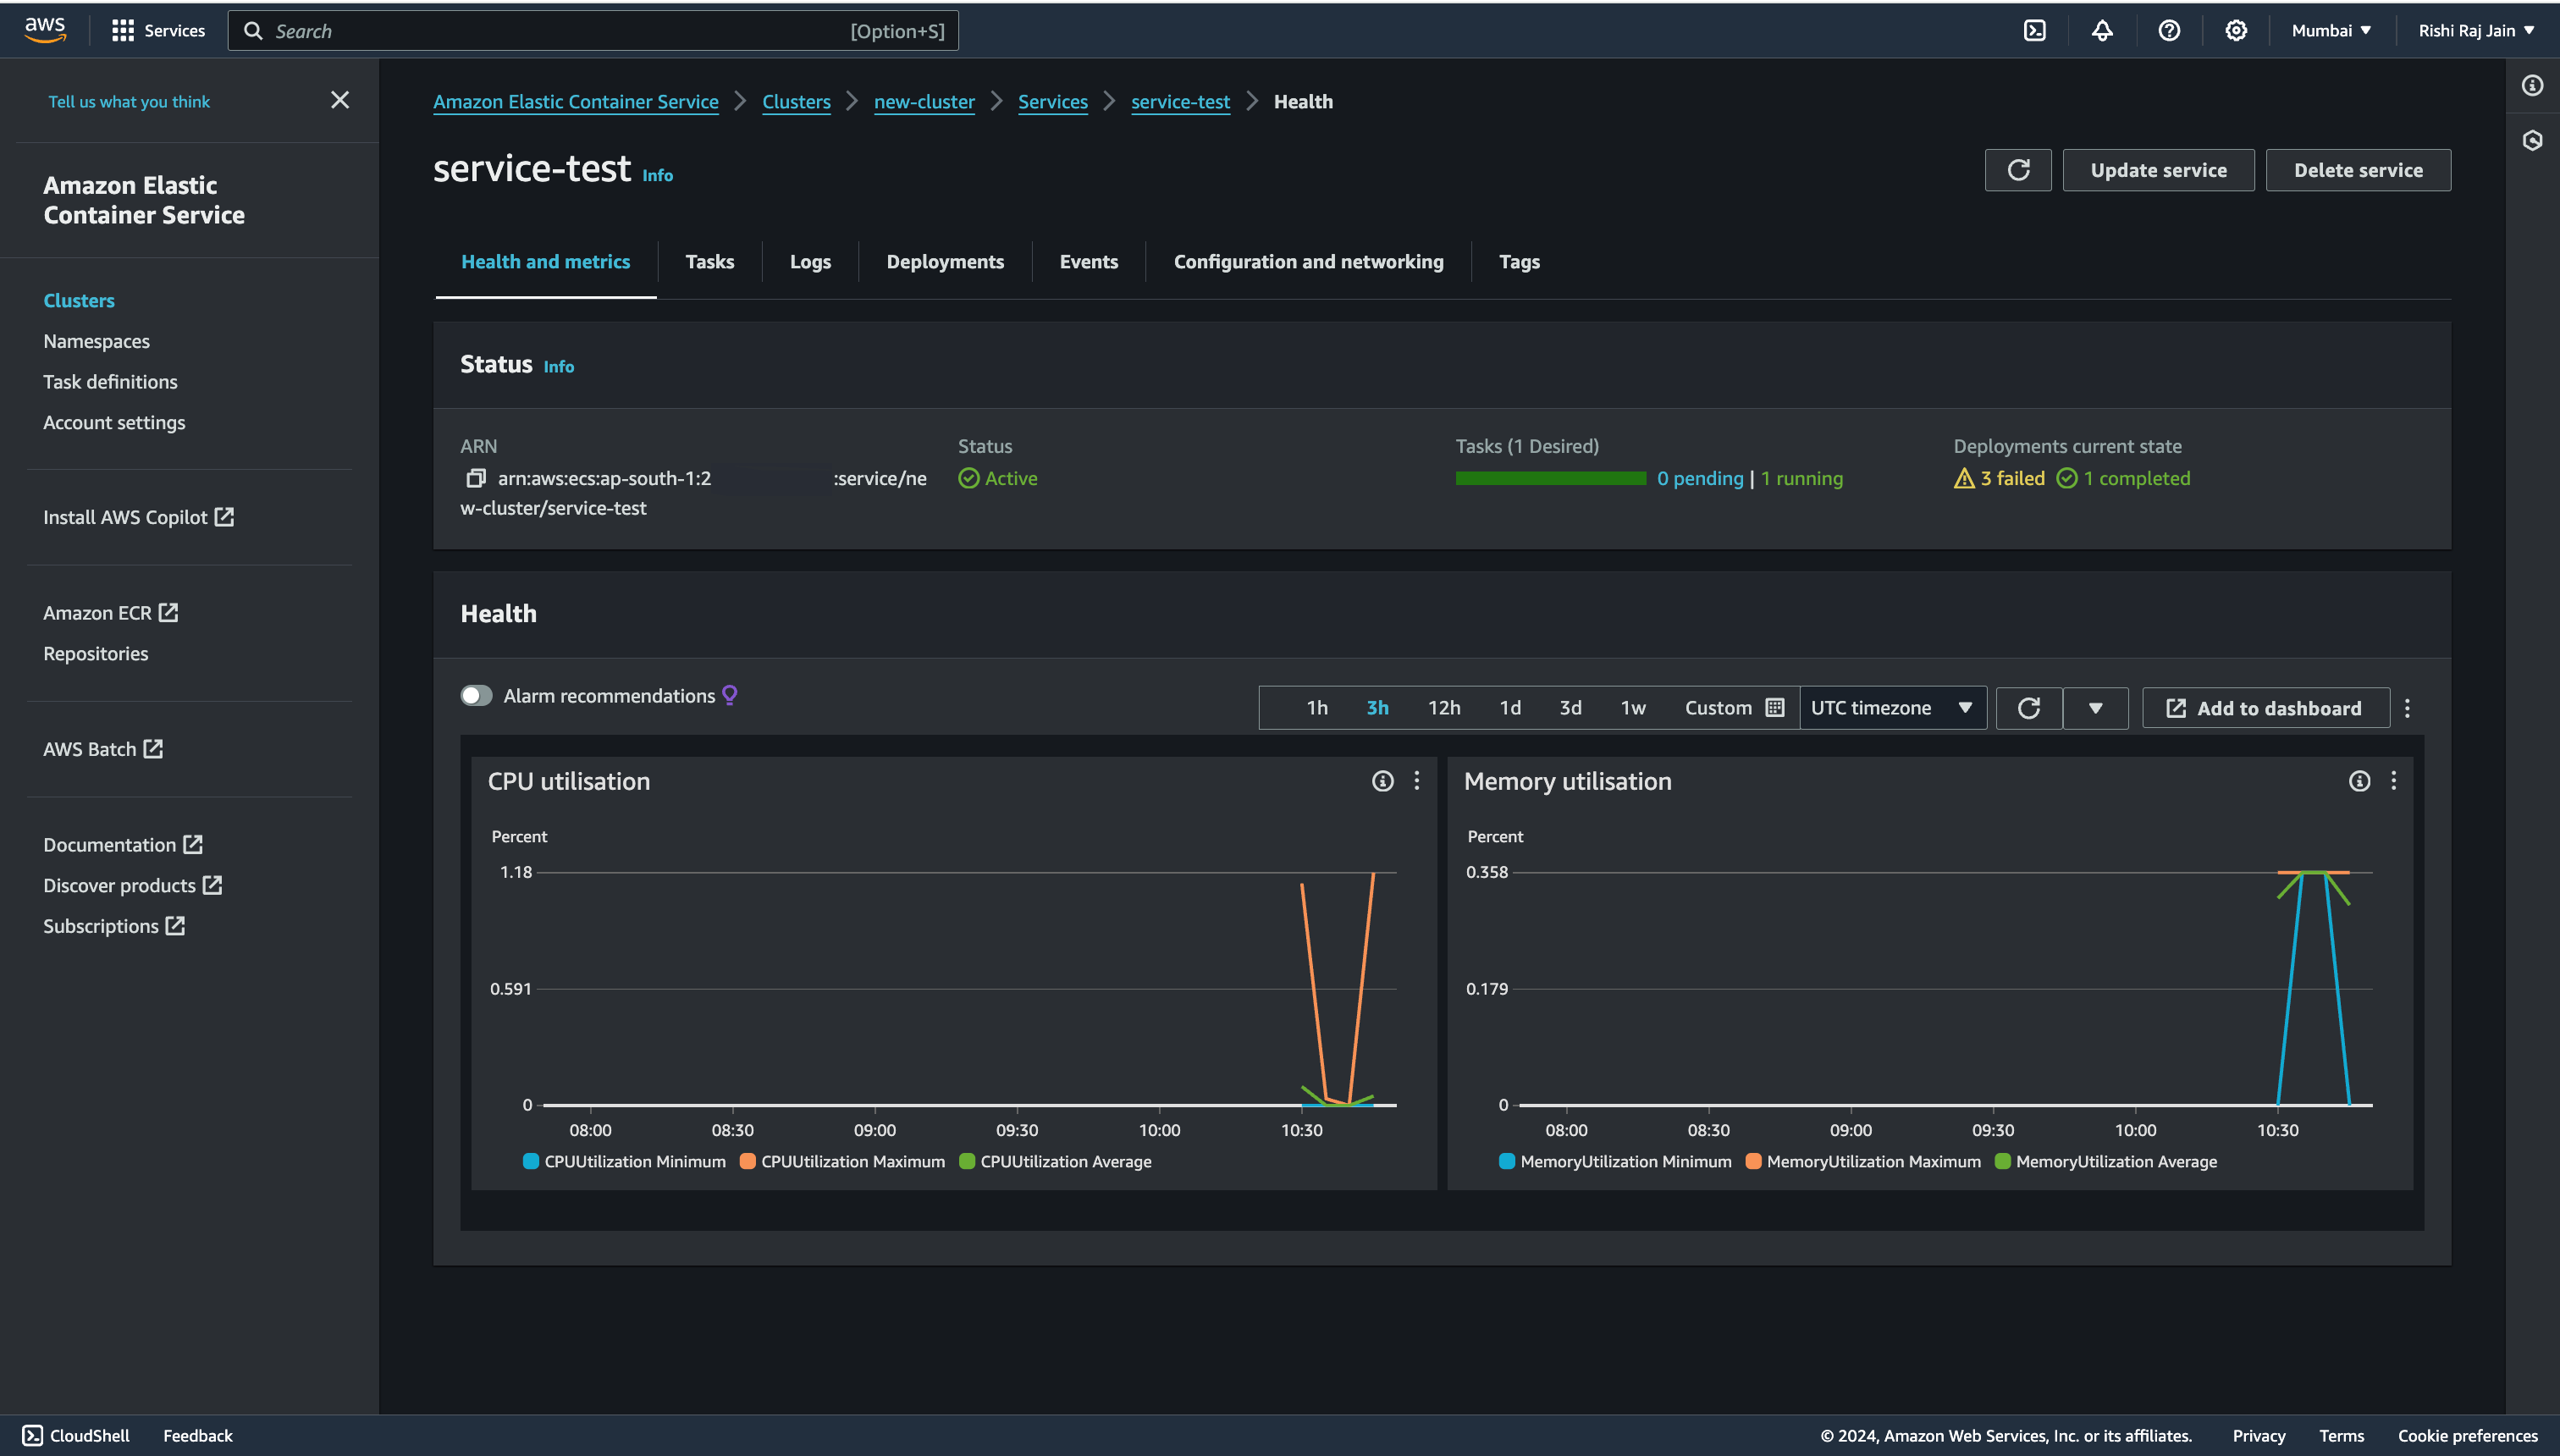 - Click on the completed Task id.
 - Click **open address** to open your deployment.
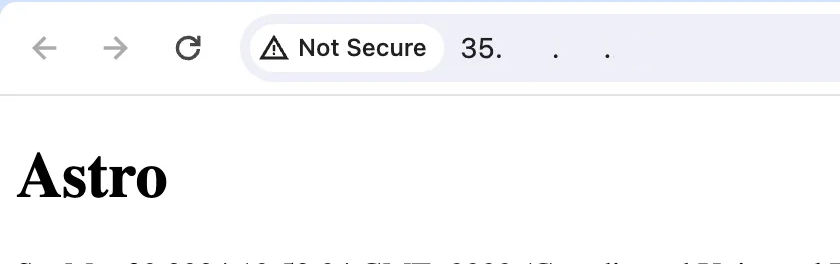
 - You will now be able to see the index route of your Astro application.
 ## References
- https://www.linkedin.com/pulse/exploring-deployment-nodejs-application-aws-ecs-fargate-vibhor-jain-phvfc/
## Conclusion
Yay! You now have an Astro project that automatically deploys to Amazon ECS on AWS Fargate upon Git push.
If you have any questions or comments, feel free to reach out to me on [Twitter](https://twitter.com/direct_messages/create/rishi_raj_jain_).
## References
- https://www.linkedin.com/pulse/exploring-deployment-nodejs-application-aws-ecs-fargate-vibhor-jain-phvfc/
## Conclusion
Yay! You now have an Astro project that automatically deploys to Amazon ECS on AWS Fargate upon Git push.
If you have any questions or comments, feel free to reach out to me on [Twitter](https://twitter.com/direct_messages/create/rishi_raj_jain_).