---
title: "Deploy Next.js to AWS Amplify"
description: "How to deploy your Next.js Server-Side Rendered (SSR) websites to AWS Amplify."
source: "https://www.launchfa.st/blog/deploy-nextjs-aws-amplify"
author: "Rishi Raj Jain"
created_at: 2024-03-31T00:00:00.000Z
updated_at: 2026-07-02T00:00:00.000Z
---
> **Site index for agents**
> Fetch https://www.launchfa.st/llms.txt to discover every page on this site.
> Every page is also available as Markdown by appending `.md` to its URL.
 ℹ️ Available today with LaunchFast Starter Kits
In this guide, you will learn how to deploy a Next.js SSR project to AWS Amplify. You will go through the process of setting up a new Next.js project, enabling server-side rendering using the AWS Amplify adapter, and finally deploying it to AWS Amplify.
## Prerequisites
You'll need the following:
- [Node.js 20](https://nodejs.org/en/blog/announcements/v20-release-announce) or later
- An [AWS](https://aws.amazon.com/free) account
## Create a new Next.js application
Let’s get started by creating a new Next.js project. Open your terminal and run the following command:
```bash
npx create-next-app@latest my-app
```
When prompted, choose:
- `Yes` when prompted to use TypeScript.
- `No` when prompted to use ESLint.
- `Yes` when prompted to use Tailwind CSS.
- `No` when prompted to use `src/` directory.
- `Yes` when prompted to use App Router.
- `No` when prompted to customize the default import alias (`@/*`).
Once that is done, move into the project directory and start the app in development mode by executing the following command:
```bash
cd my-app
npm run dev
```
The app should be running on [localhost:3000](http://localhost:3000/).
Then, you'll need to make the following change to your `next.config.js` file. Open the file and add the following code:
```tsx title="next.config.js" ins={2}
module.exports = {
output: 'standalone',
}
```
Then, create an `amplify.mjs` file at the root of the repository with the following code:
```tsx
// File: amplify.mjs
import { join } from 'node:path';
import { writeFileSync, mkdirSync, existsSync, cpSync, rmSync } from 'node:fs';
// Define all the Amplify related directories
const amplifyDirectories = [
join(process.cwd(), '.amplify-hosting'),
join(process.cwd(), '.amplify-hosting', 'static'),
join(process.cwd(), '.amplify-hosting', 'static', '_next'),
join(process.cwd(), '.amplify-hosting', 'compute'),
join(process.cwd(), '.amplify-hosting', 'compute', 'default'),
join(process.cwd(), '.amplify-hosting', 'compute', 'default', 'node_modules'),
]
// Create directories if they do no exist already
if (existsSync(amplifyDirectories[0])) rmSync(amplifyDirectories[0], { force: true, recursive: true })
// Create directories if they do no exist already
amplifyDirectories.forEach((i => mkdirSync(i)))
// A general default configuration to fallback to compute if no matching static assets found
const deployManifestConfig = {
version: 1,
routes: [
{
path: `/assets/*`,
target: {
kind: "Static",
},
},
{
path: `/*.*`,
target: {
kind: "Static",
},
fallback: {
kind: "Compute",
src: "default",
},
},
{
path: "/*",
target: {
kind: "Compute",
src: "default",
},
},
],
computeResources: [
{
name: "default",
entrypoint: "server.js",
runtime: "nodejs18.x",
},
],
framework: {
name: "next",
version: "13.5.6",
},
};
// Write the config to .amplify-hosting/deploy-manifest.json
writeFileSync(
join(process.cwd(), ".amplify-hosting", "deploy-manifest.json"),
JSON.stringify(deployManifestConfig),
);
// Copy the static assets generated in .next/static and public to .amplify-hosting/static directory
cpSync(join(process.cwd(), 'public'), amplifyDirectories[1], { recursive: true })
cpSync(join(process.cwd(), '.next', 'static'), amplifyDirectories[2], { recursive: true })
// Copy the static assets generated in .next/standalone to .amplify-hosting/compute directory
cpSync(join(process.cwd(), '.next', 'standalone'), amplifyDirectories[4], { recursive: true })
// Remove .next/static and public from .amplify-hosting/compute/default
rmSync(join(amplifyDirectories[4], '.next', 'static'), { force: true, recursive: true })
rmSync(join(amplifyDirectories[4], 'public'), { force: true, recursive: true })
```
Then, create an `amplify.yml` file at the root of the repository with the following code:
```yml
version: 1
frontend:
phases:
preBuild:
commands:
- npm ci
build:
commands:
- env >> .env
- npm run build
- node amplify.mjs
artifacts:
baseDirectory: .next
files:
- '**/*'
cache:
paths:
- node_modules/**/*
```
The code above does the following:
- Uses `preBuild` commands to install the dependencies of your Next.js project.
- Uses `build` commands to:
- Store all the environment variables into `.env` file at the root of the project.
- Build your Next.js application.
- Move the `node_modules` directory and `.env` file to Amplify's compute directory.
## Deploy to AWS Amplify
The code is now ready to deploy to AWS Amplify. Use the following steps to deploy:
- Start by creating a GitHub repository containing your app's code.
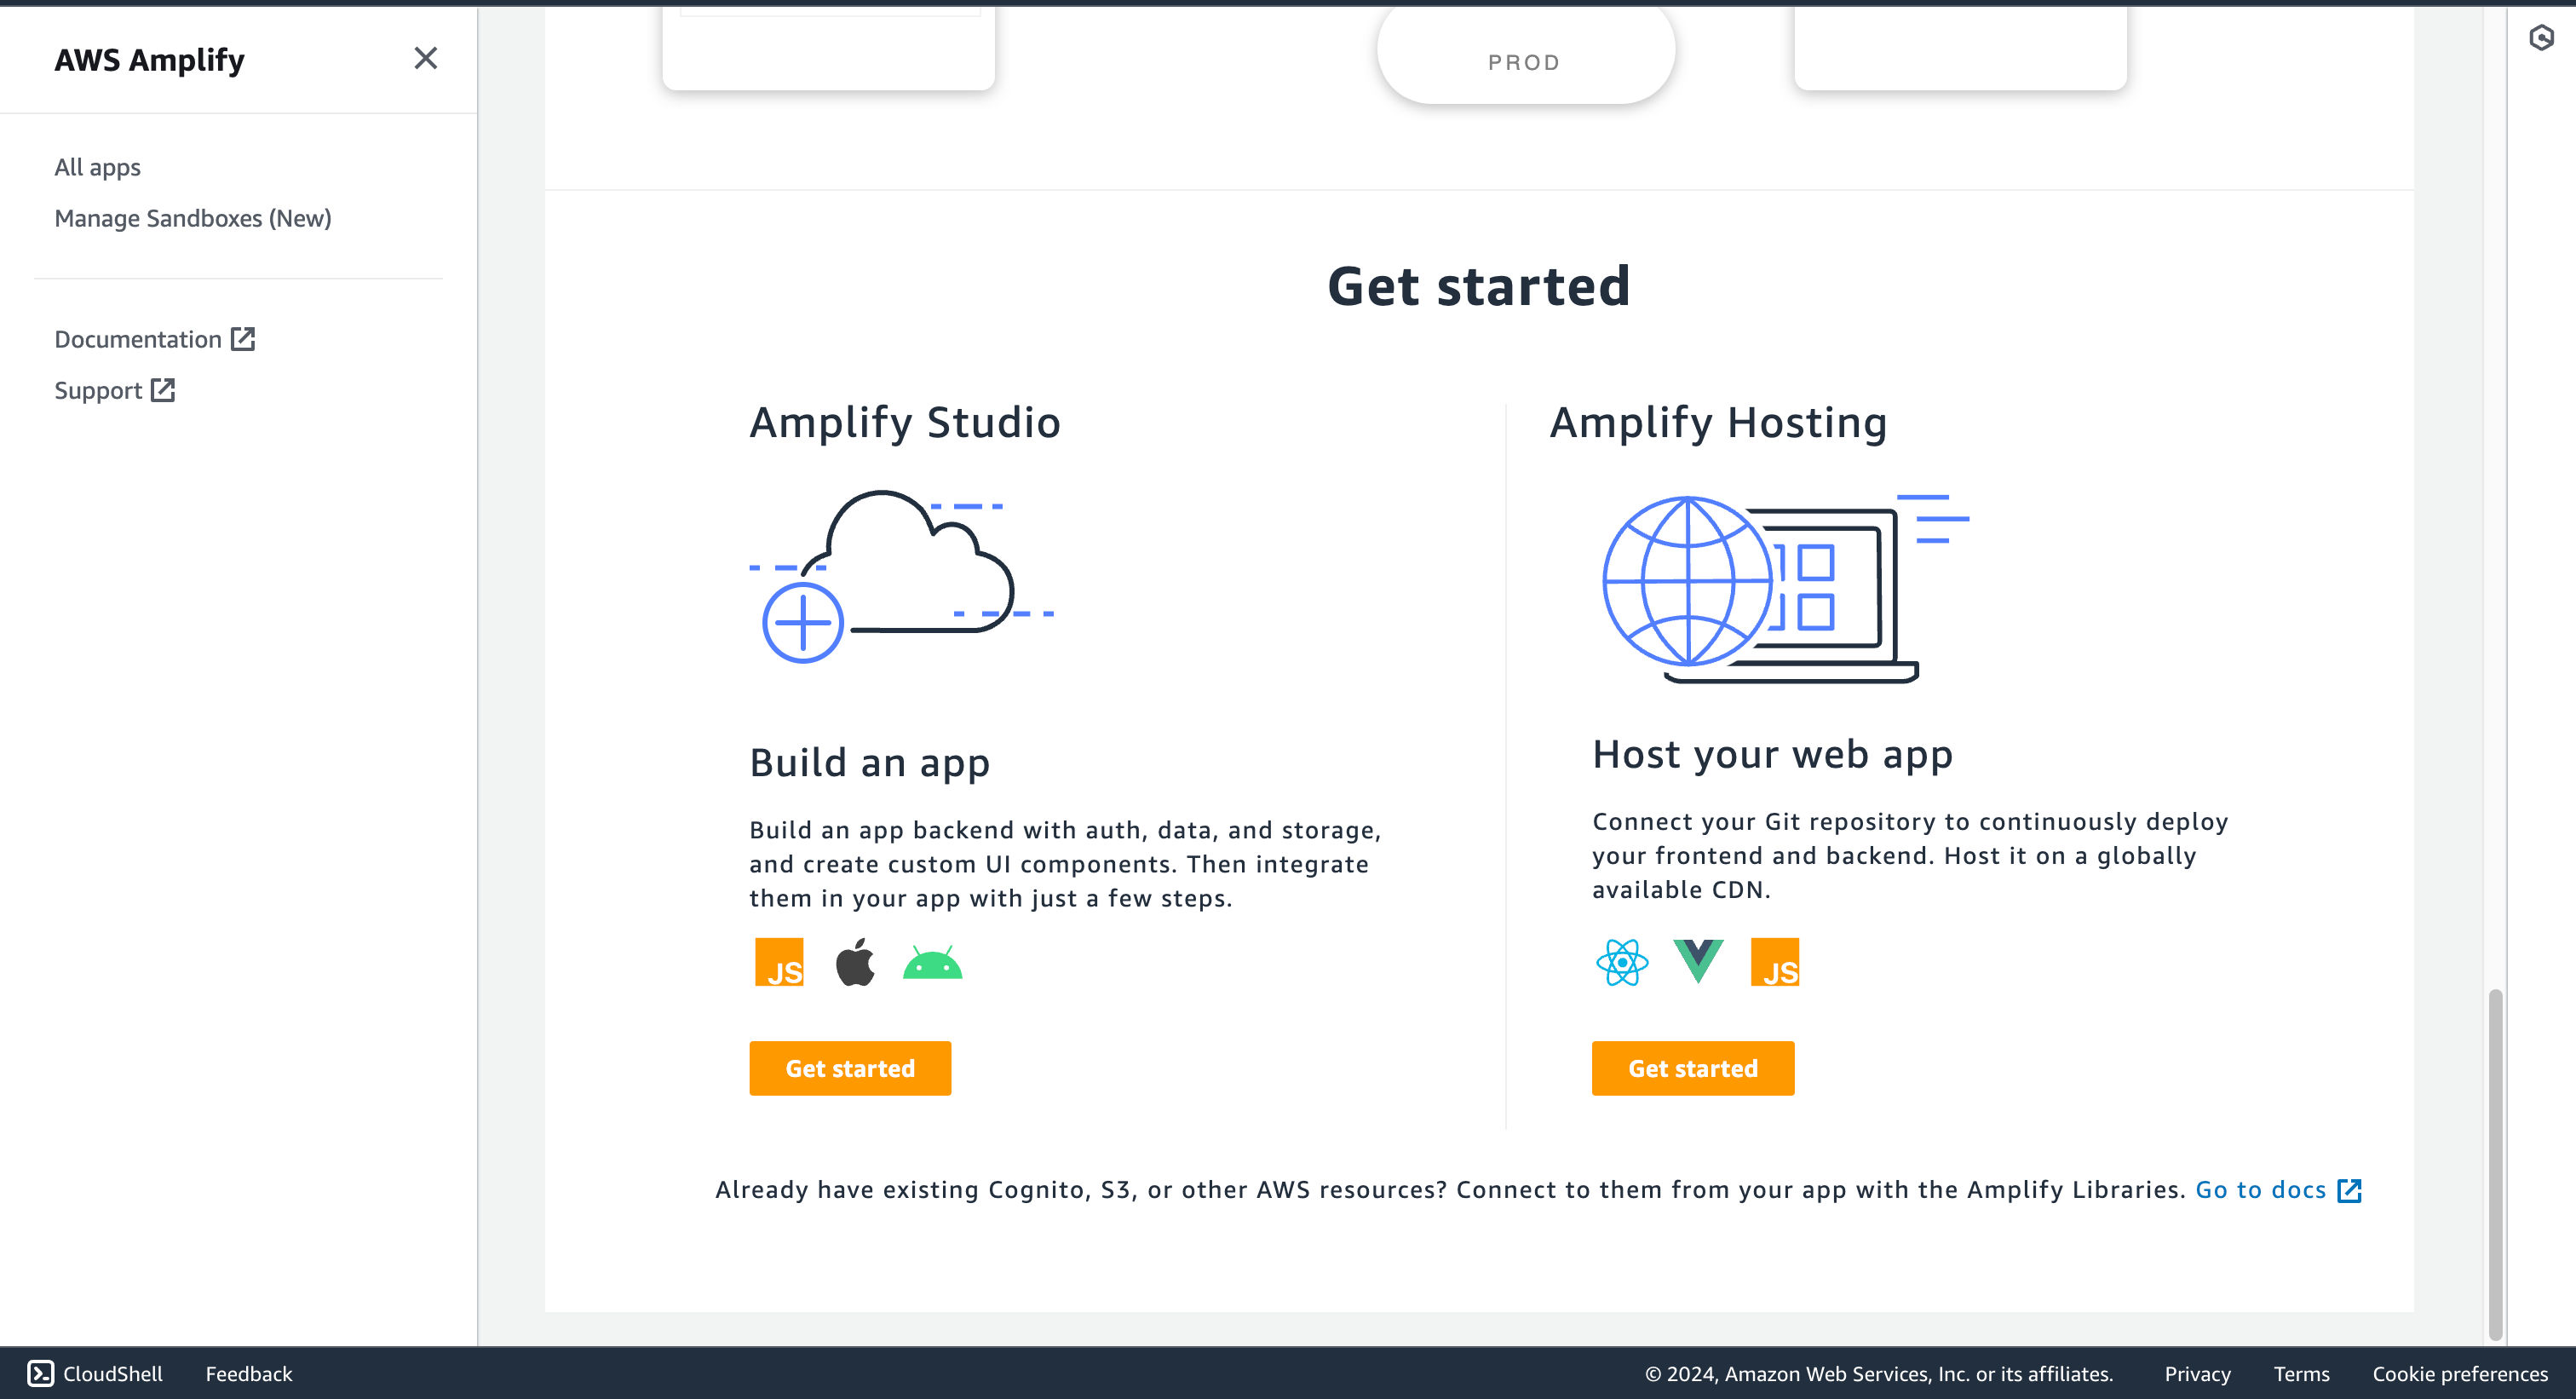
- Then, navigate to the AWS Amplify Dashboard and click on **Get Started** under the **Host your web app** section.
ℹ️ Available today with LaunchFast Starter Kits
In this guide, you will learn how to deploy a Next.js SSR project to AWS Amplify. You will go through the process of setting up a new Next.js project, enabling server-side rendering using the AWS Amplify adapter, and finally deploying it to AWS Amplify.
## Prerequisites
You'll need the following:
- [Node.js 20](https://nodejs.org/en/blog/announcements/v20-release-announce) or later
- An [AWS](https://aws.amazon.com/free) account
## Create a new Next.js application
Let’s get started by creating a new Next.js project. Open your terminal and run the following command:
```bash
npx create-next-app@latest my-app
```
When prompted, choose:
- `Yes` when prompted to use TypeScript.
- `No` when prompted to use ESLint.
- `Yes` when prompted to use Tailwind CSS.
- `No` when prompted to use `src/` directory.
- `Yes` when prompted to use App Router.
- `No` when prompted to customize the default import alias (`@/*`).
Once that is done, move into the project directory and start the app in development mode by executing the following command:
```bash
cd my-app
npm run dev
```
The app should be running on [localhost:3000](http://localhost:3000/).
Then, you'll need to make the following change to your `next.config.js` file. Open the file and add the following code:
```tsx title="next.config.js" ins={2}
module.exports = {
output: 'standalone',
}
```
Then, create an `amplify.mjs` file at the root of the repository with the following code:
```tsx
// File: amplify.mjs
import { join } from 'node:path';
import { writeFileSync, mkdirSync, existsSync, cpSync, rmSync } from 'node:fs';
// Define all the Amplify related directories
const amplifyDirectories = [
join(process.cwd(), '.amplify-hosting'),
join(process.cwd(), '.amplify-hosting', 'static'),
join(process.cwd(), '.amplify-hosting', 'static', '_next'),
join(process.cwd(), '.amplify-hosting', 'compute'),
join(process.cwd(), '.amplify-hosting', 'compute', 'default'),
join(process.cwd(), '.amplify-hosting', 'compute', 'default', 'node_modules'),
]
// Create directories if they do no exist already
if (existsSync(amplifyDirectories[0])) rmSync(amplifyDirectories[0], { force: true, recursive: true })
// Create directories if they do no exist already
amplifyDirectories.forEach((i => mkdirSync(i)))
// A general default configuration to fallback to compute if no matching static assets found
const deployManifestConfig = {
version: 1,
routes: [
{
path: `/assets/*`,
target: {
kind: "Static",
},
},
{
path: `/*.*`,
target: {
kind: "Static",
},
fallback: {
kind: "Compute",
src: "default",
},
},
{
path: "/*",
target: {
kind: "Compute",
src: "default",
},
},
],
computeResources: [
{
name: "default",
entrypoint: "server.js",
runtime: "nodejs18.x",
},
],
framework: {
name: "next",
version: "13.5.6",
},
};
// Write the config to .amplify-hosting/deploy-manifest.json
writeFileSync(
join(process.cwd(), ".amplify-hosting", "deploy-manifest.json"),
JSON.stringify(deployManifestConfig),
);
// Copy the static assets generated in .next/static and public to .amplify-hosting/static directory
cpSync(join(process.cwd(), 'public'), amplifyDirectories[1], { recursive: true })
cpSync(join(process.cwd(), '.next', 'static'), amplifyDirectories[2], { recursive: true })
// Copy the static assets generated in .next/standalone to .amplify-hosting/compute directory
cpSync(join(process.cwd(), '.next', 'standalone'), amplifyDirectories[4], { recursive: true })
// Remove .next/static and public from .amplify-hosting/compute/default
rmSync(join(amplifyDirectories[4], '.next', 'static'), { force: true, recursive: true })
rmSync(join(amplifyDirectories[4], 'public'), { force: true, recursive: true })
```
Then, create an `amplify.yml` file at the root of the repository with the following code:
```yml
version: 1
frontend:
phases:
preBuild:
commands:
- npm ci
build:
commands:
- env >> .env
- npm run build
- node amplify.mjs
artifacts:
baseDirectory: .next
files:
- '**/*'
cache:
paths:
- node_modules/**/*
```
The code above does the following:
- Uses `preBuild` commands to install the dependencies of your Next.js project.
- Uses `build` commands to:
- Store all the environment variables into `.env` file at the root of the project.
- Build your Next.js application.
- Move the `node_modules` directory and `.env` file to Amplify's compute directory.
## Deploy to AWS Amplify
The code is now ready to deploy to AWS Amplify. Use the following steps to deploy:
- Start by creating a GitHub repository containing your app's code.
- Then, navigate to the AWS Amplify Dashboard and click on **Get Started** under the **Host your web app** section.
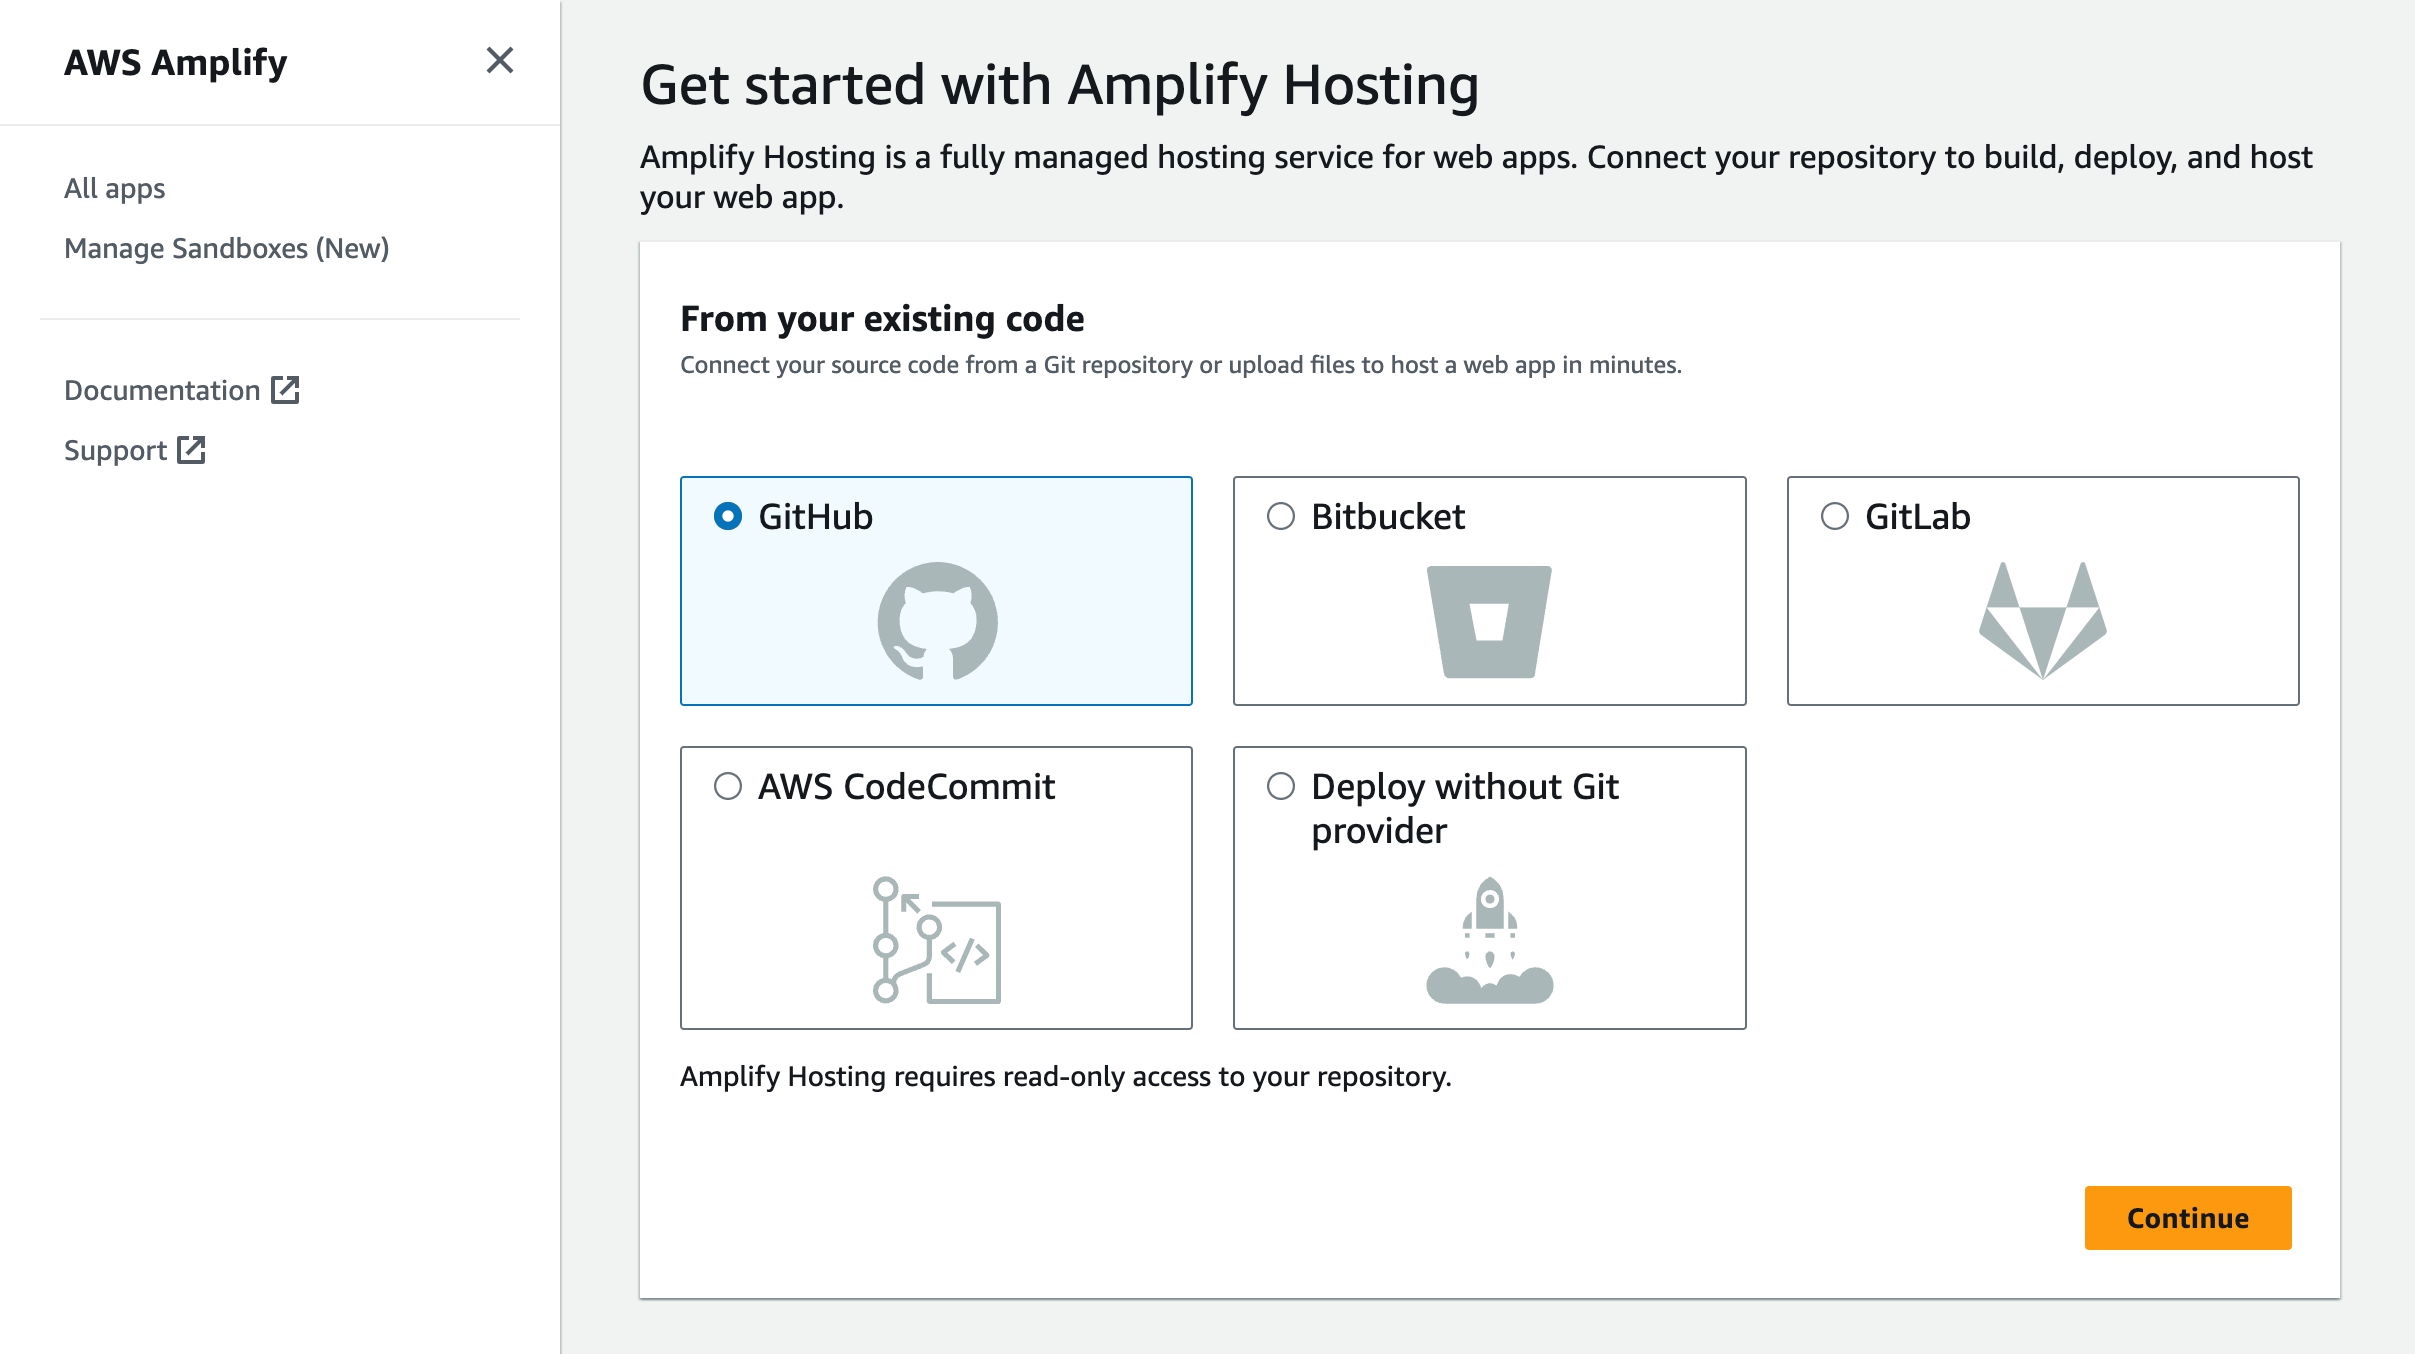
 - Select **GitHub** as the source of your Git repository.
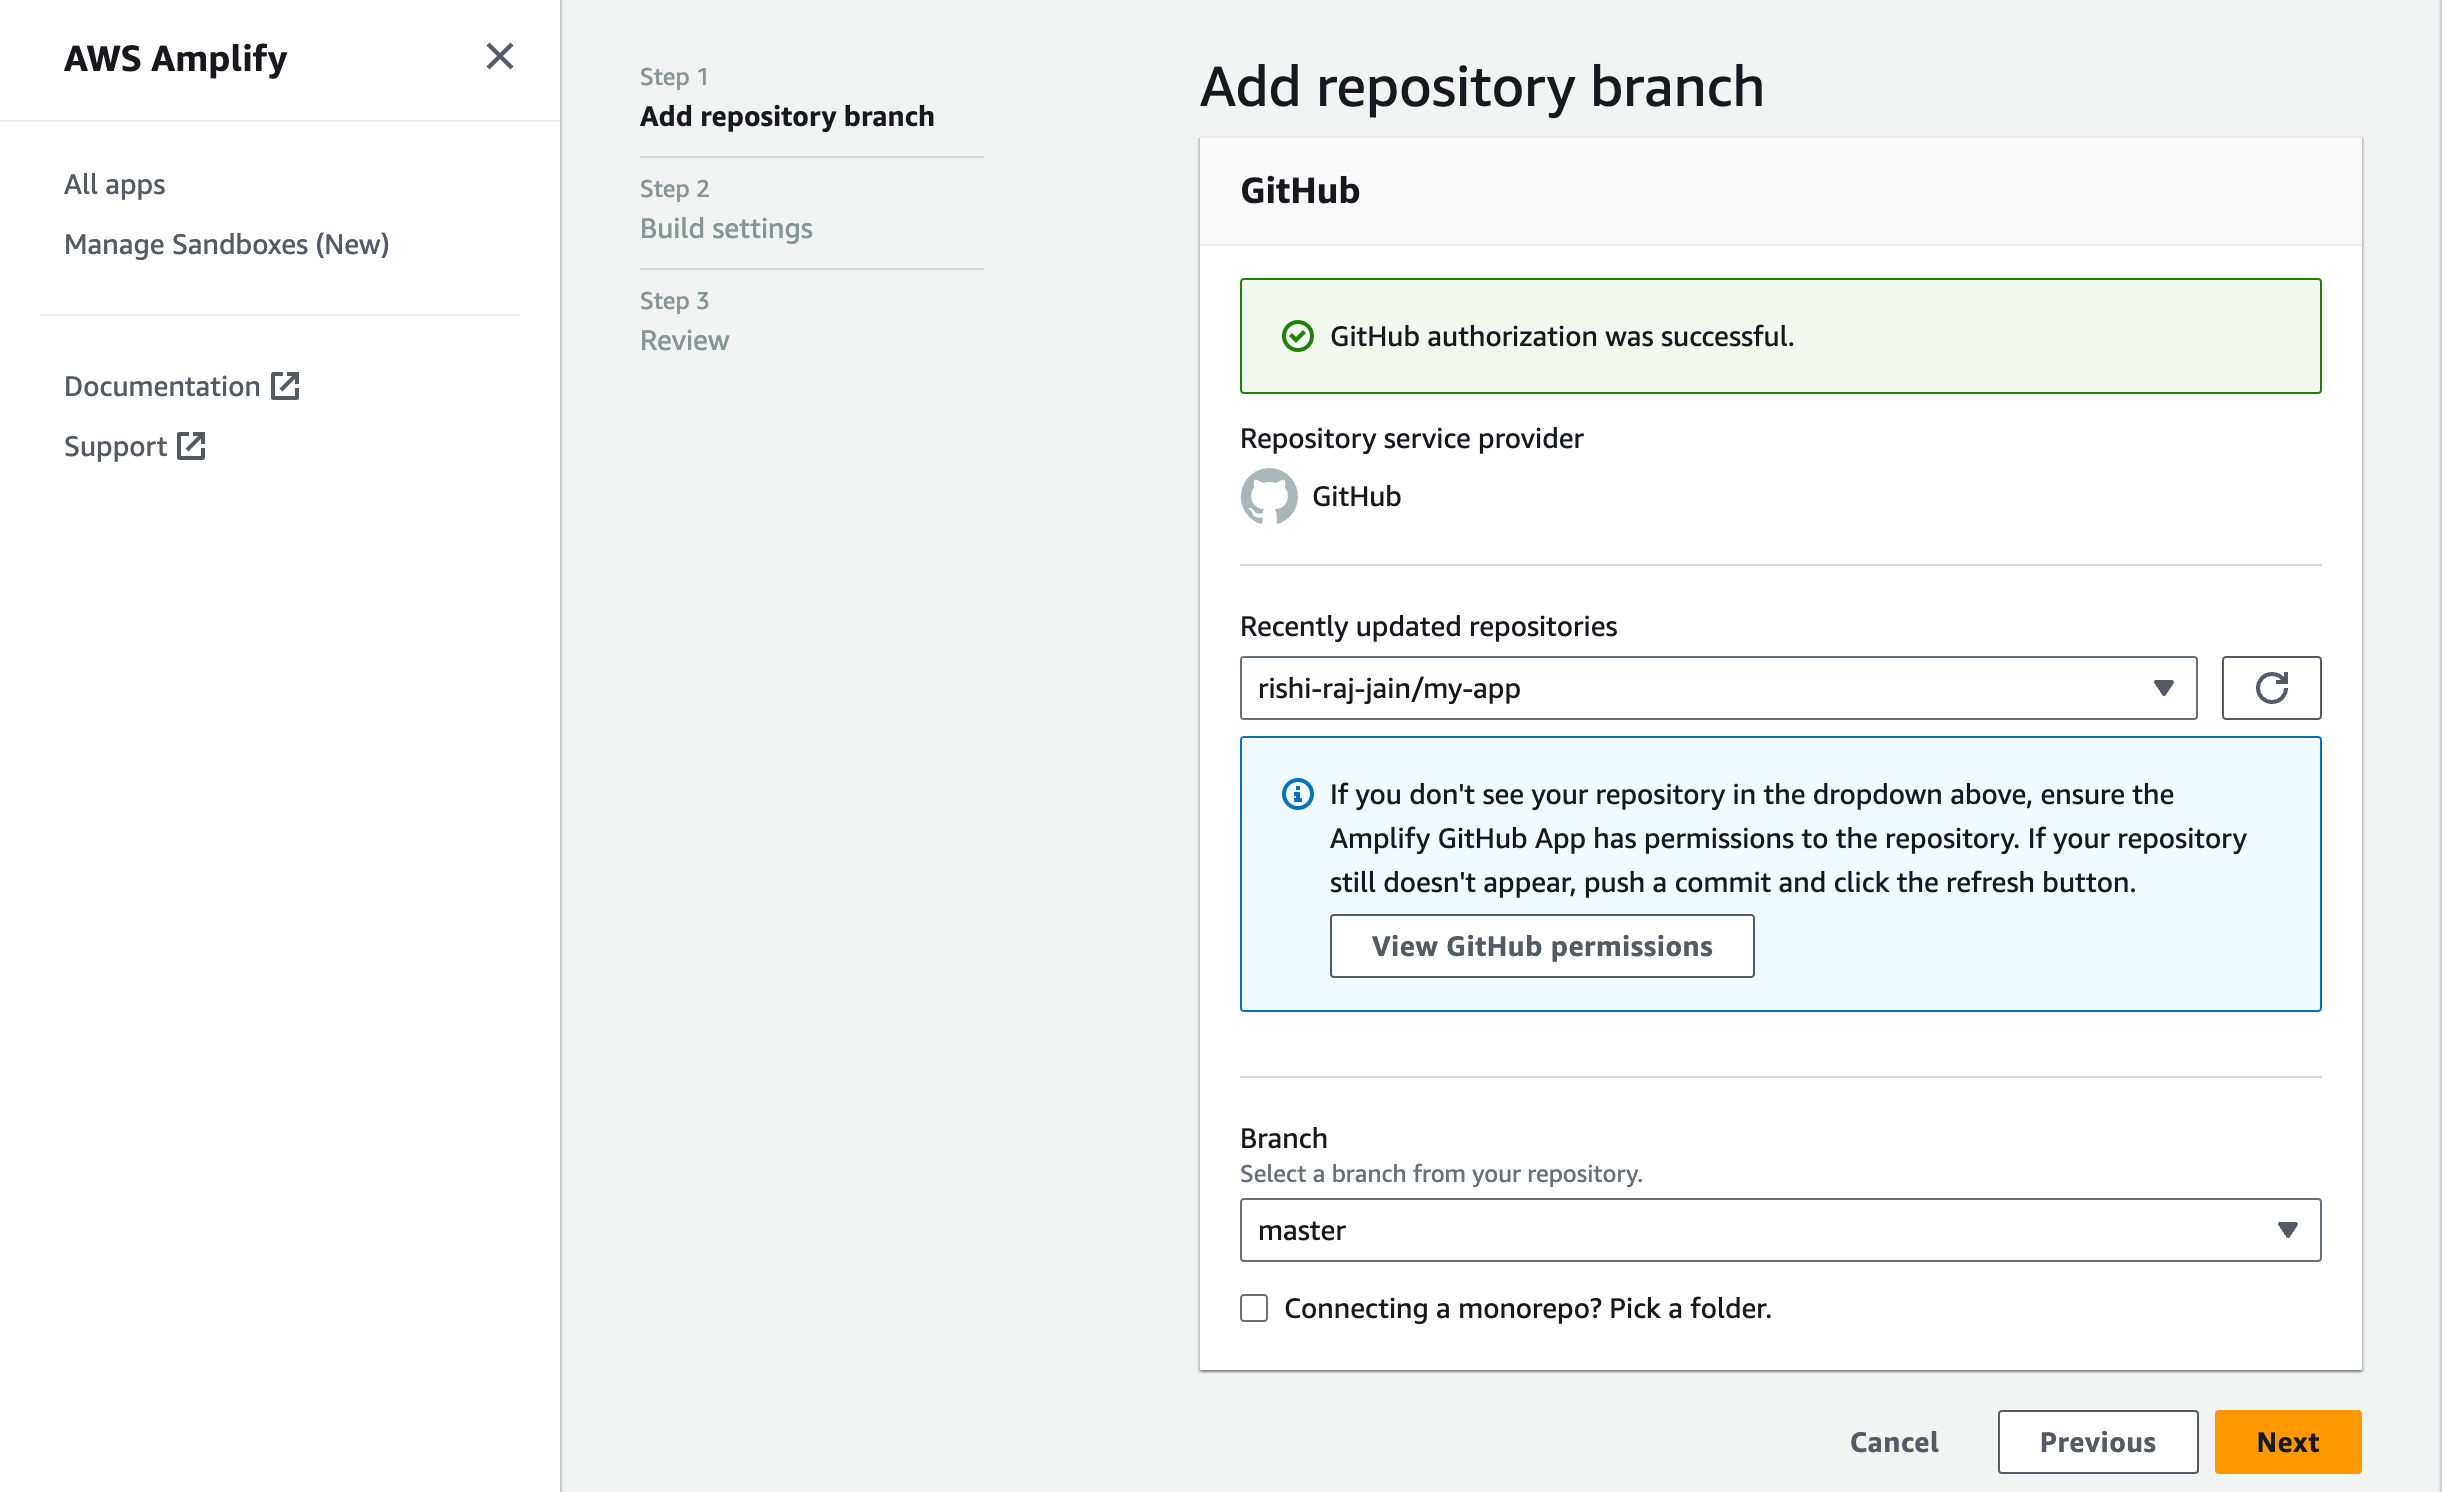
 - Link the new project to the GitHub repository you just created.
 - Give a name to your project, and click on **Advanced Settings**.
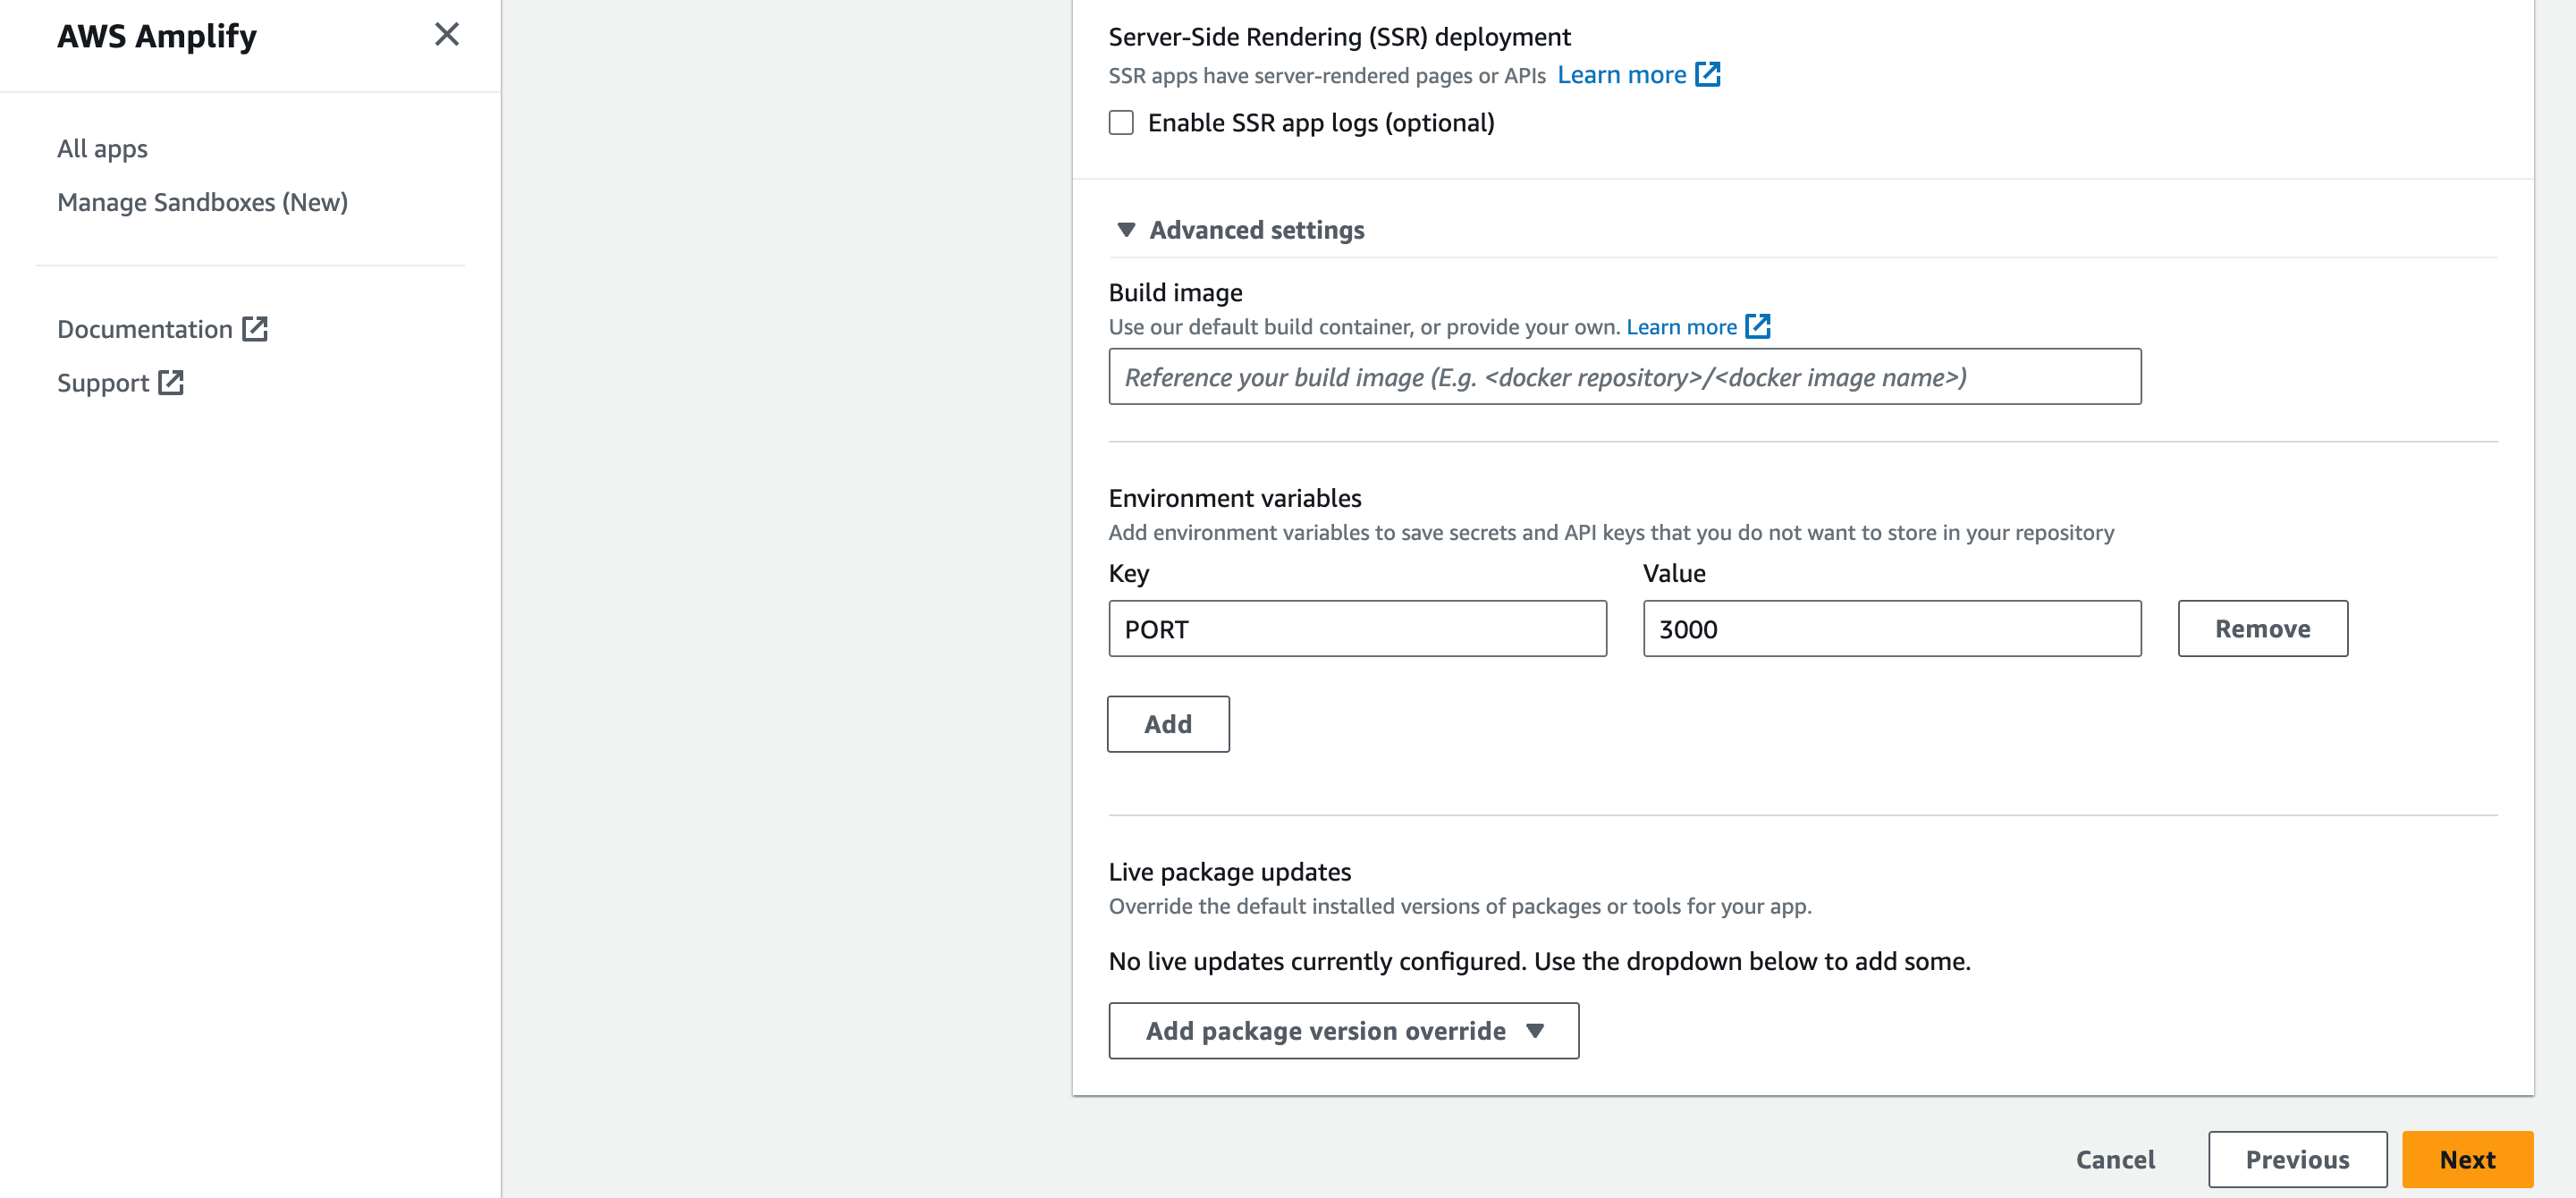
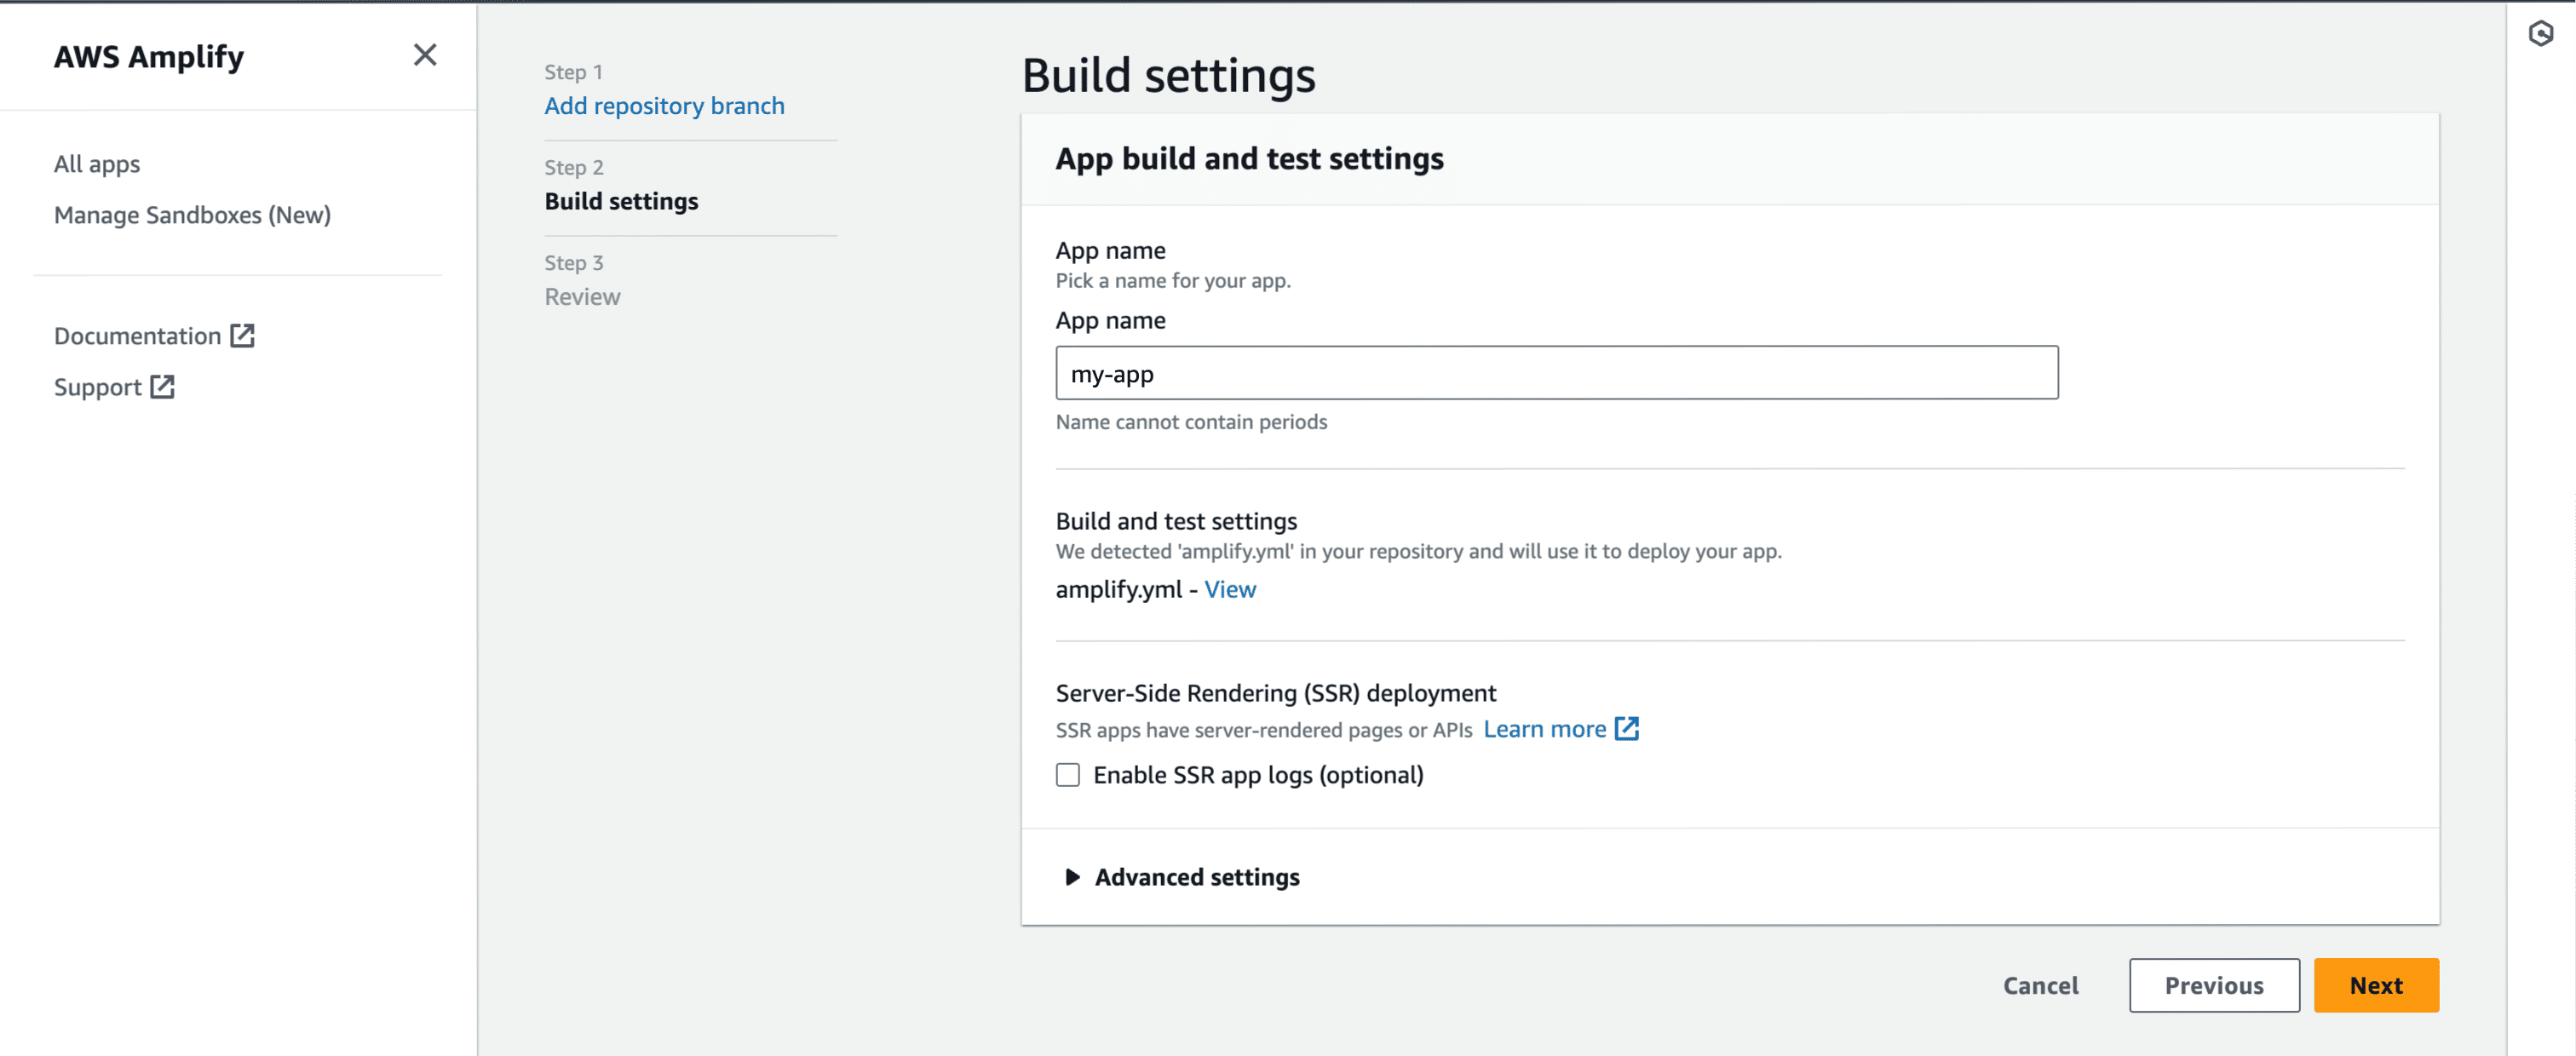 - In **Advanced Settings**, update the **Environment Variables** to match those in your local `.env` file, and `PORT` as 3000. Click **Next** to proceed.
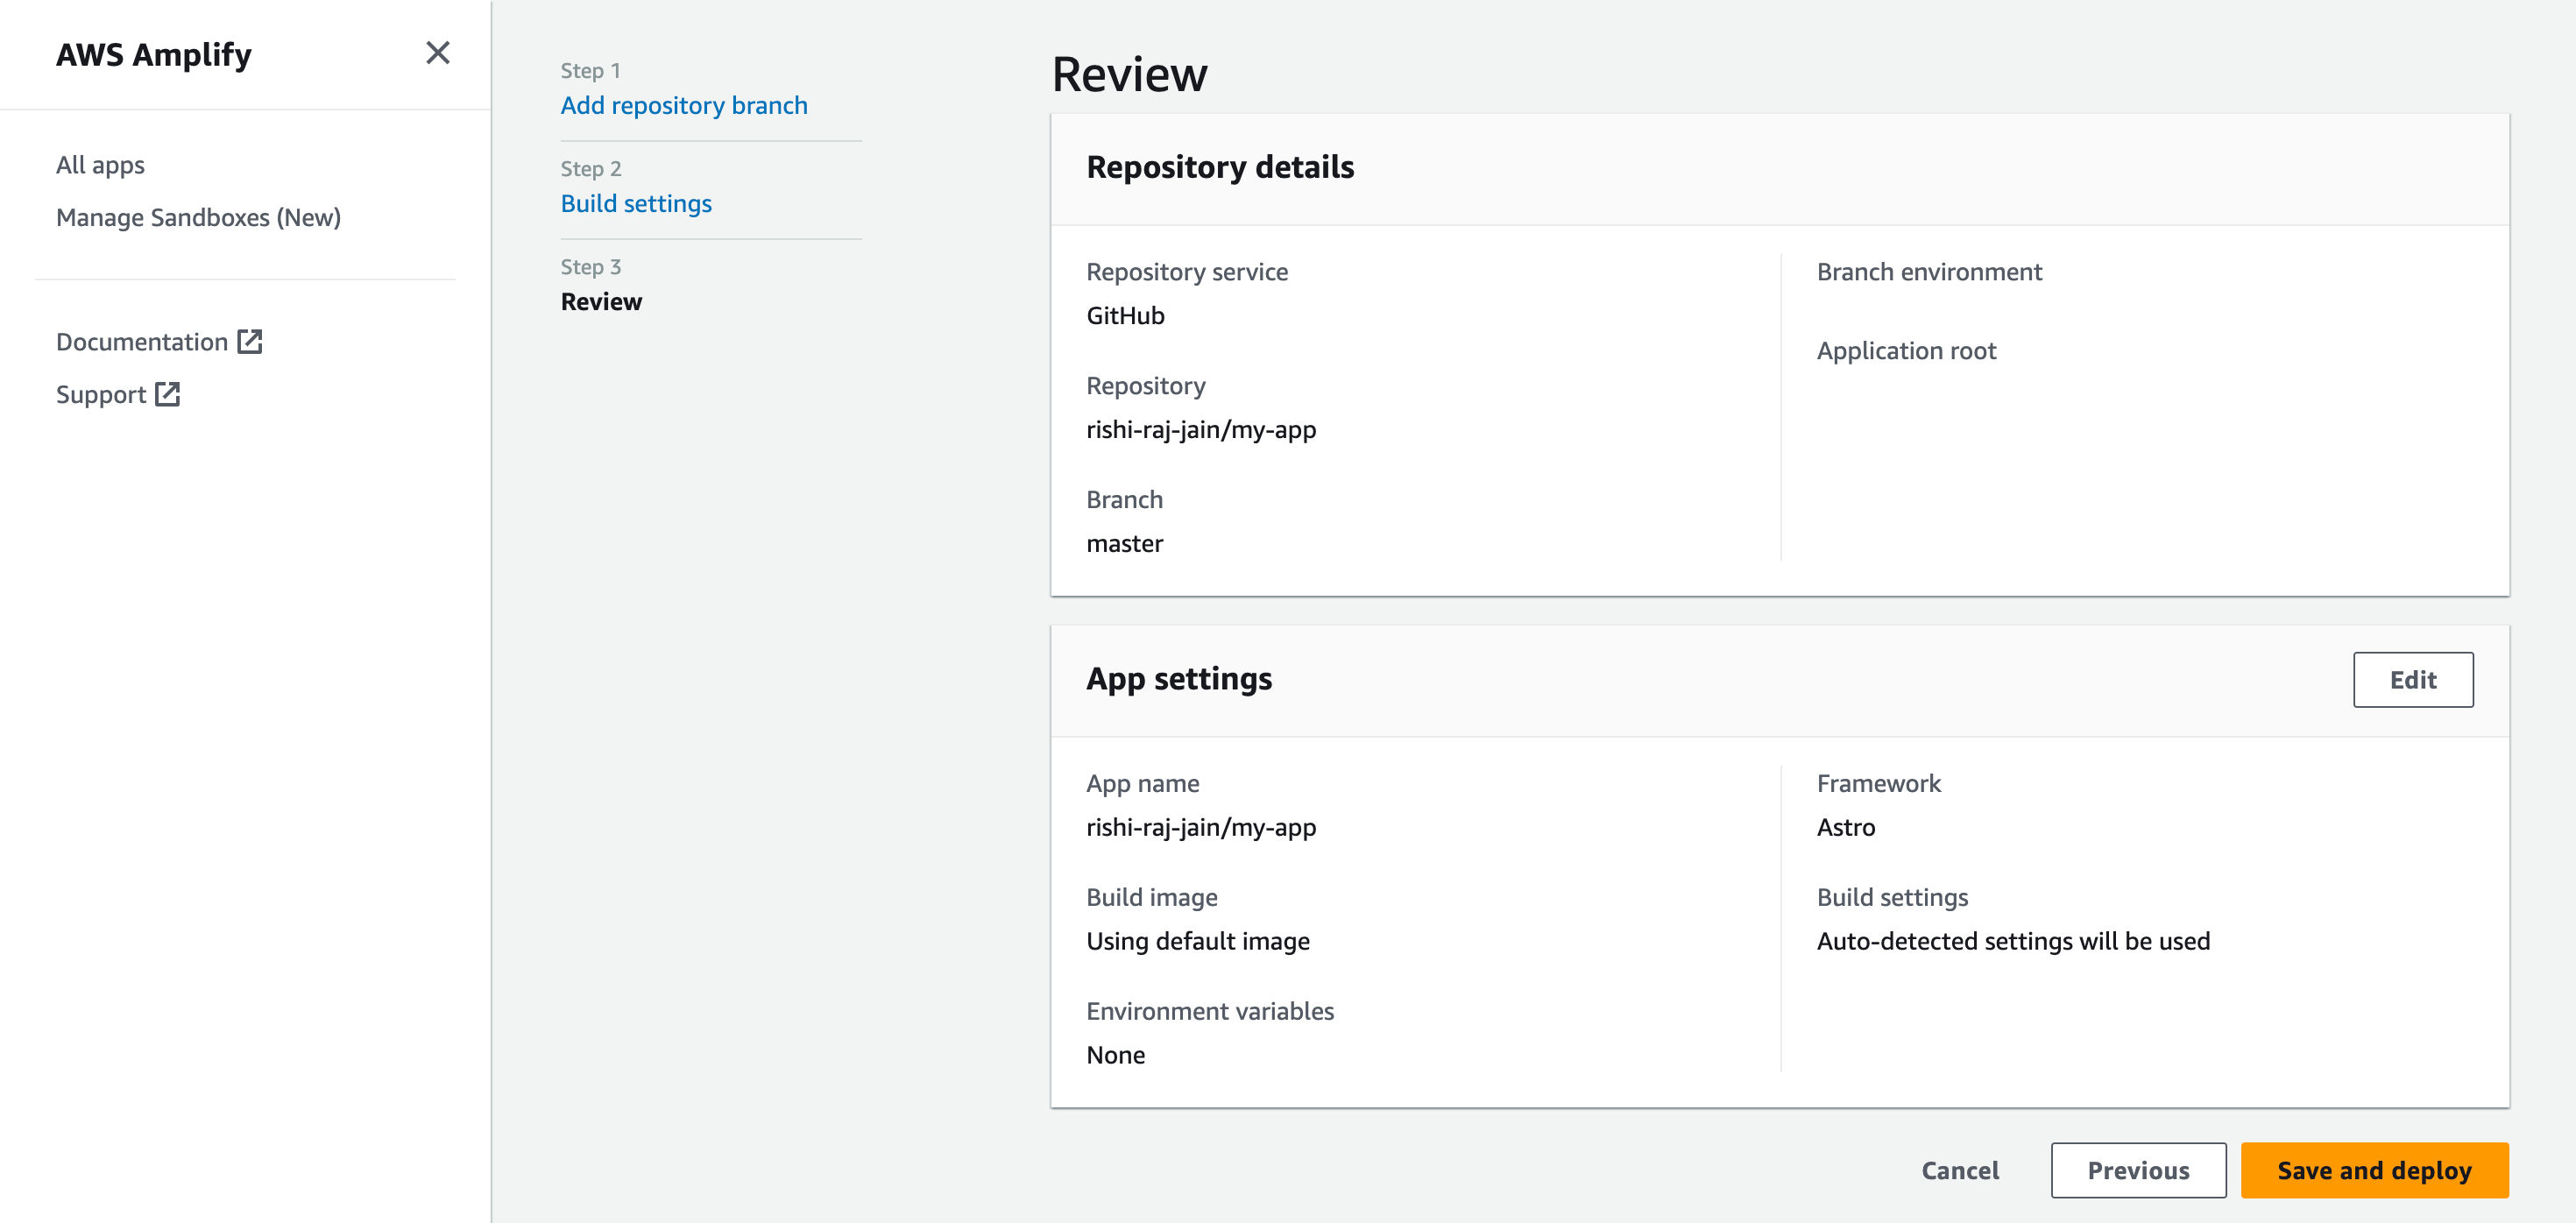
 - Click **Save and Deploy** to deploy your website.
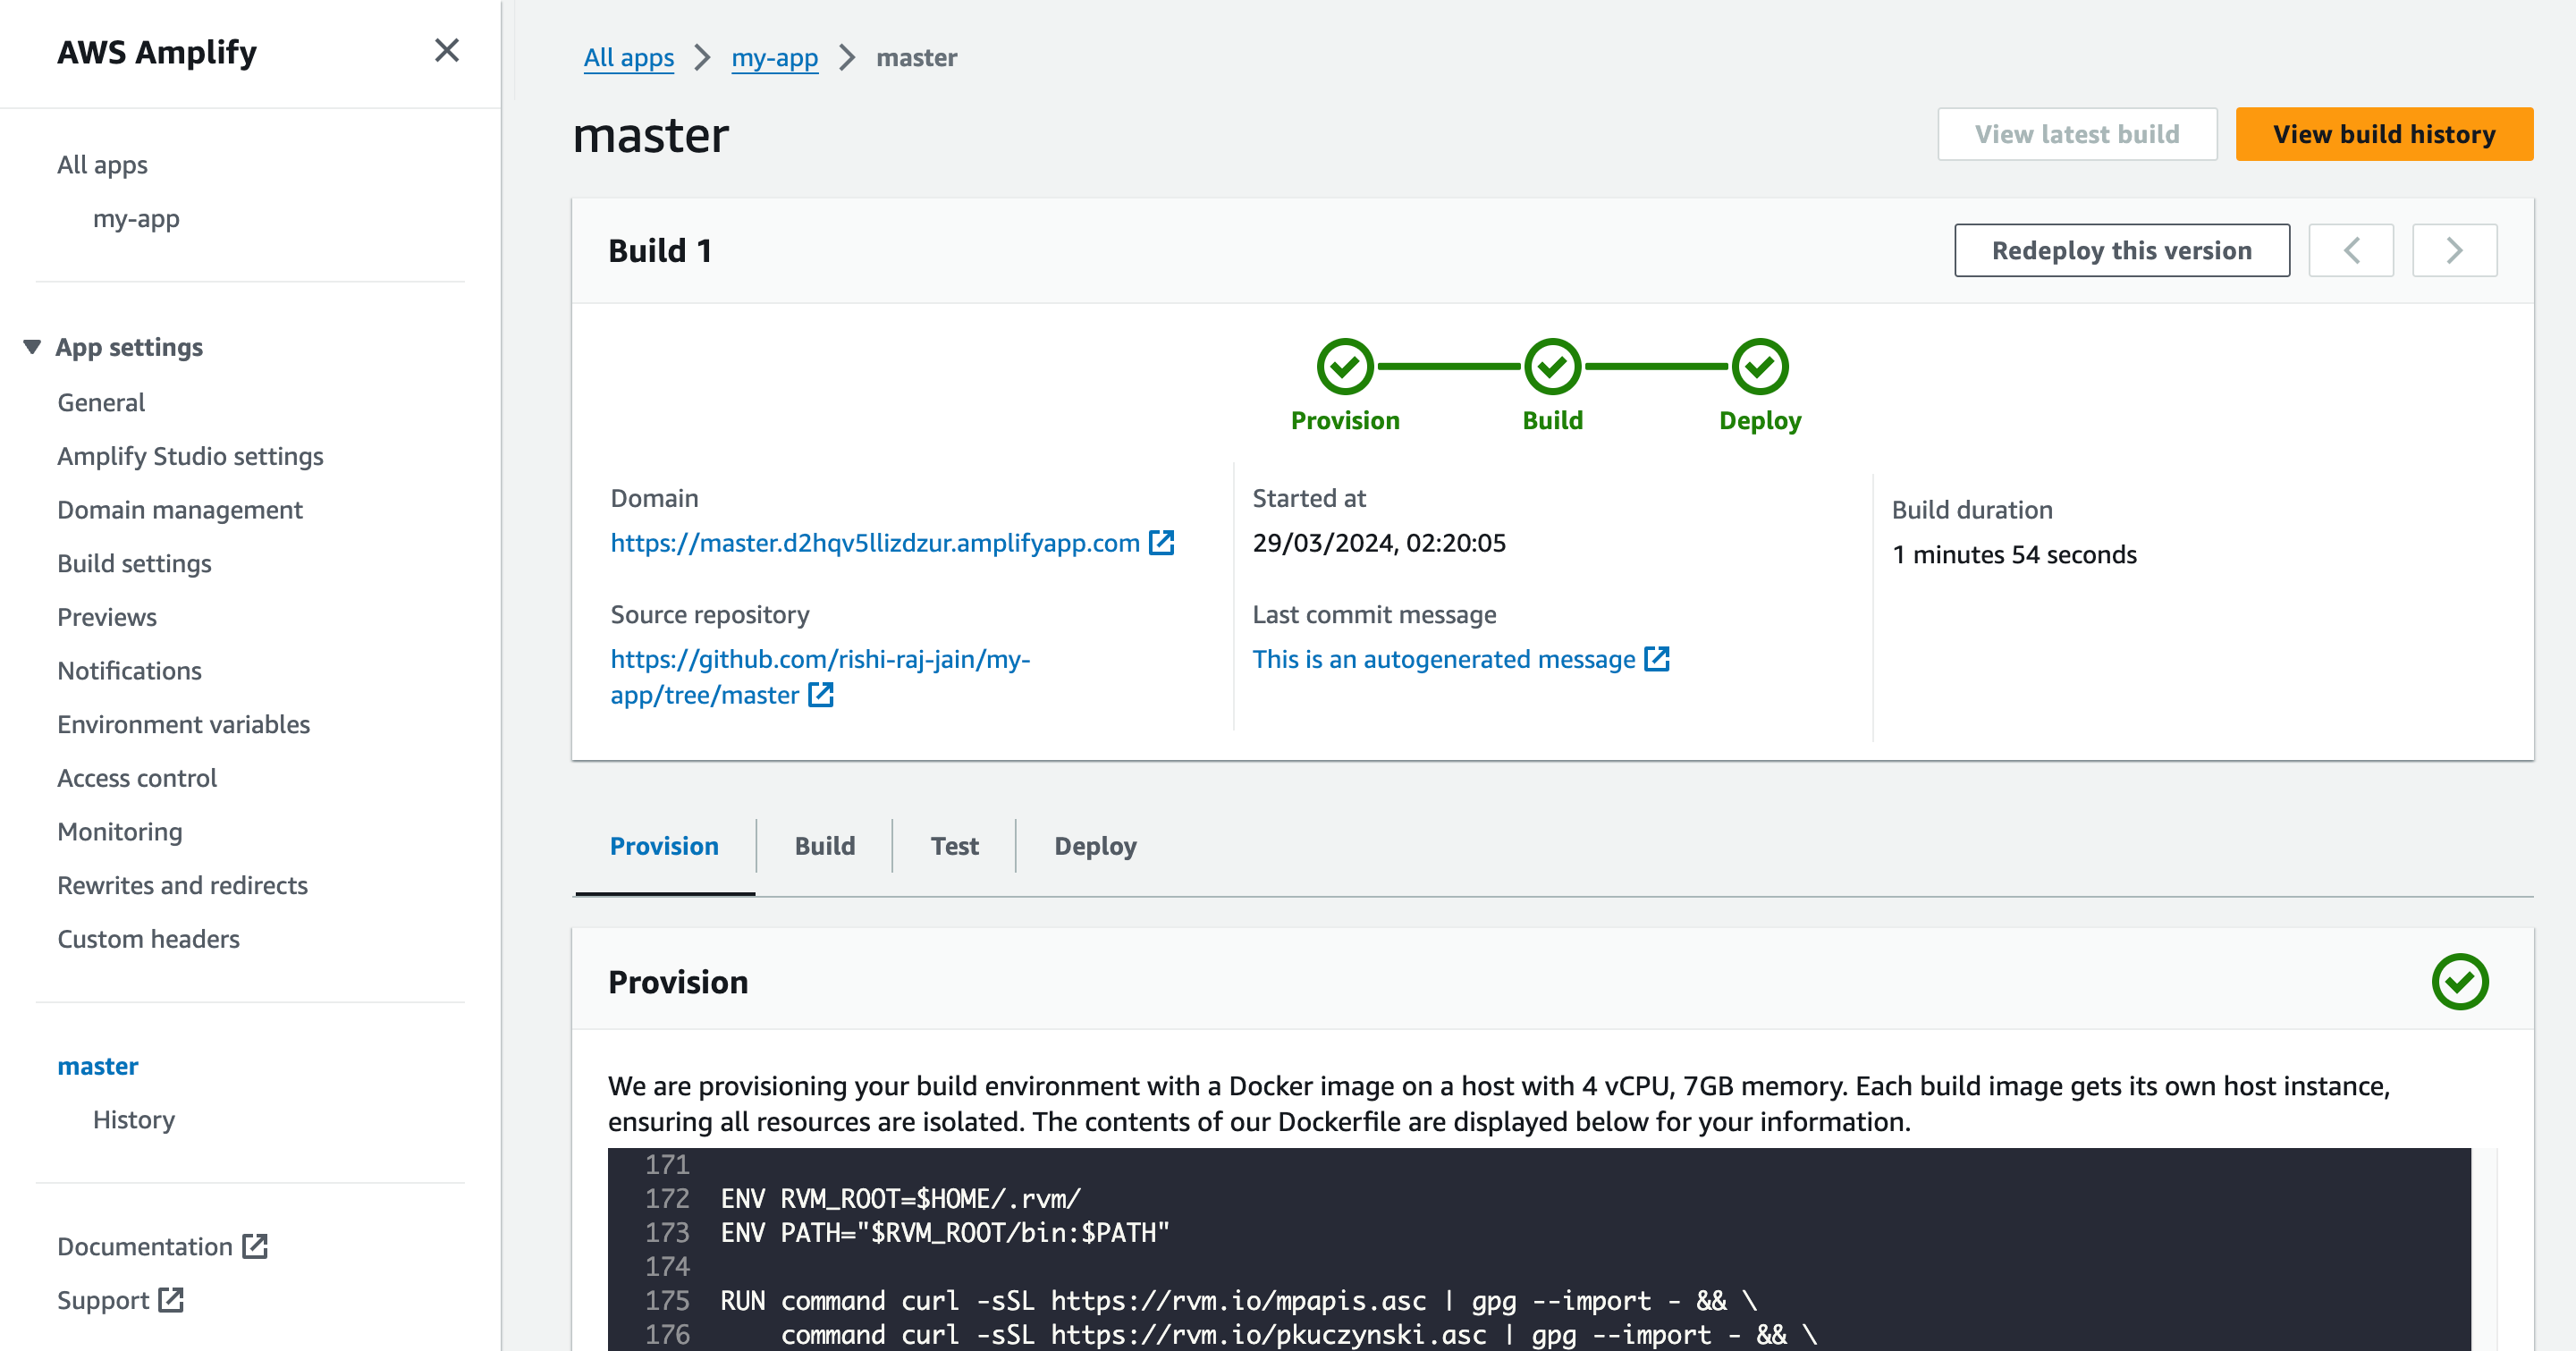
 - Grab the deployment URL under the **Domain** title in the successful build information.
 ## Conclusion
Yay! You now have a Next.js project that automatically deploys to AWS Amplify upon Git push.
If you have any questions or comments, feel free to reach out to me on [Twitter](https://twitter.com/direct_messages/create/rishi_raj_jain_).
## Conclusion
Yay! You now have a Next.js project that automatically deploys to AWS Amplify upon Git push.
If you have any questions or comments, feel free to reach out to me on [Twitter](https://twitter.com/direct_messages/create/rishi_raj_jain_).