---
title: "Authenticating users in Astro with Clerk and React"
description: "How to authenticate users in Astro application using React and Clerk?"
source: "https://www.launchfa.st/blog/react-astro-clerk"
author: "Rishi Raj Jain"
created_at: 2024-04-12T00:00:00.000Z
updated_at: 2026-07-02T00:00:00.000Z
---
> **Site index for agents**
> Fetch https://www.launchfa.st/llms.txt to discover every page on this site.
> Every page is also available as Markdown by appending `.md` to its URL.
In this guide, you will learn how to authenticate users in an Astro application using Clerk and React. You will go through the process of setting up a new Astro project, enabling server-side rendering using the Node.js adapter, and integrating Clerk to authenticate users seamlessly.
## Prerequisites
You'll need the following:
- [Node.js 20](https://nodejs.org/en/blog/announcements/v20-release-announce) or later
- A [Clerk](https://dashboard.clerk.com) account
## Table Of Contents
- [Create a new Astro application](#create-a-new-astro-application)
- [Integrate React in your Astro project](#integrate-react-in-your-astro-project)
- [Integrate Node.js adapter in your Astro project](#integrate-nodejs-adapter-in-your-astro-project)
- [Create a new Clerk application](#create-a-new-clerk-application)
- [Integrate Clerk in your Astro project](#integrate-clerk-in-your-astro-project)
- [Install the Clerk's Community SDK for Astro](#install-the-clerks-community-sdk-for-astro)
- [Intercept all incoming requests using Astro middleware](#intercept-all-incoming-requests-using-astro-middleware)
- [Create the index route](#create-the-index-route)
- [Create a custom sign-in page](#create-a-custom-sign-in-page)
- [Build and Test your Astro application locally](#build-and-test-your-astro-application-locally)
## Create a new Astro application
Let’s get started by creating a new Astro project. Execute the following command:
```bash
npm create astro@latest my-app
```
`npm create astro` is the recommended way to scaffold an Astro project quickly.
When prompted, choose:
- `Empty` when prompted on how to start the new project.
- `Yes` when prompted if you plan to write TypeScript.
- `Strict` when prompted how strict TypeScript should be.
- `Yes` when prompted to install dependencies.
- `Yes` when prompted to initialize a git repository.
Once that’s done, you can move into the project directory and start the app:
```bash
cd my-app
npm run dev
```
The app should be running on [localhost:4321](http://localhost:4321/).
Now, let's move on to integrate React in your Astro application.
## Integrate React in your Astro project
To create dynamic user interfaces with Clerk, you will integrate React in your Astro project. Execute the following command:
```bash
npx astro add react
```
`npx` allows us to execute npm package binaries without having to first install them globally.
When prompted, choose the following:
- `Yes` when prompted whether to install the React dependencies.
- `Yes` when prompted whether to make changes to the Astro configuration file.
- `Yes` when prompted whether to make changes to `tsconfig.json` file.
Now, let's move on to enabling server-side rendering in your Astro application.
## Integrate Node.js adapter in your Astro project
To authenticate and maintain user sessions with Clerk, you will enable server-side rendering in your Astro project via the Node.js adapter, execute the following command:
```bash
npx astro add node
```
When prompted, choose the following:
- `Yes` when prompted whether to install the Node.js dependencies.
- `Yes` when prompted whether to make changes to the Astro configuration file.
Now, let's move on to creating a new Clerk application.
## Create a new Clerk application
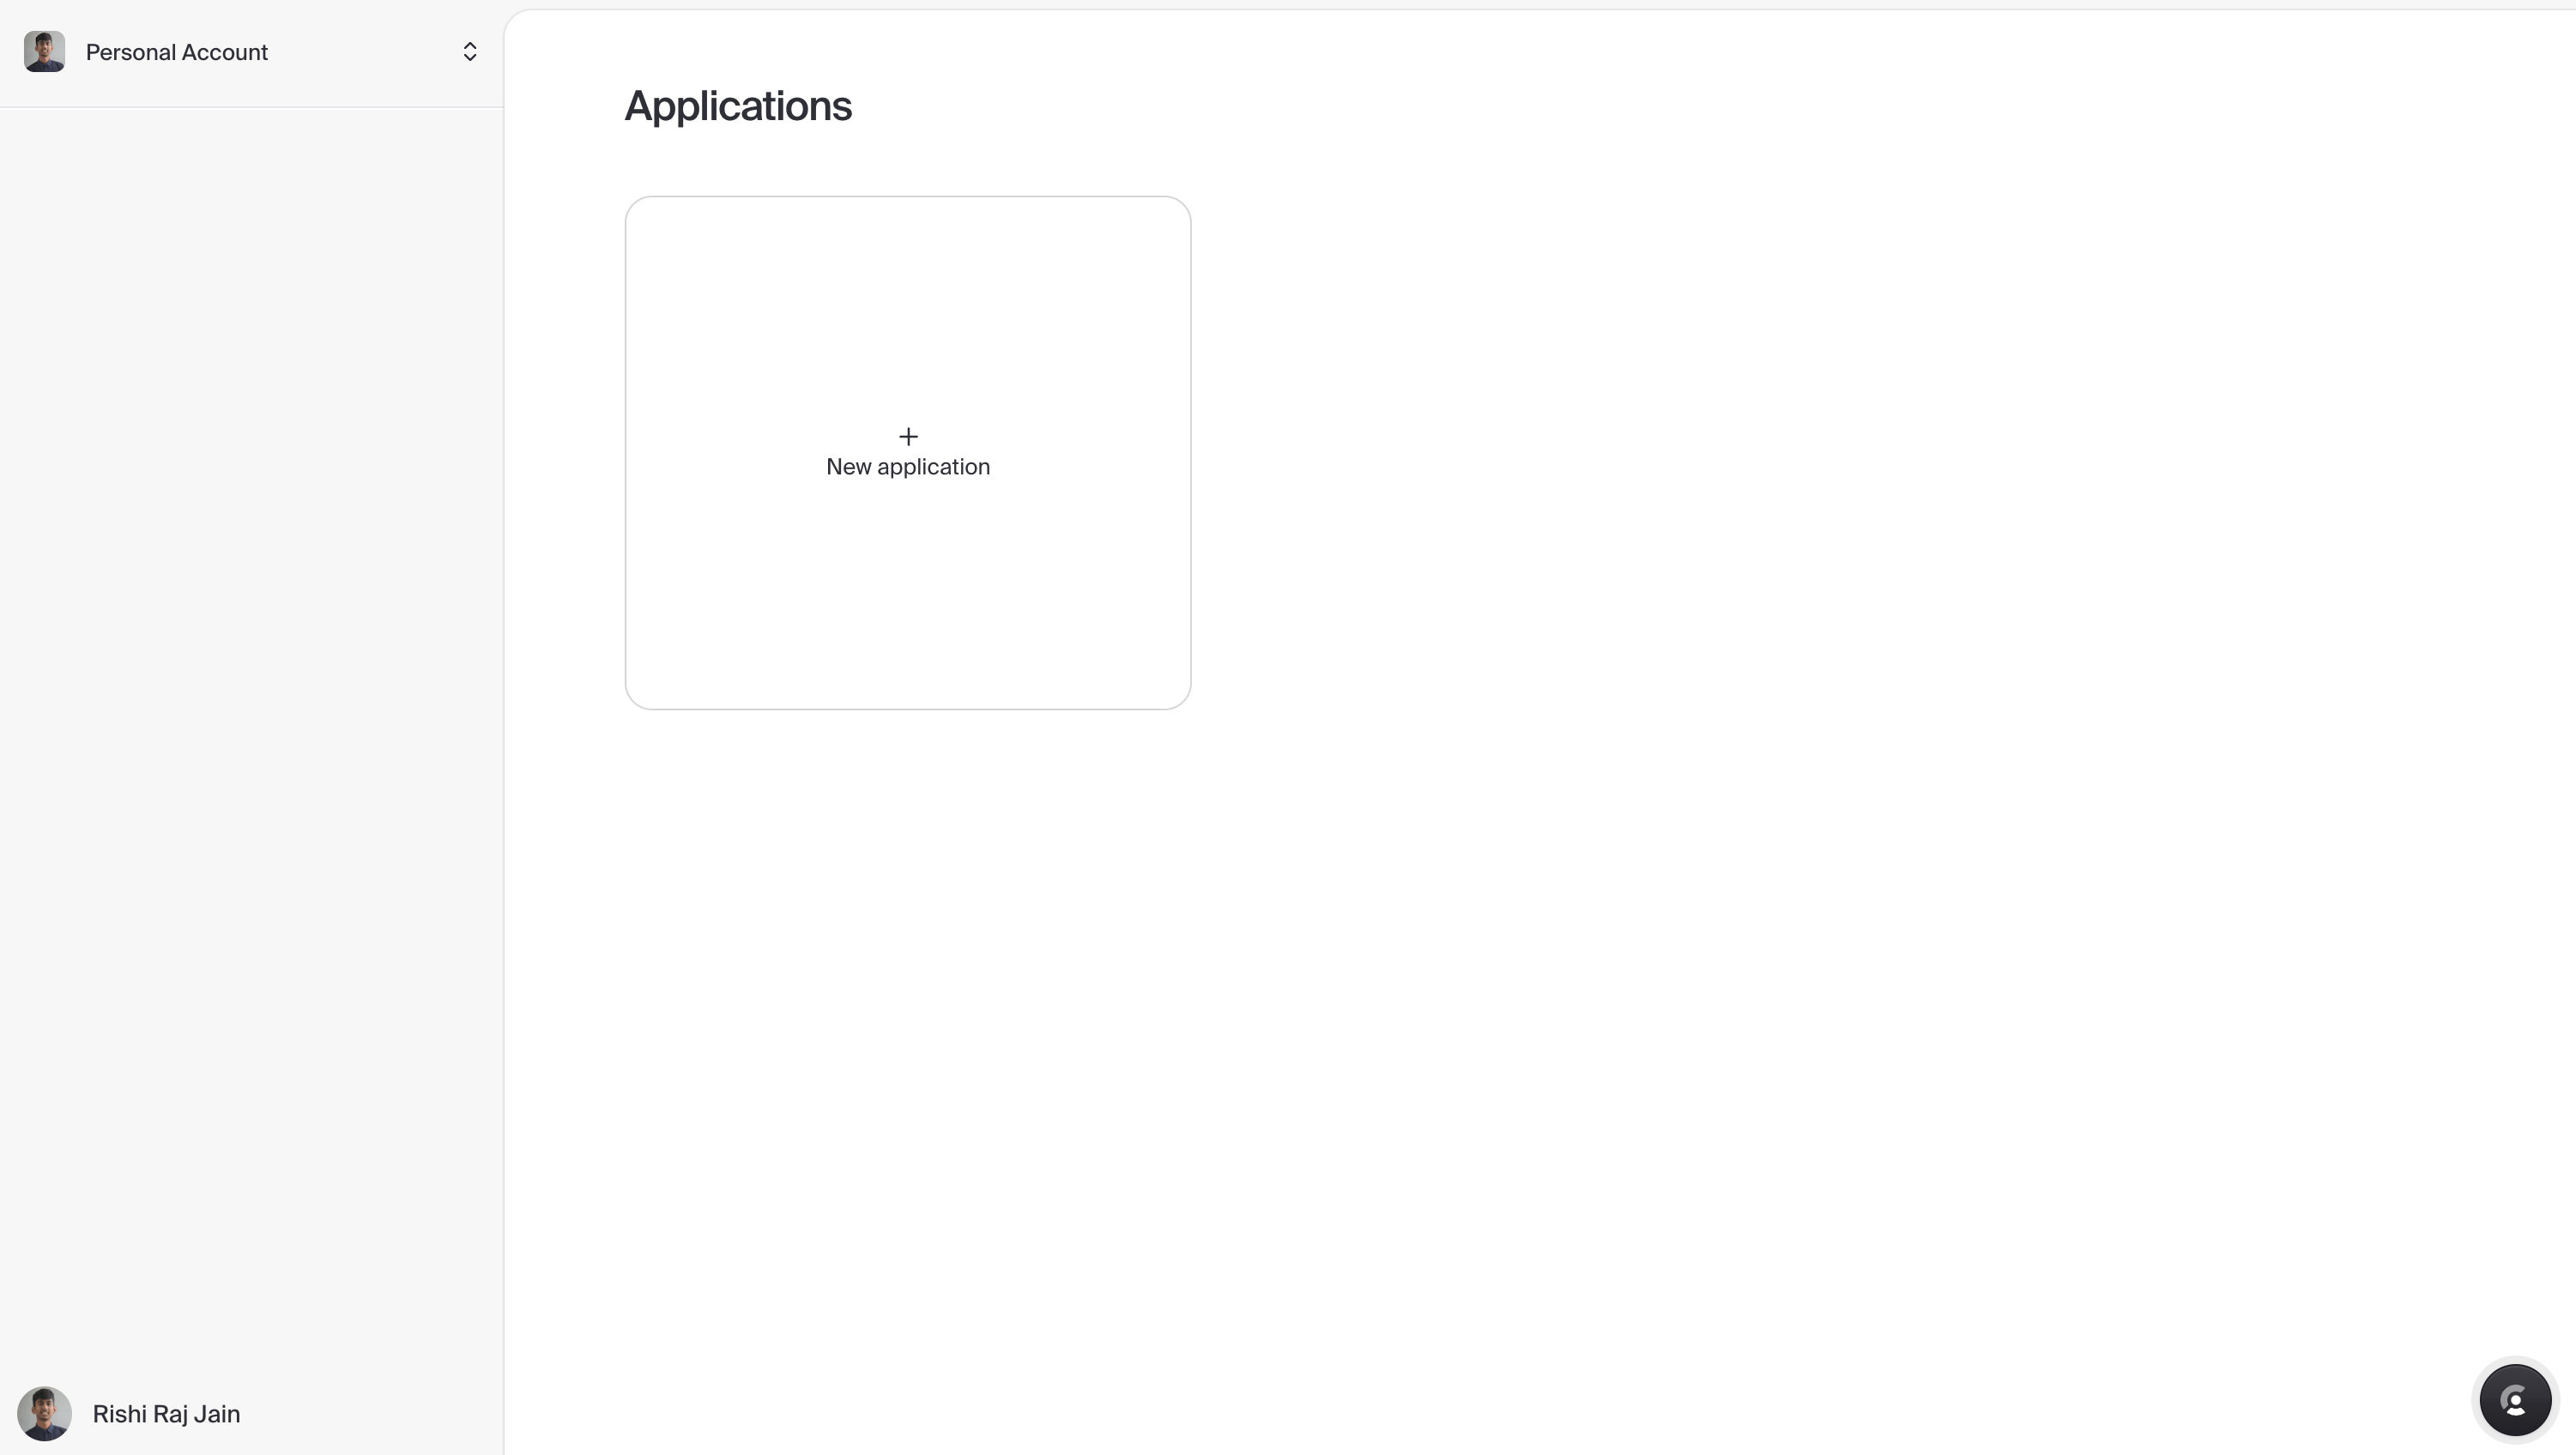
- In your [Clerk Dashboard](https://dashboard.clerk.com/), to create a new app, press the **+ New application** card to interactively start curating your own authentication setup form.
- With an application name of your choice, enable user authentication via credentials by toggling on **Email** and allow user authentication via Social Sign-On by toggling on providers such as **Google**, **GitHub** and **Microsoft**.
- Once the application is created in the Clerk dashboard, by default you will be shown with your application's API keys for Next.js. Copy and securely store these API Keys in a file named `.env` to be used in your Astro application as the following:
```bash
# .env
# Clerk Environment Variables
PUBLIC_ASTRO_APP_CLERK_PUBLISHABLE_KEY="pk_test_..."
CLERK_SECRET_KEY="sk_test_..."
```
Now, let's move on to integrate Clerk in your Astro project.
## Integrate Clerk in your Astro project
### Install the Clerk's Community SDK for Astro
Execute the command below to install the necessary package for building authentication with Clerk:
```bash
npm install astro-clerk-auth
```
The command installs the following library:
- `astro-clerk-auth`: A package that integrates Clerk with Astro via Middleware support and baked-in React and Astro components for Clerk.
Further, perform the following additions in `astro.config.mjs` to use the Clerk integration:
```tsx
// File: astro.config.mjs
import node from "@astrojs/node";
import react from "@astrojs/react";
import clerk from "astro-clerk-auth"; // [!code ++] // [!code focus]
import { defineConfig } from "astro/config";
export default defineConfig({
output: "server",
adapter: node({
mode: "standalone",
}),
integrations: [
react(),
clerk({ // [!code ++] // [!code focus]
afterSignInUrl: "/", // [!code ++] // [!code focus]
afterSignUpUrl: "/", // [!code ++] // [!code focus]
}), // [!code ++] // [!code focus]
],
});
```
### Intercept all incoming requests using Astro middleware
To make sure that each request maintains a user session accessible over the server-side endpoints, and in `.astro` pages during server-side rendering, you are going to create a middleware that uses Clerk to decode/encode a user session from the cookie.
Create a file `middleware.ts` in the `src` directory with the following code:
```tsx
// File: src/middleware.ts
import { clerkMiddleware } from "astro-clerk-auth/server";
export const onRequest = clerkMiddleware();
```
### Create the index route
Create an `App.jsx` inside the `src` directory with the following code:
```tsx
import { SignedIn, SignedOut, UserButton } from "astro-clerk-auth/client/react";
export default function () {
return <>
Sign In
}
```
The code above does the following:
- Imports the `SignedIn` and `SignedOut` components that describe the state of the user whether signed in or not.
- Creates conditional states, showing a `Sign In` button if the user is signed out, otherwise, renders an interactive `UserButton` component that allows a user to sign out and manage their settings.
To use this React component on the home page of your application, make the following changes in `src/pages/index.astro` file:
```astro
---
// File: src/pages/index.astro
import App from "../App"; // [!code ++] // [!code focus]
---
Astro // [!code ++] // [!code focus]
```
The changes above import the `App` React component and use Astro's client:load directive to make sure that this React component is hydrated immediately on the page.
### Create a custom sign-in page
Create a `sign-in.astro` file inside the `src/pages` directory with the following command:
```astro
---
// File: src/pages/sign-in.astro
import { SignIn as ClerkSignIn } from "astro-clerk-auth/client/react";
---
Astro
```
The code above does the following:
- Imports the `SignIn` component that renders all the authentication methods enabled while creating the Clerk application via the dashboard.
- Use Astro's client:load directive to make sure that this React component is hydrated immediately on the page.
## Build and Test your Astro application locally
To test the application, prepare a build and run the preview server using the command below:
```bash
npm run build && node ./dist/server/entry.mjs
```
## Conclusion
In this guide, you enabled user authentication via various methods with the help of Clerk in an Astro application. You've also gained some experience with using React in Astro, and understanding how it can help you build dynamic user interfaces.
If you have any questions or comments, feel free to reach out to me on [Twitter](https://twitter.com/direct_messages/create/rishi_raj_jain_).
 In this guide, you will learn how to authenticate users in an Astro application using Clerk and React. You will go through the process of setting up a new Astro project, enabling server-side rendering using the Node.js adapter, and integrating Clerk to authenticate users seamlessly.
## Prerequisites
You'll need the following:
- [Node.js 20](https://nodejs.org/en/blog/announcements/v20-release-announce) or later
- A [Clerk](https://dashboard.clerk.com) account
## Table Of Contents
- [Create a new Astro application](#create-a-new-astro-application)
- [Integrate React in your Astro project](#integrate-react-in-your-astro-project)
- [Integrate Node.js adapter in your Astro project](#integrate-nodejs-adapter-in-your-astro-project)
- [Create a new Clerk application](#create-a-new-clerk-application)
- [Integrate Clerk in your Astro project](#integrate-clerk-in-your-astro-project)
- [Install the Clerk's Community SDK for Astro](#install-the-clerks-community-sdk-for-astro)
- [Intercept all incoming requests using Astro middleware](#intercept-all-incoming-requests-using-astro-middleware)
- [Create the index route](#create-the-index-route)
- [Create a custom sign-in page](#create-a-custom-sign-in-page)
- [Build and Test your Astro application locally](#build-and-test-your-astro-application-locally)
## Create a new Astro application
Let’s get started by creating a new Astro project. Execute the following command:
```bash
npm create astro@latest my-app
```
`npm create astro` is the recommended way to scaffold an Astro project quickly.
When prompted, choose:
- `Empty` when prompted on how to start the new project.
- `Yes` when prompted if you plan to write TypeScript.
- `Strict` when prompted how strict TypeScript should be.
- `Yes` when prompted to install dependencies.
- `Yes` when prompted to initialize a git repository.
Once that’s done, you can move into the project directory and start the app:
```bash
cd my-app
npm run dev
```
The app should be running on [localhost:4321](http://localhost:4321/).
Now, let's move on to integrate React in your Astro application.
## Integrate React in your Astro project
To create dynamic user interfaces with Clerk, you will integrate React in your Astro project. Execute the following command:
```bash
npx astro add react
```
`npx` allows us to execute npm package binaries without having to first install them globally.
When prompted, choose the following:
- `Yes` when prompted whether to install the React dependencies.
- `Yes` when prompted whether to make changes to the Astro configuration file.
- `Yes` when prompted whether to make changes to `tsconfig.json` file.
Now, let's move on to enabling server-side rendering in your Astro application.
## Integrate Node.js adapter in your Astro project
To authenticate and maintain user sessions with Clerk, you will enable server-side rendering in your Astro project via the Node.js adapter, execute the following command:
```bash
npx astro add node
```
When prompted, choose the following:
- `Yes` when prompted whether to install the Node.js dependencies.
- `Yes` when prompted whether to make changes to the Astro configuration file.
Now, let's move on to creating a new Clerk application.
## Create a new Clerk application
- In your [Clerk Dashboard](https://dashboard.clerk.com/), to create a new app, press the **+ New application** card to interactively start curating your own authentication setup form.
In this guide, you will learn how to authenticate users in an Astro application using Clerk and React. You will go through the process of setting up a new Astro project, enabling server-side rendering using the Node.js adapter, and integrating Clerk to authenticate users seamlessly.
## Prerequisites
You'll need the following:
- [Node.js 20](https://nodejs.org/en/blog/announcements/v20-release-announce) or later
- A [Clerk](https://dashboard.clerk.com) account
## Table Of Contents
- [Create a new Astro application](#create-a-new-astro-application)
- [Integrate React in your Astro project](#integrate-react-in-your-astro-project)
- [Integrate Node.js adapter in your Astro project](#integrate-nodejs-adapter-in-your-astro-project)
- [Create a new Clerk application](#create-a-new-clerk-application)
- [Integrate Clerk in your Astro project](#integrate-clerk-in-your-astro-project)
- [Install the Clerk's Community SDK for Astro](#install-the-clerks-community-sdk-for-astro)
- [Intercept all incoming requests using Astro middleware](#intercept-all-incoming-requests-using-astro-middleware)
- [Create the index route](#create-the-index-route)
- [Create a custom sign-in page](#create-a-custom-sign-in-page)
- [Build and Test your Astro application locally](#build-and-test-your-astro-application-locally)
## Create a new Astro application
Let’s get started by creating a new Astro project. Execute the following command:
```bash
npm create astro@latest my-app
```
`npm create astro` is the recommended way to scaffold an Astro project quickly.
When prompted, choose:
- `Empty` when prompted on how to start the new project.
- `Yes` when prompted if you plan to write TypeScript.
- `Strict` when prompted how strict TypeScript should be.
- `Yes` when prompted to install dependencies.
- `Yes` when prompted to initialize a git repository.
Once that’s done, you can move into the project directory and start the app:
```bash
cd my-app
npm run dev
```
The app should be running on [localhost:4321](http://localhost:4321/).
Now, let's move on to integrate React in your Astro application.
## Integrate React in your Astro project
To create dynamic user interfaces with Clerk, you will integrate React in your Astro project. Execute the following command:
```bash
npx astro add react
```
`npx` allows us to execute npm package binaries without having to first install them globally.
When prompted, choose the following:
- `Yes` when prompted whether to install the React dependencies.
- `Yes` when prompted whether to make changes to the Astro configuration file.
- `Yes` when prompted whether to make changes to `tsconfig.json` file.
Now, let's move on to enabling server-side rendering in your Astro application.
## Integrate Node.js adapter in your Astro project
To authenticate and maintain user sessions with Clerk, you will enable server-side rendering in your Astro project via the Node.js adapter, execute the following command:
```bash
npx astro add node
```
When prompted, choose the following:
- `Yes` when prompted whether to install the Node.js dependencies.
- `Yes` when prompted whether to make changes to the Astro configuration file.
Now, let's move on to creating a new Clerk application.
## Create a new Clerk application
- In your [Clerk Dashboard](https://dashboard.clerk.com/), to create a new app, press the **+ New application** card to interactively start curating your own authentication setup form.
 - With an application name of your choice, enable user authentication via credentials by toggling on **Email** and allow user authentication via Social Sign-On by toggling on providers such as **Google**, **GitHub** and **Microsoft**.
.png) - Once the application is created in the Clerk dashboard, by default you will be shown with your application's API keys for Next.js. Copy and securely store these API Keys in a file named `.env` to be used in your Astro application as the following:
```bash
# .env
# Clerk Environment Variables
PUBLIC_ASTRO_APP_CLERK_PUBLISHABLE_KEY="pk_test_..."
CLERK_SECRET_KEY="sk_test_..."
```
- Once the application is created in the Clerk dashboard, by default you will be shown with your application's API keys for Next.js. Copy and securely store these API Keys in a file named `.env` to be used in your Astro application as the following:
```bash
# .env
# Clerk Environment Variables
PUBLIC_ASTRO_APP_CLERK_PUBLISHABLE_KEY="pk_test_..."
CLERK_SECRET_KEY="sk_test_..."
```
.png) Now, let's move on to integrate Clerk in your Astro project.
## Integrate Clerk in your Astro project
### Install the Clerk's Community SDK for Astro
Execute the command below to install the necessary package for building authentication with Clerk:
```bash
npm install astro-clerk-auth
```
The command installs the following library:
- `astro-clerk-auth`: A package that integrates Clerk with Astro via Middleware support and baked-in React and Astro components for Clerk.
Further, perform the following additions in `astro.config.mjs` to use the Clerk integration:
```tsx
// File: astro.config.mjs
import node from "@astrojs/node";
import react from "@astrojs/react";
import clerk from "astro-clerk-auth"; // [!code ++] // [!code focus]
import { defineConfig } from "astro/config";
export default defineConfig({
output: "server",
adapter: node({
mode: "standalone",
}),
integrations: [
react(),
clerk({ // [!code ++] // [!code focus]
afterSignInUrl: "/", // [!code ++] // [!code focus]
afterSignUpUrl: "/", // [!code ++] // [!code focus]
}), // [!code ++] // [!code focus]
],
});
```
### Intercept all incoming requests using Astro middleware
To make sure that each request maintains a user session accessible over the server-side endpoints, and in `.astro` pages during server-side rendering, you are going to create a middleware that uses Clerk to decode/encode a user session from the cookie.
Create a file `middleware.ts` in the `src` directory with the following code:
```tsx
// File: src/middleware.ts
import { clerkMiddleware } from "astro-clerk-auth/server";
export const onRequest = clerkMiddleware();
```
### Create the index route
Create an `App.jsx` inside the `src` directory with the following code:
```tsx
import { SignedIn, SignedOut, UserButton } from "astro-clerk-auth/client/react";
export default function () {
return <>
Now, let's move on to integrate Clerk in your Astro project.
## Integrate Clerk in your Astro project
### Install the Clerk's Community SDK for Astro
Execute the command below to install the necessary package for building authentication with Clerk:
```bash
npm install astro-clerk-auth
```
The command installs the following library:
- `astro-clerk-auth`: A package that integrates Clerk with Astro via Middleware support and baked-in React and Astro components for Clerk.
Further, perform the following additions in `astro.config.mjs` to use the Clerk integration:
```tsx
// File: astro.config.mjs
import node from "@astrojs/node";
import react from "@astrojs/react";
import clerk from "astro-clerk-auth"; // [!code ++] // [!code focus]
import { defineConfig } from "astro/config";
export default defineConfig({
output: "server",
adapter: node({
mode: "standalone",
}),
integrations: [
react(),
clerk({ // [!code ++] // [!code focus]
afterSignInUrl: "/", // [!code ++] // [!code focus]
afterSignUpUrl: "/", // [!code ++] // [!code focus]
}), // [!code ++] // [!code focus]
],
});
```
### Intercept all incoming requests using Astro middleware
To make sure that each request maintains a user session accessible over the server-side endpoints, and in `.astro` pages during server-side rendering, you are going to create a middleware that uses Clerk to decode/encode a user session from the cookie.
Create a file `middleware.ts` in the `src` directory with the following code:
```tsx
// File: src/middleware.ts
import { clerkMiddleware } from "astro-clerk-auth/server";
export const onRequest = clerkMiddleware();
```
### Create the index route
Create an `App.jsx` inside the `src` directory with the following code:
```tsx
import { SignedIn, SignedOut, UserButton } from "astro-clerk-auth/client/react";
export default function () {
return <>