---
title: "Incremental Static Regeneration (ISR) in Astro mit Cloudflare KV implementieren"
description: "Erfahren Sie, wie Sie ISR-ähnliche Muster in Astro mit Cloudflare KV für On-Demand-Revalidierung umsetzen. Bauen Sie eine hybride Rendering-Strategie, die die Performance von SSG mit der Flexibilität von SSR verbindet."
source: "https://www.launchfa.st/de/blog/astro-incremental-static-regeneration-cloudflare-kv"
author: "Rishi Raj Jain"
created_at: 2025-12-03T12:00:00.000Z
keywords: "astro, incremental static regeneration, isr, cloudflare kv, caching, performance, hybrid rendering, on-demand revalidation"
---
> **Site index for agents**
> Fetch https://www.launchfa.st/llms.txt to discover every page on this site.
> Every page is also available as Markdown by appending `.md` to its URL.
 Eines der leistungsstärksten Features in Next.js ist **Incremental Static Regeneration (ISR)**, damit lassen sich statische Seiten nach dem Deployment aktualisieren, ohne die gesamte Site neu zu bauen. Astro bietet zwar keine eingebaute ISR-Unterstützung, aber ein ähnliches Muster lässt sich mit serverseitigem Rendering und Cloudflare KV als verteilter Cache-Schicht umsetzen.
In diesem umfassenden Leitfaden lernen Sie, wie Sie ein ISR-ähnliches System in Astro aufbauen, das das Beste aus beiden Welten verbindet: die Performance statischer Generierung mit der Flexibilität dynamischer Updates. Wir behandeln zeitbasierte Revalidierung, On-Demand-Revalidierung über Webhooks und Strategien zur Cache-Invalidierung.
- [Beispielprojekt auf GitHub ansehen](https://github.com/rishi-raj-jain/my-isr-app)
## Voraussetzungen
Sie benötigen Folgendes:
- [Node.js 20](https://nodejs.org/en/blog/announcements/v20-release-announce) oder höher
- Ein [Cloudflare-Konto](https://dash.cloudflare.com/sign-up)
## ISR verstehen und warum es wichtig ist
Klassische Static Site Generation (SSG) hat eine wesentliche Einschränkung: Bei jeder Inhaltsänderung müssen Sie die gesamte Site neu bauen und erneut deployen. Bei Sites mit Tausenden von Seiten kann das Minuten oder sogar Stunden dauern.
Incremental Static Regeneration löst dieses Problem mit einem hybriden Ansatz:
1. **Veralteten Inhalt sofort ausliefern**: Wenn ein Nutzer eine Seite anfordert, liefern Sie die gecachte Version sofort aus
2. **Im Hintergrund revalidieren**: Ist der Cache veraltet (basierend auf einem Zeit-Schwellenwert), starten Sie eine Regenerierung im Hintergrund
3. **Cache aktualisieren**: Sobald die Regenerierung abgeschlossen ist, aktualisieren Sie den Cache für künftige Anfragen
Das bringt Ihnen:
- **⚡ Blitzschnelle Antwortzeiten** (Auslieferung aus dem Cache)
- **🔄 Immer aktuelle Inhalte** (automatische Revalidierung)
- **📉 Kürzere Build-Zeiten** (kein vollständiger Rebuild nötig)
- **💰 Geringere Kosten** (weniger Rechenzeit für Builds)
## Wie wir ISR in Astro umsetzen
Unsere Implementierung nutzt:
- **Astro mit SSR**: Serverseitiges Rendering für dynamische Seitengenerierung
- **Cloudflare KV**: Verteilter Key-Value-Store zum Cachen gerenderter HTML-Seiten
- **Middleware**: Eigene Logik zur Prüfung der Cache-Gültigkeit und für Revalidierung
- **Webhooks**: API-Endpunkte für On-Demand-Cache-Invalidierung
Der Ablauf sieht so aus:
```
User Request → Middleware → Check KV Cache
↓
Cache exists & fresh?
↓
Yes ─────────────→ Return cached HTML
↓ No
Generate page → Store in KV → Return HTML
```
## Neue Astro-Anwendung erstellen
Legen wir los und erstellen ein neues Astro-Projekt. Führen Sie den folgenden Befehl aus:
```bash
npm create astro@latest my-isr-app
```
Wählen Sie bei den Abfragen:
- `Use minimal (empty) template`, wenn Sie gefragt werden, wie Sie das neue Projekt starten möchten.
- `Yes`, wenn Sie gefragt werden, ob Abhängigkeiten installiert werden sollen.
- `Yes`, wenn Sie gefragt werden, ob ein Git-Repository initialisiert werden soll.
Anschließend wechseln Sie in das Projektverzeichnis und starten die App:
```bash
cd my-isr-app
npm install wrangler
npm run dev
```
Die App sollte unter [localhost:4321](http://localhost:4321/) laufen.
## Cloudflare-Adapter in Ihr Astro-Projekt integrieren
Um Ihr Astro-Projekt auf Cloudflare Workers zu deployen und Cloudflare KV zu nutzen, installieren Sie den Cloudflare-Adapter. Führen Sie den folgenden Befehl aus:
```bash
npx astro add cloudflare --yes
```
Aktualisieren Sie `astro.config.mjs`, sodass **output** auf **server** steht:
```javascript
// File: astro.config.mjs
import { defineConfig } from 'astro/config';
import cloudflare from '@astrojs/cloudflare';
export default defineConfig({
output: 'server',
adapter: cloudflare()
});
```
## Cloudflare KV für Caching einrichten
Cloudflare KV (Key-Value) ist ein global verteilter Key-Value-Store, der sich hervorragend zum Cachen gerenderter Seiten am Edge eignet.
### KV-Namespace erstellen
Erstellen Sie zuerst einen KV-Namespace für Ihren Cache:
```bash
# Create a production KV namespace
npx wrangler kv namespace create ISR_CACHE
```
Wählen Sie bei den Abfragen Folgendes:
- Would you like Wrangler to add it on your behalf? … **yes**
- What binding name would you like to use? … **ISR_CREATE**
- For local dev, do you want to connect to the remote resource instead of a local resource? … **yes**
Wrangler erstellt automatisch eine **wrangler.jsonc**-Datei.
### Umgebungstypen konfigurieren
Erstellen Sie eine neue Datei `src/env.d.ts` (oder aktualisieren Sie die bestehende), um TypeScript-Definitionen für das KV-Binding hinzuzufügen:
```typescript
///
type KVNamespace = import('@cloudflare/workers-types').KVNamespace
type ENV = {
ISR_CACHE: KVNamespace
}
type Runtime = import('@astrojs/cloudflare').Runtime
declare namespace App {
interface Locals extends Runtime {
// Add custom locals here
}
}
```
Damit kennt TypeScript Ihren KV-Namespace und bietet passende Autovervollständigung.
## ISR-Cache-Utility erstellen
Erstellen wir als Nächstes ein wiederverwendbares Utility zur Verwaltung des ISR-Caches. Legen Sie eine neue Datei `src/lib/isr-cache.ts` an:
```typescript
export interface ISRCacheOptions {
/**
* Time in seconds before cache is considered stale
* @default 60
*/
revalidate?: number
/**
* Custom cache key prefix
* @default 'isr'
*/
prefix?: string
/**
* Whether to enable cache
* @default true
*/
enabled?: boolean
}
export interface CachedData {
/** The cached HTML content */
html: string
/** Timestamp when the cache was created */
timestamp: number
/** Revalidation time in seconds */
revalidate: number
/** URL that was cached */
url: string
}
export class ISRCache {
private kv: KVNamespace
private options: Required
constructor(kv: KVNamespace, options: ISRCacheOptions = {}) {
this.kv = kv
this.options = {
revalidate: options.revalidate ?? 60,
prefix: options.prefix ?? 'isr',
enabled: options.enabled ?? true,
}
}
/**
* Generate a cache key for a given URL
*/
private getCacheKey(url: string): string {
// Remove query params and hash for consistent caching
const cleanUrl = url.split('?')[0].split('#')[0]
return `${this.options.prefix}:${cleanUrl}`
}
/**
* Get cached data if it exists
*/
async get(url: string): Promise {
if (!this.options.enabled) return null
try {
const key = this.getCacheKey(url)
const cached = await this.kv.get(key, 'json') as CachedData | null
return cached
} catch (error) {
console.error('[ISR Cache] Error getting cache:', error)
return null
}
}
/**
* Check if cached data is still fresh
*/
isFresh(cachedData: CachedData): boolean {
const now = Date.now()
const age = (now - cachedData.timestamp) / 1000 // Convert to seconds
return age < cachedData.revalidate
}
/**
* Store HTML in cache
*/
async set(url: string, html: string, revalidate?: number): Promise {
if (!this.options.enabled) return
try {
const key = this.getCacheKey(url)
const data: CachedData = {
html,
timestamp: Date.now(),
revalidate: revalidate ?? this.options.revalidate,
url,
}
// Store in KV with metadata
await this.kv.put(key, JSON.stringify(data), {
// Optional: Set expiration time to automatically clean up old cache
// expirationTtl: (revalidate ?? this.options.revalidate) * 2,
metadata: {
url,
cachedAt: new Date().toISOString(),
},
})
console.log(`[ISR Cache] Cached: ${url} (revalidate: ${data.revalidate}s)`)
} catch (error) {
console.error('[ISR Cache] Error setting cache:', error)
}
}
/**
* Invalidate (delete) cache for a specific URL
*/
async invalidate(url: string): Promise {
try {
const key = this.getCacheKey(url)
await this.kv.delete(key)
console.log(`[ISR Cache] Invalidated: ${url}`)
return true
} catch (error) {
console.error('[ISR Cache] Error invalidating cache:', error)
return false
}
}
/**
* Invalidate multiple URLs at once
*/
async invalidateMany(urls: string[]): Promise {
let invalidated = 0
await Promise.all(
urls.map(async (url) => {
const success = await this.invalidate(url)
if (success) invalidated++
})
)
return invalidated
}
/**
* List all cached URLs with a given prefix
*/
async list(prefix?: string): Promise {
try {
const listPrefix = prefix ? `${this.options.prefix}:${prefix}` : `${this.options.prefix}:`
const list = await this.kv.list({ prefix: listPrefix })
return list.keys.map((key) => key.name.replace(`${this.options.prefix}:`, ''))
} catch (error) {
console.error('[ISR Cache] Error listing cache:', error)
return []
}
}
/**
* Get cache statistics
*/
async getStats(): Promise<{
totalKeys: number
keys: string[]
}> {
const keys = await this.list()
return {
totalKeys: keys.length,
keys,
}
}
}
/**
* Helper function to create an ISR cache instance
*/
export function createISRCache(locals: App.Locals, options?: ISRCacheOptions): ISRCache {
const kv = locals.runtime.env.ISR_CREATE
if (!kv) {
throw new Error('ISR_CREATE KV namespace not found. Make sure it is configured in wrangler.toml')
}
return new ISRCache(kv, options)
}
```
Dieses Utility bietet eine saubere API für:
- **Gecachte Seiten abrufen**: `cache.get(url)`
- **Frische prüfen**: `cache.isFresh(data)`
- **Cache setzen**: `cache.set(url, html, revalidate)`
- **Cache invalidieren**: `cache.invalidate(url)` oder `cache.invalidateMany(urls)`
- **Gecachte Seiten auflisten**: `cache.list()`
## Zeitbasierte Revalidierung implementieren
Erstellen wir als Nächstes Middleware, die das ISR-Muster umsetzt. Legen Sie eine neue Datei `src/middleware.ts` an:
```typescript
import { defineMiddleware } from 'astro:middleware'
import { createISRCache } from './lib/isr-cache'
const revalidate = 2
export const onRequest = defineMiddleware(async (context, next) => {
const { request, locals, url } = context
// Only apply ISR to GET requests for HTML pages
if (request.method !== 'GET') {
return next()
}
// Skip ISR for API routes and static assets
if (url.pathname.startsWith('/api/') || url.pathname.match(/\.(js|css|png|jpg|svg|ico|woff|woff2)$/)) {
return next()
}
// Skip ISR if KV is not available (local development)
if (!locals.runtime?.env?.ISR_CREATE) {
console.log('[ISR] KV not available, skipping cache')
return next()
}
try {
// Create ISR cache instance with 60 second default revalidation
const cache = createISRCache(locals, {
revalidate,
enabled: true,
})
// Try to get cached version
const cached = await cache.get(url.pathname)
if (cached) {
// Check if cache is still fresh
if (cache.isFresh(cached)) {
console.log(`[ISR] Cache HIT (fresh): ${url.pathname}`)
// Return cached HTML with cache headers
return new Response(cached.html, {
status: 200,
headers: {
'Content-Type': 'text/html; charset=utf-8',
'Cache-Control': 'public, s-maxage=31536000, stale-while-revalidate',
'X-Cache-Status': 'HIT',
'X-Cache-Age': String(Math.floor((Date.now() - cached.timestamp) / 1000)),
},
})
} else {
console.log(`[ISR] Cache HIT (stale): ${url.pathname}`)
// Cache is stale, but serve it anyway while we regenerate
// This is the "stale-while-revalidate" pattern
// Return stale content immediately
const response = new Response(cached.html, {
status: 200,
headers: {
'Content-Type': 'text/html; charset=utf-8',
'Cache-Control': 'public, s-maxage=31536000, stale-while-revalidate',
'X-Cache-Status': 'STALE',
'X-Cache-Age': String(Math.floor((Date.now() - cached.timestamp) / 1000)),
},
})
// Trigger background regeneration (non-blocking)
context.locals.runtime.ctx.waitUntil(
(async () => {
try {
console.log(`[ISR] Regenerating in background: ${url.pathname}`)
// Generate fresh page
const freshResponse = await next()
const freshHtml = await freshResponse.text()
// Update cache
await cache.set(url.pathname, freshHtml, 60)
console.log(`[ISR] Background regeneration complete: ${url.pathname}`)
} catch (error) {
console.error(`[ISR] Background regeneration failed: ${url.pathname}`, error)
}
})()
)
return response
}
} else {
console.log(`[ISR] Cache MISS: ${url.pathname}`)
// No cache exists, generate page
const response = await next()
// Only cache successful HTML responses
if (response.status === 200 && response.headers.get('content-type')?.includes('text/html')) {
const html = await response.text()
// Store in cache (non-blocking)
context.locals.runtime.ctx.waitUntil(cache.set(url.pathname, html, 60))
// Return response with cache miss header
return new Response(html, {
status: response.status,
headers: {
...Object.fromEntries(response.headers),
'X-Cache-Status': 'MISS',
},
})
}
return response
}
} catch (error) {
console.error('[ISR] Error in middleware:', error)
// On error, fall back to normal SSR
return next()
}
})
```
Diese Middleware setzt das vollständige ISR-Muster um:
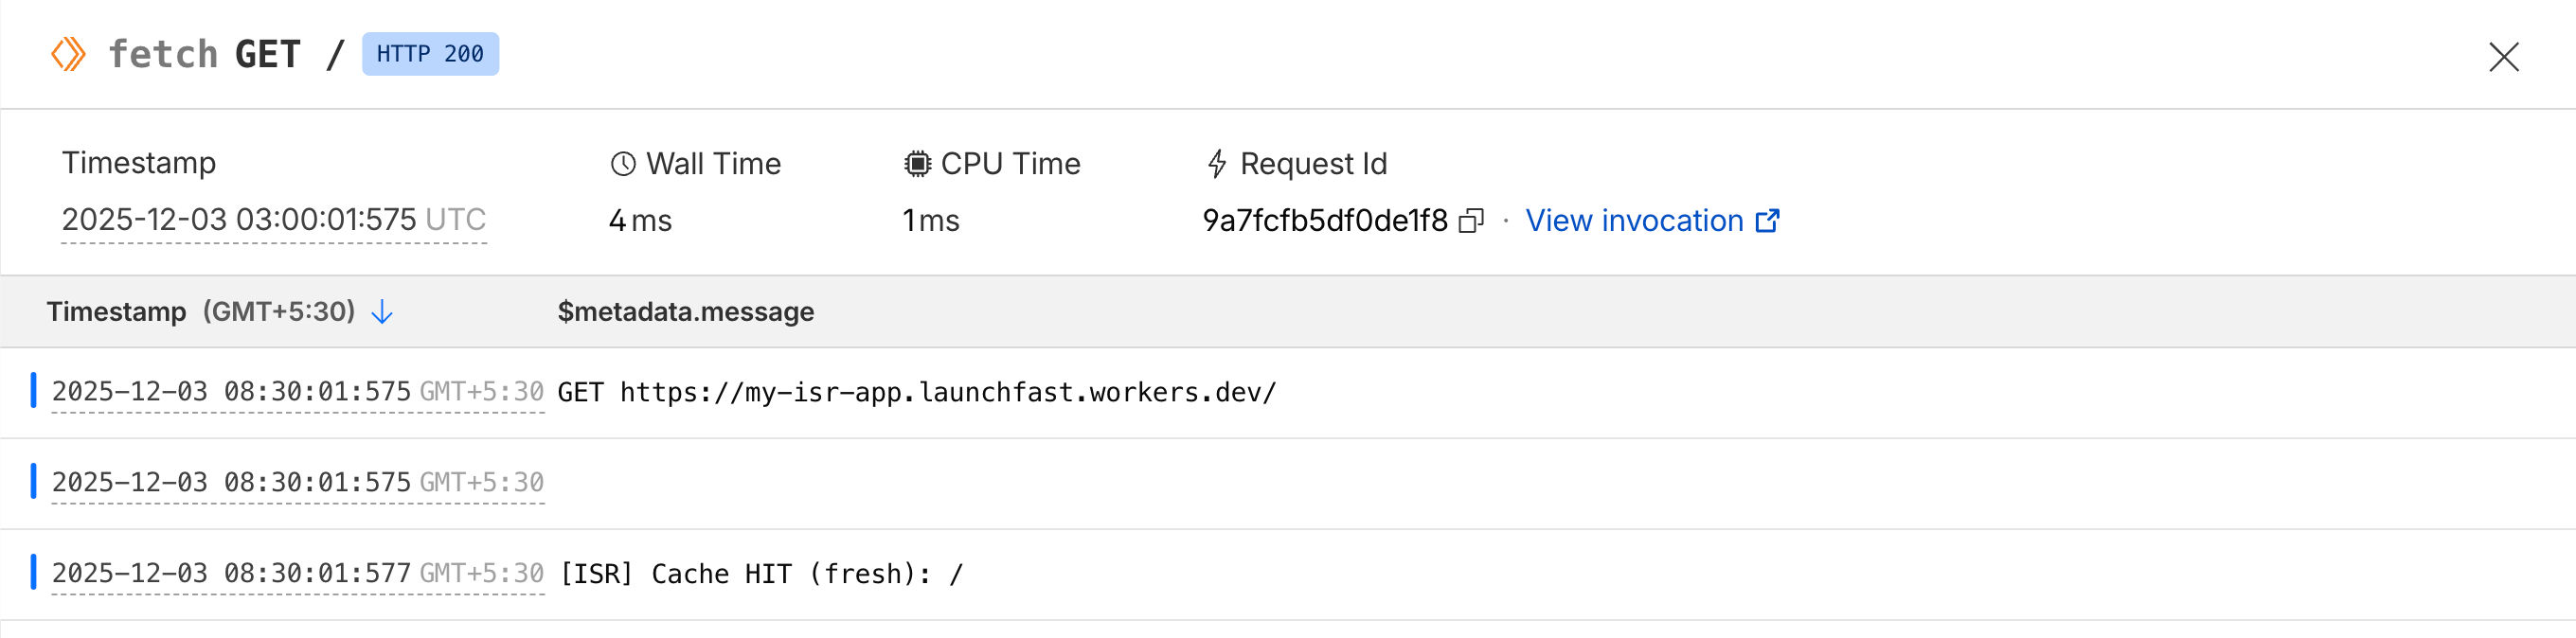
1. **Cache HIT (fresh)**: Gecachtes HTML sofort zurückgeben
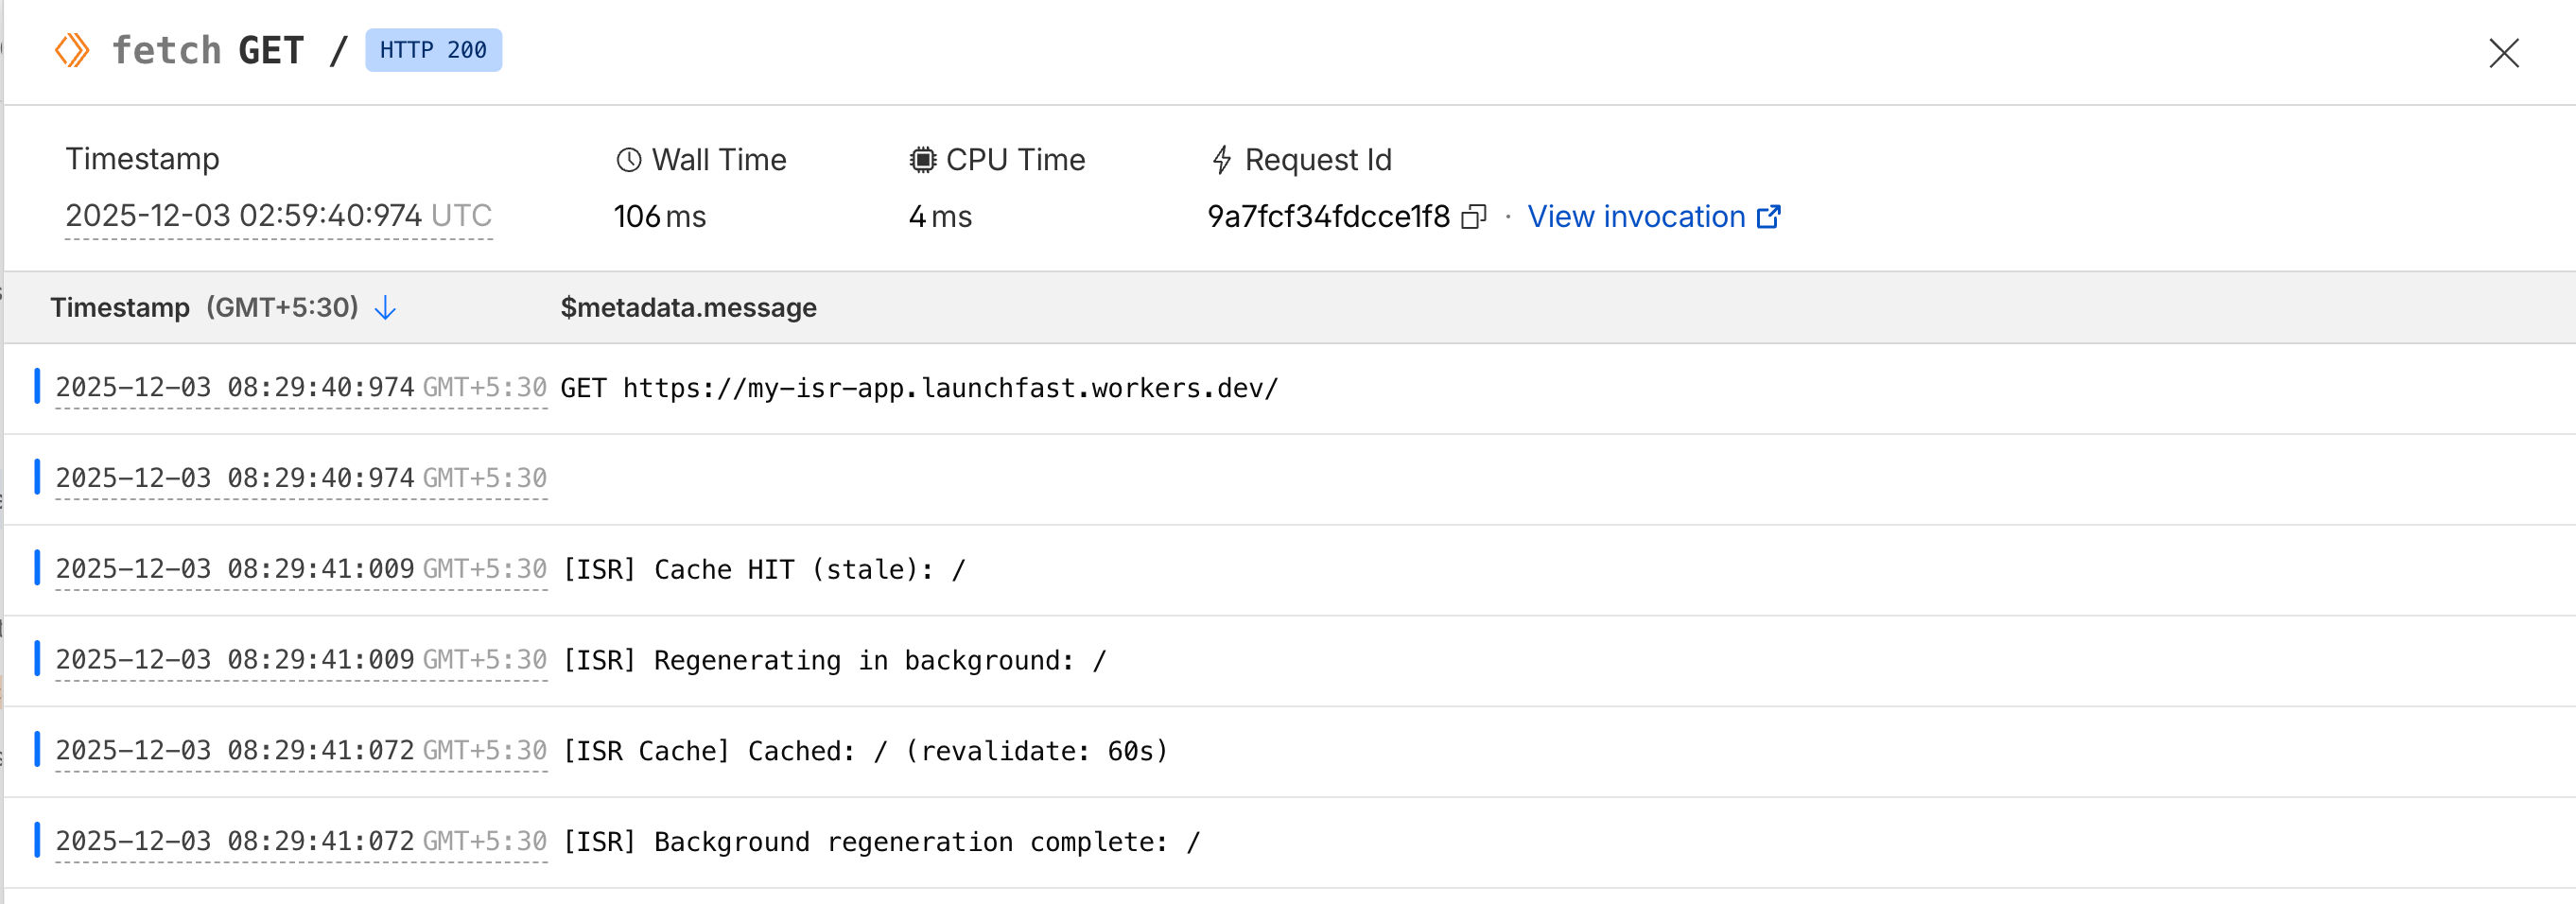
2. **Cache HIT (stale)**: Veraltetes HTML sofort zurückgeben, im Hintergrund regenerieren
3. **Cache MISS**: Seite generieren, cachen und HTML zurückgeben
Der Clou liegt im **stale-while-revalidate**-Muster, Nutzer erhalten immer sofortige Antworten, auch während der Cache aktualisiert wird.
#### Cache Hits ausliefern
Eines der leistungsstärksten Features in Next.js ist **Incremental Static Regeneration (ISR)**, damit lassen sich statische Seiten nach dem Deployment aktualisieren, ohne die gesamte Site neu zu bauen. Astro bietet zwar keine eingebaute ISR-Unterstützung, aber ein ähnliches Muster lässt sich mit serverseitigem Rendering und Cloudflare KV als verteilter Cache-Schicht umsetzen.
In diesem umfassenden Leitfaden lernen Sie, wie Sie ein ISR-ähnliches System in Astro aufbauen, das das Beste aus beiden Welten verbindet: die Performance statischer Generierung mit der Flexibilität dynamischer Updates. Wir behandeln zeitbasierte Revalidierung, On-Demand-Revalidierung über Webhooks und Strategien zur Cache-Invalidierung.
- [Beispielprojekt auf GitHub ansehen](https://github.com/rishi-raj-jain/my-isr-app)
## Voraussetzungen
Sie benötigen Folgendes:
- [Node.js 20](https://nodejs.org/en/blog/announcements/v20-release-announce) oder höher
- Ein [Cloudflare-Konto](https://dash.cloudflare.com/sign-up)
## ISR verstehen und warum es wichtig ist
Klassische Static Site Generation (SSG) hat eine wesentliche Einschränkung: Bei jeder Inhaltsänderung müssen Sie die gesamte Site neu bauen und erneut deployen. Bei Sites mit Tausenden von Seiten kann das Minuten oder sogar Stunden dauern.
Incremental Static Regeneration löst dieses Problem mit einem hybriden Ansatz:
1. **Veralteten Inhalt sofort ausliefern**: Wenn ein Nutzer eine Seite anfordert, liefern Sie die gecachte Version sofort aus
2. **Im Hintergrund revalidieren**: Ist der Cache veraltet (basierend auf einem Zeit-Schwellenwert), starten Sie eine Regenerierung im Hintergrund
3. **Cache aktualisieren**: Sobald die Regenerierung abgeschlossen ist, aktualisieren Sie den Cache für künftige Anfragen
Das bringt Ihnen:
- **⚡ Blitzschnelle Antwortzeiten** (Auslieferung aus dem Cache)
- **🔄 Immer aktuelle Inhalte** (automatische Revalidierung)
- **📉 Kürzere Build-Zeiten** (kein vollständiger Rebuild nötig)
- **💰 Geringere Kosten** (weniger Rechenzeit für Builds)
## Wie wir ISR in Astro umsetzen
Unsere Implementierung nutzt:
- **Astro mit SSR**: Serverseitiges Rendering für dynamische Seitengenerierung
- **Cloudflare KV**: Verteilter Key-Value-Store zum Cachen gerenderter HTML-Seiten
- **Middleware**: Eigene Logik zur Prüfung der Cache-Gültigkeit und für Revalidierung
- **Webhooks**: API-Endpunkte für On-Demand-Cache-Invalidierung
Der Ablauf sieht so aus:
```
User Request → Middleware → Check KV Cache
↓
Cache exists & fresh?
↓
Yes ─────────────→ Return cached HTML
↓ No
Generate page → Store in KV → Return HTML
```
## Neue Astro-Anwendung erstellen
Legen wir los und erstellen ein neues Astro-Projekt. Führen Sie den folgenden Befehl aus:
```bash
npm create astro@latest my-isr-app
```
Wählen Sie bei den Abfragen:
- `Use minimal (empty) template`, wenn Sie gefragt werden, wie Sie das neue Projekt starten möchten.
- `Yes`, wenn Sie gefragt werden, ob Abhängigkeiten installiert werden sollen.
- `Yes`, wenn Sie gefragt werden, ob ein Git-Repository initialisiert werden soll.
Anschließend wechseln Sie in das Projektverzeichnis und starten die App:
```bash
cd my-isr-app
npm install wrangler
npm run dev
```
Die App sollte unter [localhost:4321](http://localhost:4321/) laufen.
## Cloudflare-Adapter in Ihr Astro-Projekt integrieren
Um Ihr Astro-Projekt auf Cloudflare Workers zu deployen und Cloudflare KV zu nutzen, installieren Sie den Cloudflare-Adapter. Führen Sie den folgenden Befehl aus:
```bash
npx astro add cloudflare --yes
```
Aktualisieren Sie `astro.config.mjs`, sodass **output** auf **server** steht:
```javascript
// File: astro.config.mjs
import { defineConfig } from 'astro/config';
import cloudflare from '@astrojs/cloudflare';
export default defineConfig({
output: 'server',
adapter: cloudflare()
});
```
## Cloudflare KV für Caching einrichten
Cloudflare KV (Key-Value) ist ein global verteilter Key-Value-Store, der sich hervorragend zum Cachen gerenderter Seiten am Edge eignet.
### KV-Namespace erstellen
Erstellen Sie zuerst einen KV-Namespace für Ihren Cache:
```bash
# Create a production KV namespace
npx wrangler kv namespace create ISR_CACHE
```
Wählen Sie bei den Abfragen Folgendes:
- Would you like Wrangler to add it on your behalf? … **yes**
- What binding name would you like to use? … **ISR_CREATE**
- For local dev, do you want to connect to the remote resource instead of a local resource? … **yes**
Wrangler erstellt automatisch eine **wrangler.jsonc**-Datei.
### Umgebungstypen konfigurieren
Erstellen Sie eine neue Datei `src/env.d.ts` (oder aktualisieren Sie die bestehende), um TypeScript-Definitionen für das KV-Binding hinzuzufügen:
```typescript
///
type KVNamespace = import('@cloudflare/workers-types').KVNamespace
type ENV = {
ISR_CACHE: KVNamespace
}
type Runtime = import('@astrojs/cloudflare').Runtime
declare namespace App {
interface Locals extends Runtime {
// Add custom locals here
}
}
```
Damit kennt TypeScript Ihren KV-Namespace und bietet passende Autovervollständigung.
## ISR-Cache-Utility erstellen
Erstellen wir als Nächstes ein wiederverwendbares Utility zur Verwaltung des ISR-Caches. Legen Sie eine neue Datei `src/lib/isr-cache.ts` an:
```typescript
export interface ISRCacheOptions {
/**
* Time in seconds before cache is considered stale
* @default 60
*/
revalidate?: number
/**
* Custom cache key prefix
* @default 'isr'
*/
prefix?: string
/**
* Whether to enable cache
* @default true
*/
enabled?: boolean
}
export interface CachedData {
/** The cached HTML content */
html: string
/** Timestamp when the cache was created */
timestamp: number
/** Revalidation time in seconds */
revalidate: number
/** URL that was cached */
url: string
}
export class ISRCache {
private kv: KVNamespace
private options: Required
constructor(kv: KVNamespace, options: ISRCacheOptions = {}) {
this.kv = kv
this.options = {
revalidate: options.revalidate ?? 60,
prefix: options.prefix ?? 'isr',
enabled: options.enabled ?? true,
}
}
/**
* Generate a cache key for a given URL
*/
private getCacheKey(url: string): string {
// Remove query params and hash for consistent caching
const cleanUrl = url.split('?')[0].split('#')[0]
return `${this.options.prefix}:${cleanUrl}`
}
/**
* Get cached data if it exists
*/
async get(url: string): Promise {
if (!this.options.enabled) return null
try {
const key = this.getCacheKey(url)
const cached = await this.kv.get(key, 'json') as CachedData | null
return cached
} catch (error) {
console.error('[ISR Cache] Error getting cache:', error)
return null
}
}
/**
* Check if cached data is still fresh
*/
isFresh(cachedData: CachedData): boolean {
const now = Date.now()
const age = (now - cachedData.timestamp) / 1000 // Convert to seconds
return age < cachedData.revalidate
}
/**
* Store HTML in cache
*/
async set(url: string, html: string, revalidate?: number): Promise {
if (!this.options.enabled) return
try {
const key = this.getCacheKey(url)
const data: CachedData = {
html,
timestamp: Date.now(),
revalidate: revalidate ?? this.options.revalidate,
url,
}
// Store in KV with metadata
await this.kv.put(key, JSON.stringify(data), {
// Optional: Set expiration time to automatically clean up old cache
// expirationTtl: (revalidate ?? this.options.revalidate) * 2,
metadata: {
url,
cachedAt: new Date().toISOString(),
},
})
console.log(`[ISR Cache] Cached: ${url} (revalidate: ${data.revalidate}s)`)
} catch (error) {
console.error('[ISR Cache] Error setting cache:', error)
}
}
/**
* Invalidate (delete) cache for a specific URL
*/
async invalidate(url: string): Promise {
try {
const key = this.getCacheKey(url)
await this.kv.delete(key)
console.log(`[ISR Cache] Invalidated: ${url}`)
return true
} catch (error) {
console.error('[ISR Cache] Error invalidating cache:', error)
return false
}
}
/**
* Invalidate multiple URLs at once
*/
async invalidateMany(urls: string[]): Promise {
let invalidated = 0
await Promise.all(
urls.map(async (url) => {
const success = await this.invalidate(url)
if (success) invalidated++
})
)
return invalidated
}
/**
* List all cached URLs with a given prefix
*/
async list(prefix?: string): Promise {
try {
const listPrefix = prefix ? `${this.options.prefix}:${prefix}` : `${this.options.prefix}:`
const list = await this.kv.list({ prefix: listPrefix })
return list.keys.map((key) => key.name.replace(`${this.options.prefix}:`, ''))
} catch (error) {
console.error('[ISR Cache] Error listing cache:', error)
return []
}
}
/**
* Get cache statistics
*/
async getStats(): Promise<{
totalKeys: number
keys: string[]
}> {
const keys = await this.list()
return {
totalKeys: keys.length,
keys,
}
}
}
/**
* Helper function to create an ISR cache instance
*/
export function createISRCache(locals: App.Locals, options?: ISRCacheOptions): ISRCache {
const kv = locals.runtime.env.ISR_CREATE
if (!kv) {
throw new Error('ISR_CREATE KV namespace not found. Make sure it is configured in wrangler.toml')
}
return new ISRCache(kv, options)
}
```
Dieses Utility bietet eine saubere API für:
- **Gecachte Seiten abrufen**: `cache.get(url)`
- **Frische prüfen**: `cache.isFresh(data)`
- **Cache setzen**: `cache.set(url, html, revalidate)`
- **Cache invalidieren**: `cache.invalidate(url)` oder `cache.invalidateMany(urls)`
- **Gecachte Seiten auflisten**: `cache.list()`
## Zeitbasierte Revalidierung implementieren
Erstellen wir als Nächstes Middleware, die das ISR-Muster umsetzt. Legen Sie eine neue Datei `src/middleware.ts` an:
```typescript
import { defineMiddleware } from 'astro:middleware'
import { createISRCache } from './lib/isr-cache'
const revalidate = 2
export const onRequest = defineMiddleware(async (context, next) => {
const { request, locals, url } = context
// Only apply ISR to GET requests for HTML pages
if (request.method !== 'GET') {
return next()
}
// Skip ISR for API routes and static assets
if (url.pathname.startsWith('/api/') || url.pathname.match(/\.(js|css|png|jpg|svg|ico|woff|woff2)$/)) {
return next()
}
// Skip ISR if KV is not available (local development)
if (!locals.runtime?.env?.ISR_CREATE) {
console.log('[ISR] KV not available, skipping cache')
return next()
}
try {
// Create ISR cache instance with 60 second default revalidation
const cache = createISRCache(locals, {
revalidate,
enabled: true,
})
// Try to get cached version
const cached = await cache.get(url.pathname)
if (cached) {
// Check if cache is still fresh
if (cache.isFresh(cached)) {
console.log(`[ISR] Cache HIT (fresh): ${url.pathname}`)
// Return cached HTML with cache headers
return new Response(cached.html, {
status: 200,
headers: {
'Content-Type': 'text/html; charset=utf-8',
'Cache-Control': 'public, s-maxage=31536000, stale-while-revalidate',
'X-Cache-Status': 'HIT',
'X-Cache-Age': String(Math.floor((Date.now() - cached.timestamp) / 1000)),
},
})
} else {
console.log(`[ISR] Cache HIT (stale): ${url.pathname}`)
// Cache is stale, but serve it anyway while we regenerate
// This is the "stale-while-revalidate" pattern
// Return stale content immediately
const response = new Response(cached.html, {
status: 200,
headers: {
'Content-Type': 'text/html; charset=utf-8',
'Cache-Control': 'public, s-maxage=31536000, stale-while-revalidate',
'X-Cache-Status': 'STALE',
'X-Cache-Age': String(Math.floor((Date.now() - cached.timestamp) / 1000)),
},
})
// Trigger background regeneration (non-blocking)
context.locals.runtime.ctx.waitUntil(
(async () => {
try {
console.log(`[ISR] Regenerating in background: ${url.pathname}`)
// Generate fresh page
const freshResponse = await next()
const freshHtml = await freshResponse.text()
// Update cache
await cache.set(url.pathname, freshHtml, 60)
console.log(`[ISR] Background regeneration complete: ${url.pathname}`)
} catch (error) {
console.error(`[ISR] Background regeneration failed: ${url.pathname}`, error)
}
})()
)
return response
}
} else {
console.log(`[ISR] Cache MISS: ${url.pathname}`)
// No cache exists, generate page
const response = await next()
// Only cache successful HTML responses
if (response.status === 200 && response.headers.get('content-type')?.includes('text/html')) {
const html = await response.text()
// Store in cache (non-blocking)
context.locals.runtime.ctx.waitUntil(cache.set(url.pathname, html, 60))
// Return response with cache miss header
return new Response(html, {
status: response.status,
headers: {
...Object.fromEntries(response.headers),
'X-Cache-Status': 'MISS',
},
})
}
return response
}
} catch (error) {
console.error('[ISR] Error in middleware:', error)
// On error, fall back to normal SSR
return next()
}
})
```
Diese Middleware setzt das vollständige ISR-Muster um:
1. **Cache HIT (fresh)**: Gecachtes HTML sofort zurückgeben
2. **Cache HIT (stale)**: Veraltetes HTML sofort zurückgeben, im Hintergrund regenerieren
3. **Cache MISS**: Seite generieren, cachen und HTML zurückgeben
Der Clou liegt im **stale-while-revalidate**-Muster, Nutzer erhalten immer sofortige Antworten, auch während der Cache aktualisiert wird.
#### Cache Hits ausliefern
 #### Cache im Hintergrund automatisch regenerieren
 ## Revalidierungs-API-Endpunkt erstellen
Erstellen wir als Nächstes API-Endpunkte für On-Demand-Revalidierung. Das ist nützlich, wenn Sie den Cache sofort invalidieren möchten, zum Beispiel, wenn sich Inhalte in Ihrem CMS ändern.
Legen Sie eine neue Datei `src/pages/api/revalidate.ts` an:
```typescript
import type { APIRoute } from 'astro'
import { createISRCache } from '../../lib/isr-cache'
/**
* POST /api/revalidate
*
* Invalidate cache for specific paths on-demand
*
* Body:
* {
* "secret": "your-secret-key",
* "paths": ["/", "/blog/post-2"]
* }
*/
export const POST: APIRoute = async ({ request, locals }) => {
try {
// Parse request body
const body = await request.json()
const { secret, paths } = body
// Validate secret (you should set this as an environment variable)
const REVALIDATION_SECRET = locals.runtime.env.REVALIDATION_SECRET || 'your-secret-key'
if (secret !== REVALIDATION_SECRET) {
return new Response(
JSON.stringify({
success: false,
error: 'Invalid secret',
}),
{
status: 401,
headers: { 'Content-Type': 'application/json' },
}
)
}
// Validate paths
if (!Array.isArray(paths) || paths.length === 0) {
return new Response(
JSON.stringify({
success: false,
error: 'Invalid paths array',
}),
{
status: 400,
headers: { 'Content-Type': 'application/json' },
}
)
}
// Create cache instance
const cache = createISRCache(locals)
// Invalidate all specified paths
const invalidated = await cache.invalidateMany(paths)
return new Response(
JSON.stringify({
success: true,
invalidated,
paths,
message: `Successfully invalidated ${invalidated} path(s)`,
}),
{
status: 200,
headers: { 'Content-Type': 'application/json' },
}
)
} catch (error) {
console.error('[Revalidate API] Error:', error)
return new Response(
JSON.stringify({
success: false,
error: error instanceof Error ? error.message : 'Unknown error',
}),
{
status: 500,
headers: { 'Content-Type': 'application/json' },
}
)
}
}
```
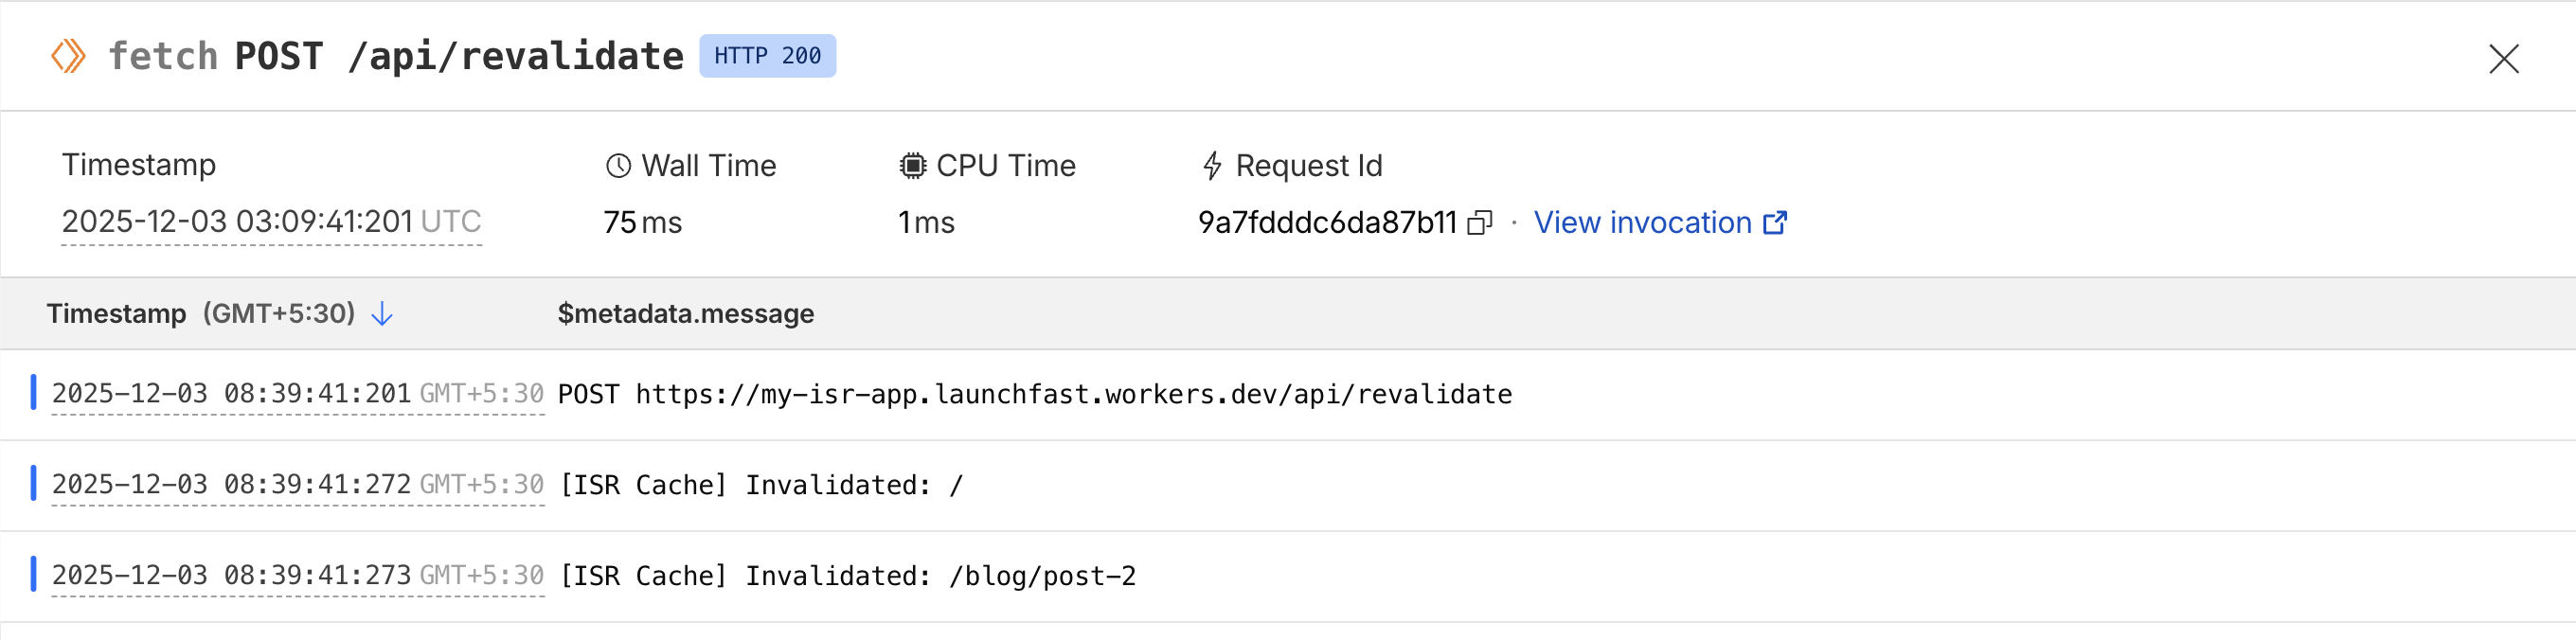
Jetzt können Sie den Cache **on-demand invalidieren** mit `POST /api/revalidate`, indem Sie die zu invalidierenden Pfade übergeben.
Ein Beispiel-cURL:
```
curl -X POST https://my-isr-app.launchfast.workers.dev/api/revalidate \
-H "Content-Type: application/json" \
-d '{"secret":"your-secret-key","paths":["/"]}'
```
## Revalidierungs-API-Endpunkt erstellen
Erstellen wir als Nächstes API-Endpunkte für On-Demand-Revalidierung. Das ist nützlich, wenn Sie den Cache sofort invalidieren möchten, zum Beispiel, wenn sich Inhalte in Ihrem CMS ändern.
Legen Sie eine neue Datei `src/pages/api/revalidate.ts` an:
```typescript
import type { APIRoute } from 'astro'
import { createISRCache } from '../../lib/isr-cache'
/**
* POST /api/revalidate
*
* Invalidate cache for specific paths on-demand
*
* Body:
* {
* "secret": "your-secret-key",
* "paths": ["/", "/blog/post-2"]
* }
*/
export const POST: APIRoute = async ({ request, locals }) => {
try {
// Parse request body
const body = await request.json()
const { secret, paths } = body
// Validate secret (you should set this as an environment variable)
const REVALIDATION_SECRET = locals.runtime.env.REVALIDATION_SECRET || 'your-secret-key'
if (secret !== REVALIDATION_SECRET) {
return new Response(
JSON.stringify({
success: false,
error: 'Invalid secret',
}),
{
status: 401,
headers: { 'Content-Type': 'application/json' },
}
)
}
// Validate paths
if (!Array.isArray(paths) || paths.length === 0) {
return new Response(
JSON.stringify({
success: false,
error: 'Invalid paths array',
}),
{
status: 400,
headers: { 'Content-Type': 'application/json' },
}
)
}
// Create cache instance
const cache = createISRCache(locals)
// Invalidate all specified paths
const invalidated = await cache.invalidateMany(paths)
return new Response(
JSON.stringify({
success: true,
invalidated,
paths,
message: `Successfully invalidated ${invalidated} path(s)`,
}),
{
status: 200,
headers: { 'Content-Type': 'application/json' },
}
)
} catch (error) {
console.error('[Revalidate API] Error:', error)
return new Response(
JSON.stringify({
success: false,
error: error instanceof Error ? error.message : 'Unknown error',
}),
{
status: 500,
headers: { 'Content-Type': 'application/json' },
}
)
}
}
```
Jetzt können Sie den Cache **on-demand invalidieren** mit `POST /api/revalidate`, indem Sie die zu invalidierenden Pfade übergeben.
Ein Beispiel-cURL:
```
curl -X POST https://my-isr-app.launchfast.workers.dev/api/revalidate \
-H "Content-Type: application/json" \
-d '{"secret":"your-secret-key","paths":["/"]}'
```
 ## Auf Cloudflare Workers deployen
Deployen Sie Ihre Anwendung auf Cloudflare Workers:
```bash
# Build the project
npm run build
# Deploy to Cloudflare Workers
npx wrangler deploy
```
Nach dem Deployment:
1. Öffnen Sie Ihr Cloudflare-Dashboard
2. Navigieren Sie zu Workers
3. Fügen Sie eine Umgebungsvariable hinzu:
- Name: `REVALIDATION_SECRET`
- Wert: Eine sichere Zufallszeichenkette
Ihr ISR-System ist jetzt live in Produktion!
## Vergleich mit Next.js ISR
So vergleicht sich unsere Astro-ISR-Implementierung mit Next.js ISR:
| Feature | Next.js ISR | Astro + Cloudflare KV ISR |
|---------|-------------|---------------------------|
| **Zeitbasierte Revalidierung** | ✅ Eingebaut | ✅ Eigene Implementierung |
| **On-Demand-Revalidierung** | ✅ `revalidatePath()` | ✅ Eigener API-Endpunkt |
| **Stale-while-revalidate** | ✅ Automatisch | ✅ In Middleware implementiert |
| **Edge-Caching** | ⚠️ Abhängig vom Hosting | ✅ Global über Cloudflare |
| **Cache-Persistenz** | ⚠️ Abhängig vom Hosting | ✅ Persistent in KV |
| **Setup-Aufwand** | ✅ Zero Config | ⚠️ Manuelle Einrichtung nötig |
| **Flexibilität** | ⚠️ Begrenzt | ✅ Volle Kontrolle |
## Fazit
Sie haben Incremental Static Regeneration in Astro mit Cloudflare KV erfolgreich implementiert!
Astro bietet zwar keine eingebaute ISR wie Next.js, aber diese eigene Implementierung gibt Ihnen noch mehr Flexibilität und Kontrolle. Sie können die Cache-Logik an Ihre Anforderungen anpassen, verschiedene Storage-Backends nutzen und für Ihren Use Case optimieren.
Bei Fragen oder Anmerkungen erreichen Sie mich gerne auf [Twitter](https://twitter.com/direct_messages/create/rishi_raj_jain_).
## Auf Cloudflare Workers deployen
Deployen Sie Ihre Anwendung auf Cloudflare Workers:
```bash
# Build the project
npm run build
# Deploy to Cloudflare Workers
npx wrangler deploy
```
Nach dem Deployment:
1. Öffnen Sie Ihr Cloudflare-Dashboard
2. Navigieren Sie zu Workers
3. Fügen Sie eine Umgebungsvariable hinzu:
- Name: `REVALIDATION_SECRET`
- Wert: Eine sichere Zufallszeichenkette
Ihr ISR-System ist jetzt live in Produktion!
## Vergleich mit Next.js ISR
So vergleicht sich unsere Astro-ISR-Implementierung mit Next.js ISR:
| Feature | Next.js ISR | Astro + Cloudflare KV ISR |
|---------|-------------|---------------------------|
| **Zeitbasierte Revalidierung** | ✅ Eingebaut | ✅ Eigene Implementierung |
| **On-Demand-Revalidierung** | ✅ `revalidatePath()` | ✅ Eigener API-Endpunkt |
| **Stale-while-revalidate** | ✅ Automatisch | ✅ In Middleware implementiert |
| **Edge-Caching** | ⚠️ Abhängig vom Hosting | ✅ Global über Cloudflare |
| **Cache-Persistenz** | ⚠️ Abhängig vom Hosting | ✅ Persistent in KV |
| **Setup-Aufwand** | ✅ Zero Config | ⚠️ Manuelle Einrichtung nötig |
| **Flexibilität** | ⚠️ Begrenzt | ✅ Volle Kontrolle |
## Fazit
Sie haben Incremental Static Regeneration in Astro mit Cloudflare KV erfolgreich implementiert!
Astro bietet zwar keine eingebaute ISR wie Next.js, aber diese eigene Implementierung gibt Ihnen noch mehr Flexibilität und Kontrolle. Sie können die Cache-Logik an Ihre Anforderungen anpassen, verschiedene Storage-Backends nutzen und für Ihren Use Case optimieren.
Bei Fragen oder Anmerkungen erreichen Sie mich gerne auf [Twitter](https://twitter.com/direct_messages/create/rishi_raj_jain_).