---
title: "Stellen Sie Next.js in AWS Amplify bereit"
description: "So stellen Sie Ihre Next.js Server-Side Rendered (SSR)-Websites in AWS Amplify bereit."
source: "https://www.launchfa.st/de/blog/deploy-nextjs-aws-amplify"
author: "Rishi Raj Jain"
created_at: 2024-03-31T00:00:00.000Z
---
> **Site index for agents**
> Fetch https://www.launchfa.st/llms.txt to discover every page on this site.
> Every page is also available as Markdown by appending `.md` to its URL.
 In diesem Leitfaden erfahren Sie, wie Sie ein Nextjs-SSR-Projekt in AWS Amplify bereitstellen. Sie durchlaufen den Prozess der Einrichtung eines neuen Nextjs-Projekts, der Aktivierung des serverseitigen Renderings mithilfe des AWS Amplify-Adapters und der schließlichen Bereitstellung in AWS Amplify
## Voraussetzungen
Sie benötigen Folgendes:
- [Nodejs 18](https://nodejs.org/en/blog/announcements/v20-release-announce) oder höher
- Ein [AWS](https://aws.amazon.com/free)-Konto
## Erstellen Sie eine neue Nextjs-Anwendung
Beginnen wir mit der Erstellung eines neuen Nextjs-Projekts. Öffnen Sie Ihr Terminal und führen Sie den folgenden Befehl aus:
```bash
npx create-next-app@latest my-app
```
Wenn Sie dazu aufgefordert werden, wählen Sie:
- „Ja“, wenn Sie aufgefordert werden, TypeScript zu verwenden
- „Nein“, wenn Sie aufgefordert werden, ESLint zu verwenden
- „Ja“, wenn Sie aufgefordert werden, Tailwind CSS zu verwenden
- „Nein“, wenn Sie aufgefordert werden, das Verzeichnis „src/“ zu verwenden
- „Ja“, wenn Sie aufgefordert werden, App Router zu verwenden
- „Nein“, wenn Sie aufgefordert werden, den Standard-Importalias („@/*“) anzupassen.
Sobald dies erledigt ist, wechseln Sie in das Projektverzeichnis und starten Sie die App im Entwicklungsmodus, indem Sie den folgenden Befehl ausführen:
```bash
cd my-app
npm run dev
```
Die App sollte auf [localhost:3000](http://localhost:3000/) ausgeführt werden.
Anschließend müssen Sie die folgende Änderung an Ihrer „nextconfigjs“-Datei vornehmen. Öffnen Sie die Datei und fügen Sie den folgenden Code hinzu:
```tsx
module.exports = {
output: 'standalone', // [!code ++]
}
```
Erstellen Sie dann eine „amplifymjs“-Datei im Stammverzeichnis des Repositorys mit dem folgenden Code:
```tsx
// File: amplify.mjs
import { join } from 'node:path';
import { writeFileSync, mkdirSync, existsSync, cpSync, rmSync } from 'node:fs';
// Define all the Amplify related directories
const amplifyDirectories = [
join(process.cwd(), '.amplify-hosting'),
join(process.cwd(), '.amplify-hosting', 'static'),
join(process.cwd(), '.amplify-hosting', 'static', '_next'),
join(process.cwd(), '.amplify-hosting', 'compute'),
join(process.cwd(), '.amplify-hosting', 'compute', 'default'),
join(process.cwd(), '.amplify-hosting', 'compute', 'default', 'node_modules'),
]
// Create directories if they do no exist already
if (existsSync(amplifyDirectories[0])) rmSync(amplifyDirectories[0], { force: true, recursive: true })
// Create directories if they do no exist already
amplifyDirectories.forEach((i => mkdirSync(i)))
// A general default configuration to fallback to compute if no matching static assets found
const deployManifestConfig = {
version: 1,
routes: [
{
path: `/assets/*`,
target: {
kind: "Static",
},
},
{
path: `/*.*`,
target: {
kind: "Static",
},
fallback: {
kind: "Compute",
src: "default",
},
},
{
path: "/*",
target: {
kind: "Compute",
src: "default",
},
},
],
computeResources: [
{
name: "default",
entrypoint: "server.js",
runtime: "nodejs18.x",
},
],
framework: {
name: "next",
version: "13.5.6",
},
};
// Write the config to .amplify-hosting/deploy-manifest.json
writeFileSync(
join(process.cwd(), ".amplify-hosting", "deploy-manifest.json"),
JSON.stringify(deployManifestConfig),
);
// Copy the static assets generated in .next/static and public to .amplify-hosting/static directory
cpSync(join(process.cwd(), 'public'), amplifyDirectories[1], { recursive: true })
cpSync(join(process.cwd(), '.next', 'static'), amplifyDirectories[2], { recursive: true })
// Copy the static assets generated in .next/standalone to .amplify-hosting/compute directory
cpSync(join(process.cwd(), '.next', 'standalone'), amplifyDirectories[4], { recursive: true })
// Remove .next/static and public from .amplify-hosting/compute/default
rmSync(join(amplifyDirectories[4], '.next', 'static'), { force: true, recursive: true })
rmSync(join(amplifyDirectories[4], 'public'), { force: true, recursive: true })
```
Erstellen Sie dann eine „amplifyyml“-Datei im Stammverzeichnis des Repositorys mit dem folgenden Code:
```yml
version: 1
frontend:
phases:
preBuild:
commands:
- npm ci
build:
commands:
- env >> .env
- npm run build
- node amplify.mjs
artifacts:
baseDirectory: .next
files:
- '**/*'
cache:
paths:
- node_modules/**/*
```
Der obige Code führt Folgendes aus:
– Verwendet „preBuild“-Befehle, um die Abhängigkeiten Ihres Nextjs-Projekts zu installieren
- Verwendet „Build“-Befehle, um:
- Speichern Sie alle Umgebungsvariablen in der Datei „env“ im Stammverzeichnis des Projekts
- Erstellen Sie Ihre Nextjs-Anwendung
- Verschieben Sie das Verzeichnis „node_modules“ und die Datei „env“ in das Compute-Verzeichnis von Amplify
## Bereitstellung auf AWS Amplify
Der Code kann nun in AWS Amplify bereitgestellt werden. Führen Sie zur Bereitstellung die folgenden Schritte aus:
- Beginnen Sie mit der Erstellung eines GitHub-Repositorys, das den Code Ihrer App enthält
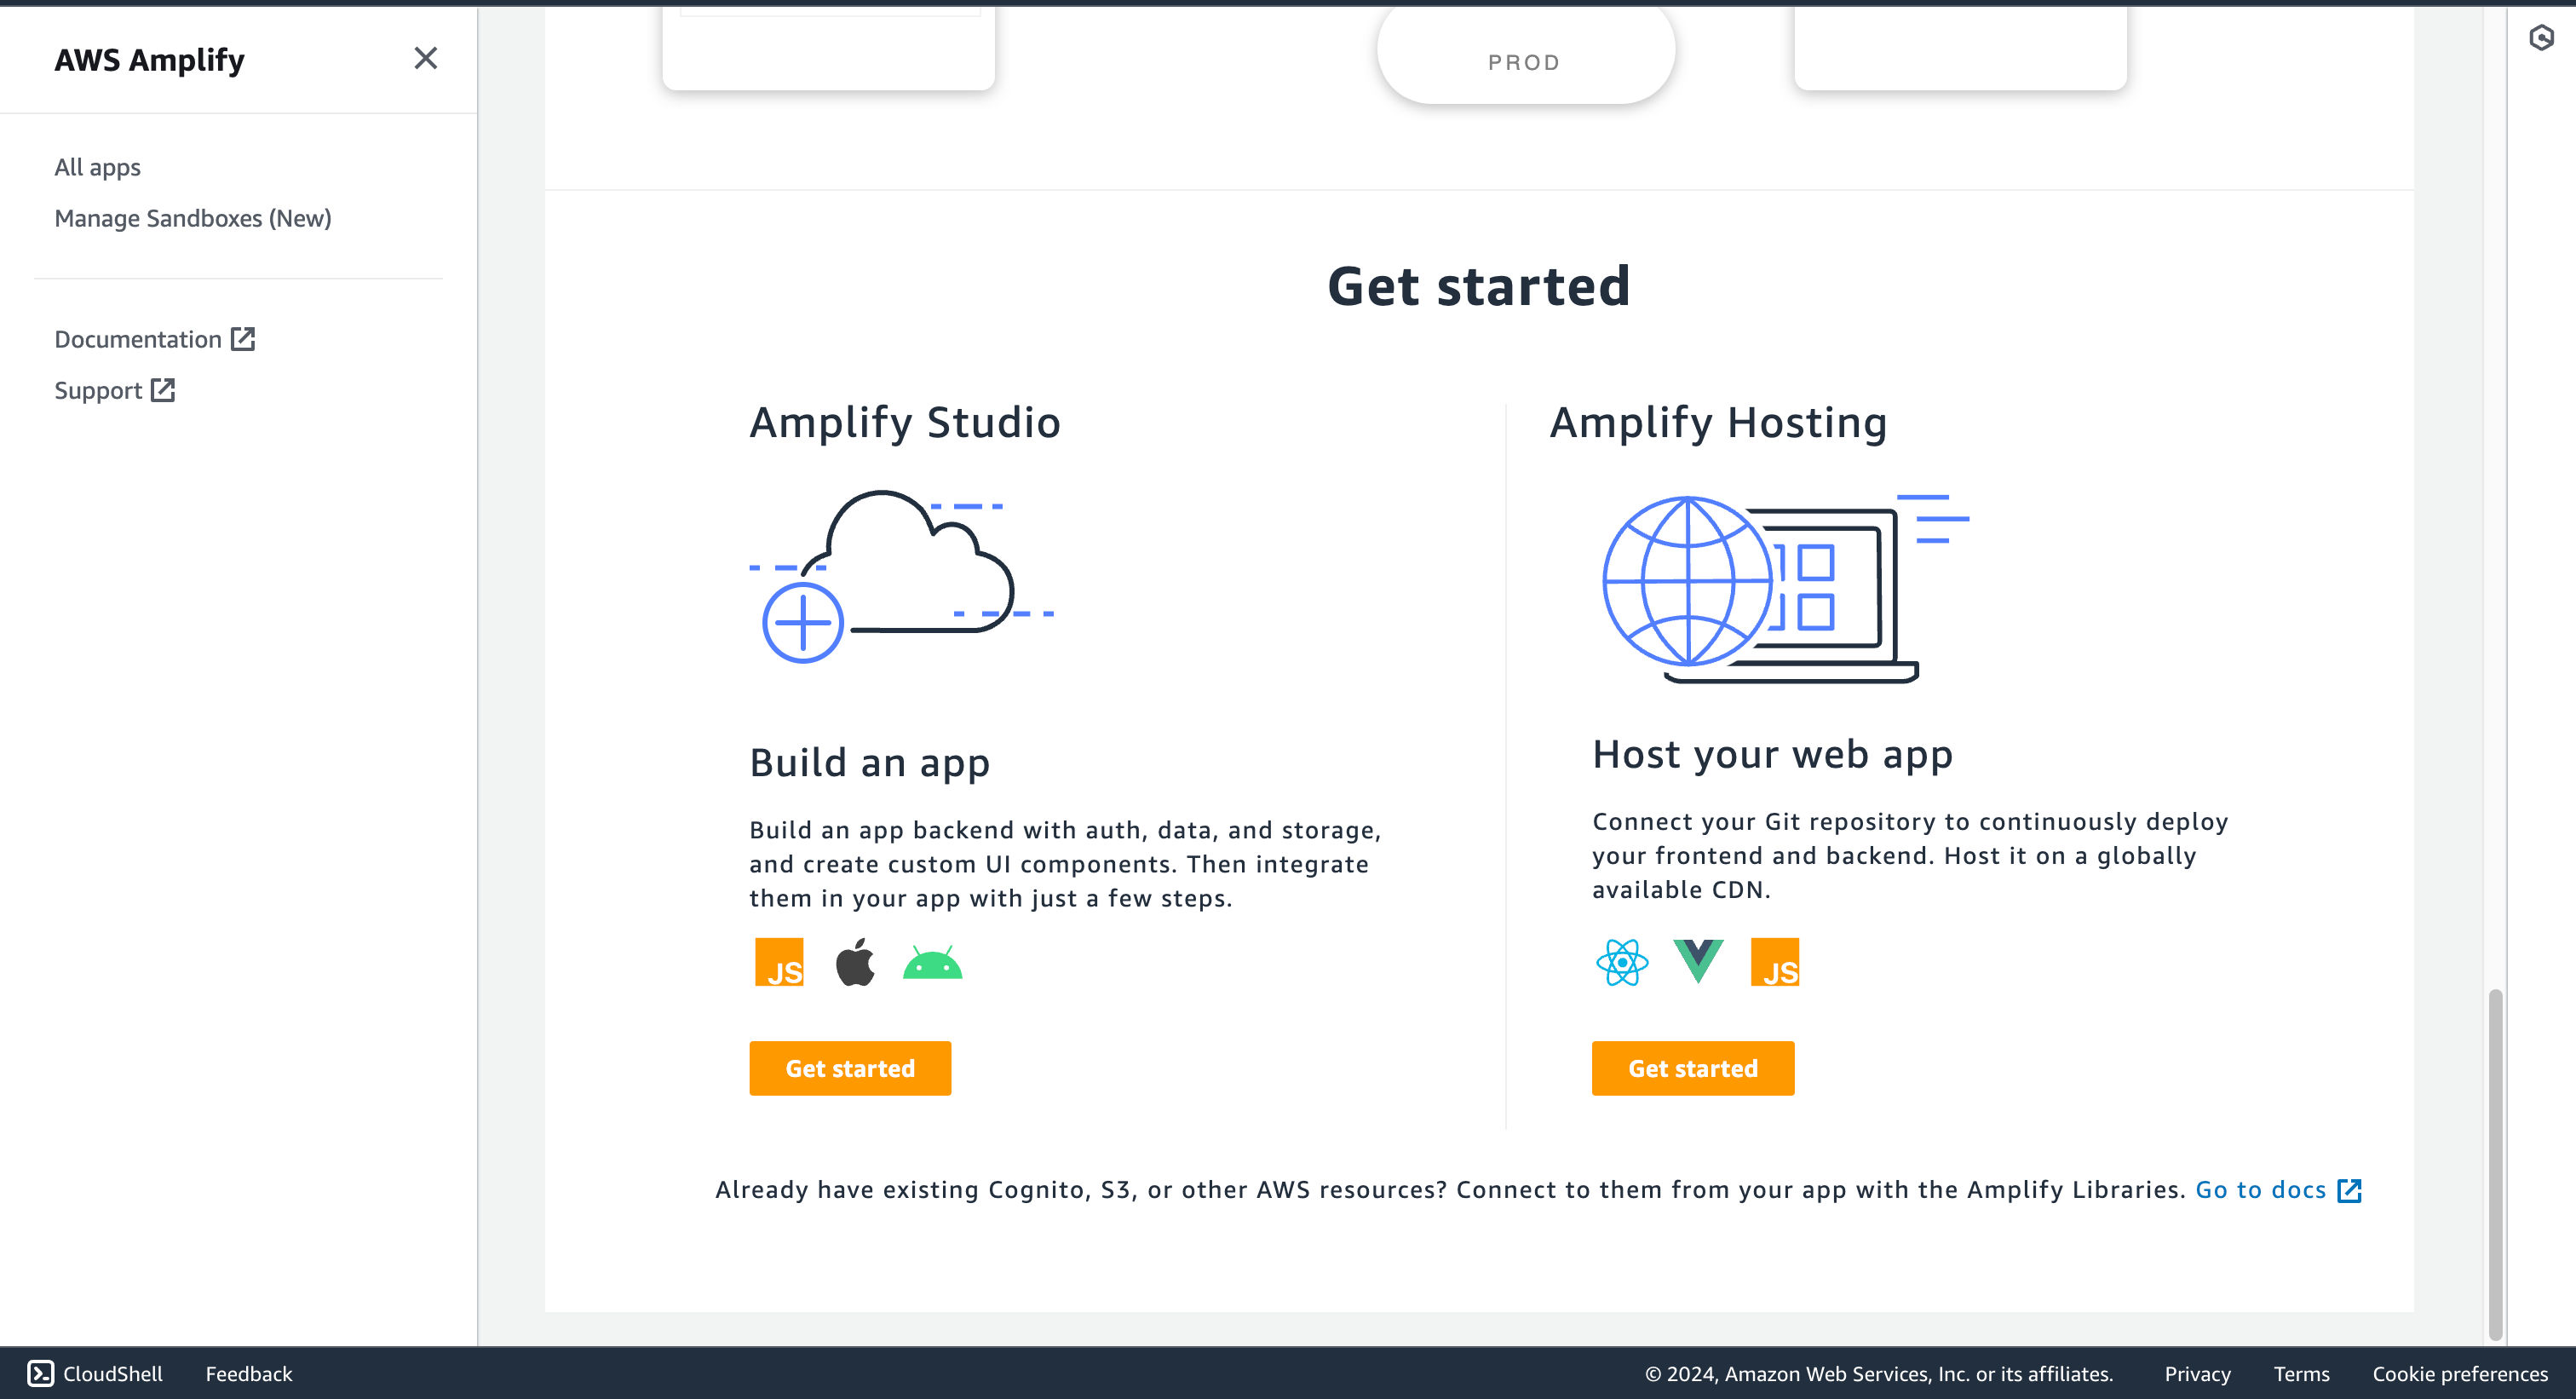
- Navigieren Sie dann zum AWS Amplify Dashboard und klicken Sie im Abschnitt **Hosten Sie Ihre Web-App** auf **Erste Schritte**
In diesem Leitfaden erfahren Sie, wie Sie ein Nextjs-SSR-Projekt in AWS Amplify bereitstellen. Sie durchlaufen den Prozess der Einrichtung eines neuen Nextjs-Projekts, der Aktivierung des serverseitigen Renderings mithilfe des AWS Amplify-Adapters und der schließlichen Bereitstellung in AWS Amplify
## Voraussetzungen
Sie benötigen Folgendes:
- [Nodejs 18](https://nodejs.org/en/blog/announcements/v20-release-announce) oder höher
- Ein [AWS](https://aws.amazon.com/free)-Konto
## Erstellen Sie eine neue Nextjs-Anwendung
Beginnen wir mit der Erstellung eines neuen Nextjs-Projekts. Öffnen Sie Ihr Terminal und führen Sie den folgenden Befehl aus:
```bash
npx create-next-app@latest my-app
```
Wenn Sie dazu aufgefordert werden, wählen Sie:
- „Ja“, wenn Sie aufgefordert werden, TypeScript zu verwenden
- „Nein“, wenn Sie aufgefordert werden, ESLint zu verwenden
- „Ja“, wenn Sie aufgefordert werden, Tailwind CSS zu verwenden
- „Nein“, wenn Sie aufgefordert werden, das Verzeichnis „src/“ zu verwenden
- „Ja“, wenn Sie aufgefordert werden, App Router zu verwenden
- „Nein“, wenn Sie aufgefordert werden, den Standard-Importalias („@/*“) anzupassen.
Sobald dies erledigt ist, wechseln Sie in das Projektverzeichnis und starten Sie die App im Entwicklungsmodus, indem Sie den folgenden Befehl ausführen:
```bash
cd my-app
npm run dev
```
Die App sollte auf [localhost:3000](http://localhost:3000/) ausgeführt werden.
Anschließend müssen Sie die folgende Änderung an Ihrer „nextconfigjs“-Datei vornehmen. Öffnen Sie die Datei und fügen Sie den folgenden Code hinzu:
```tsx
module.exports = {
output: 'standalone', // [!code ++]
}
```
Erstellen Sie dann eine „amplifymjs“-Datei im Stammverzeichnis des Repositorys mit dem folgenden Code:
```tsx
// File: amplify.mjs
import { join } from 'node:path';
import { writeFileSync, mkdirSync, existsSync, cpSync, rmSync } from 'node:fs';
// Define all the Amplify related directories
const amplifyDirectories = [
join(process.cwd(), '.amplify-hosting'),
join(process.cwd(), '.amplify-hosting', 'static'),
join(process.cwd(), '.amplify-hosting', 'static', '_next'),
join(process.cwd(), '.amplify-hosting', 'compute'),
join(process.cwd(), '.amplify-hosting', 'compute', 'default'),
join(process.cwd(), '.amplify-hosting', 'compute', 'default', 'node_modules'),
]
// Create directories if they do no exist already
if (existsSync(amplifyDirectories[0])) rmSync(amplifyDirectories[0], { force: true, recursive: true })
// Create directories if they do no exist already
amplifyDirectories.forEach((i => mkdirSync(i)))
// A general default configuration to fallback to compute if no matching static assets found
const deployManifestConfig = {
version: 1,
routes: [
{
path: `/assets/*`,
target: {
kind: "Static",
},
},
{
path: `/*.*`,
target: {
kind: "Static",
},
fallback: {
kind: "Compute",
src: "default",
},
},
{
path: "/*",
target: {
kind: "Compute",
src: "default",
},
},
],
computeResources: [
{
name: "default",
entrypoint: "server.js",
runtime: "nodejs18.x",
},
],
framework: {
name: "next",
version: "13.5.6",
},
};
// Write the config to .amplify-hosting/deploy-manifest.json
writeFileSync(
join(process.cwd(), ".amplify-hosting", "deploy-manifest.json"),
JSON.stringify(deployManifestConfig),
);
// Copy the static assets generated in .next/static and public to .amplify-hosting/static directory
cpSync(join(process.cwd(), 'public'), amplifyDirectories[1], { recursive: true })
cpSync(join(process.cwd(), '.next', 'static'), amplifyDirectories[2], { recursive: true })
// Copy the static assets generated in .next/standalone to .amplify-hosting/compute directory
cpSync(join(process.cwd(), '.next', 'standalone'), amplifyDirectories[4], { recursive: true })
// Remove .next/static and public from .amplify-hosting/compute/default
rmSync(join(amplifyDirectories[4], '.next', 'static'), { force: true, recursive: true })
rmSync(join(amplifyDirectories[4], 'public'), { force: true, recursive: true })
```
Erstellen Sie dann eine „amplifyyml“-Datei im Stammverzeichnis des Repositorys mit dem folgenden Code:
```yml
version: 1
frontend:
phases:
preBuild:
commands:
- npm ci
build:
commands:
- env >> .env
- npm run build
- node amplify.mjs
artifacts:
baseDirectory: .next
files:
- '**/*'
cache:
paths:
- node_modules/**/*
```
Der obige Code führt Folgendes aus:
– Verwendet „preBuild“-Befehle, um die Abhängigkeiten Ihres Nextjs-Projekts zu installieren
- Verwendet „Build“-Befehle, um:
- Speichern Sie alle Umgebungsvariablen in der Datei „env“ im Stammverzeichnis des Projekts
- Erstellen Sie Ihre Nextjs-Anwendung
- Verschieben Sie das Verzeichnis „node_modules“ und die Datei „env“ in das Compute-Verzeichnis von Amplify
## Bereitstellung auf AWS Amplify
Der Code kann nun in AWS Amplify bereitgestellt werden. Führen Sie zur Bereitstellung die folgenden Schritte aus:
- Beginnen Sie mit der Erstellung eines GitHub-Repositorys, das den Code Ihrer App enthält
- Navigieren Sie dann zum AWS Amplify Dashboard und klicken Sie im Abschnitt **Hosten Sie Ihre Web-App** auf **Erste Schritte**
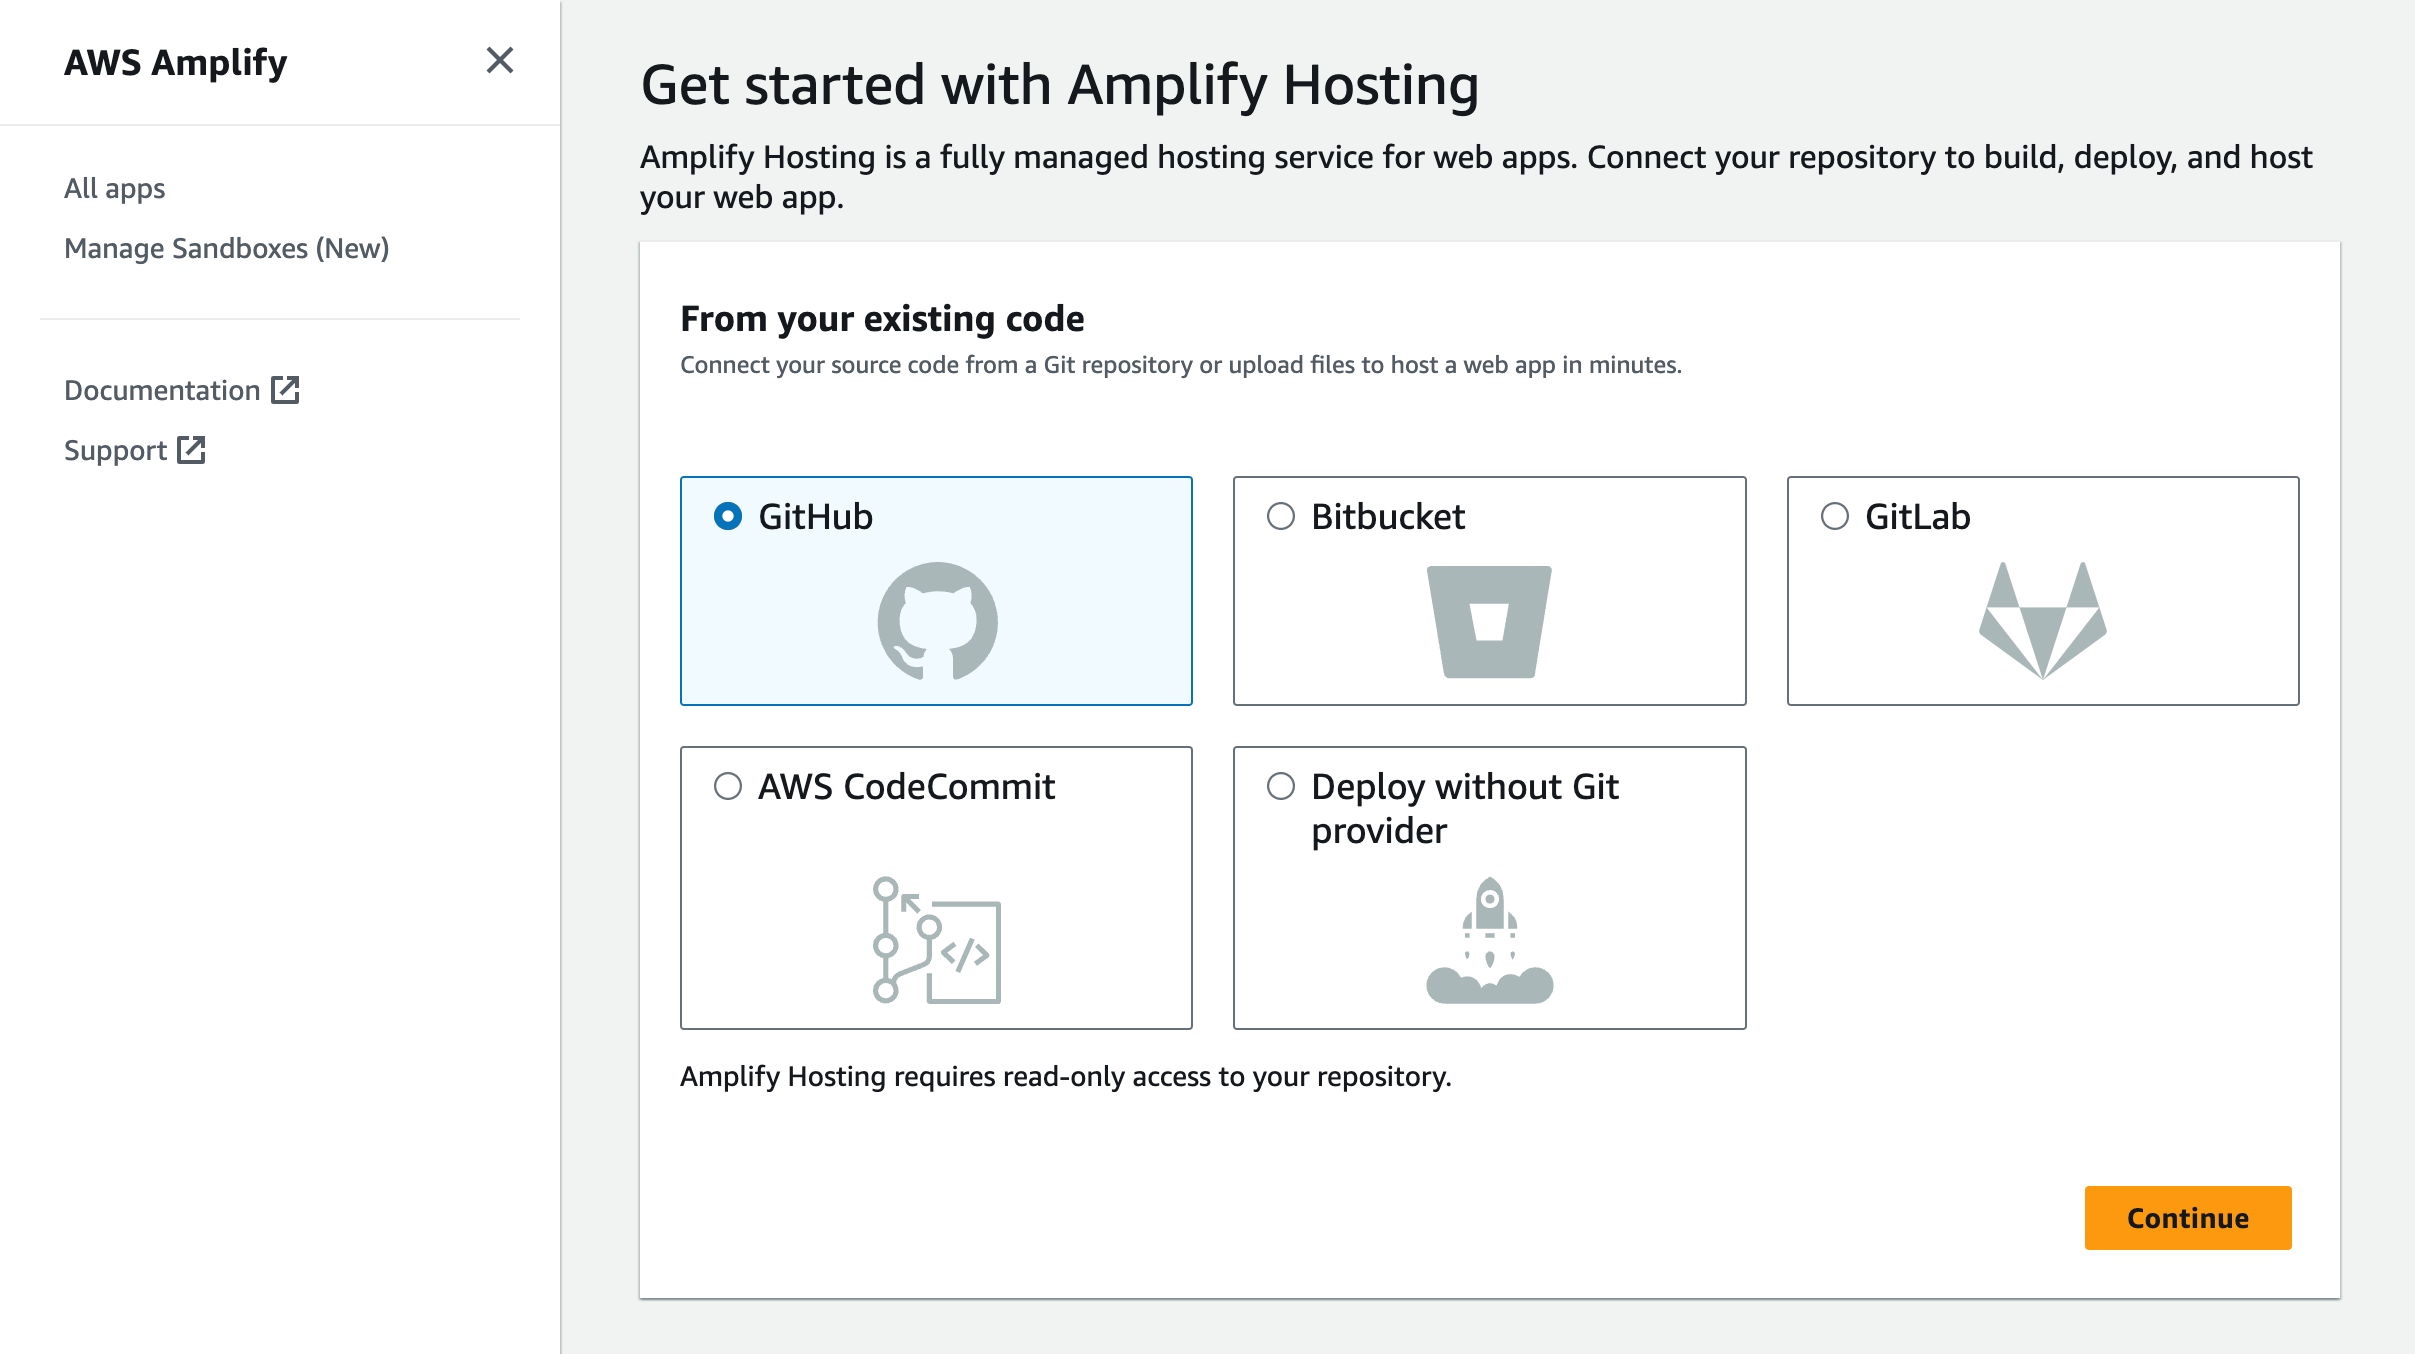
 - Wählen Sie **GitHub** als Quelle Ihres Git-Repositorys aus
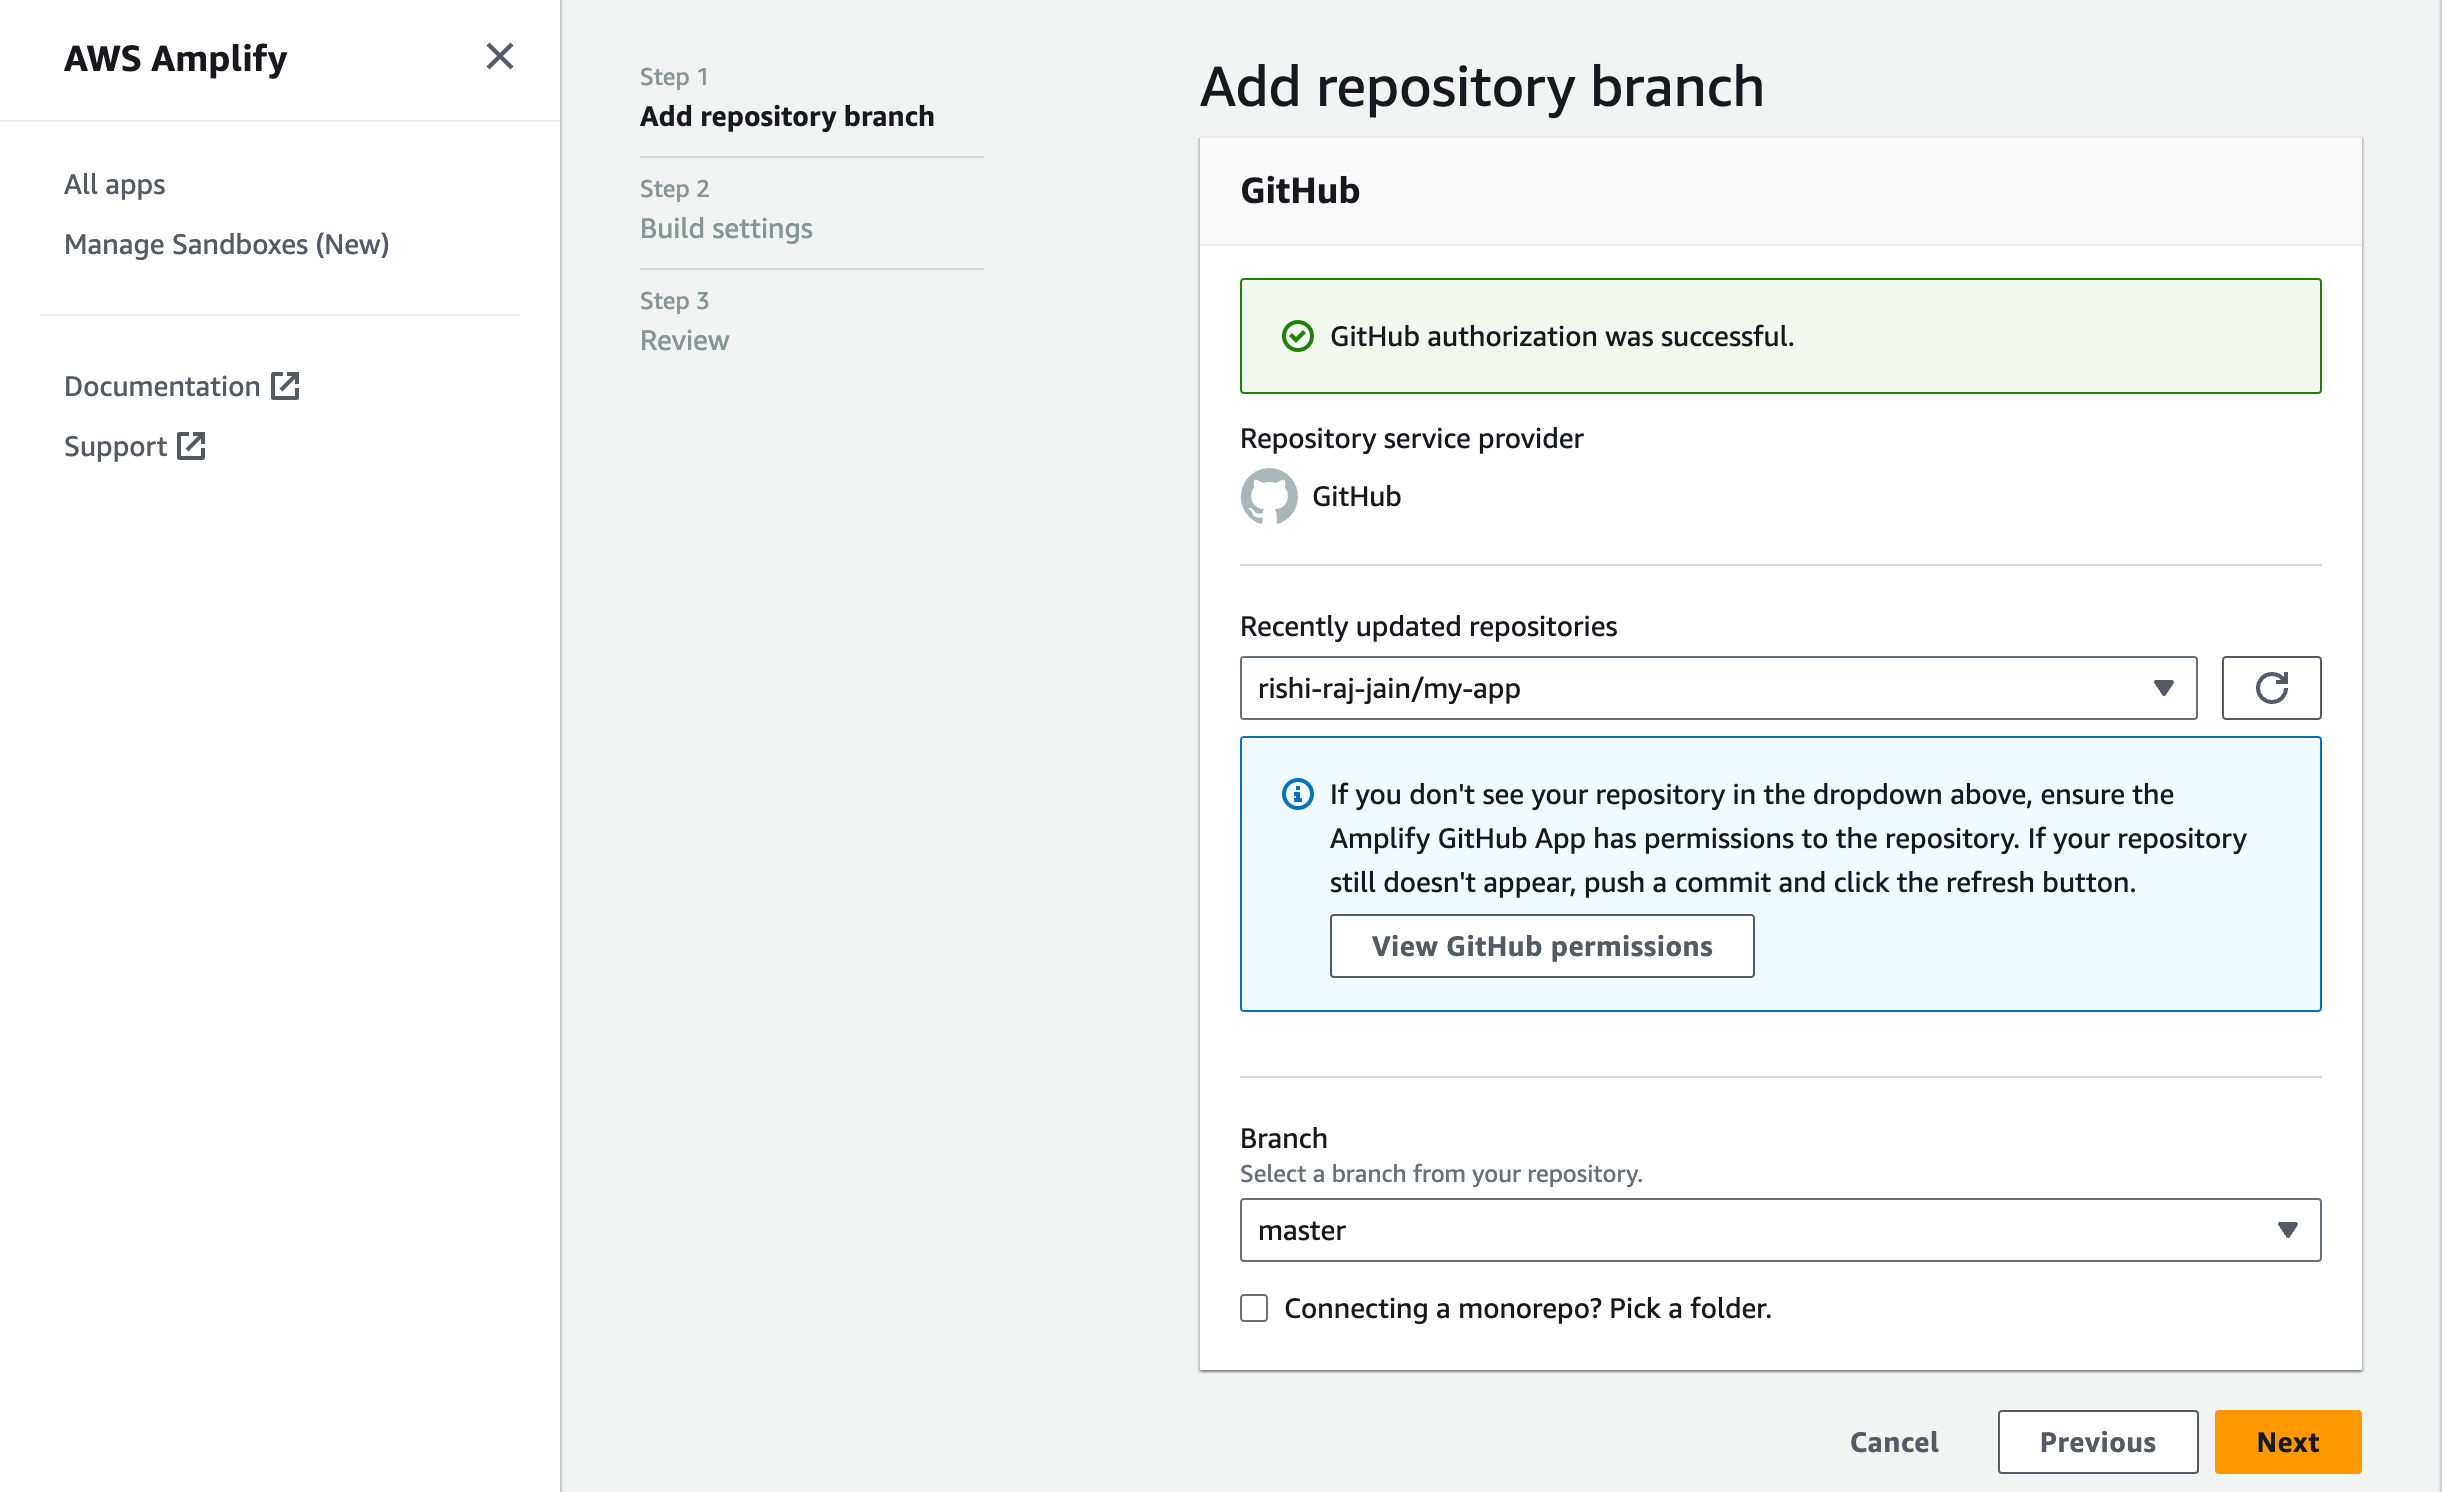
 - Verknüpfen Sie das neue Projekt mit dem GitHub-Repository, das Sie gerade erstellt haben
 - Geben Sie Ihrem Projekt einen Namen und klicken Sie auf **Erweiterte Einstellungen**
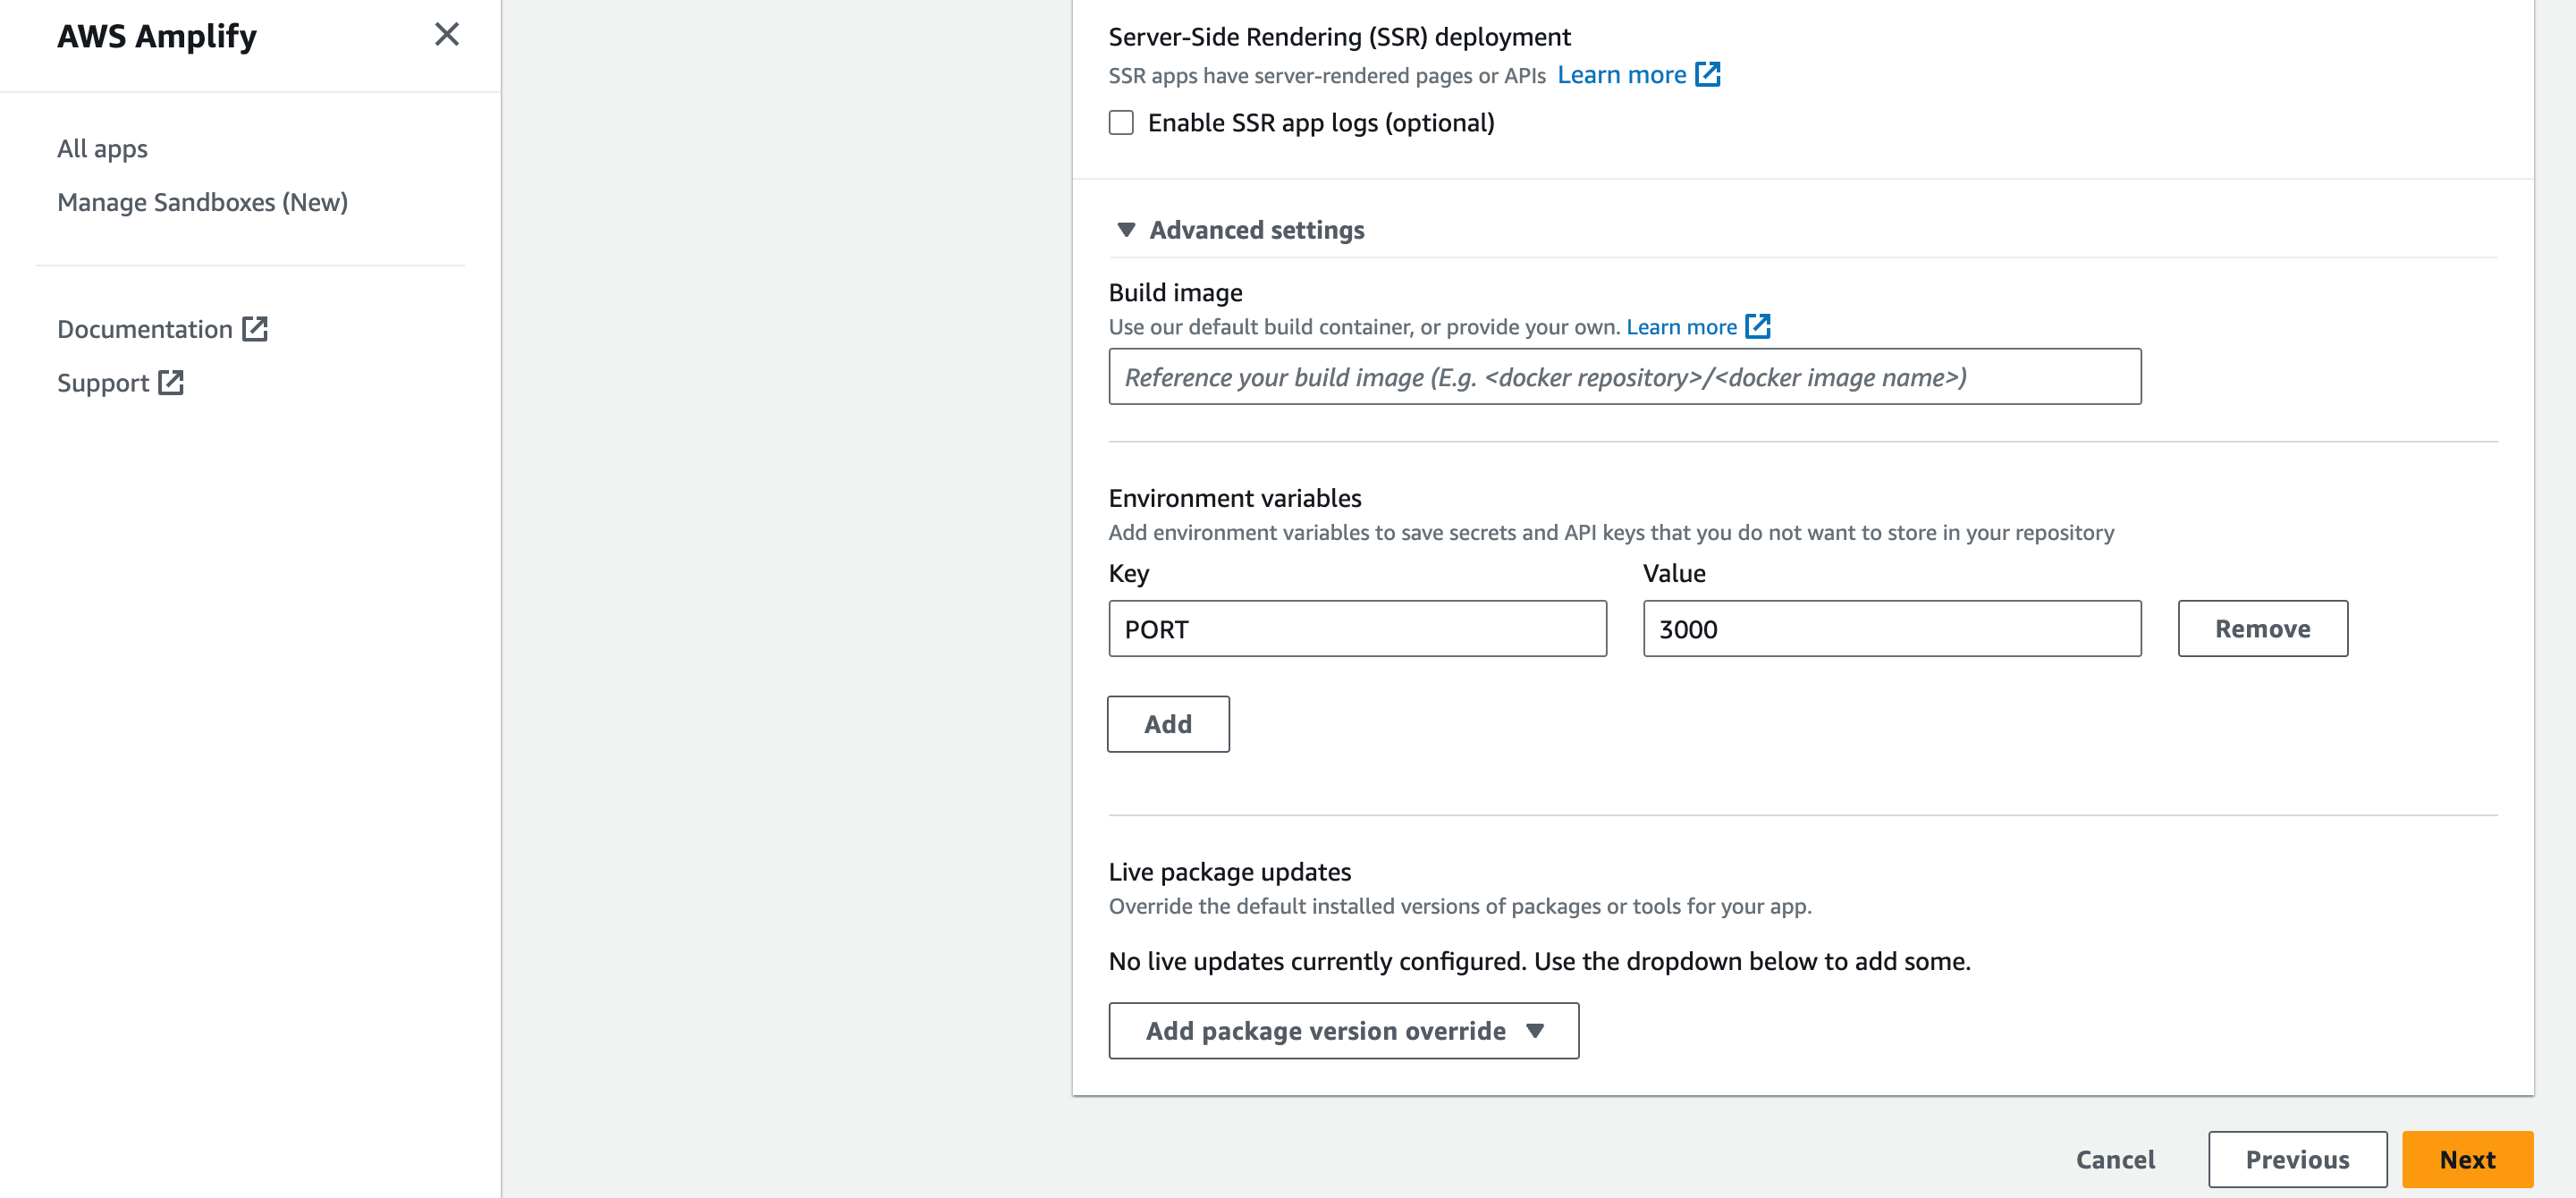
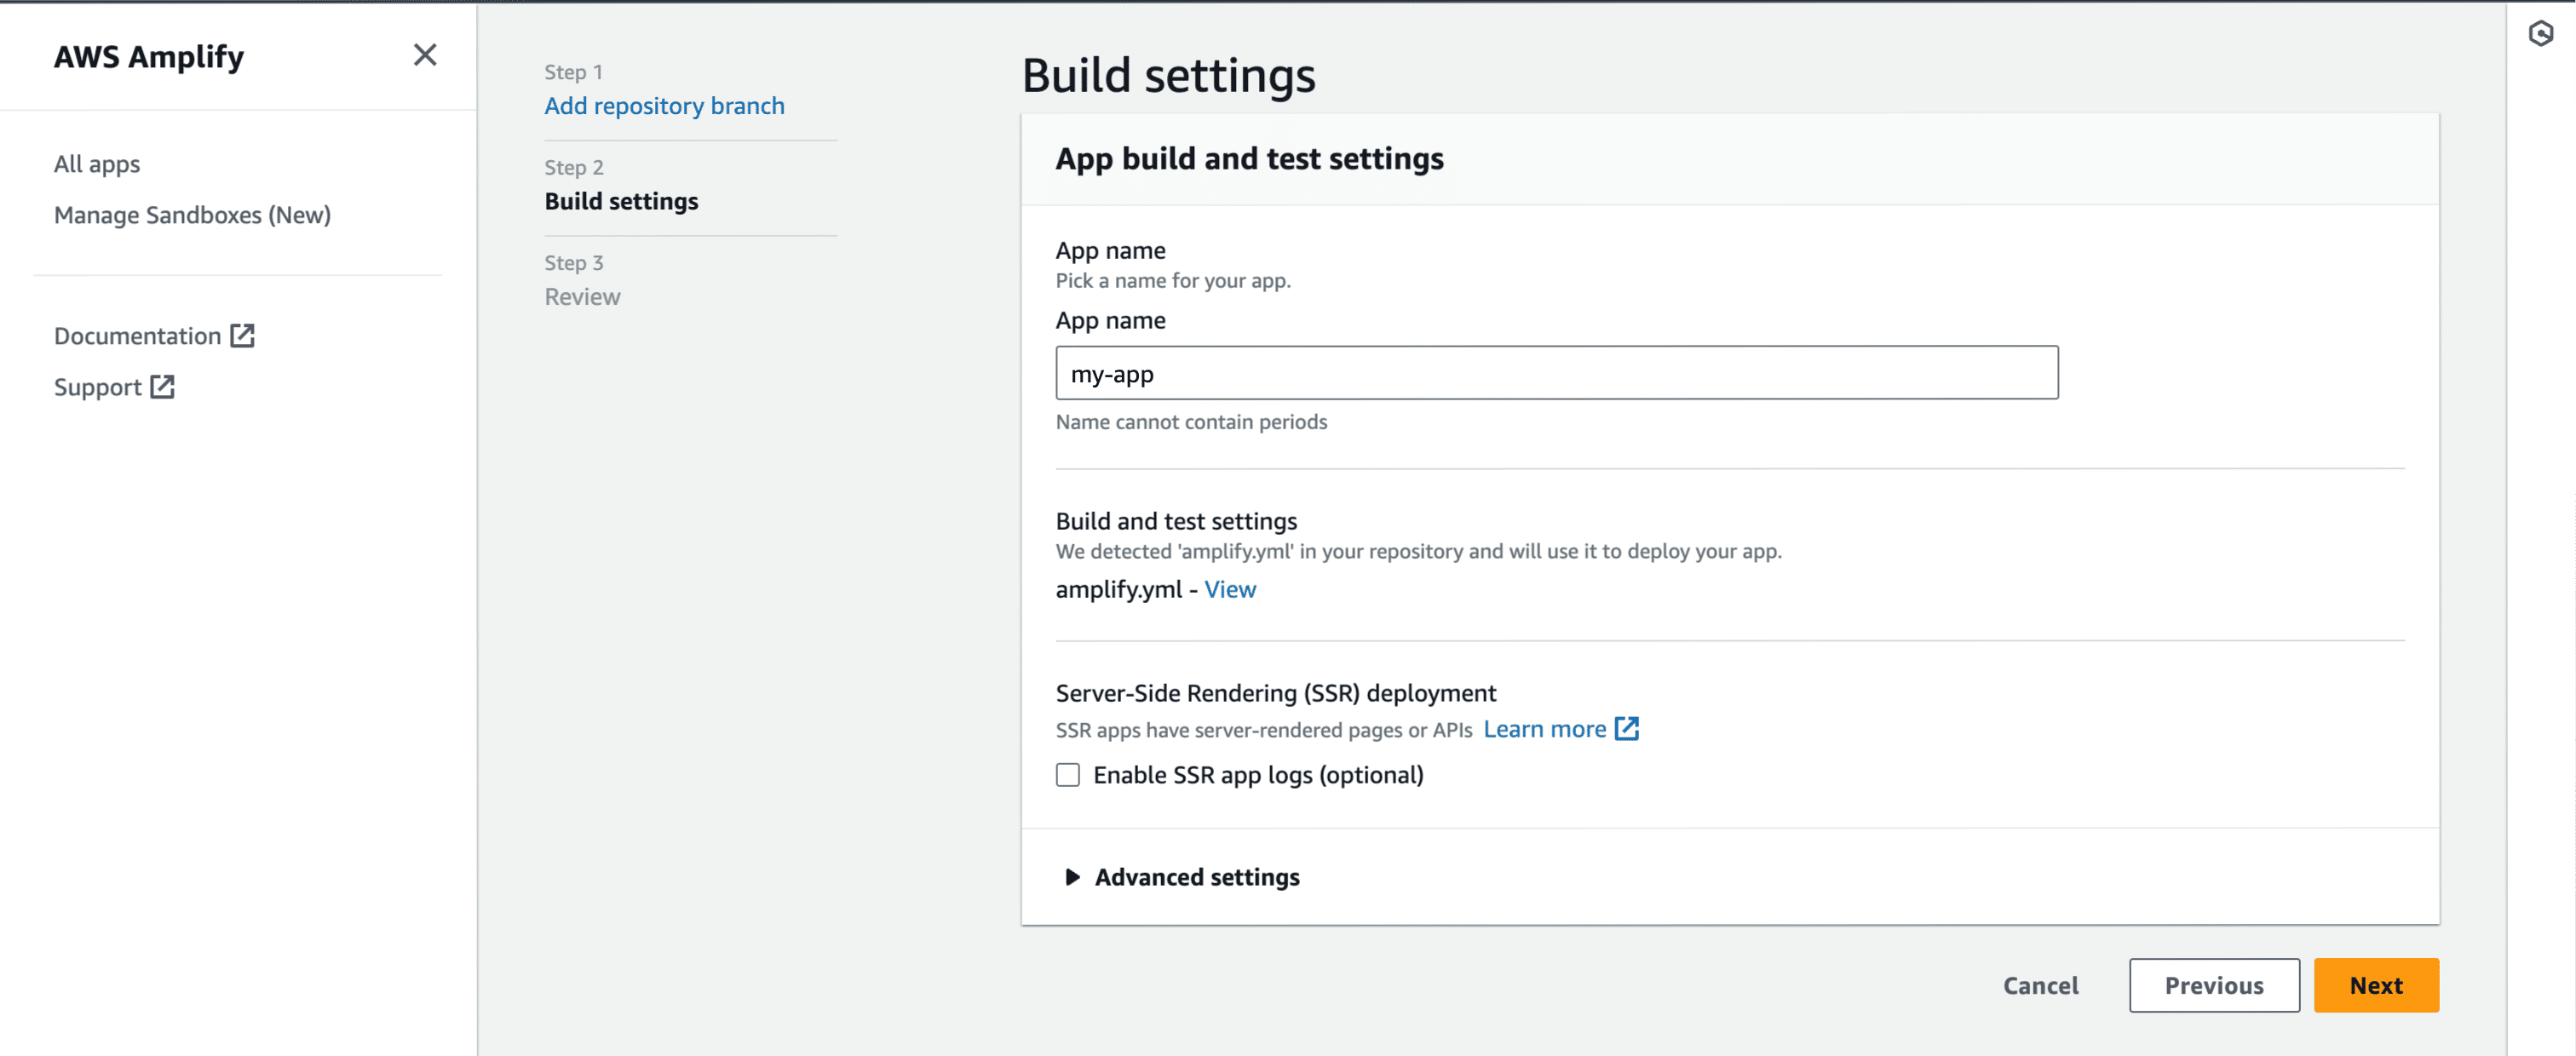 - Aktualisieren Sie in **Erweiterte Einstellungen** die **Umgebungsvariablen** so, dass sie mit denen in Ihrer lokalen „env“-Datei übereinstimmen, und „PORT“ als 3000. Klicken Sie auf **Weiter**, um fortzufahren
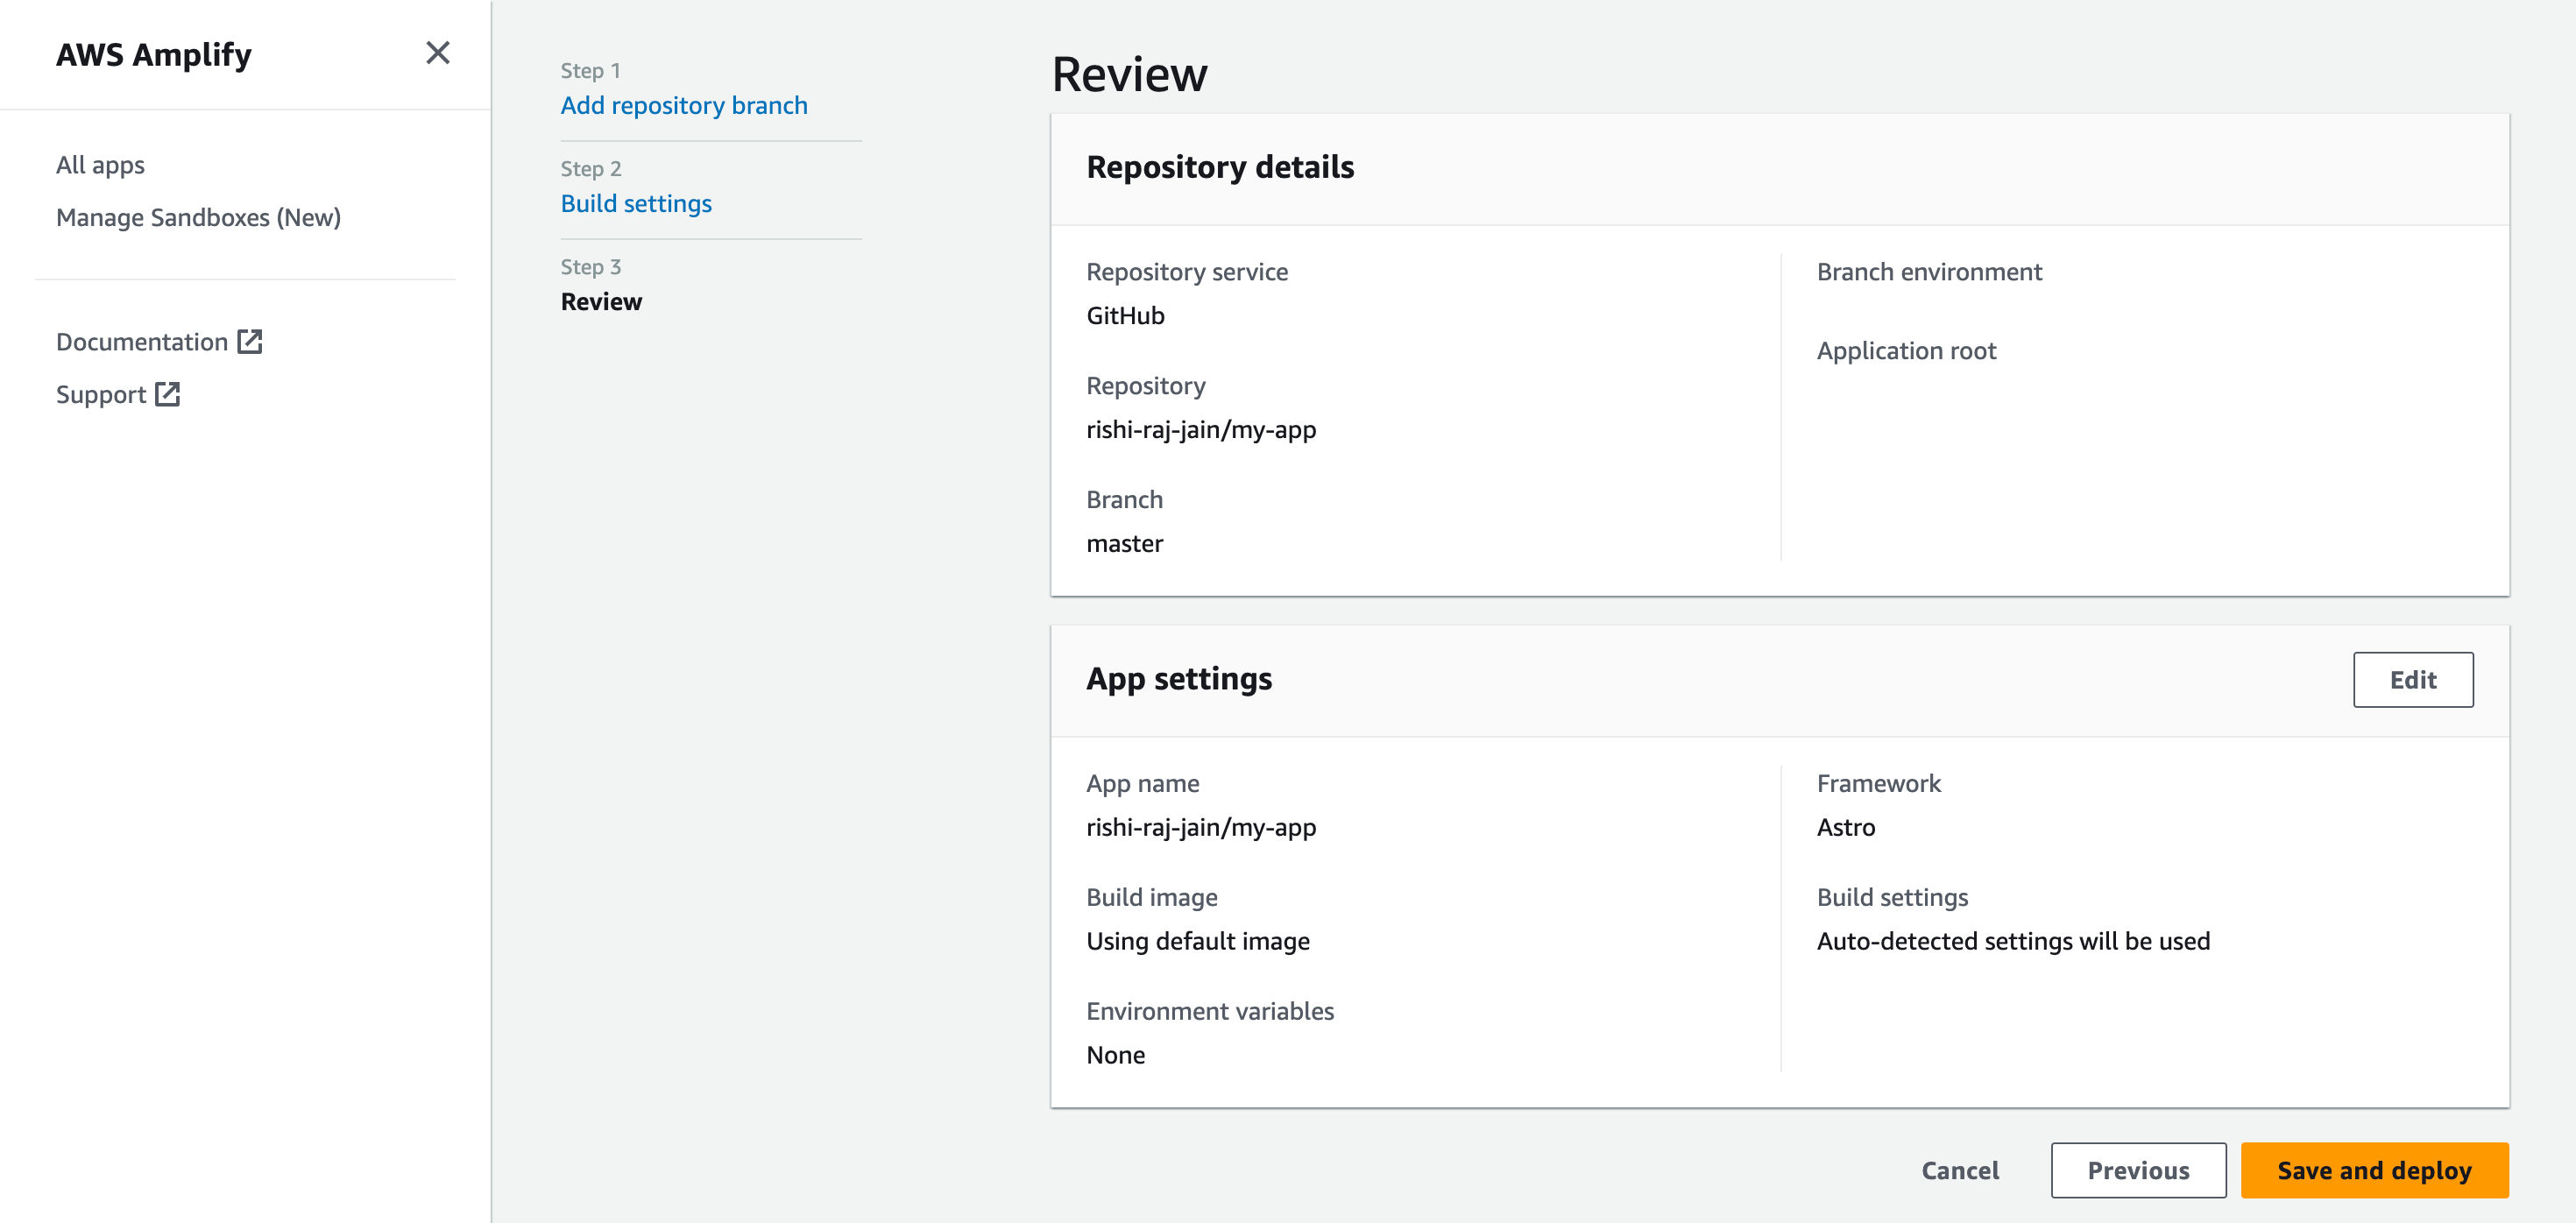
 - Klicken Sie auf **Speichern und bereitstellen**, um Ihre Website bereitzustellen
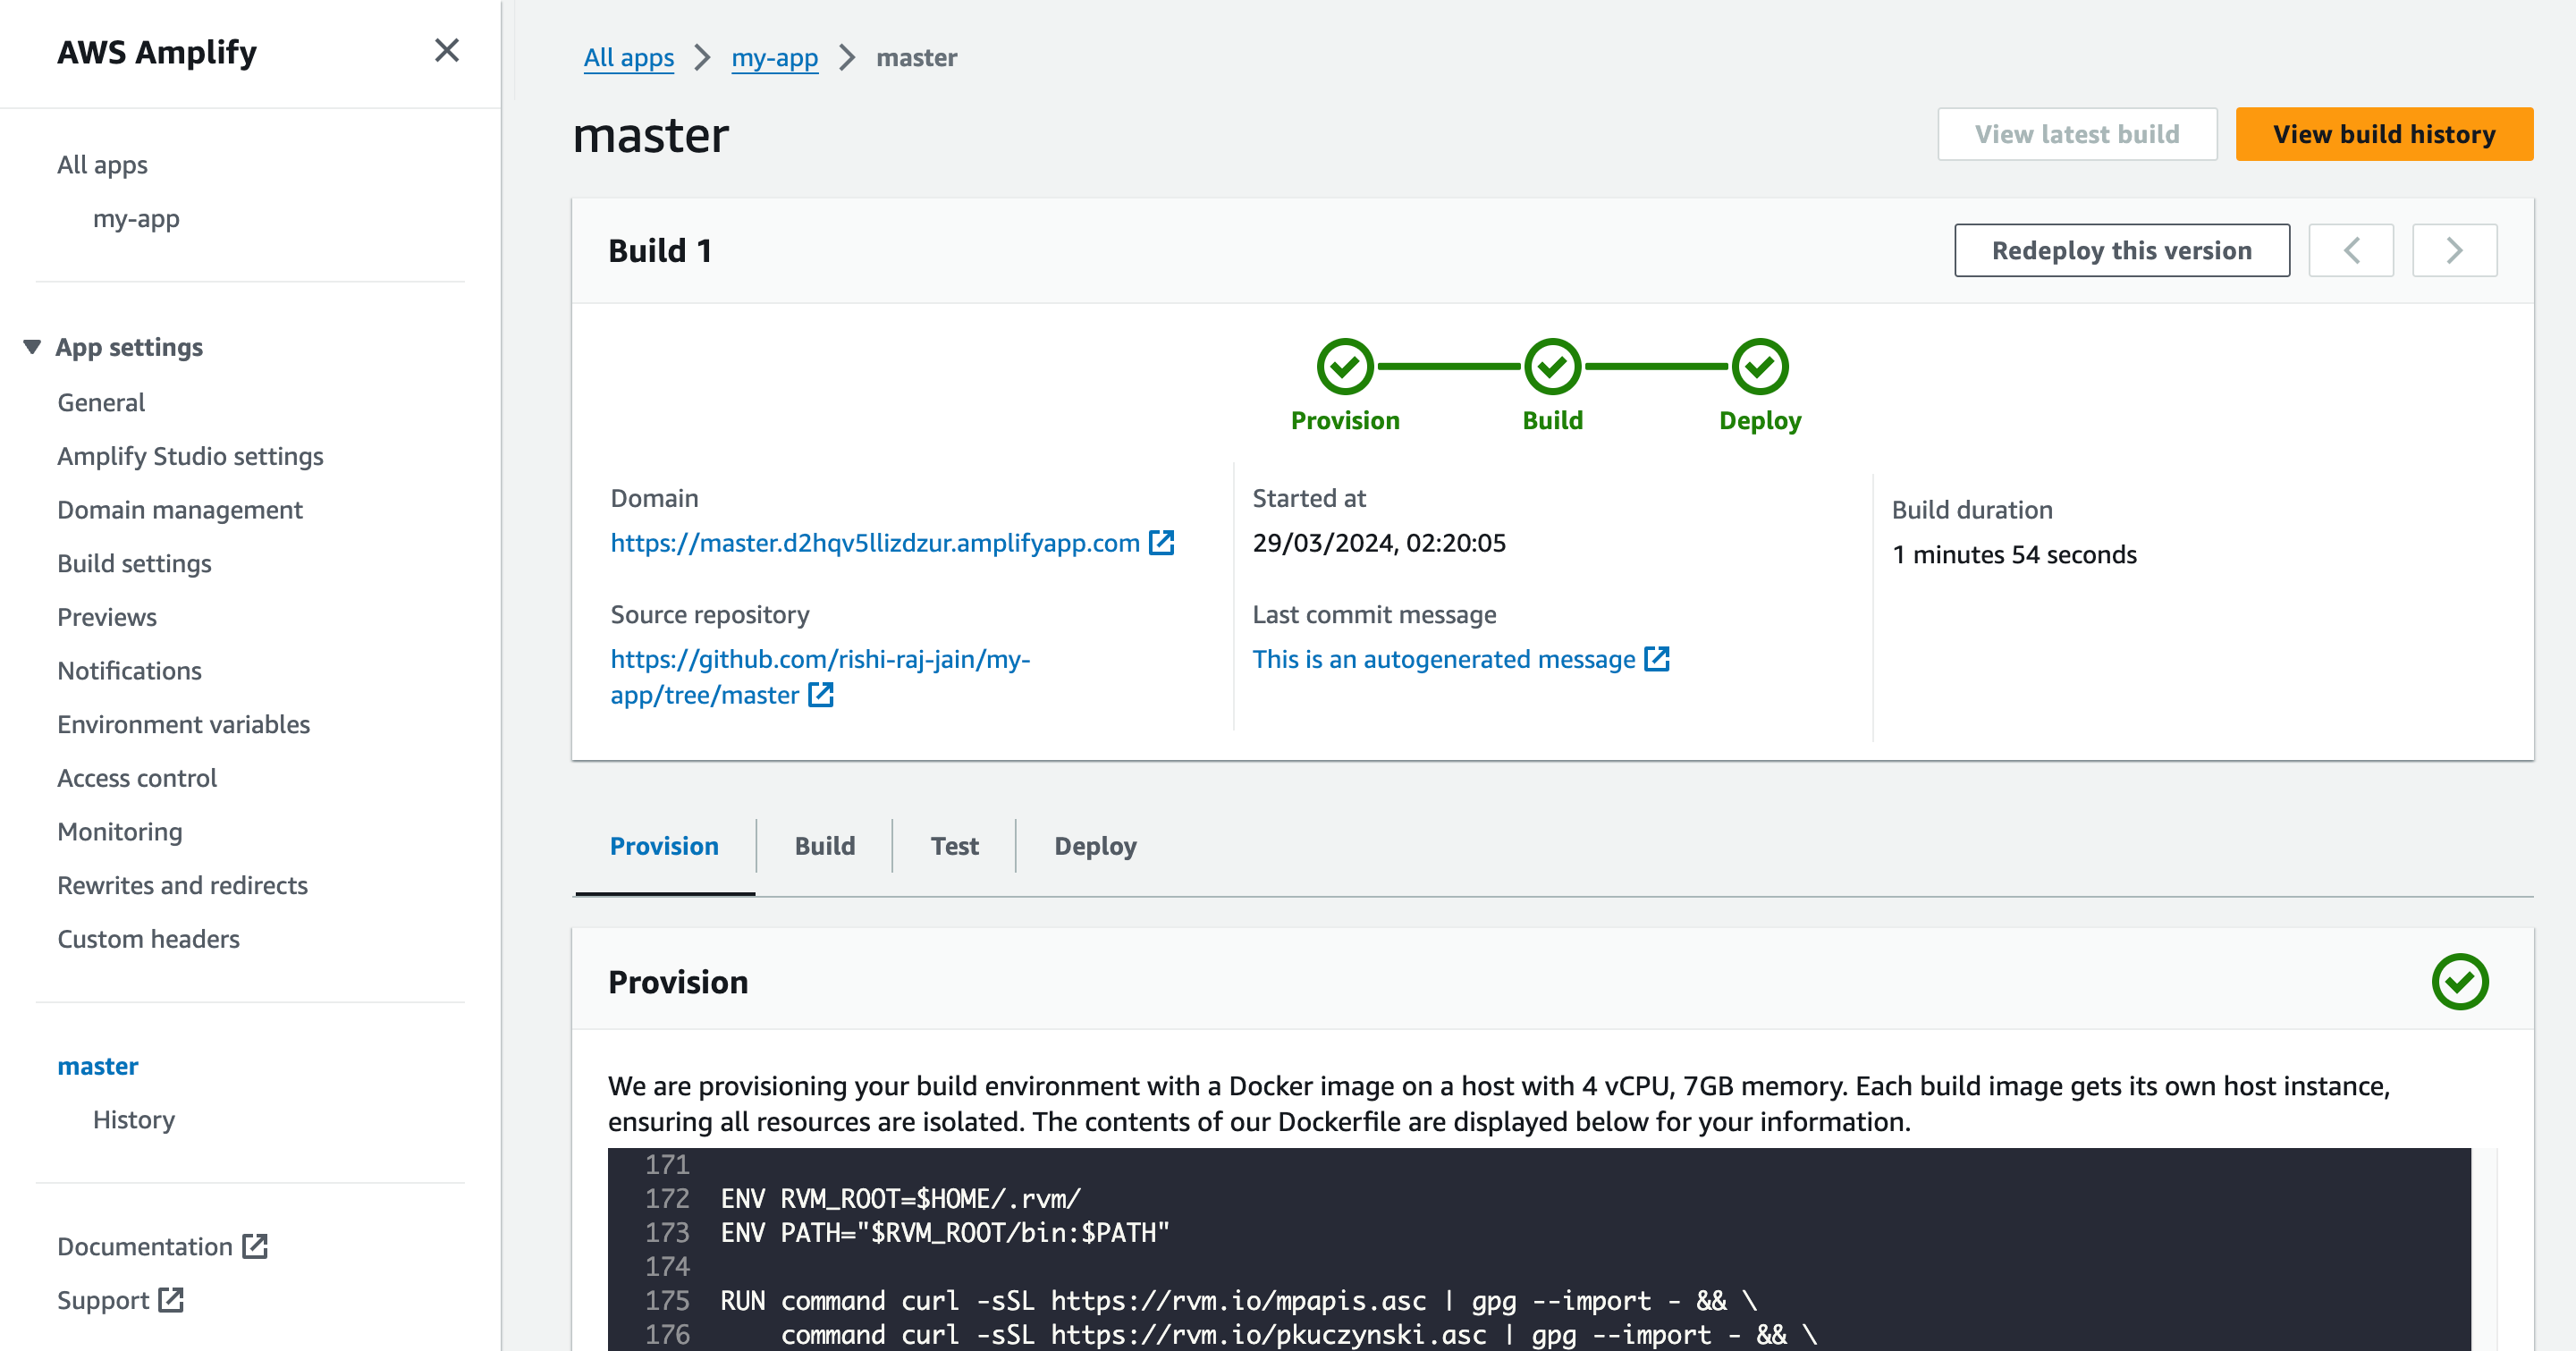
 – Suchen Sie in den Informationen zum erfolgreichen Build nach der Bereitstellungs-URL unter dem Titel **Domäne**
 ## Abschluss
Juhuu! Sie haben jetzt ein Nextjs-Projekt, das bei Git-Push automatisch in AWS Amplify bereitgestellt wird
Wenn Sie Fragen oder Kommentare haben, können Sie mich gerne auf [Twitter](https://twitter.com/direct_messages/create/rishi_raj_jain_).
## Abschluss
Juhuu! Sie haben jetzt ein Nextjs-Projekt, das bei Git-Push automatisch in AWS Amplify bereitgestellt wird
Wenn Sie Fragen oder Kommentare haben, können Sie mich gerne auf [Twitter](https://twitter.com/direct_messages/create/rishi_raj_jain_).