---
title: "Stellen Sie SvelteKit in AWS Amplify bereit"
description: "So stellen Sie Ihre SvelteKit Server-Side Rendered (SSR)-Websites auf AWS Amplify bereit."
source: "https://www.launchfa.st/de/blog/deploy-sveltekit-aws-amplify"
author: "Rishi Raj Jain"
created_at: 2024-03-30T00:00:00.000Z
---
> **Site index for agents**
> Fetch https://www.launchfa.st/llms.txt to discover every page on this site.
> Every page is also available as Markdown by appending `.md` to its URL.
 In diesem Leitfaden erfahren Sie, wie Sie ein SvelteKit-SSR-Projekt auf AWS Amplify bereitstellen. Sie durchlaufen den Prozess der Einrichtung eines neuen SvelteKit-Projekts, der Aktivierung des serverseitigen Renderings mithilfe des AWS Amplify-Adapters und der schließlichen Bereitstellung auf AWS Amplify
## Inhaltsverzeichnis
- [Voraussetzungen](#voraussetzungen)
- [Eine neue SvelteKit-Anwendung erstellen](#create-a-new-sveltekit-application)
- [Erste Schritte mit dem Nodejs-Adapter für SvelteKit](#getting-started-with-the-nodejs-adapter-for-sveltekit)
- [Auf AWS Amplify bereitstellen](#deploy-to-aws-amplify)
- [Schlussfolgerung](#Schlussfolgerung)
## Voraussetzungen
Sie benötigen Folgendes:
- [Nodejs 18](https://nodejs.org/en/blog/announcements/v20-release-announce) oder höher
- Ein [AWS](https://aws.amazon.com/free)-Konto
## Erstellen Sie eine neue SvelteKit-Anwendung
Beginnen wir mit der Erstellung eines neuen SvelteKit-Projekts. Öffnen Sie Ihr Terminal und führen Sie den folgenden Befehl aus:
```bash
npm create svelte@latest my-app
```
„npm create svelte“ ist die empfohlene Methode, um schnell ein SvelteKit-Projekt zu erstellen
Wenn Sie dazu aufgefordert werden, wählen Sie:
- „SvelteKit-Demo-App“, wenn Sie aufgefordert werden, die App-Vorlage auszuwählen
– „Ja, TypeScript-Syntax verwenden“, wenn Sie aufgefordert werden, die Typprüfung mit TypeScript hinzuzufügen
- „Fügen Sie Prettier für die Codeformatierung hinzu“, wenn Sie aufgefordert werden, zusätzliche Optionen auszuwählen
Sobald das erledigt ist, können Sie in das Projektverzeichnis wechseln, die Abhängigkeiten installieren und die App starten:
```bash
cd my-app
npm install
npm run dev
```
Die App sollte auf [localhost:5173](http://localhost:5173/) ausgeführt werden.
Führen Sie als Nächstes in Ihrem ersten Terminalfenster den folgenden Befehl aus, um die erforderlichen Bibliotheken und Pakete zum Erstellen der Anwendung zu installieren:
```bash
npm install dotenv @vercel/nft
npm install -D prepend-file
```
Zu den installierten Bibliotheken gehören:
- „dotenv“: Eine Bibliothek zum Umgang mit Umgebungsvariablen
- „@vercel/nft“: Eine Bibliothek zur Ermittlung aller für die Anwendungslaufzeit erforderlichen Dateien mithilfe von Einstiegspunkten.
Zu den entwicklungsspezifischen Bibliotheken gehören:
- „prepend-file“: Eine Bibliothek, um einer Datei Daten voranzustellen
## Erste Schritte mit dem Nodejs-Adapter für SvelteKit
Bevor Sie Ihr SvelteKit-Projekt bereitstellen, müssen Sie den Adapter „@sveltejs/adapter-node“ installieren. Führen Sie den folgenden Befehl in Ihrem Terminalfenster aus:
```bash
npm install @sveltejs/adapter-node
```
Zu den installierten Bibliotheken gehören:
- „@sveltejs/adapter-node“: Ein Adapter, der SvelteKit-Websites für die Ausführung als eigenständiger Nodejs-Server vorbereitet
Sobald der Adapter installiert ist, müssen Sie ihn zu Ihrer „svelteconfigjs“-Datei hinzufügen. Öffnen Sie die Datei und fügen Sie den folgenden Code hinzu:
```diff
// File: svelte.config.js
import adapter from '@sveltejs/adapter-auto' // [!code --]
import adapter from '@sveltejs/adapter-node' // [!code ++]
import { vitePreprocess } from '@sveltejs/kit/vite'
/** @type {import('@sveltejs/kit').Config} */
const config = {
// Consult https://kit.svelte.dev/docs/integrations#preprocessors
// for more information about preprocessors
preprocess: vitePreprocess(),
kit: {
// adapter-auto only supports some environments, see https://kit.svelte.dev/docs/adapter-auto for a list.
// If your environment is not supported or you settled on a specific environment, switch out the adapter.
// See https://kit.svelte.dev/docs/adapters for more information about adapters.
adapter: adapter()
}
};
export default config;
```
Die Zusätze bewirken Folgendes:
– Importiert den Standardexport von „@sveltejs/adapter-node“.
– Verwendet den oben genannten Import als „Adapter“ Ihrer SvelteKit-Anwendung
Erstellen Sie dann eine „amplifymjs“-Datei im Stammverzeichnis des Repositorys mit dem folgenden Code:
```tsx
// File: amplify.mjs
import { join } from 'node:path'
import { nodeFileTrace } from '@vercel/nft'
import { sync as prependSync } from 'prepend-file'
import { writeFileSync, mkdirSync, existsSync, cpSync, rmSync } from 'node:fs'
// Define all the Amplify related directories
const amplifyDirectories = [
join(process.cwd(), '.amplify-hosting'),
join(process.cwd(), '.amplify-hosting', 'static'),
join(process.cwd(), '.amplify-hosting', 'compute'),
join(process.cwd(), '.amplify-hosting', 'compute', 'default'),
join(process.cwd(), '.amplify-hosting', 'compute', 'default', 'node_modules'),
]
// Create directories if they do no exist already
if (existsSync(amplifyDirectories[0])) rmSync(amplifyDirectories[0], { force: true, recursive: true })
// Create directories if they do no exist already
amplifyDirectories.forEach((i) => mkdirSync(i))
const deployManifestConfig = {
version: 1,
routes: [
{
path: `/assets/*`,
target: {
kind: 'Static',
},
},
{
path: `/*.*`,
target: {
kind: 'Static',
},
fallback: {
kind: 'Compute',
src: 'default',
},
},
{
path: '/*',
target: {
kind: 'Compute',
src: 'default',
},
},
],
computeResources: [
{
name: 'default',
runtime: 'nodejs18.x',
entrypoint: 'build/index.js',
},
],
framework: {
name: 'sveltekit',
version: '1.20.4',
},
}
// Write the config to .amplify-hosting/deploy-manifest.json
writeFileSync(join(process.cwd(), '.amplify-hosting', 'deploy-manifest.json'), JSON.stringify(deployManifestConfig))
// Move the build/client to the static directory for Amplify
cpSync(join(process.cwd(), 'build', 'client'), amplifyDirectories[1], { recursive: true })
// Ref: https://rishi.app/blog/using-vercel-nft-to-compute-runtime-dependencies-for-your-remix-express-app/
async function computeDependencies(paths = []) {
// the whole app inside index.js,
// include other paths that are
// not bundled with your app builds
const files = paths
// Compute file trace
const { fileList } = await nodeFileTrace(files)
// Store set of packages
let packages = {}
fileList.forEach((i) => {
if (i.includes('node_modules/')) {
let temp = i.replace('node_modules/', '')
temp = temp.substring(0, temp.indexOf('/'))
packages[`node_modules/${temp}`] = true
} else packages[i] = true
})
// Sort the set of packages by name (for easier difference comparison with git)
// Dump the list of the computed packages for further references while deploying the app
Object.keys(packages)
.sort()
.forEach((i) => {
cpSync(i, join(amplifyDirectories[3], i), { recursive: true })
})
}
// Prepend dotenv import into the entrypoint
prependSync(join('build', 'index.js'), `import 'dotenv/config'\n`)
// Compute all the dependents on build/index.js and load them into the compute
computeDependencies(['./build/index.js'])
```
Erstellen Sie dann eine „amplifyyml“-Datei im Stammverzeichnis des Repositorys mit dem folgenden Code:
```yml
version: 1
frontend:
phases:
preBuild:
commands:
- npm ci
build:
commands:
- env >> .env
- npm run build
- node amplify.mjs
artifacts:
baseDirectory: .amplify-hosting
files:
- '**/*'
cache:
paths:
- node_modules/**/*
```
Der obige Code führt Folgendes aus:
- Verwendet „preBuild“-Befehle, um die Abhängigkeiten Ihres SvelteKit-Projekts zu installieren
- Verwendet „Build“-Befehle, um:
- Speichern Sie alle Umgebungsvariablen in der Datei „env“ im Stammverzeichnis des Projekts
- Erstellen Sie Ihre SvelteKit-Anwendung
- Verschieben Sie das Verzeichnis „node_modules“ und die Datei „env“ in das Compute-Verzeichnis von Amplify
## Bereitstellung auf AWS Amplify
Der Code kann nun in AWS Amplify bereitgestellt werden. Führen Sie zur Bereitstellung die folgenden Schritte aus:
- Beginnen Sie mit der Erstellung eines GitHub-Repositorys, das den Code Ihrer App enthält
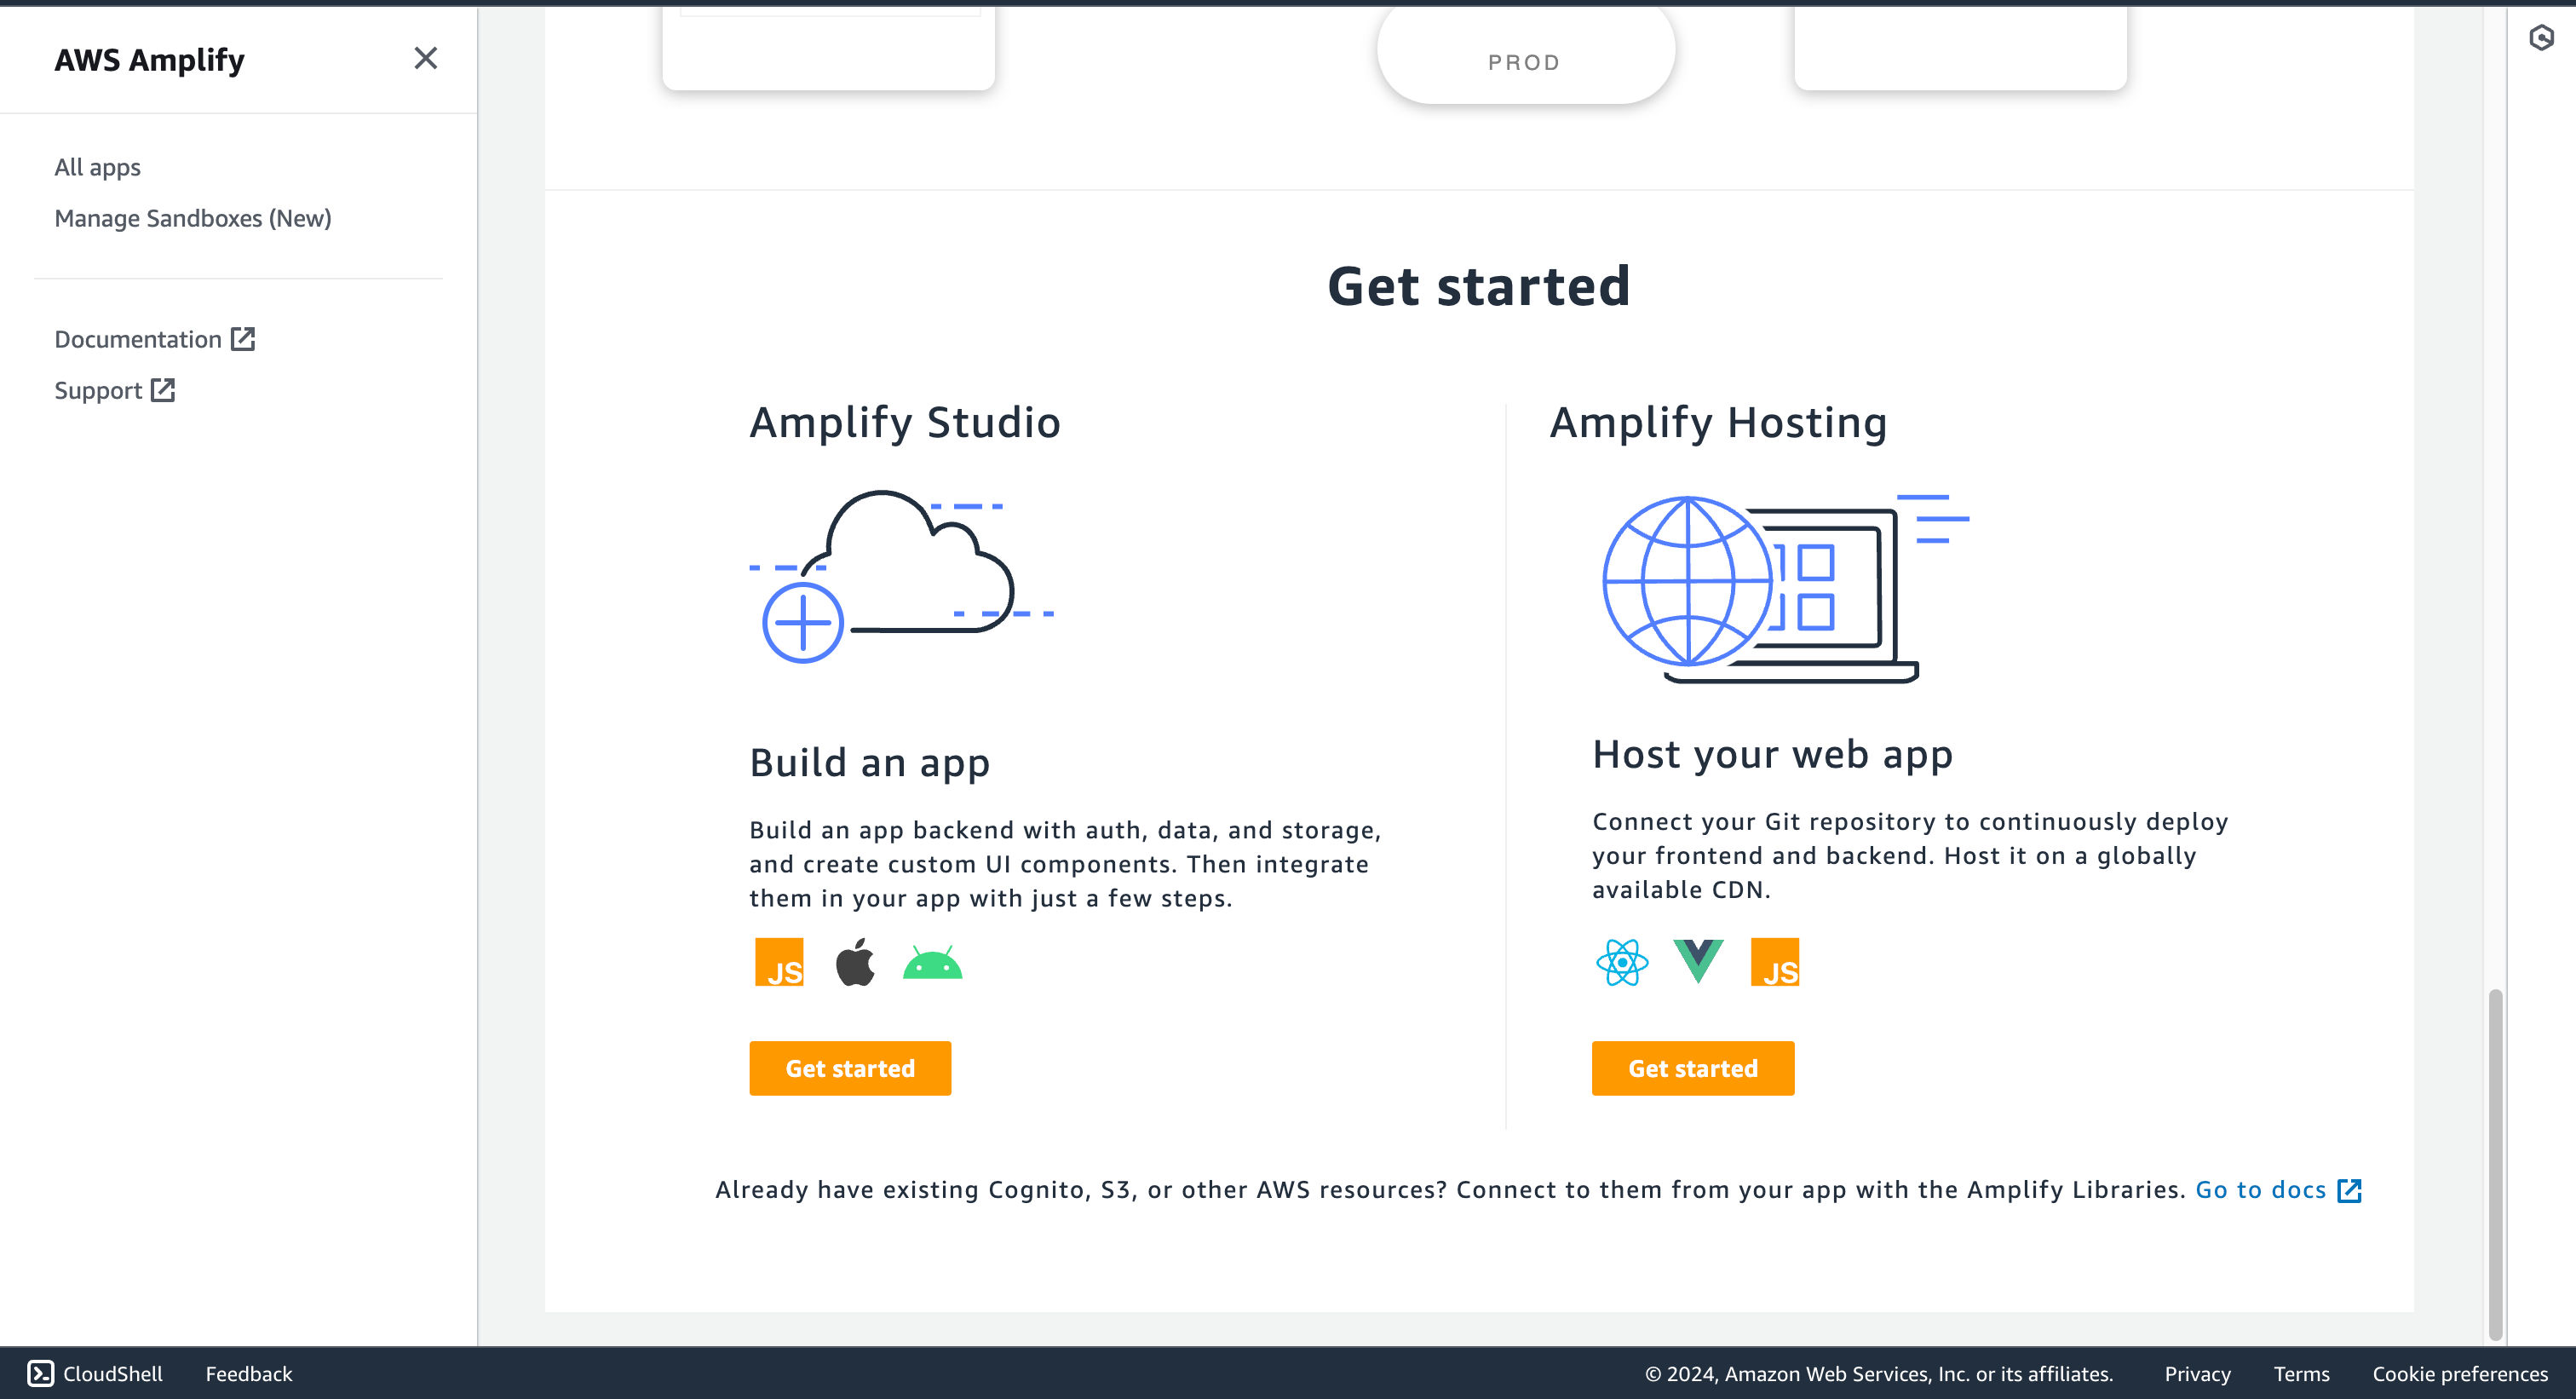
- Navigieren Sie dann zum AWS Amplify Dashboard und klicken Sie im Abschnitt **Hosten Sie Ihre Web-App** auf **Erste Schritte**
In diesem Leitfaden erfahren Sie, wie Sie ein SvelteKit-SSR-Projekt auf AWS Amplify bereitstellen. Sie durchlaufen den Prozess der Einrichtung eines neuen SvelteKit-Projekts, der Aktivierung des serverseitigen Renderings mithilfe des AWS Amplify-Adapters und der schließlichen Bereitstellung auf AWS Amplify
## Inhaltsverzeichnis
- [Voraussetzungen](#voraussetzungen)
- [Eine neue SvelteKit-Anwendung erstellen](#create-a-new-sveltekit-application)
- [Erste Schritte mit dem Nodejs-Adapter für SvelteKit](#getting-started-with-the-nodejs-adapter-for-sveltekit)
- [Auf AWS Amplify bereitstellen](#deploy-to-aws-amplify)
- [Schlussfolgerung](#Schlussfolgerung)
## Voraussetzungen
Sie benötigen Folgendes:
- [Nodejs 18](https://nodejs.org/en/blog/announcements/v20-release-announce) oder höher
- Ein [AWS](https://aws.amazon.com/free)-Konto
## Erstellen Sie eine neue SvelteKit-Anwendung
Beginnen wir mit der Erstellung eines neuen SvelteKit-Projekts. Öffnen Sie Ihr Terminal und führen Sie den folgenden Befehl aus:
```bash
npm create svelte@latest my-app
```
„npm create svelte“ ist die empfohlene Methode, um schnell ein SvelteKit-Projekt zu erstellen
Wenn Sie dazu aufgefordert werden, wählen Sie:
- „SvelteKit-Demo-App“, wenn Sie aufgefordert werden, die App-Vorlage auszuwählen
– „Ja, TypeScript-Syntax verwenden“, wenn Sie aufgefordert werden, die Typprüfung mit TypeScript hinzuzufügen
- „Fügen Sie Prettier für die Codeformatierung hinzu“, wenn Sie aufgefordert werden, zusätzliche Optionen auszuwählen
Sobald das erledigt ist, können Sie in das Projektverzeichnis wechseln, die Abhängigkeiten installieren und die App starten:
```bash
cd my-app
npm install
npm run dev
```
Die App sollte auf [localhost:5173](http://localhost:5173/) ausgeführt werden.
Führen Sie als Nächstes in Ihrem ersten Terminalfenster den folgenden Befehl aus, um die erforderlichen Bibliotheken und Pakete zum Erstellen der Anwendung zu installieren:
```bash
npm install dotenv @vercel/nft
npm install -D prepend-file
```
Zu den installierten Bibliotheken gehören:
- „dotenv“: Eine Bibliothek zum Umgang mit Umgebungsvariablen
- „@vercel/nft“: Eine Bibliothek zur Ermittlung aller für die Anwendungslaufzeit erforderlichen Dateien mithilfe von Einstiegspunkten.
Zu den entwicklungsspezifischen Bibliotheken gehören:
- „prepend-file“: Eine Bibliothek, um einer Datei Daten voranzustellen
## Erste Schritte mit dem Nodejs-Adapter für SvelteKit
Bevor Sie Ihr SvelteKit-Projekt bereitstellen, müssen Sie den Adapter „@sveltejs/adapter-node“ installieren. Führen Sie den folgenden Befehl in Ihrem Terminalfenster aus:
```bash
npm install @sveltejs/adapter-node
```
Zu den installierten Bibliotheken gehören:
- „@sveltejs/adapter-node“: Ein Adapter, der SvelteKit-Websites für die Ausführung als eigenständiger Nodejs-Server vorbereitet
Sobald der Adapter installiert ist, müssen Sie ihn zu Ihrer „svelteconfigjs“-Datei hinzufügen. Öffnen Sie die Datei und fügen Sie den folgenden Code hinzu:
```diff
// File: svelte.config.js
import adapter from '@sveltejs/adapter-auto' // [!code --]
import adapter from '@sveltejs/adapter-node' // [!code ++]
import { vitePreprocess } from '@sveltejs/kit/vite'
/** @type {import('@sveltejs/kit').Config} */
const config = {
// Consult https://kit.svelte.dev/docs/integrations#preprocessors
// for more information about preprocessors
preprocess: vitePreprocess(),
kit: {
// adapter-auto only supports some environments, see https://kit.svelte.dev/docs/adapter-auto for a list.
// If your environment is not supported or you settled on a specific environment, switch out the adapter.
// See https://kit.svelte.dev/docs/adapters for more information about adapters.
adapter: adapter()
}
};
export default config;
```
Die Zusätze bewirken Folgendes:
– Importiert den Standardexport von „@sveltejs/adapter-node“.
– Verwendet den oben genannten Import als „Adapter“ Ihrer SvelteKit-Anwendung
Erstellen Sie dann eine „amplifymjs“-Datei im Stammverzeichnis des Repositorys mit dem folgenden Code:
```tsx
// File: amplify.mjs
import { join } from 'node:path'
import { nodeFileTrace } from '@vercel/nft'
import { sync as prependSync } from 'prepend-file'
import { writeFileSync, mkdirSync, existsSync, cpSync, rmSync } from 'node:fs'
// Define all the Amplify related directories
const amplifyDirectories = [
join(process.cwd(), '.amplify-hosting'),
join(process.cwd(), '.amplify-hosting', 'static'),
join(process.cwd(), '.amplify-hosting', 'compute'),
join(process.cwd(), '.amplify-hosting', 'compute', 'default'),
join(process.cwd(), '.amplify-hosting', 'compute', 'default', 'node_modules'),
]
// Create directories if they do no exist already
if (existsSync(amplifyDirectories[0])) rmSync(amplifyDirectories[0], { force: true, recursive: true })
// Create directories if they do no exist already
amplifyDirectories.forEach((i) => mkdirSync(i))
const deployManifestConfig = {
version: 1,
routes: [
{
path: `/assets/*`,
target: {
kind: 'Static',
},
},
{
path: `/*.*`,
target: {
kind: 'Static',
},
fallback: {
kind: 'Compute',
src: 'default',
},
},
{
path: '/*',
target: {
kind: 'Compute',
src: 'default',
},
},
],
computeResources: [
{
name: 'default',
runtime: 'nodejs18.x',
entrypoint: 'build/index.js',
},
],
framework: {
name: 'sveltekit',
version: '1.20.4',
},
}
// Write the config to .amplify-hosting/deploy-manifest.json
writeFileSync(join(process.cwd(), '.amplify-hosting', 'deploy-manifest.json'), JSON.stringify(deployManifestConfig))
// Move the build/client to the static directory for Amplify
cpSync(join(process.cwd(), 'build', 'client'), amplifyDirectories[1], { recursive: true })
// Ref: https://rishi.app/blog/using-vercel-nft-to-compute-runtime-dependencies-for-your-remix-express-app/
async function computeDependencies(paths = []) {
// the whole app inside index.js,
// include other paths that are
// not bundled with your app builds
const files = paths
// Compute file trace
const { fileList } = await nodeFileTrace(files)
// Store set of packages
let packages = {}
fileList.forEach((i) => {
if (i.includes('node_modules/')) {
let temp = i.replace('node_modules/', '')
temp = temp.substring(0, temp.indexOf('/'))
packages[`node_modules/${temp}`] = true
} else packages[i] = true
})
// Sort the set of packages by name (for easier difference comparison with git)
// Dump the list of the computed packages for further references while deploying the app
Object.keys(packages)
.sort()
.forEach((i) => {
cpSync(i, join(amplifyDirectories[3], i), { recursive: true })
})
}
// Prepend dotenv import into the entrypoint
prependSync(join('build', 'index.js'), `import 'dotenv/config'\n`)
// Compute all the dependents on build/index.js and load them into the compute
computeDependencies(['./build/index.js'])
```
Erstellen Sie dann eine „amplifyyml“-Datei im Stammverzeichnis des Repositorys mit dem folgenden Code:
```yml
version: 1
frontend:
phases:
preBuild:
commands:
- npm ci
build:
commands:
- env >> .env
- npm run build
- node amplify.mjs
artifacts:
baseDirectory: .amplify-hosting
files:
- '**/*'
cache:
paths:
- node_modules/**/*
```
Der obige Code führt Folgendes aus:
- Verwendet „preBuild“-Befehle, um die Abhängigkeiten Ihres SvelteKit-Projekts zu installieren
- Verwendet „Build“-Befehle, um:
- Speichern Sie alle Umgebungsvariablen in der Datei „env“ im Stammverzeichnis des Projekts
- Erstellen Sie Ihre SvelteKit-Anwendung
- Verschieben Sie das Verzeichnis „node_modules“ und die Datei „env“ in das Compute-Verzeichnis von Amplify
## Bereitstellung auf AWS Amplify
Der Code kann nun in AWS Amplify bereitgestellt werden. Führen Sie zur Bereitstellung die folgenden Schritte aus:
- Beginnen Sie mit der Erstellung eines GitHub-Repositorys, das den Code Ihrer App enthält
- Navigieren Sie dann zum AWS Amplify Dashboard und klicken Sie im Abschnitt **Hosten Sie Ihre Web-App** auf **Erste Schritte**
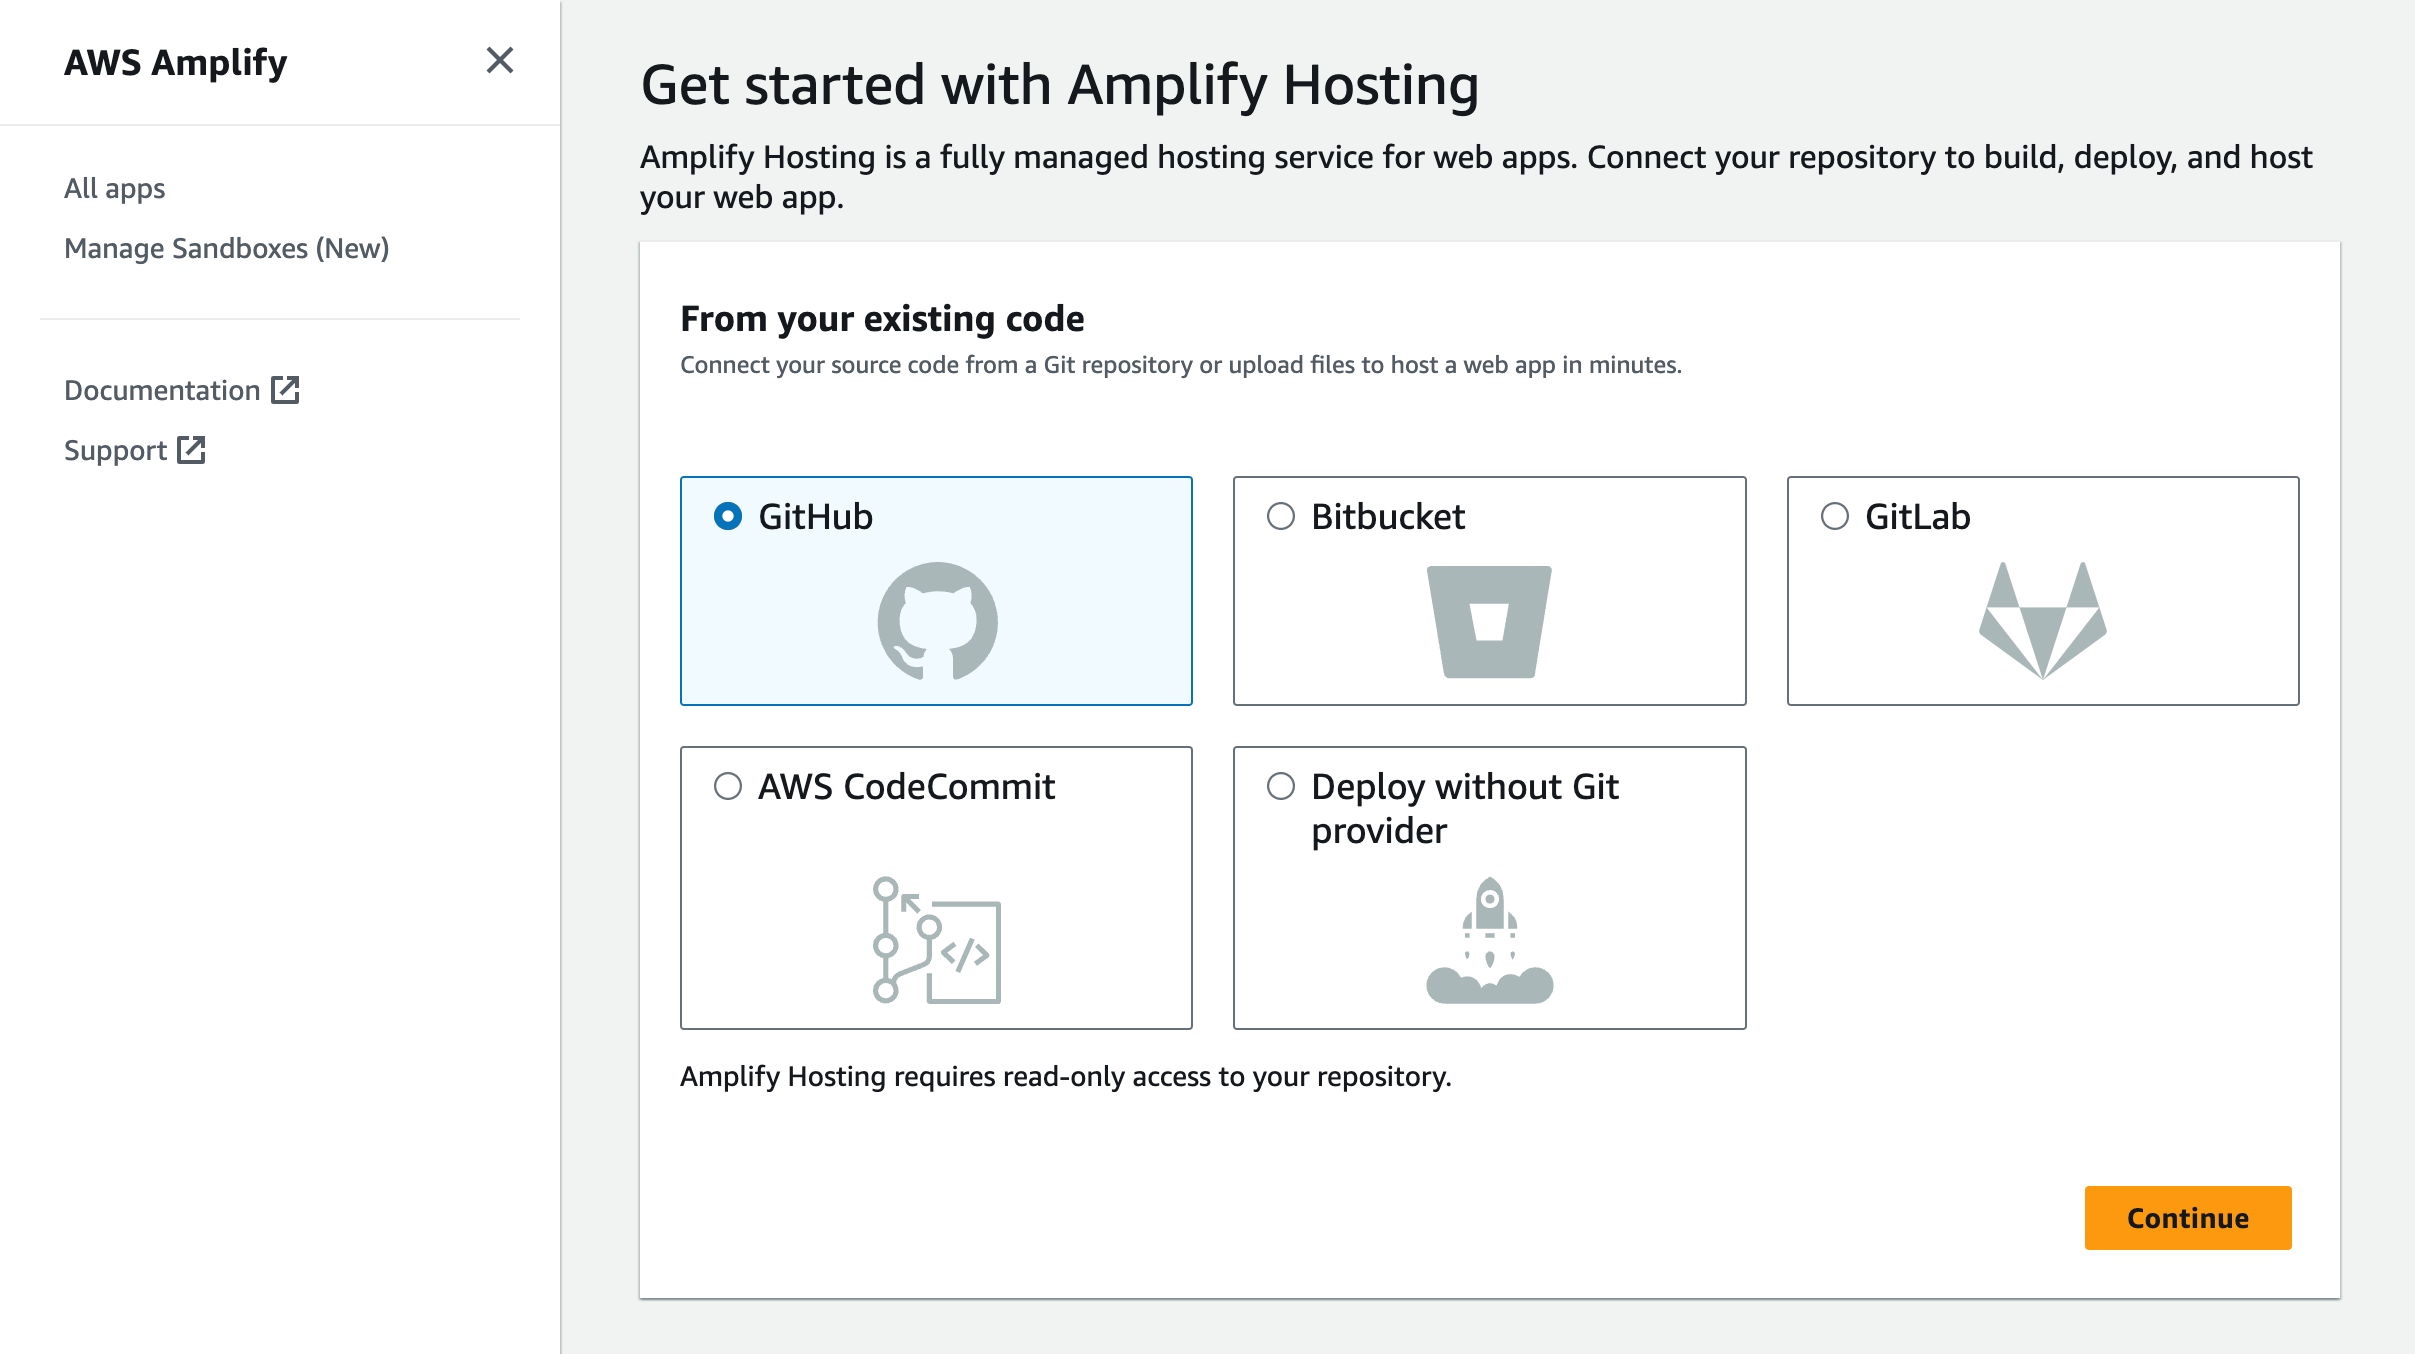
 - Wählen Sie **GitHub** als Quelle Ihres Git-Repositorys aus
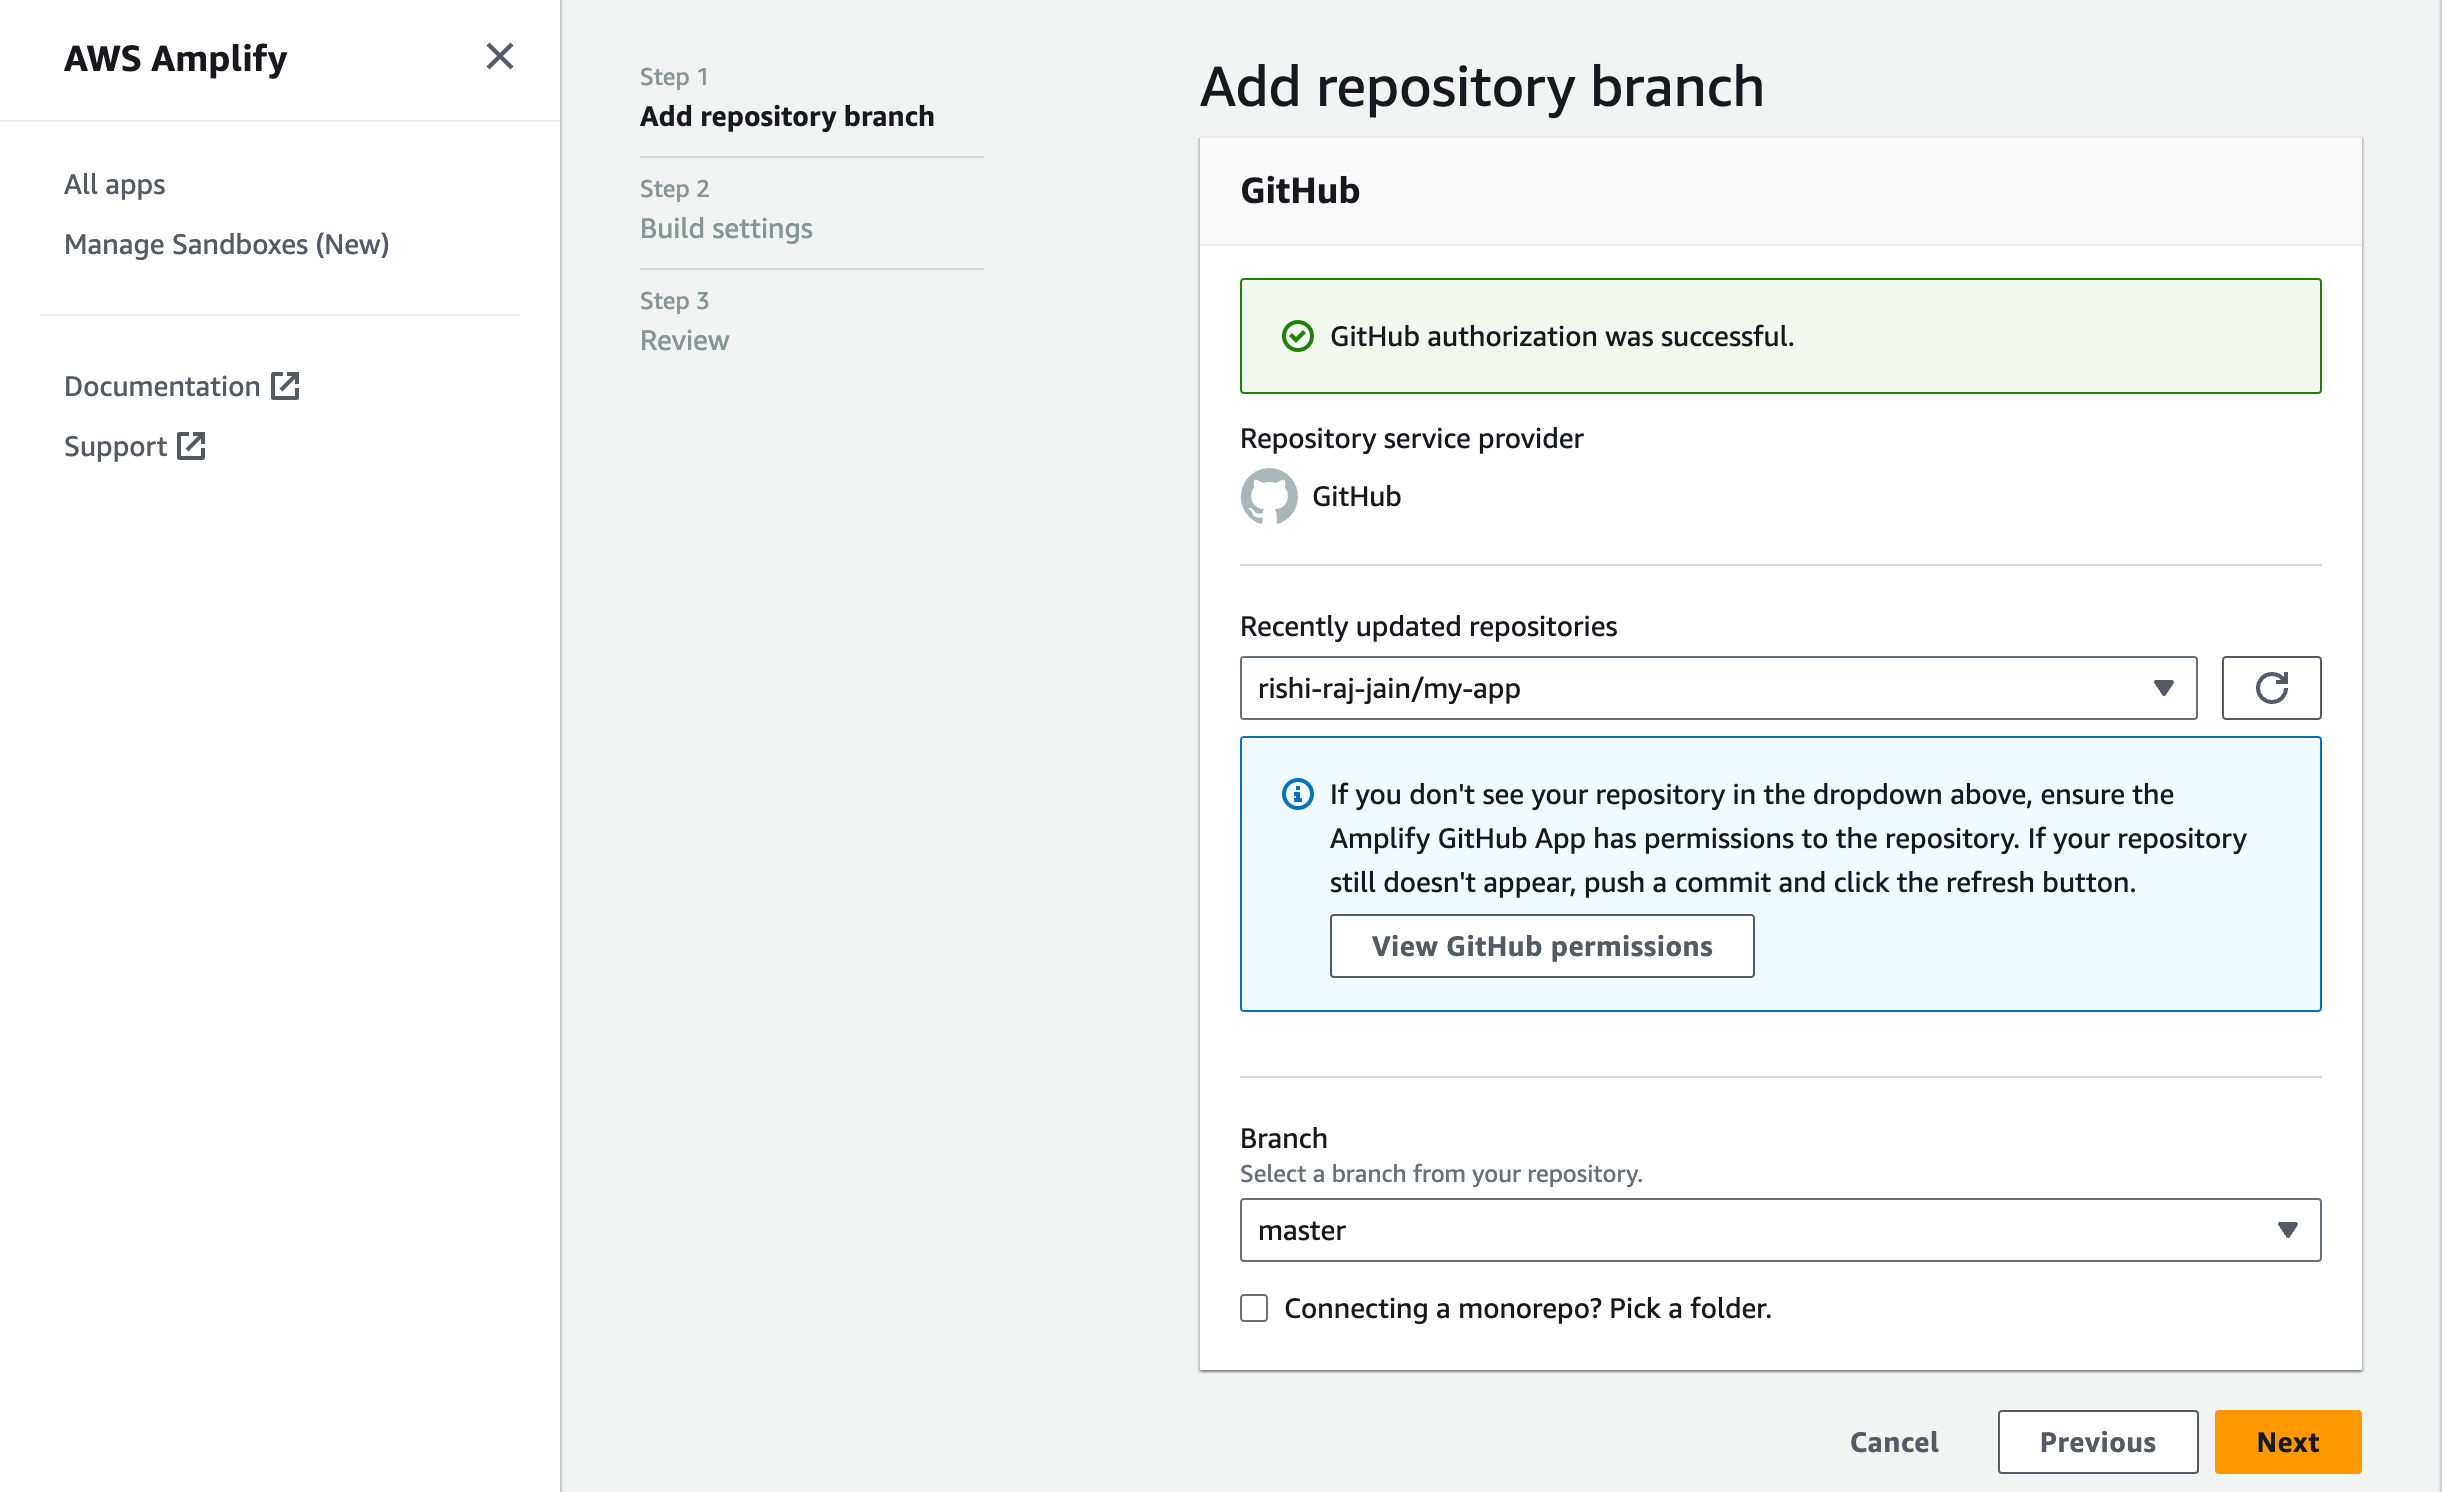
 - Verknüpfen Sie das neue Projekt mit dem GitHub-Repository, das Sie gerade erstellt haben
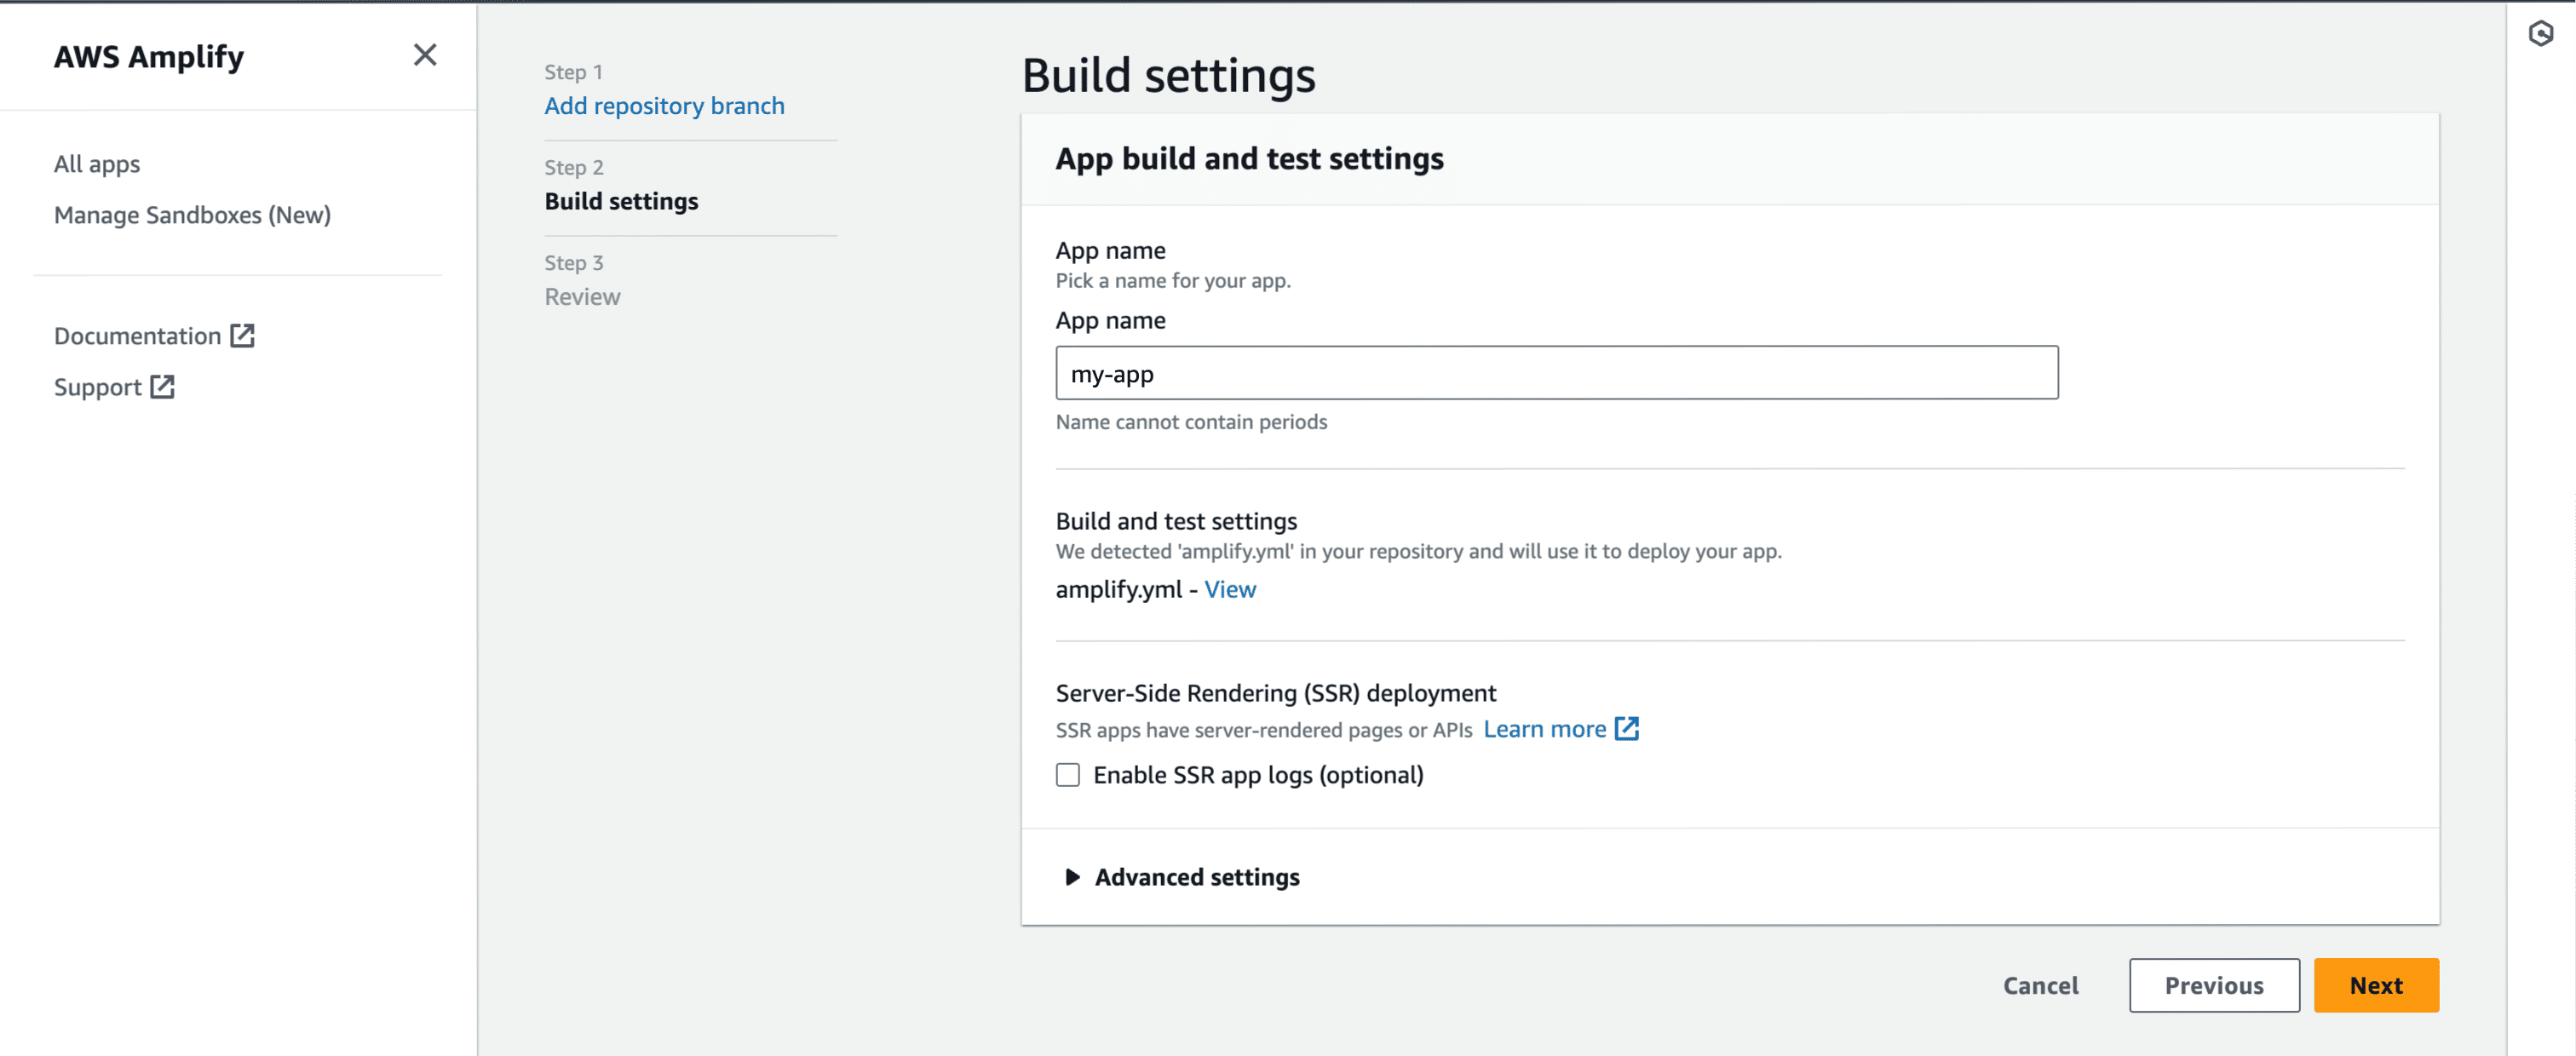
 - Geben Sie Ihrem Projekt einen Namen und klicken Sie auf **Erweiterte Einstellungen**
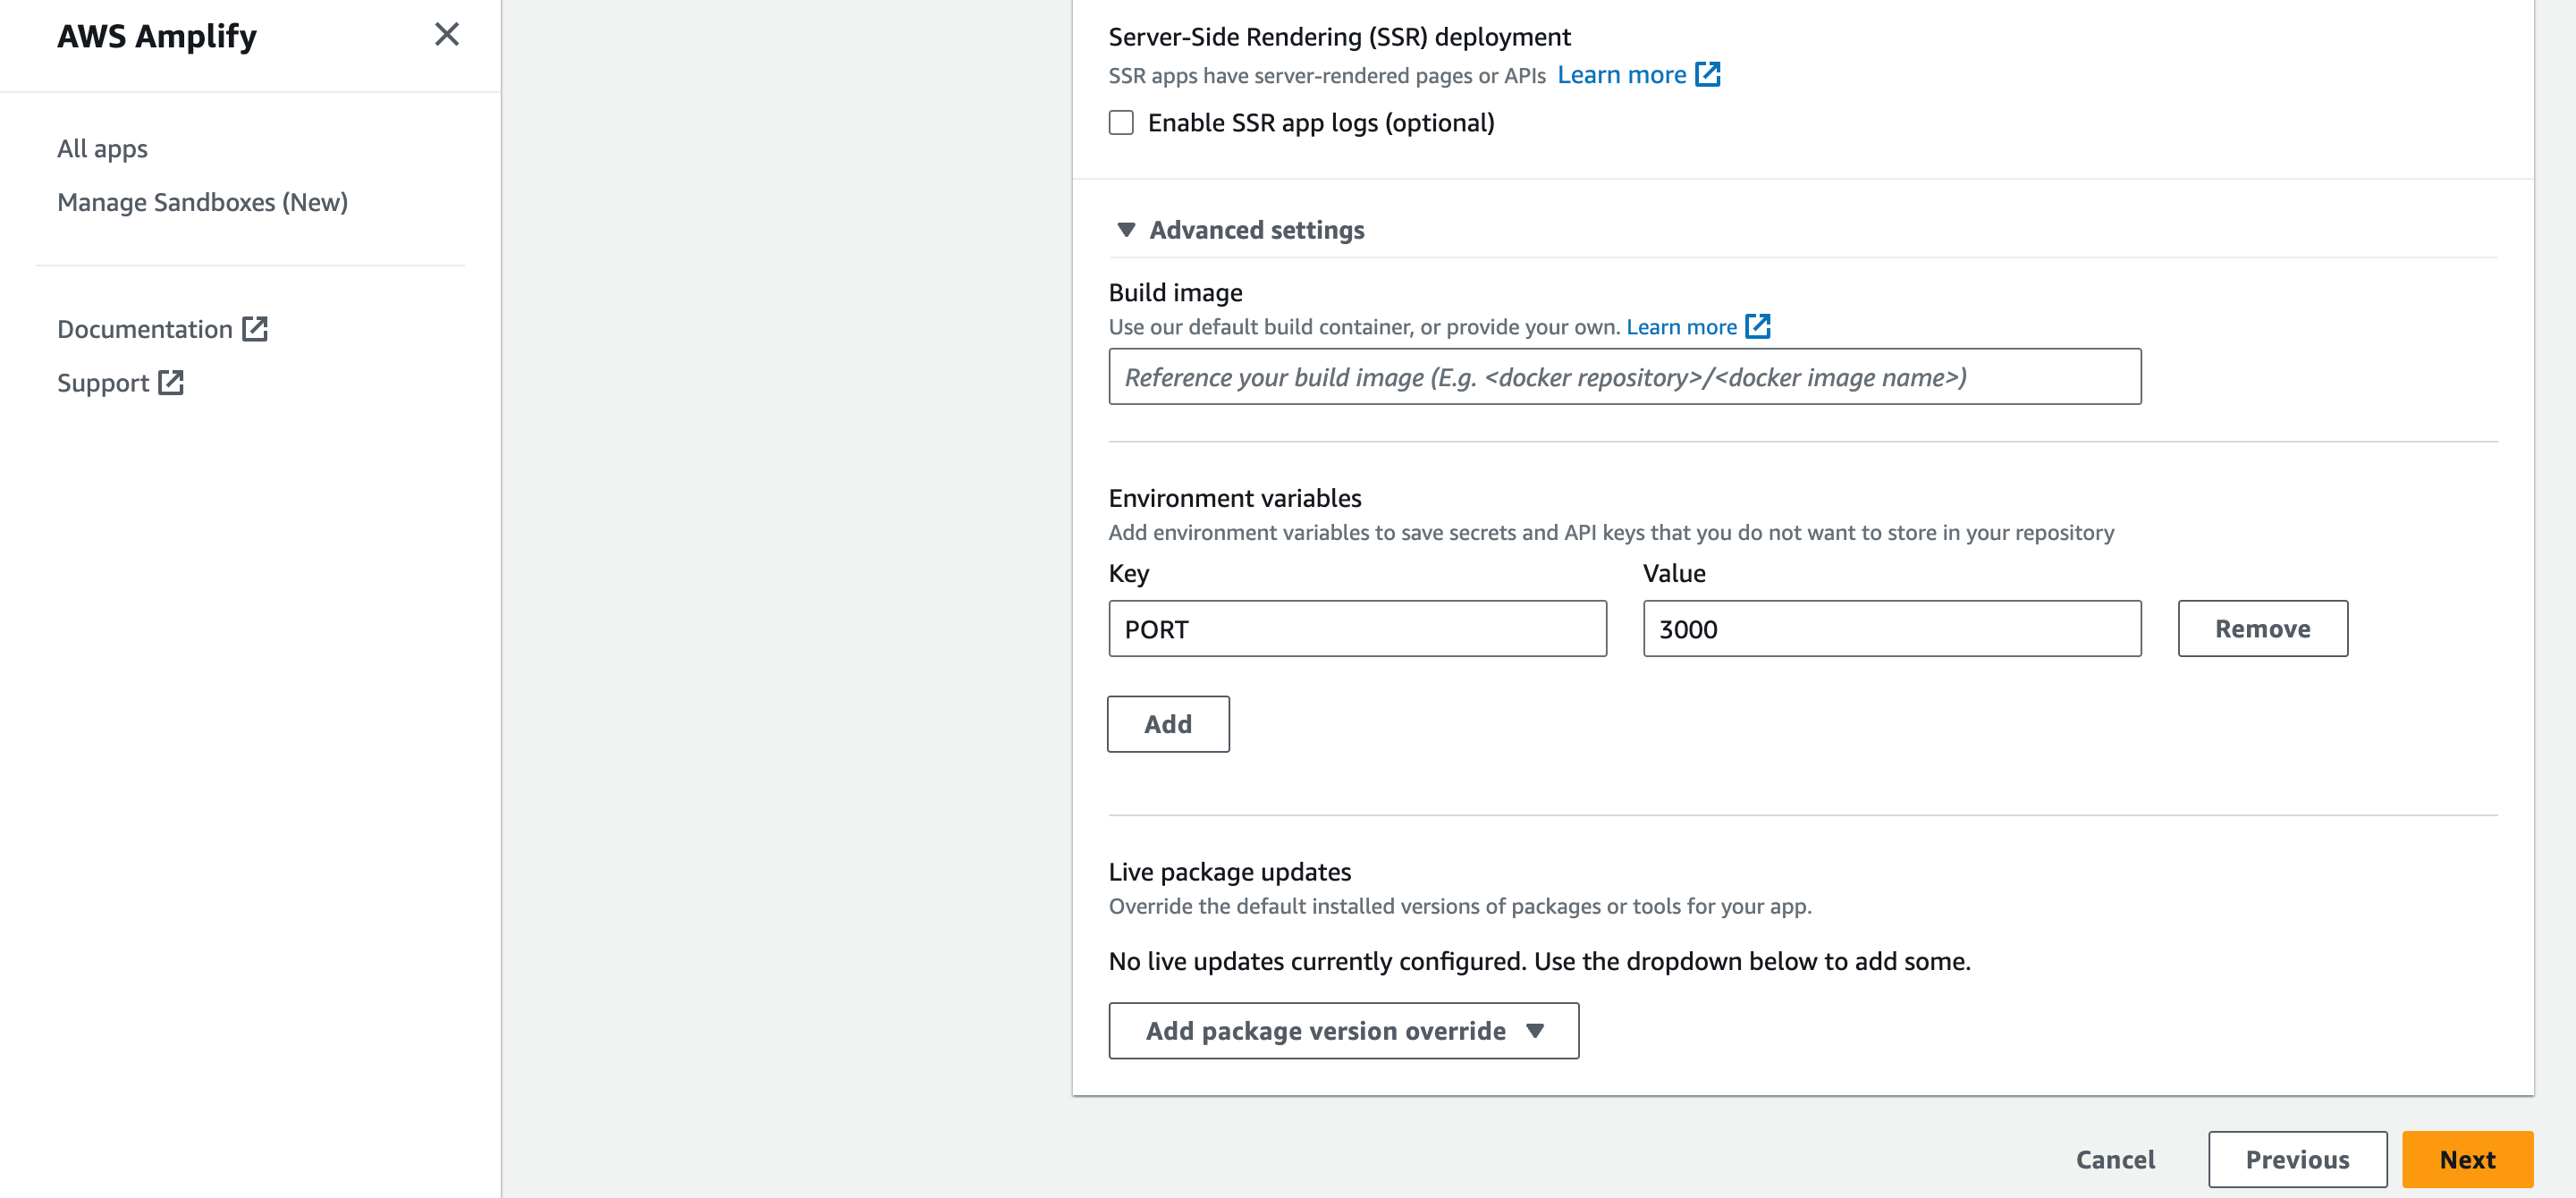
 - Aktualisieren Sie in **Erweiterte Einstellungen** die **Umgebungsvariablen** so, dass sie mit denen in Ihrer lokalen „env“-Datei übereinstimmen, und „PORT“ als 3000. Klicken Sie auf **Weiter**, um fortzufahren
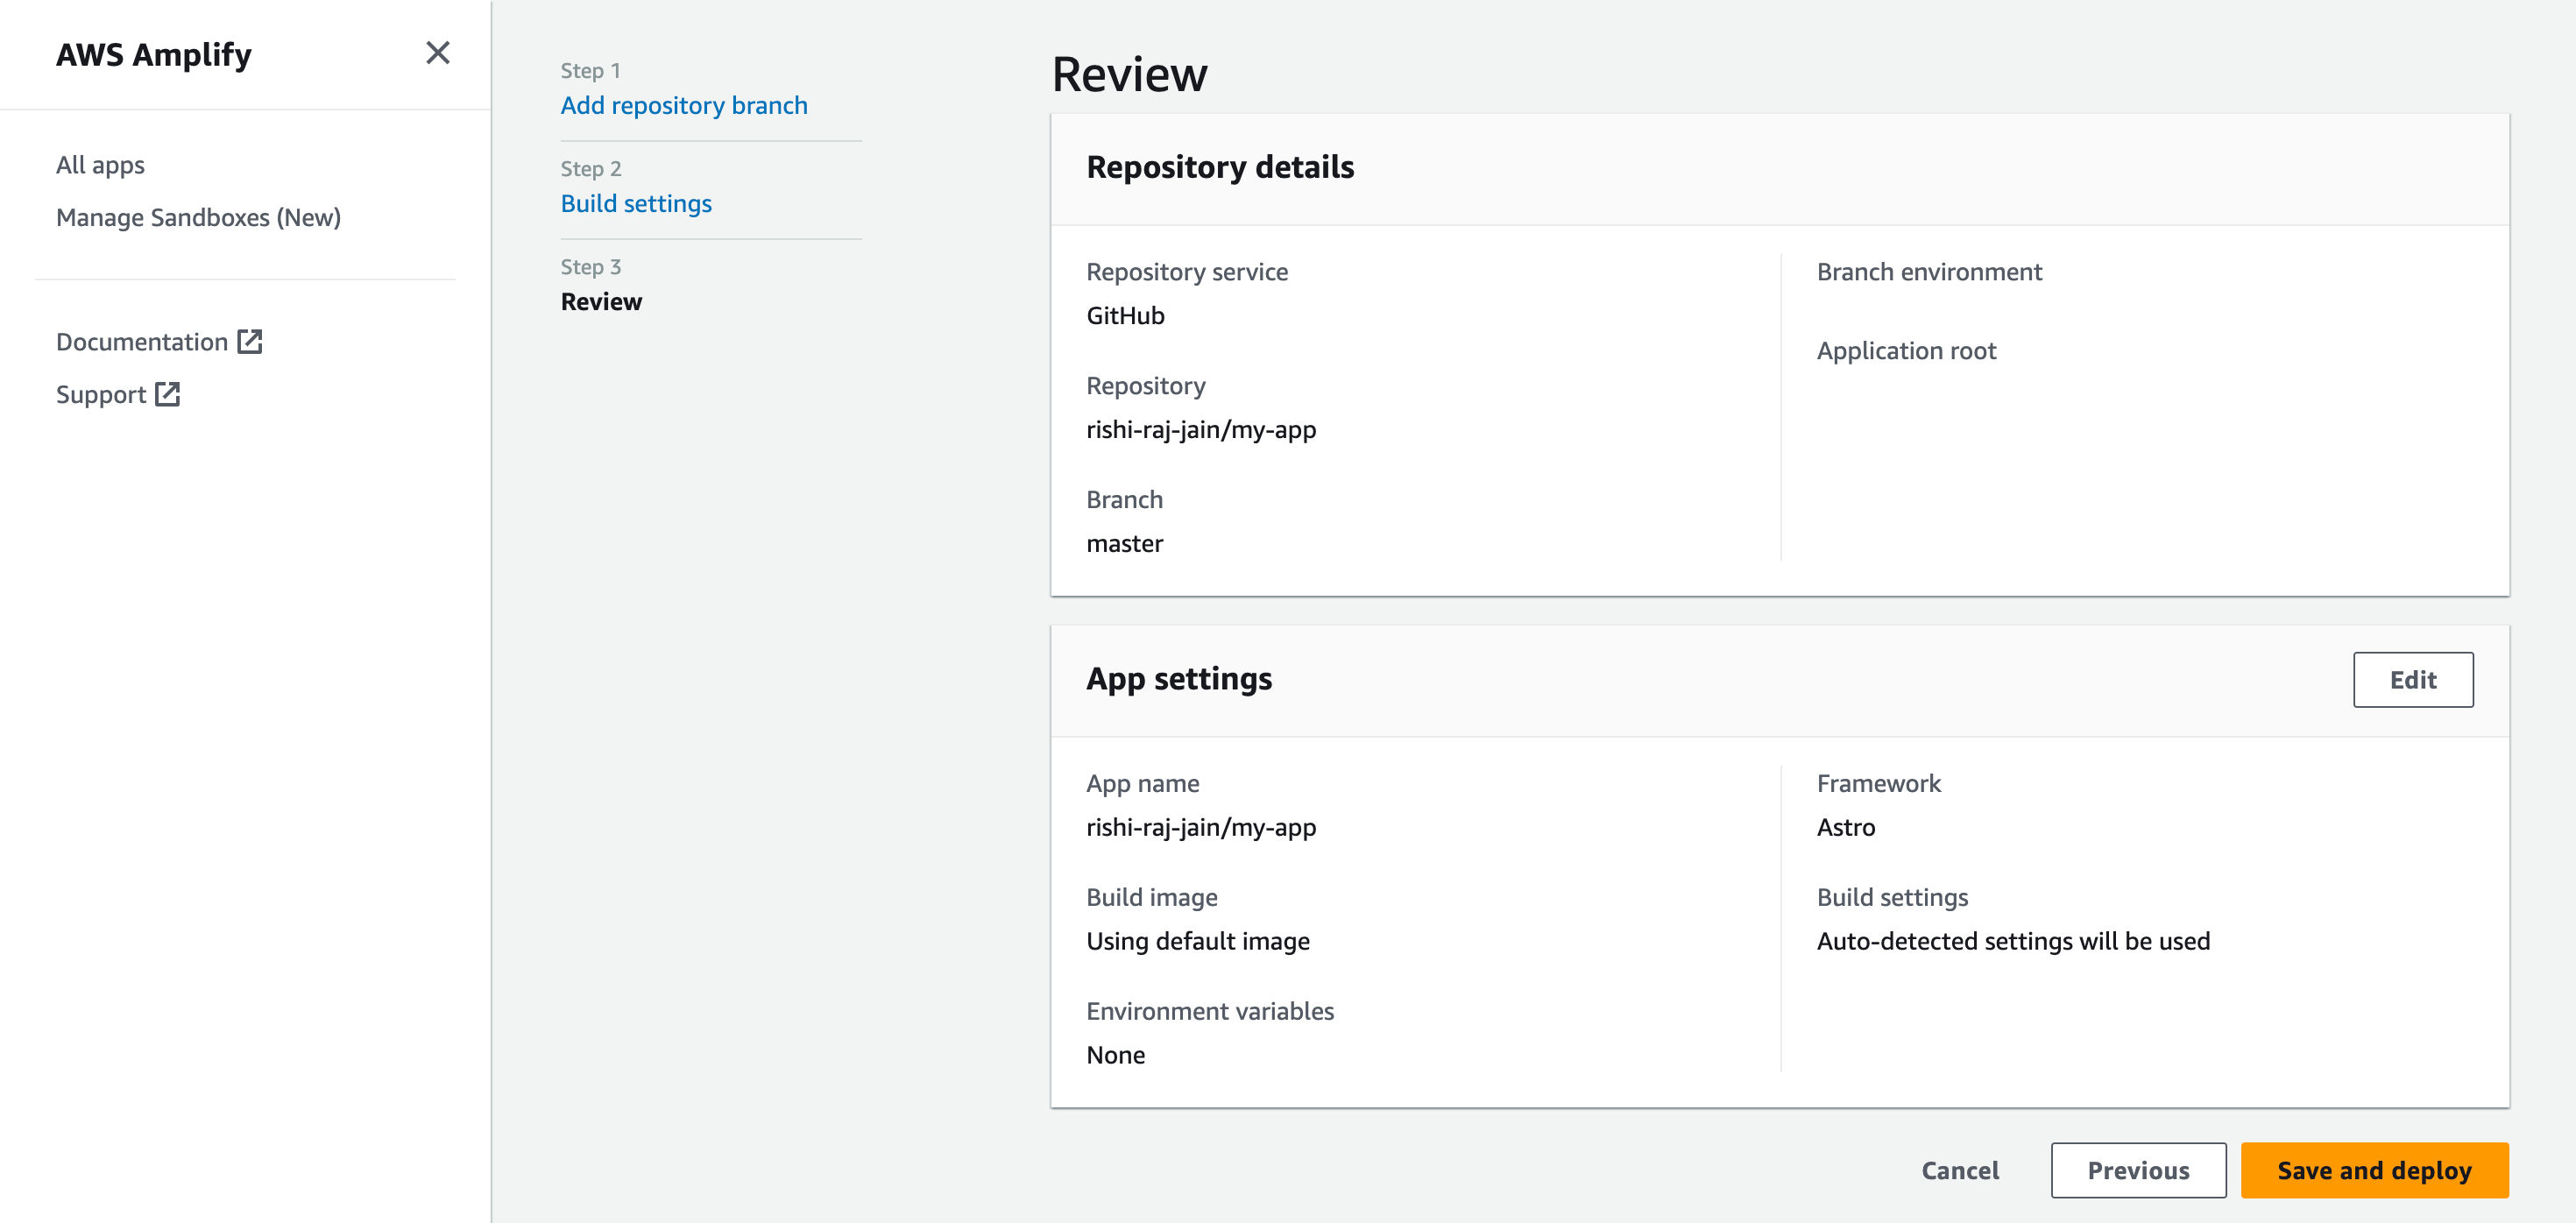
 - Klicken Sie auf **Speichern und bereitstellen**, um Ihre Website bereitzustellen
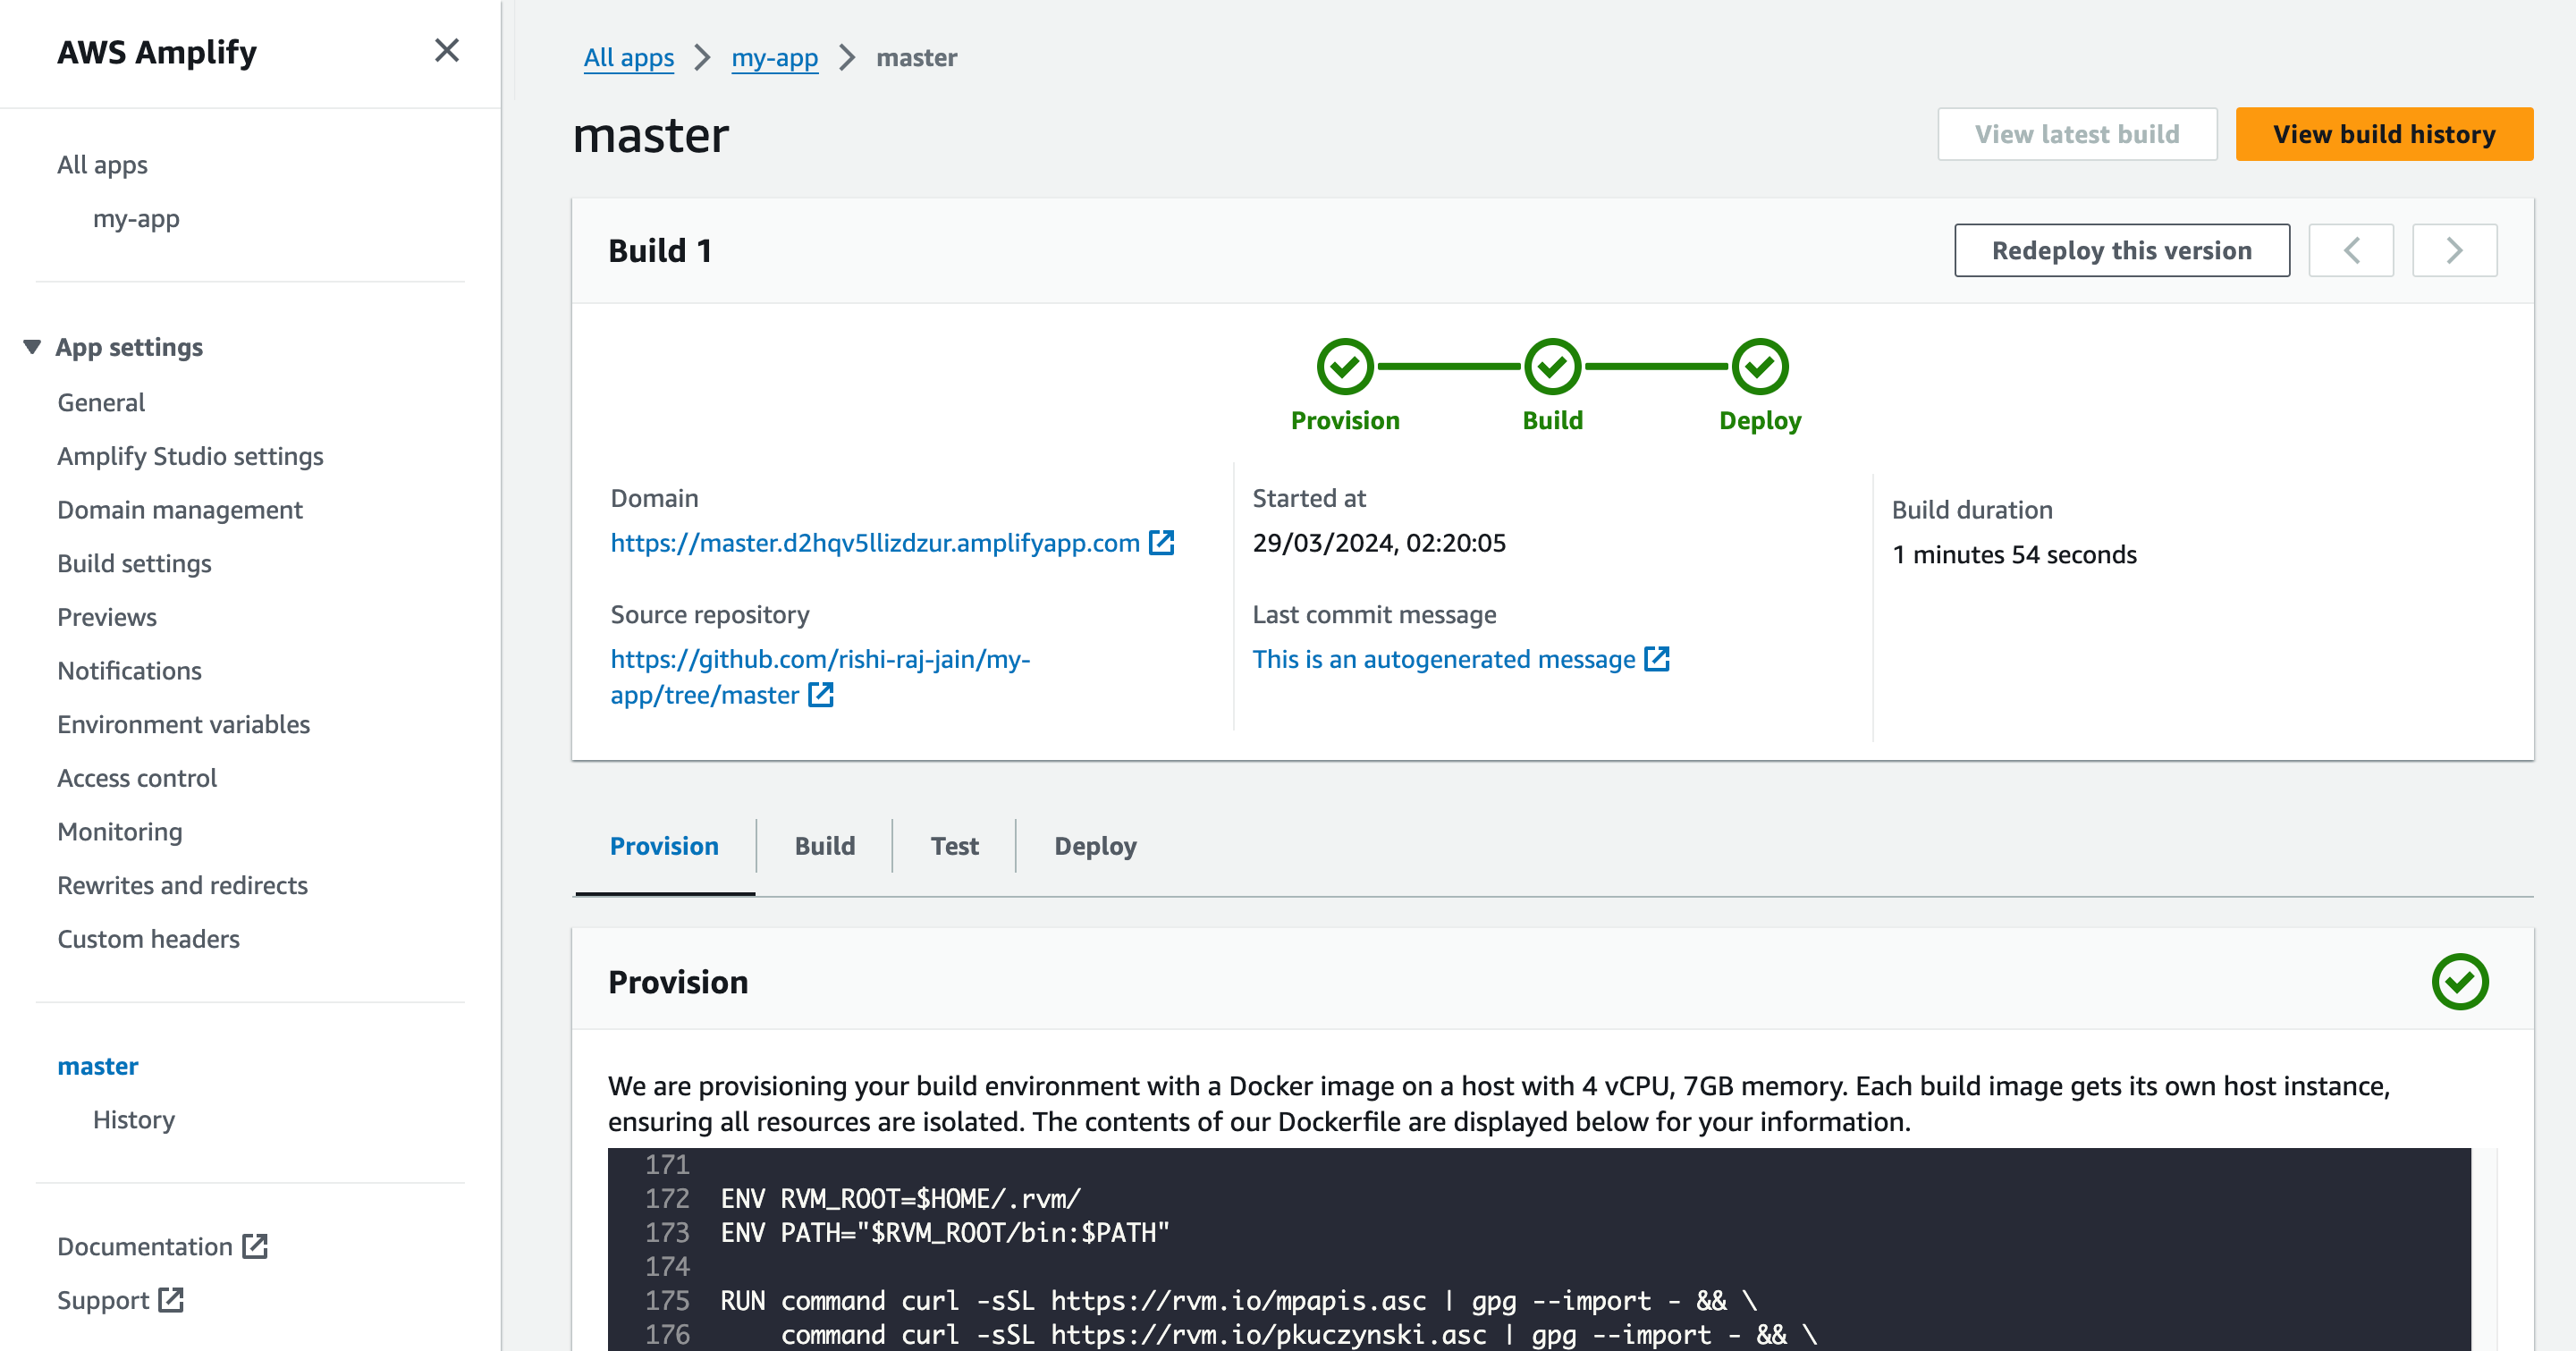
 – Suchen Sie in den Informationen zum erfolgreichen Build nach der Bereitstellungs-URL unter dem Titel **Domäne**
 ## Abschluss
Juhuu! Sie haben jetzt ein SvelteKit-Projekt, das bei Git-Push automatisch in AWS Amplify bereitgestellt wird
Wenn Sie Fragen oder Kommentare haben, können Sie mich gerne auf [Twitter](https://twitter.com/direct_messages/create/rishi_raj_jain_).
## Abschluss
Juhuu! Sie haben jetzt ein SvelteKit-Projekt, das bei Git-Push automatisch in AWS Amplify bereitgestellt wird
Wenn Sie Fragen oder Kommentare haben, können Sie mich gerne auf [Twitter](https://twitter.com/direct_messages/create/rishi_raj_jain_).