---
title: "Implemente Astro en AWS Elasic Beanstalk"
description: "Cómo implementar sus sitios web Astro Server-Side Rendered (SSR) en AWS Elasic Beanstalk."
source: "https://www.launchfa.st/es/blog/deploy-astro-aws-elastic-beanstalk"
author: "Rishi Raj Jain"
created_at: 2024-04-08T00:00:00.000Z
---
> **Site index for agents**
> Fetch https://www.launchfa.st/llms.txt to discover every page on this site.
> Every page is also available as Markdown by appending `.md` to its URL.
 En esta guía, aprenderá cómo implementar un proyecto Astro SSR en AWS Elasic Beanstalk. Pasará por el proceso de configurar un nuevo proyecto Astro, habilitar la renderización del lado del servidor y, finalmente, implementarlo en AWS Elasic Beanstalk.
## Tabla de contenido
- [Requisitos previos](#requisitos previos)
- [Crear una nueva aplicación Astro](#crea-una-nueva-aplicación-astro)
- [Comenzando con el adaptador Nodejs para Astro](#empezando-con-el-adaptador-nodejs-para-astro)
- [Configure sus roles de IAM](#configure-your-iam-roles)
- [Implementar en AWS Elastic Beanstalk](#deploy-to-aws-elastic-beanstalk)
- [Conclusión](#conclusión)
## Requisitos previos
Necesitará lo siguiente:
- [Nodejs 18](https://nodejs.org/en/blog/announcements/v20-release-announce) o posterior
- Una cuenta [AWS](https://aws.amazon.com/free)
## Crea una nueva aplicación Astro
Comencemos creando un nuevo proyecto Astro. Abra su terminal y ejecute el siguiente comando:
```bash
npm create astro@latest my-app
```
`npm create astro` es la forma recomendada de desarrollar rápidamente un proyecto Astro
Cuando se le solicite, elija:
- `Empty` cuando se le pregunta cómo iniciar el nuevo proyecto
- `Sí` cuando se le pregunte si planea escribir Typecript
- `Estricto` cuando se le pregunta qué tan estricto debe ser Typecript.
- `Sí` cuando se le solicita instalar dependencias
- `Sí` cuando se le solicita inicializar un repositorio de git
Una vez hecho esto, puede ir al directorio del proyecto e iniciar la aplicación:
```bash
cd my-app
npm run dev
```
La aplicación debe ejecutarse en [localhost:4321](http://localhost:4321/). A continuación, ejecute el siguiente comando para instalar las bibliotecas y los paquetes necesarios para crear la aplicación:
```bash
npm install dotenv
npm install -D prepend-file
```
Las bibliotecas instaladas incluyen:
- `dotenv`: una biblioteca para manejar variables de entorno
Las bibliotecas específicas de desarrollo incluyen:
- `prepend-file`: una biblioteca para anteponer datos a un archivo
## Primeros pasos con el adaptador Nodejs para Astro
Antes de implementar su proyecto Astro, necesita instalar el adaptador `@astrojs/node`. Ejecute el siguiente comando:
```bash
npm install @astrojs/node
```
Las bibliotecas instaladas incluyen:
- `@astrojs/node`: Un adaptador que prepara los sitios web de Astro para ejecutarse como servidor Nodejs
Una vez que el adaptador esté instalado, deberá agregarlo a su archivo `astroconfigmjs`. Abra el archivo y agregue el siguiente código:
```tsx
// File: astro.config.mjs
import node from '@astrojs/node'; // [!code ++] // [!code focus]
import { defineConfig } from 'astro/config';
// https://astro.build/config
export default defineConfig({
output: "server", // [!code ++] // [!code focus]
adapter: node({ // [!code ++] // [!code focus]
mode: "standalone" // [!code ++] // [!code focus]
}), // [!code ++] // [!code focus]
});
```
Las adiciones hacen lo siguiente:
- Importa la exportación predeterminada de `@astrojs/node`
- Utiliza la importación anterior como "adaptador" de su aplicación Astro
- Establece `salida` en `servidor` para habilitar la salida compatible con la representación del lado del servidor
Luego, cree un `zipmjs` en la raíz del repositorio con el siguiente código:
```tsx
// File: zip.mjs
import zl from "zip-lib"
import { join } from "node:path"
import { sync as prependSync } from "prepend-file"
const zip = new zl.Zip()
prependSync(join("dist", "server", "entry.mjs"), `import 'dotenv/config'\n`)
zip.addFolder("./dist", "dist")
zip.addFile("./package.json", "package.json")
zip.addFile("./tsconfig.json", "tsconfig.json")
zip.addFolder("./node_modules", "node_modules")
zip.archive(`./deployment_${Math.random().toString()}.zip`)
console.log('Zipped!')
```
El código anterior hace lo siguiente:
- Importa `dotenv/config` en `dist/server/entrymjs` para cargar todas las variables de entorno en el alcance, haciéndolas accesibles a través del objeto `processenv`
- Crea un zip con los siguientes archivos y carpetas:
- `dist`: contiene los activos necesarios del lado estático y del servidor
- `node_modules`: colección de dependencias instaladas
- `tsconfigjson`: contiene alias de ruta
- `packagejson`: utilizado por AWS Elastic Beanstalk para ejecutar el comando `npm run start`
Ahora, ejecute el siguiente comando para generar un archivo zip que contenga activos estáticos, un paquete del lado del servidor y `packagejson`:
```bash
npm run build && node zip.mjs
```
Una vez que se complete, verá un archivo zip con el nombre que comienza con `deployment_`. Utilizará este zip para implementar su aplicación en AWS Elastic Beanstalk. Comencemos con la configuración de los roles de IAM necesarios para implementar una aplicación en AWS Elastic. tallo de habichuelas
## Configure sus roles de IAM
- Abra la [consola IAM](https://consoleaws.amazon.com/iam/) y haga clic en **Crear rol**
En esta guía, aprenderá cómo implementar un proyecto Astro SSR en AWS Elasic Beanstalk. Pasará por el proceso de configurar un nuevo proyecto Astro, habilitar la renderización del lado del servidor y, finalmente, implementarlo en AWS Elasic Beanstalk.
## Tabla de contenido
- [Requisitos previos](#requisitos previos)
- [Crear una nueva aplicación Astro](#crea-una-nueva-aplicación-astro)
- [Comenzando con el adaptador Nodejs para Astro](#empezando-con-el-adaptador-nodejs-para-astro)
- [Configure sus roles de IAM](#configure-your-iam-roles)
- [Implementar en AWS Elastic Beanstalk](#deploy-to-aws-elastic-beanstalk)
- [Conclusión](#conclusión)
## Requisitos previos
Necesitará lo siguiente:
- [Nodejs 18](https://nodejs.org/en/blog/announcements/v20-release-announce) o posterior
- Una cuenta [AWS](https://aws.amazon.com/free)
## Crea una nueva aplicación Astro
Comencemos creando un nuevo proyecto Astro. Abra su terminal y ejecute el siguiente comando:
```bash
npm create astro@latest my-app
```
`npm create astro` es la forma recomendada de desarrollar rápidamente un proyecto Astro
Cuando se le solicite, elija:
- `Empty` cuando se le pregunta cómo iniciar el nuevo proyecto
- `Sí` cuando se le pregunte si planea escribir Typecript
- `Estricto` cuando se le pregunta qué tan estricto debe ser Typecript.
- `Sí` cuando se le solicita instalar dependencias
- `Sí` cuando se le solicita inicializar un repositorio de git
Una vez hecho esto, puede ir al directorio del proyecto e iniciar la aplicación:
```bash
cd my-app
npm run dev
```
La aplicación debe ejecutarse en [localhost:4321](http://localhost:4321/). A continuación, ejecute el siguiente comando para instalar las bibliotecas y los paquetes necesarios para crear la aplicación:
```bash
npm install dotenv
npm install -D prepend-file
```
Las bibliotecas instaladas incluyen:
- `dotenv`: una biblioteca para manejar variables de entorno
Las bibliotecas específicas de desarrollo incluyen:
- `prepend-file`: una biblioteca para anteponer datos a un archivo
## Primeros pasos con el adaptador Nodejs para Astro
Antes de implementar su proyecto Astro, necesita instalar el adaptador `@astrojs/node`. Ejecute el siguiente comando:
```bash
npm install @astrojs/node
```
Las bibliotecas instaladas incluyen:
- `@astrojs/node`: Un adaptador que prepara los sitios web de Astro para ejecutarse como servidor Nodejs
Una vez que el adaptador esté instalado, deberá agregarlo a su archivo `astroconfigmjs`. Abra el archivo y agregue el siguiente código:
```tsx
// File: astro.config.mjs
import node from '@astrojs/node'; // [!code ++] // [!code focus]
import { defineConfig } from 'astro/config';
// https://astro.build/config
export default defineConfig({
output: "server", // [!code ++] // [!code focus]
adapter: node({ // [!code ++] // [!code focus]
mode: "standalone" // [!code ++] // [!code focus]
}), // [!code ++] // [!code focus]
});
```
Las adiciones hacen lo siguiente:
- Importa la exportación predeterminada de `@astrojs/node`
- Utiliza la importación anterior como "adaptador" de su aplicación Astro
- Establece `salida` en `servidor` para habilitar la salida compatible con la representación del lado del servidor
Luego, cree un `zipmjs` en la raíz del repositorio con el siguiente código:
```tsx
// File: zip.mjs
import zl from "zip-lib"
import { join } from "node:path"
import { sync as prependSync } from "prepend-file"
const zip = new zl.Zip()
prependSync(join("dist", "server", "entry.mjs"), `import 'dotenv/config'\n`)
zip.addFolder("./dist", "dist")
zip.addFile("./package.json", "package.json")
zip.addFile("./tsconfig.json", "tsconfig.json")
zip.addFolder("./node_modules", "node_modules")
zip.archive(`./deployment_${Math.random().toString()}.zip`)
console.log('Zipped!')
```
El código anterior hace lo siguiente:
- Importa `dotenv/config` en `dist/server/entrymjs` para cargar todas las variables de entorno en el alcance, haciéndolas accesibles a través del objeto `processenv`
- Crea un zip con los siguientes archivos y carpetas:
- `dist`: contiene los activos necesarios del lado estático y del servidor
- `node_modules`: colección de dependencias instaladas
- `tsconfigjson`: contiene alias de ruta
- `packagejson`: utilizado por AWS Elastic Beanstalk para ejecutar el comando `npm run start`
Ahora, ejecute el siguiente comando para generar un archivo zip que contenga activos estáticos, un paquete del lado del servidor y `packagejson`:
```bash
npm run build && node zip.mjs
```
Una vez que se complete, verá un archivo zip con el nombre que comienza con `deployment_`. Utilizará este zip para implementar su aplicación en AWS Elastic Beanstalk. Comencemos con la configuración de los roles de IAM necesarios para implementar una aplicación en AWS Elastic. tallo de habichuelas
## Configure sus roles de IAM
- Abra la [consola IAM](https://consoleaws.amazon.com/iam/) y haga clic en **Crear rol**
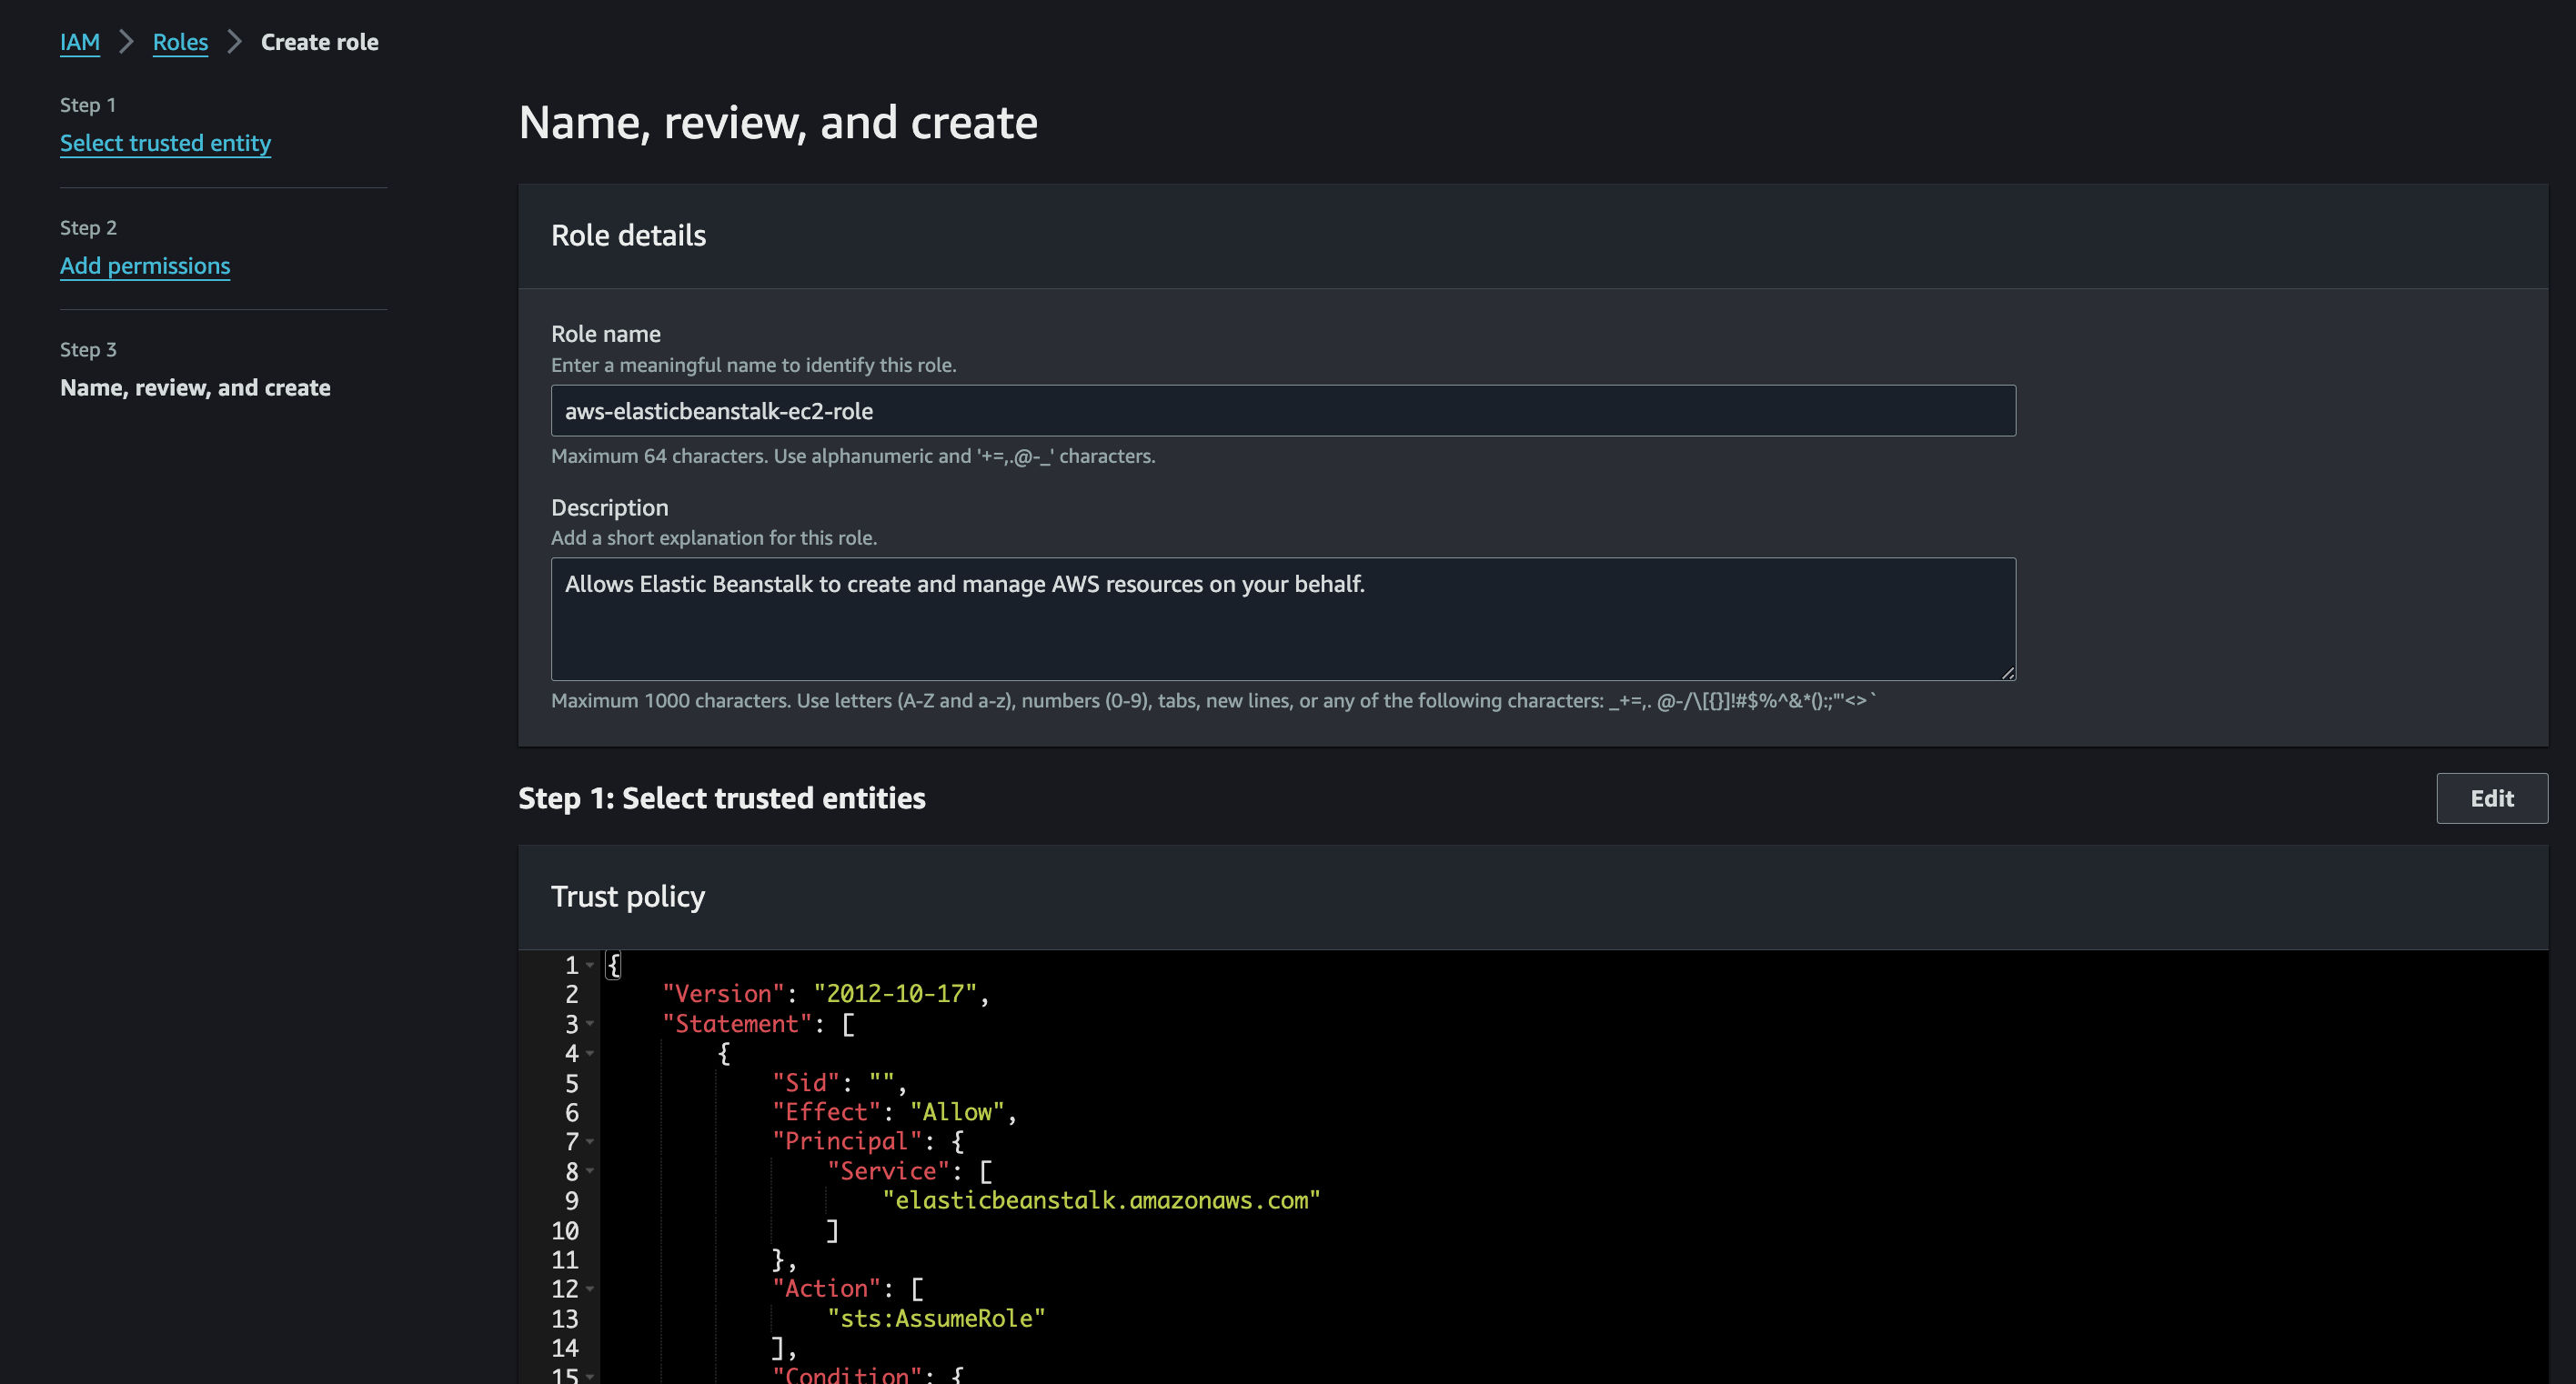
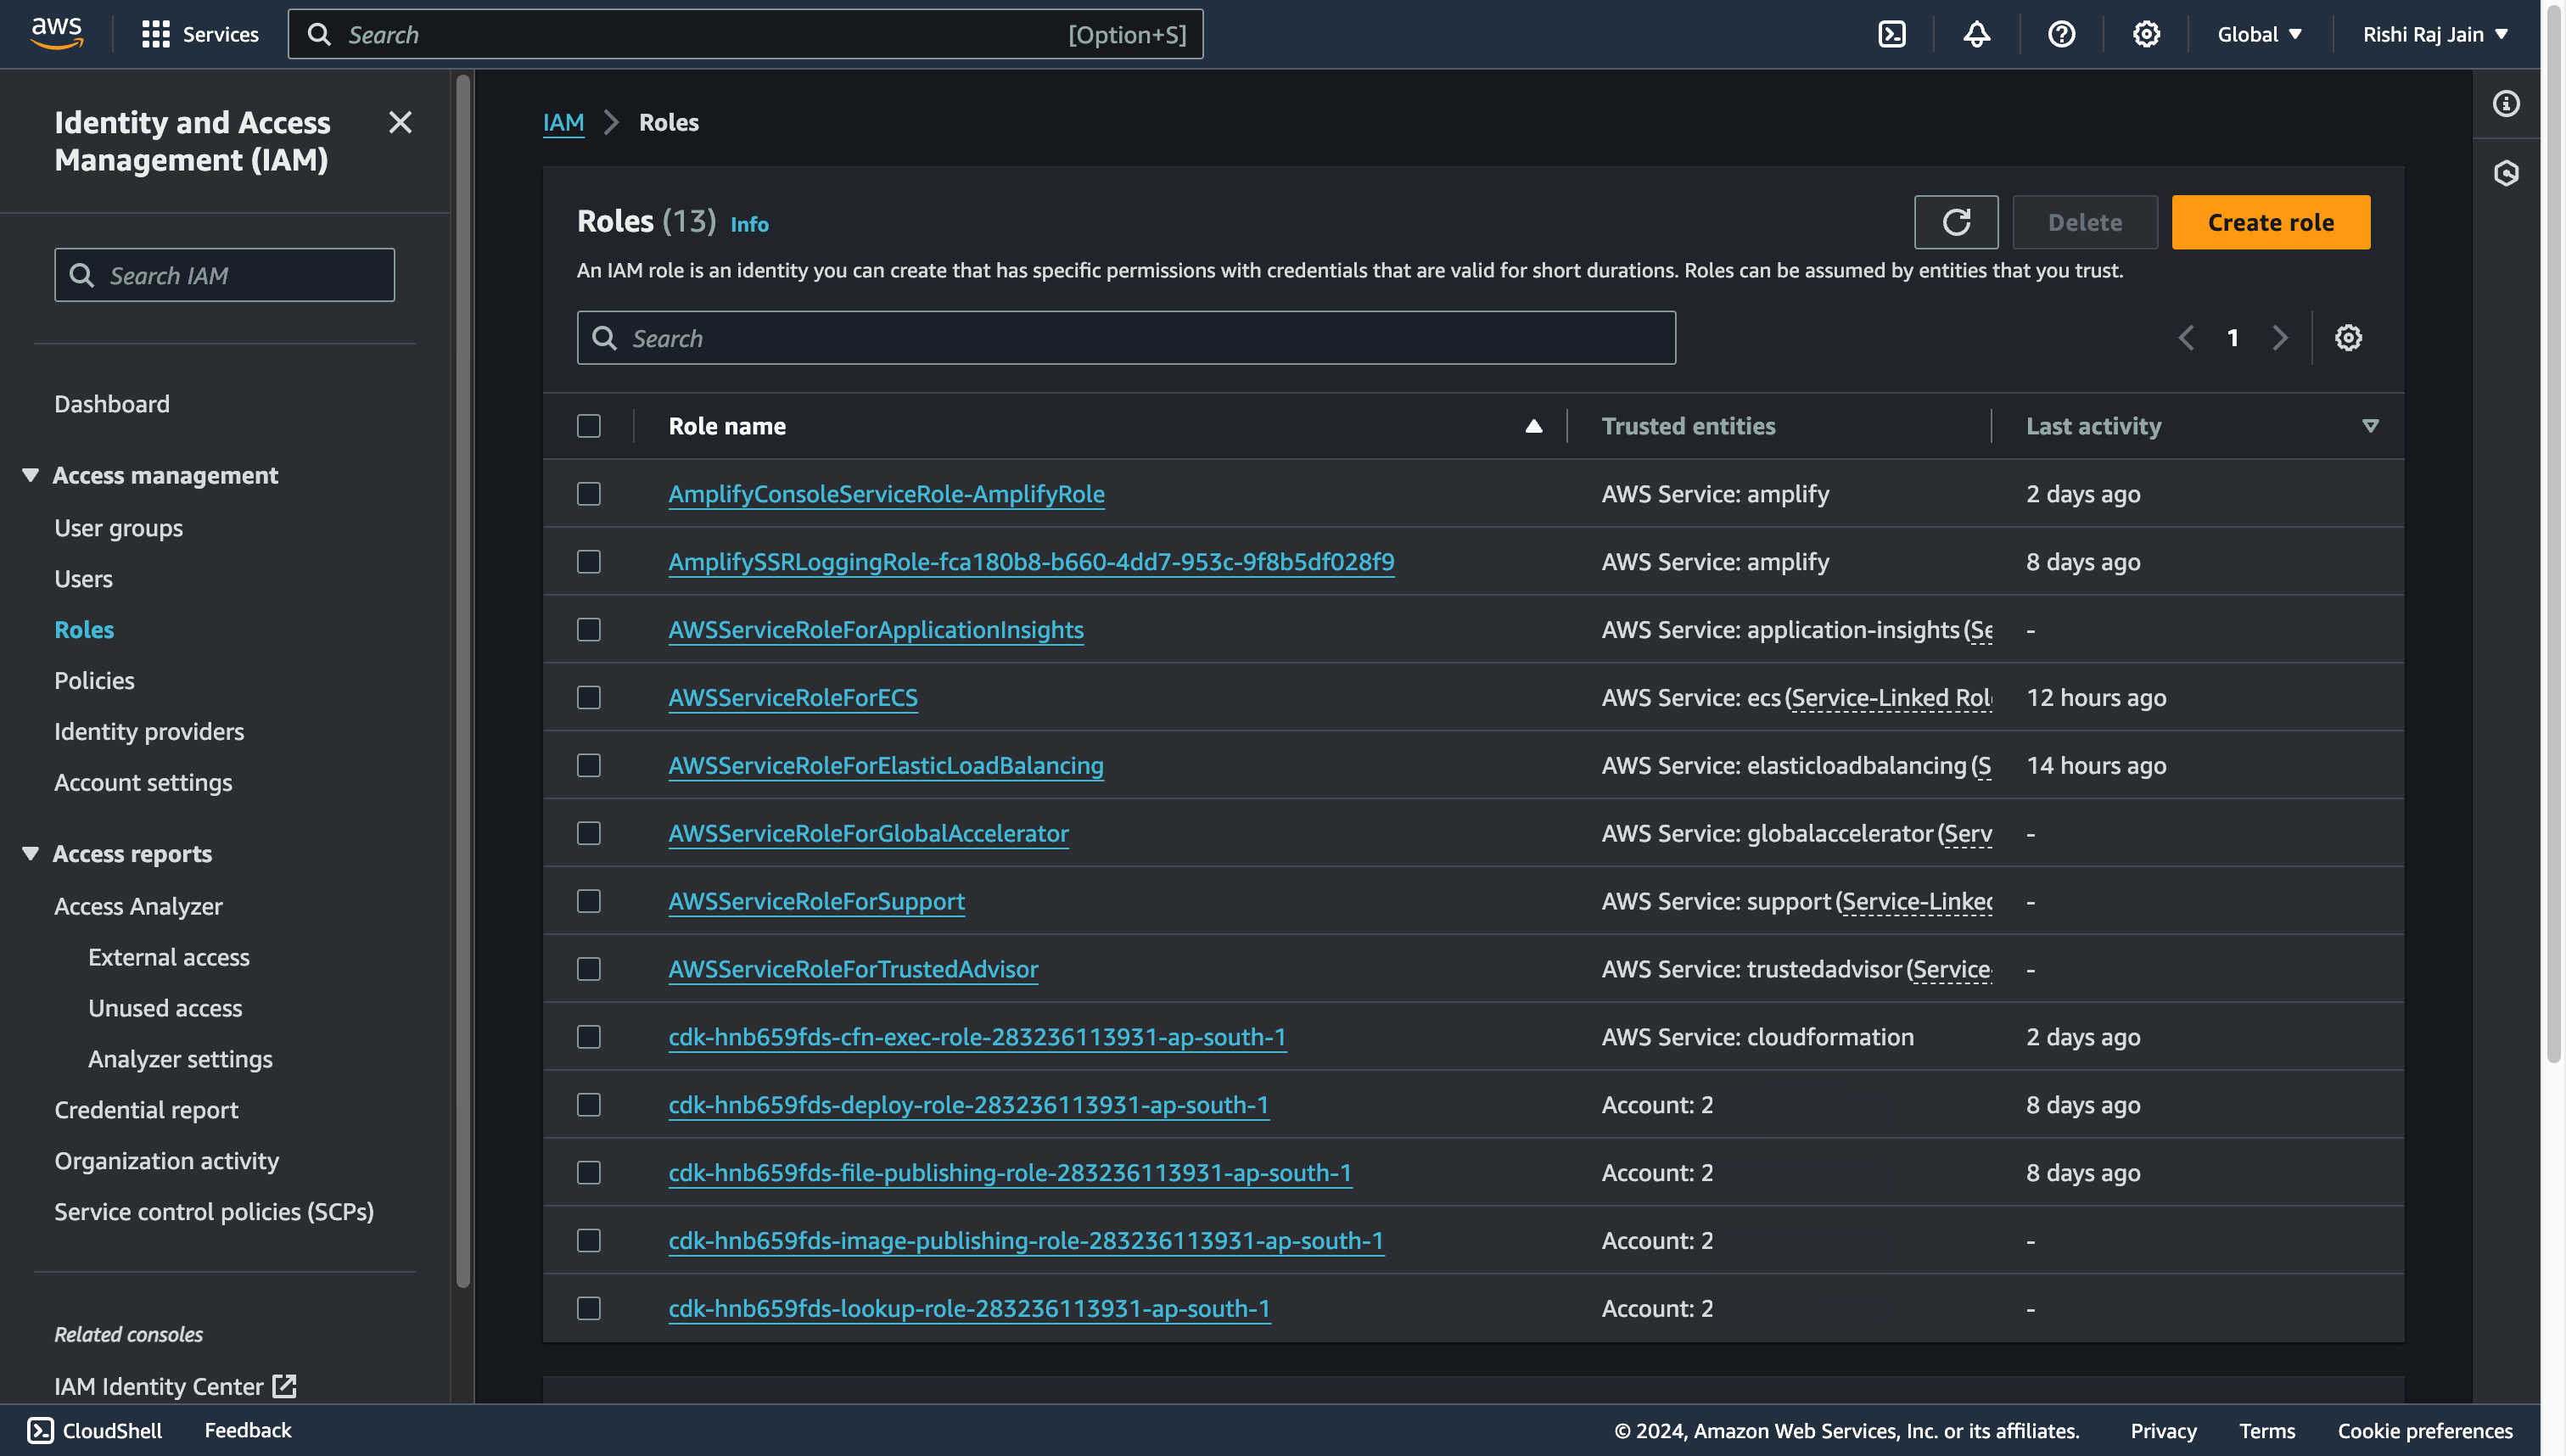 - Seleccione **Servicio AWS** y elija **Elastic Beanstalk** como servicio o caso de uso.
 - Siga el conjunto de permisos predeterminado y haga clic en **Siguiente**
 - Ingrese `aws-elasticbeanstalk-ec2-role` como **Nombre del rol**
 - Vuelva a la consola de IAM y haga clic en **Crear rol**
- Seleccione **Servicio AWS** y elija **EC2** como servicio o caso de uso.
- Vuelva a la consola de IAM y haga clic en **Crear rol**
- Seleccione **Servicio AWS** y elija **EC2** como servicio o caso de uso.
 - Filtre el gran conjunto de políticas de permisos, escriba **AWSElasticBeanstalk**, seleccione lo siguiente:
- AWSElasticBeanstalkMulticontenedorDocker
- AWSElasticBeanstalkWebTier
- AWSElasticBeanstalkWorkerTier
Luego, haga clic en **Siguiente**
- Filtre el gran conjunto de políticas de permisos, escriba **AWSElasticBeanstalk**, seleccione lo siguiente:
- AWSElasticBeanstalkMulticontenedorDocker
- AWSElasticBeanstalkWebTier
- AWSElasticBeanstalkWorkerTier
Luego, haga clic en **Siguiente**
 - Ingrese `ec2-roles` como **Nombre del rol**
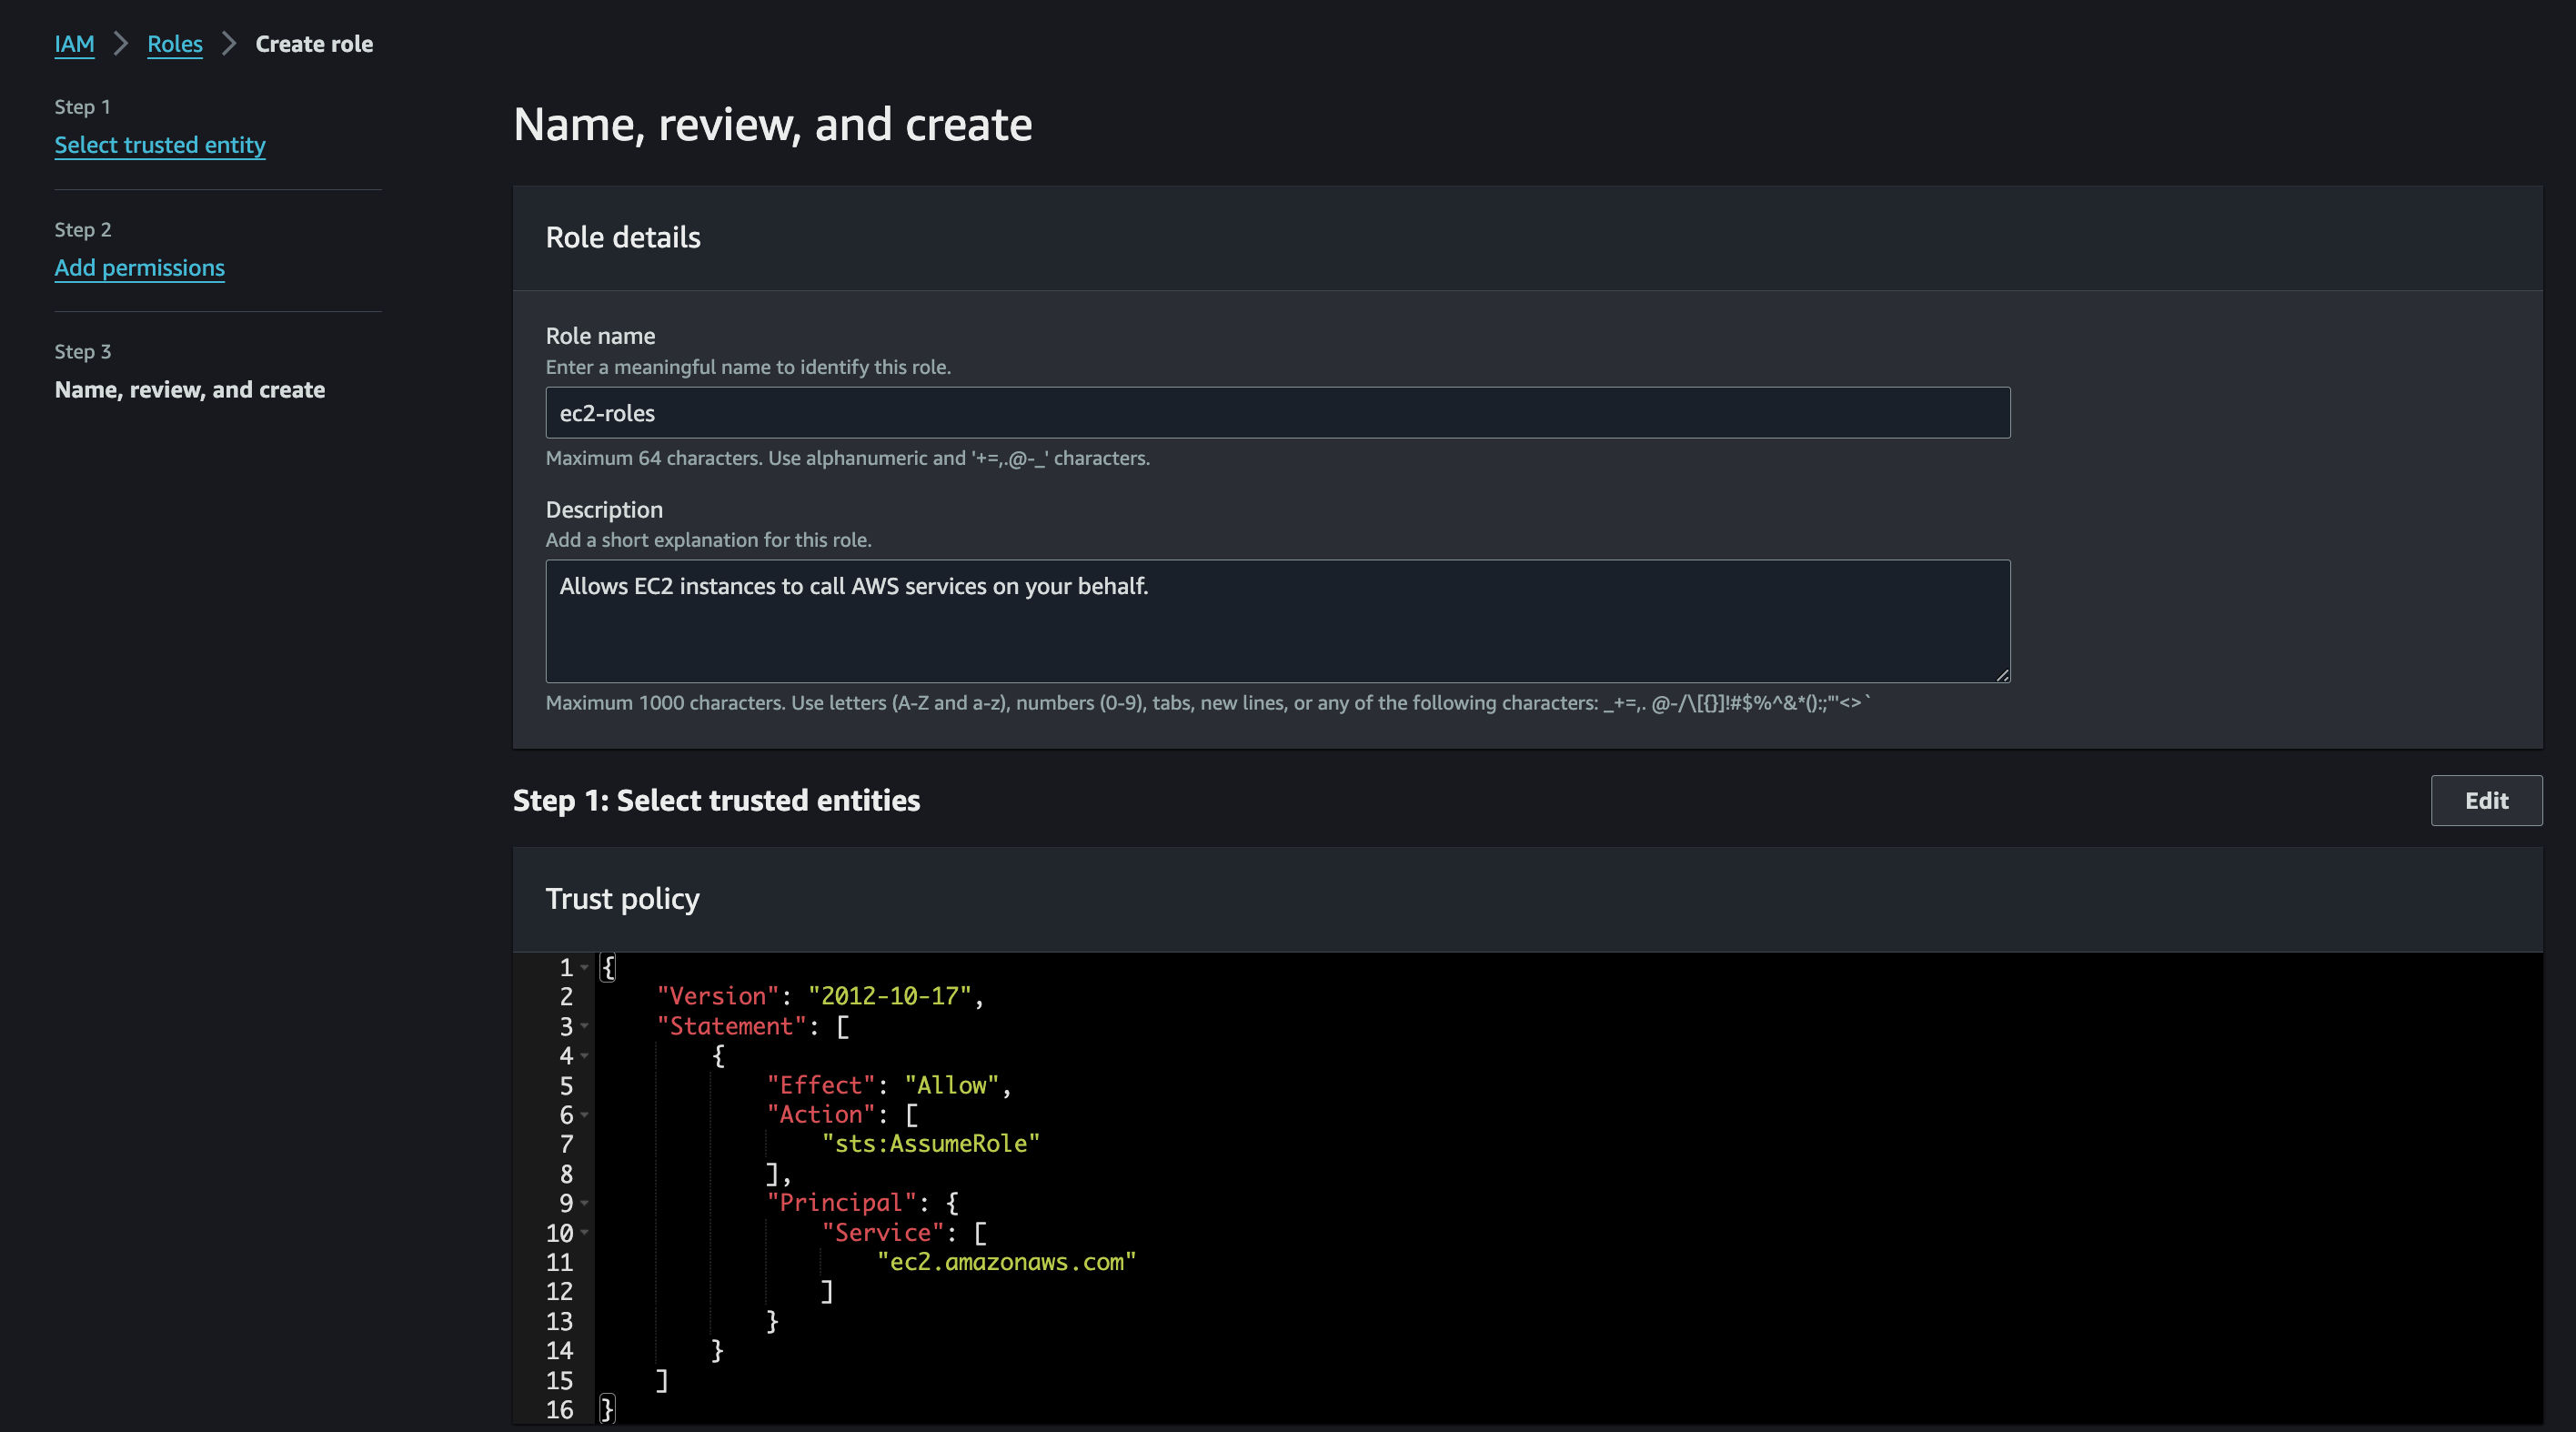 y ya ha terminado con la configuración de roles de IAM para su cuenta. Pasemos a implementar su aplicación Astro en AWS Elastic Beanstalk.
## Implementar en AWS Elastic Beanstalk
El código ahora está listo para implementarse en AWS Elasic Beanstalk. Utilice los siguientes pasos para implementarlo:
- Comience creando un repositorio de GitHub que contenga el código de su aplicación.
- Luego, navegue hasta el Panel de control de AWS Elasic Beanstalk y haga clic en **Crear aplicación** en **Comenzar** en la sección
y ya ha terminado con la configuración de roles de IAM para su cuenta. Pasemos a implementar su aplicación Astro en AWS Elastic Beanstalk.
## Implementar en AWS Elastic Beanstalk
El código ahora está listo para implementarse en AWS Elasic Beanstalk. Utilice los siguientes pasos para implementarlo:
- Comience creando un repositorio de GitHub que contenga el código de su aplicación.
- Luego, navegue hasta el Panel de control de AWS Elasic Beanstalk y haga clic en **Crear aplicación** en **Comenzar** en la sección
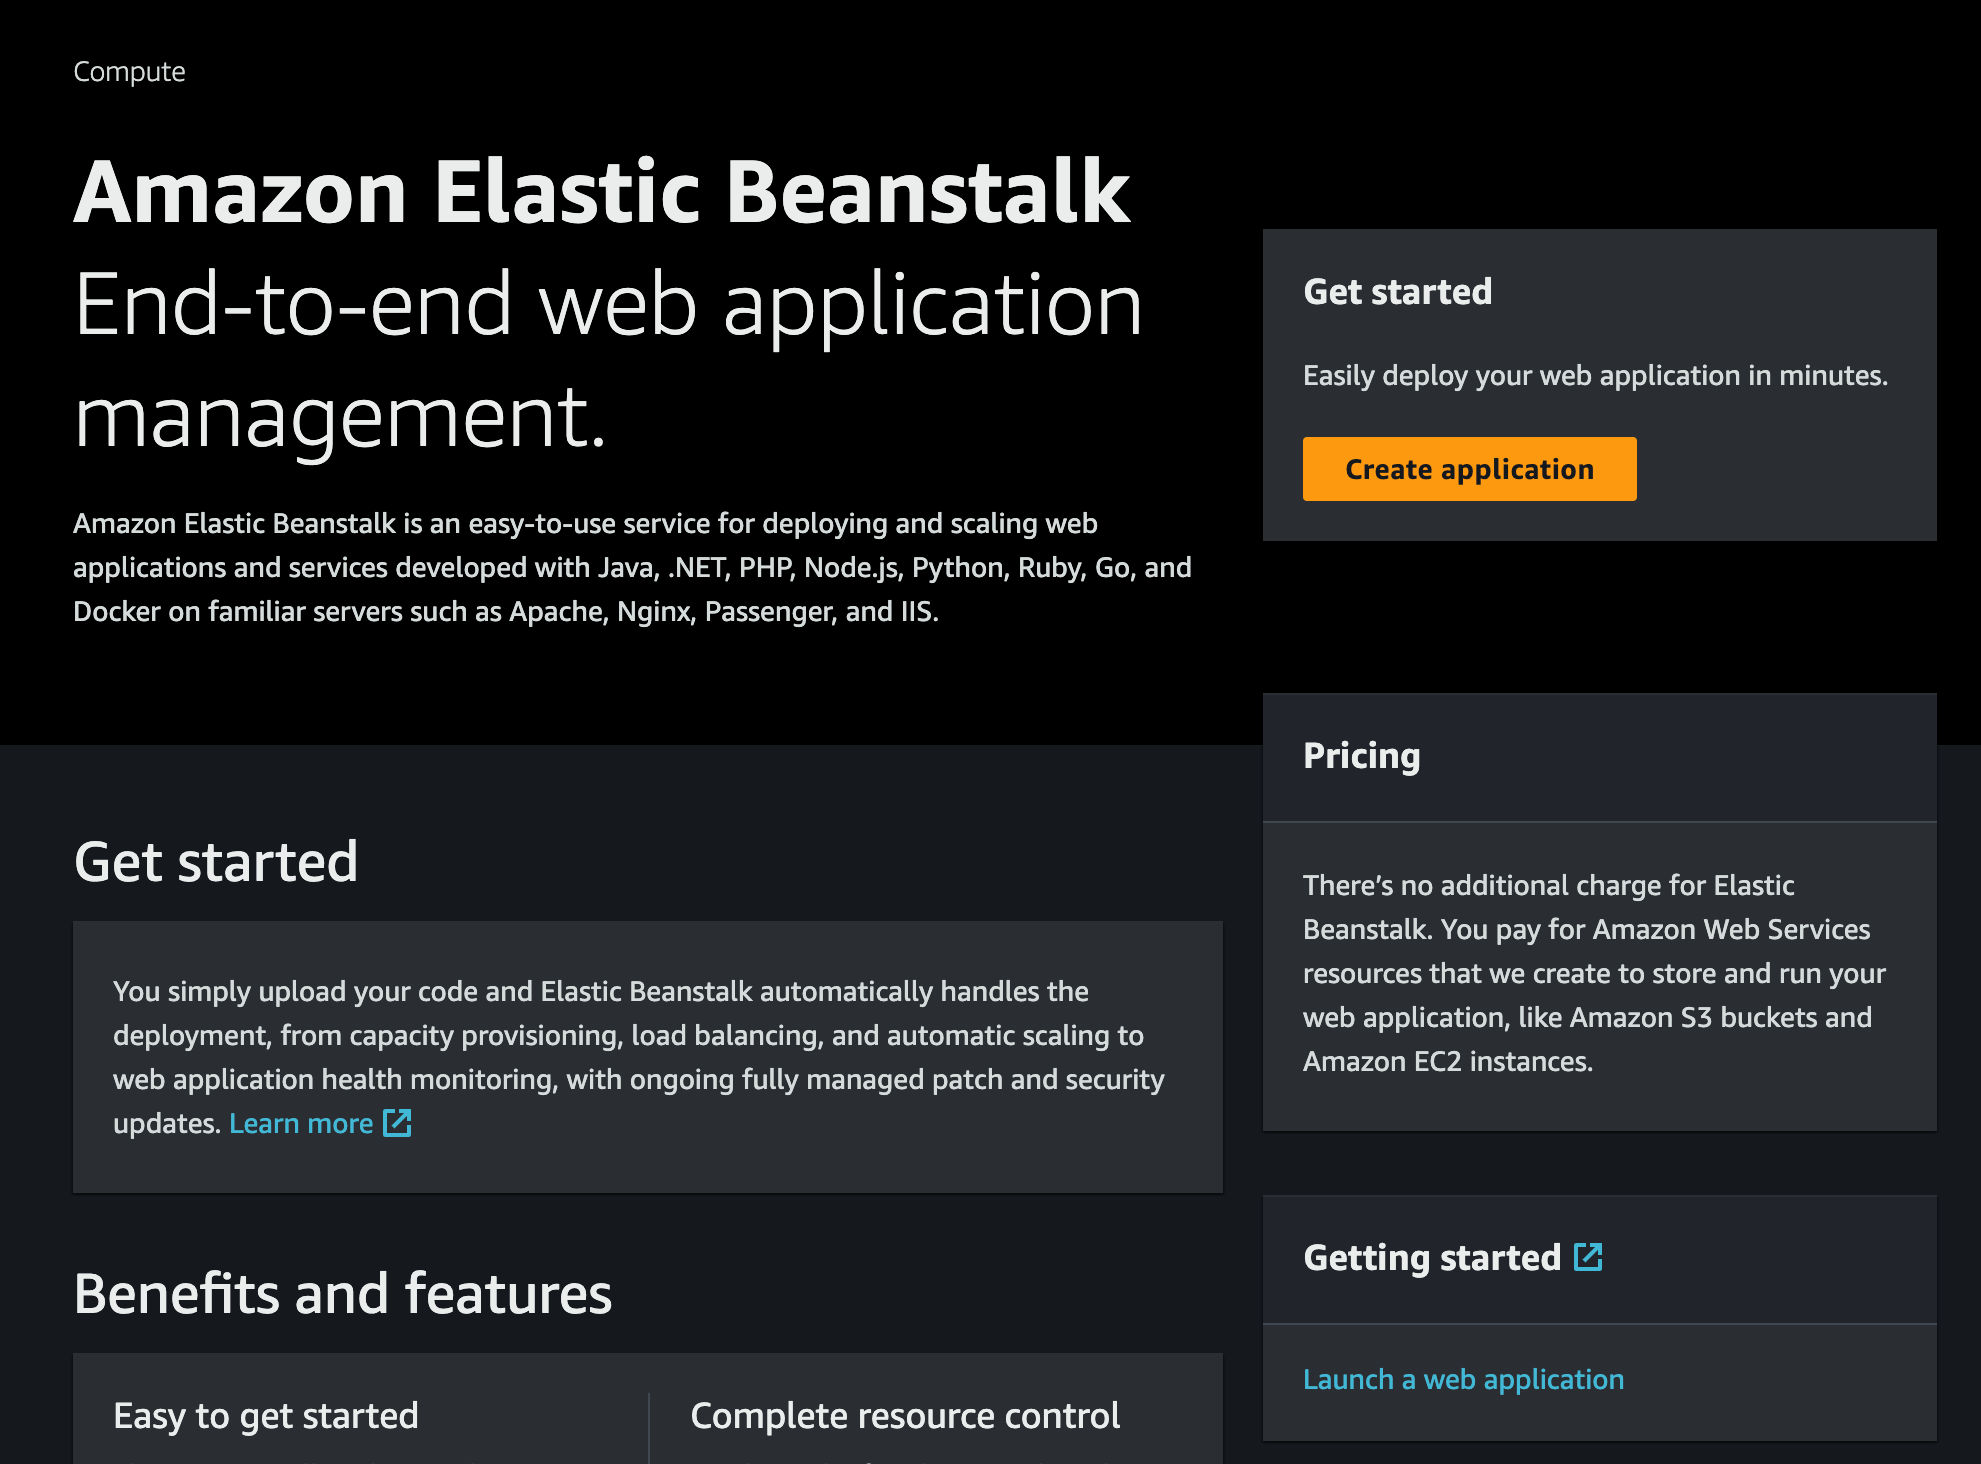 - Dale a la aplicación un nombre de tu elección.
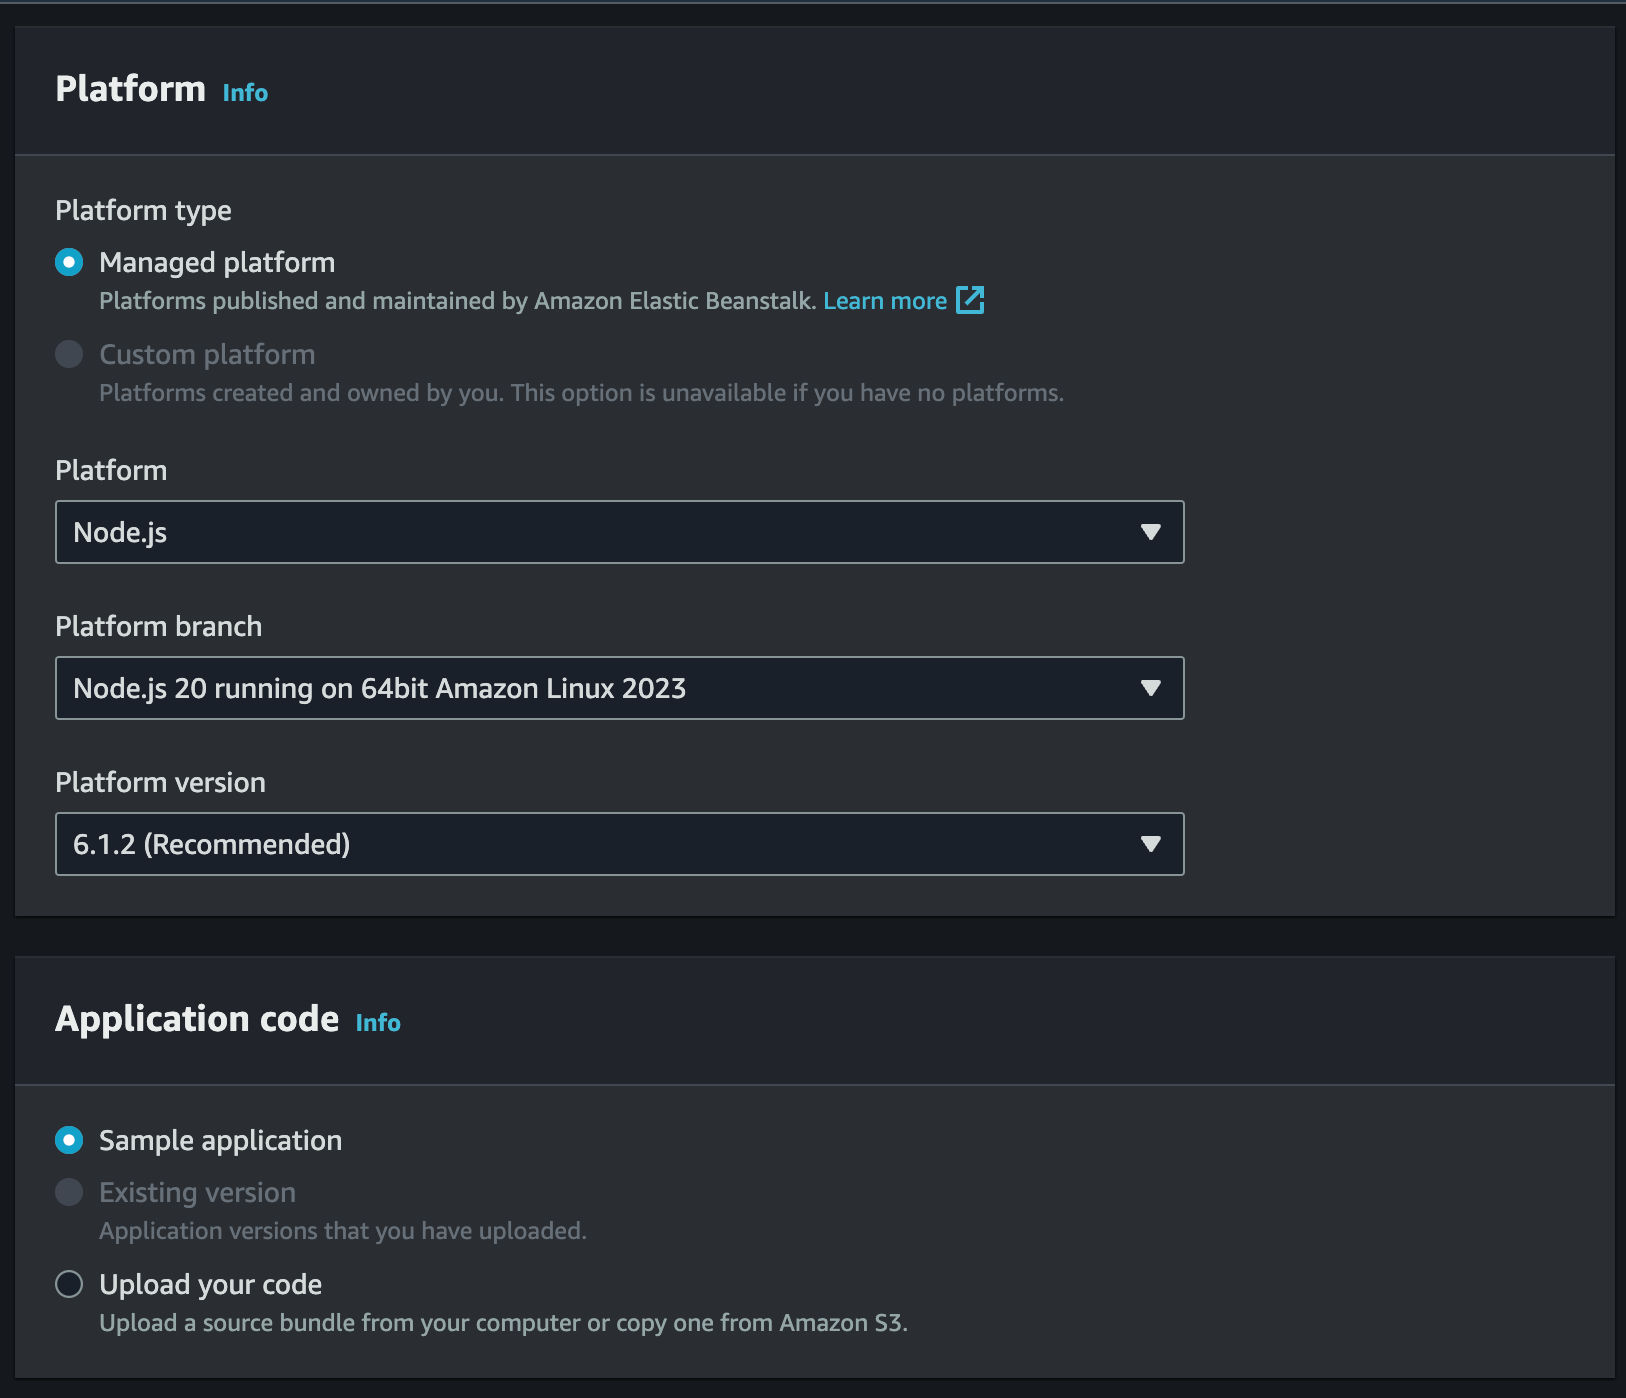
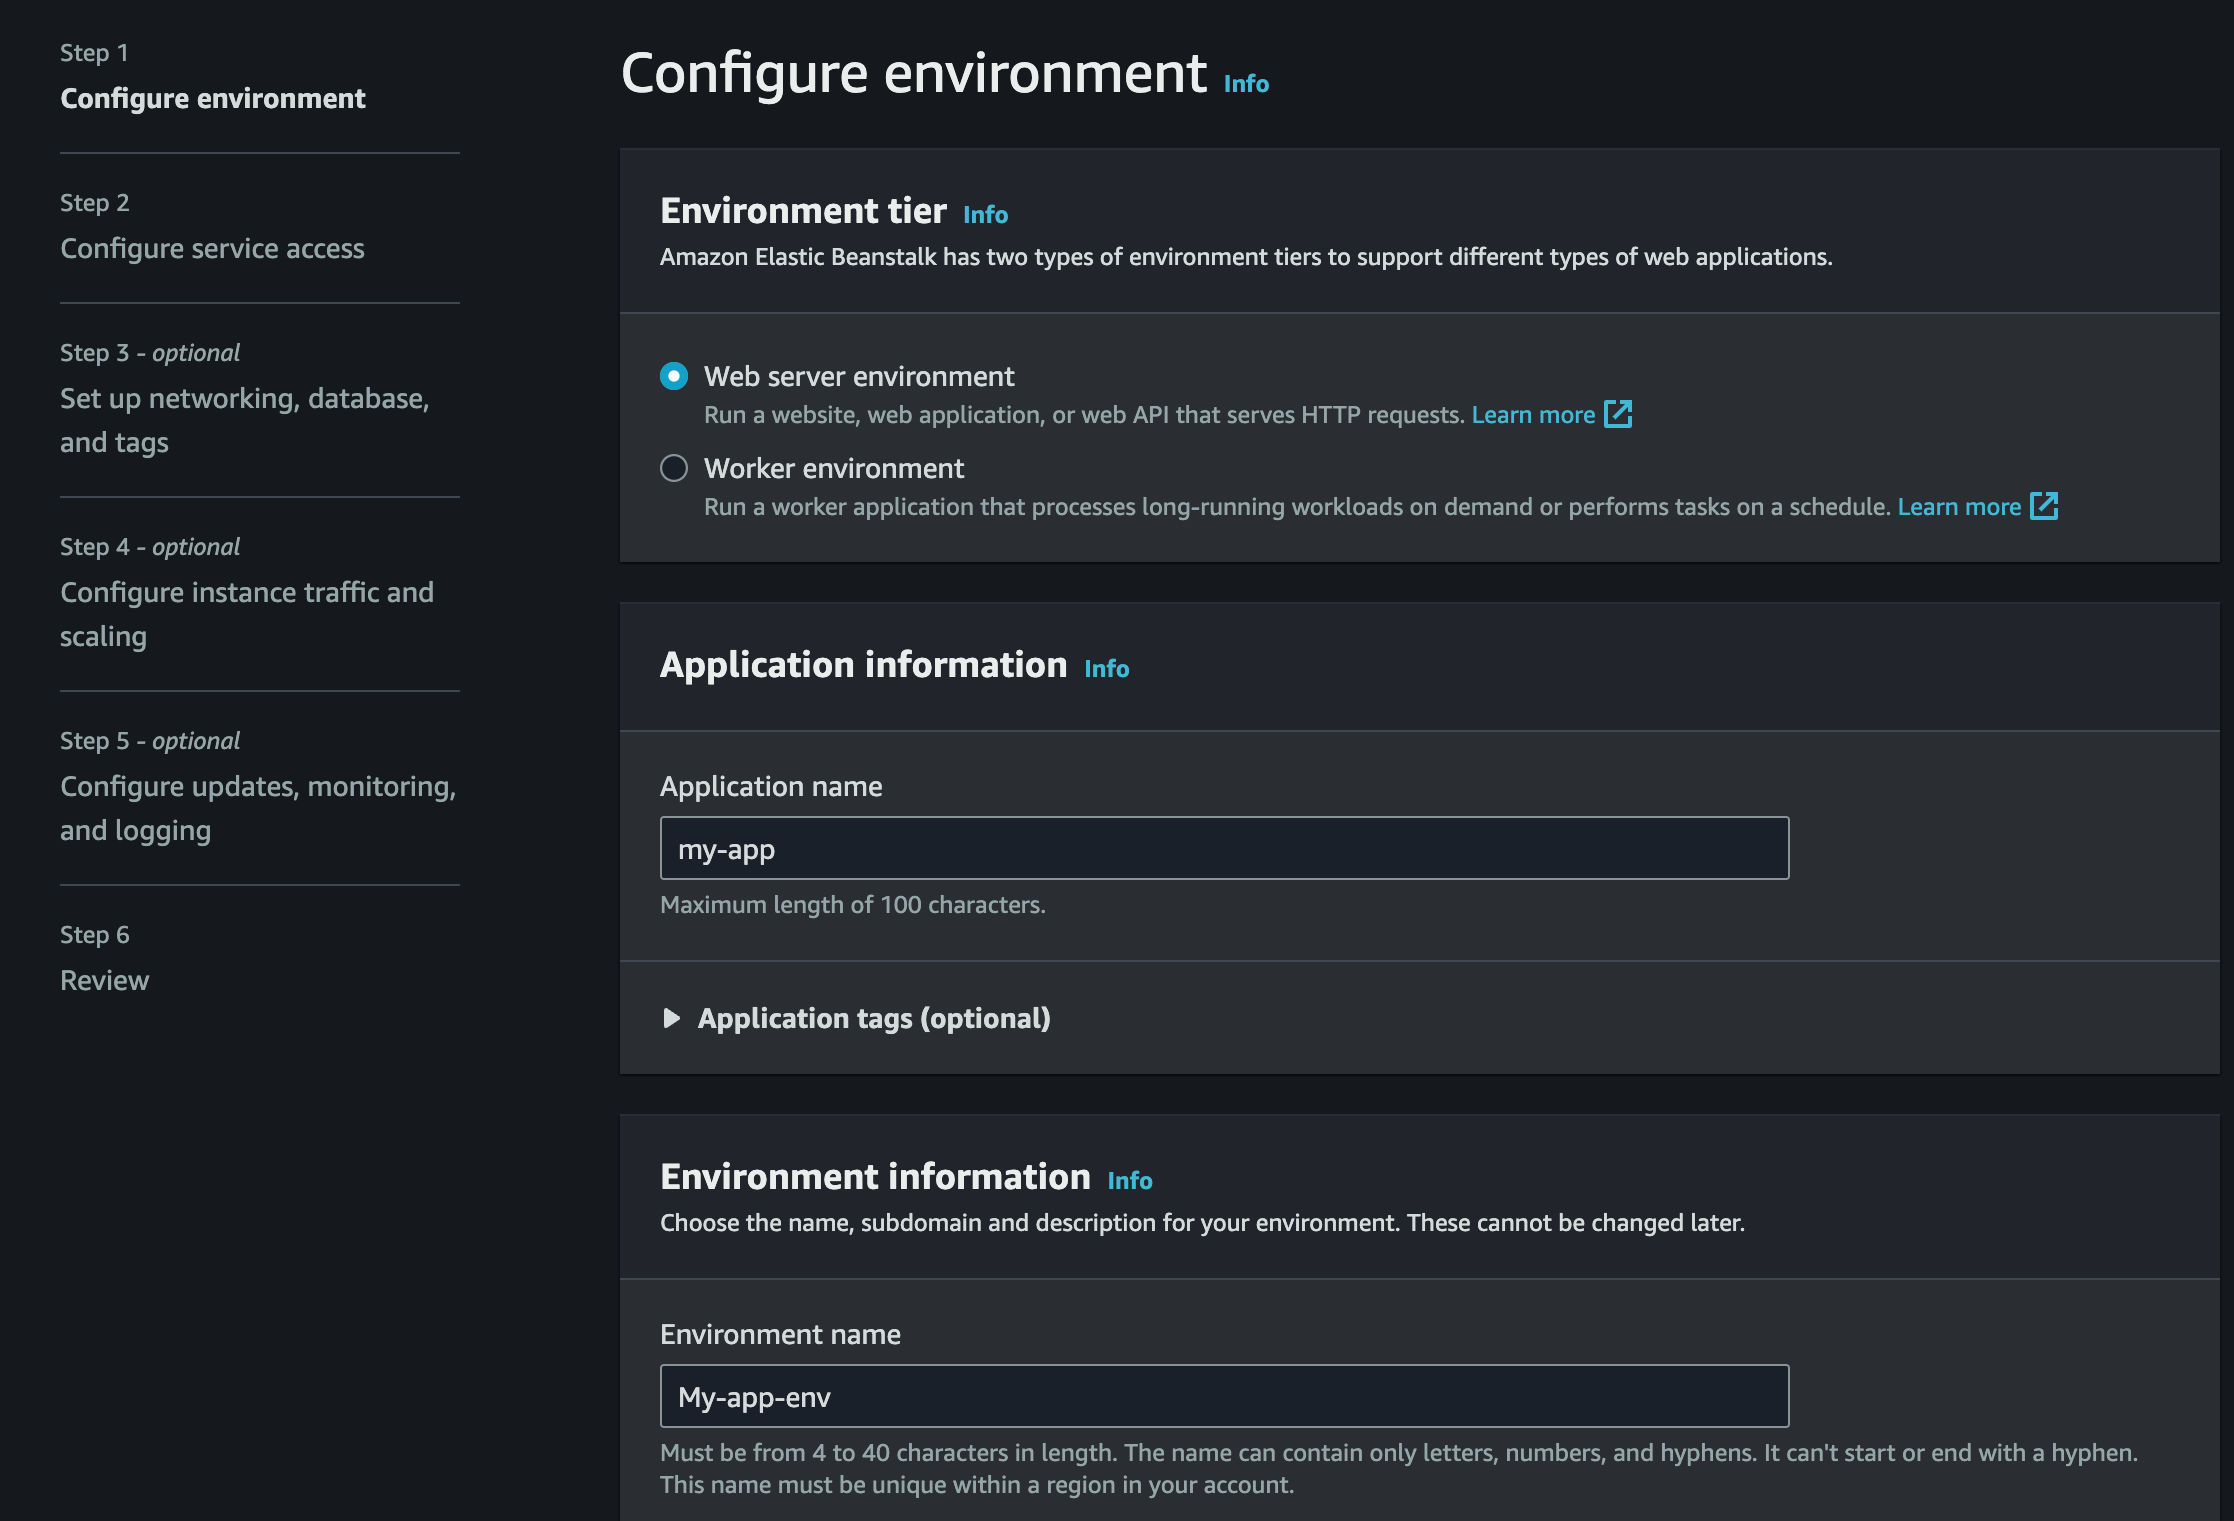 - Seleccione `Nodejs` como la plataforma que va a utilizar y haga clic en `Siguiente`
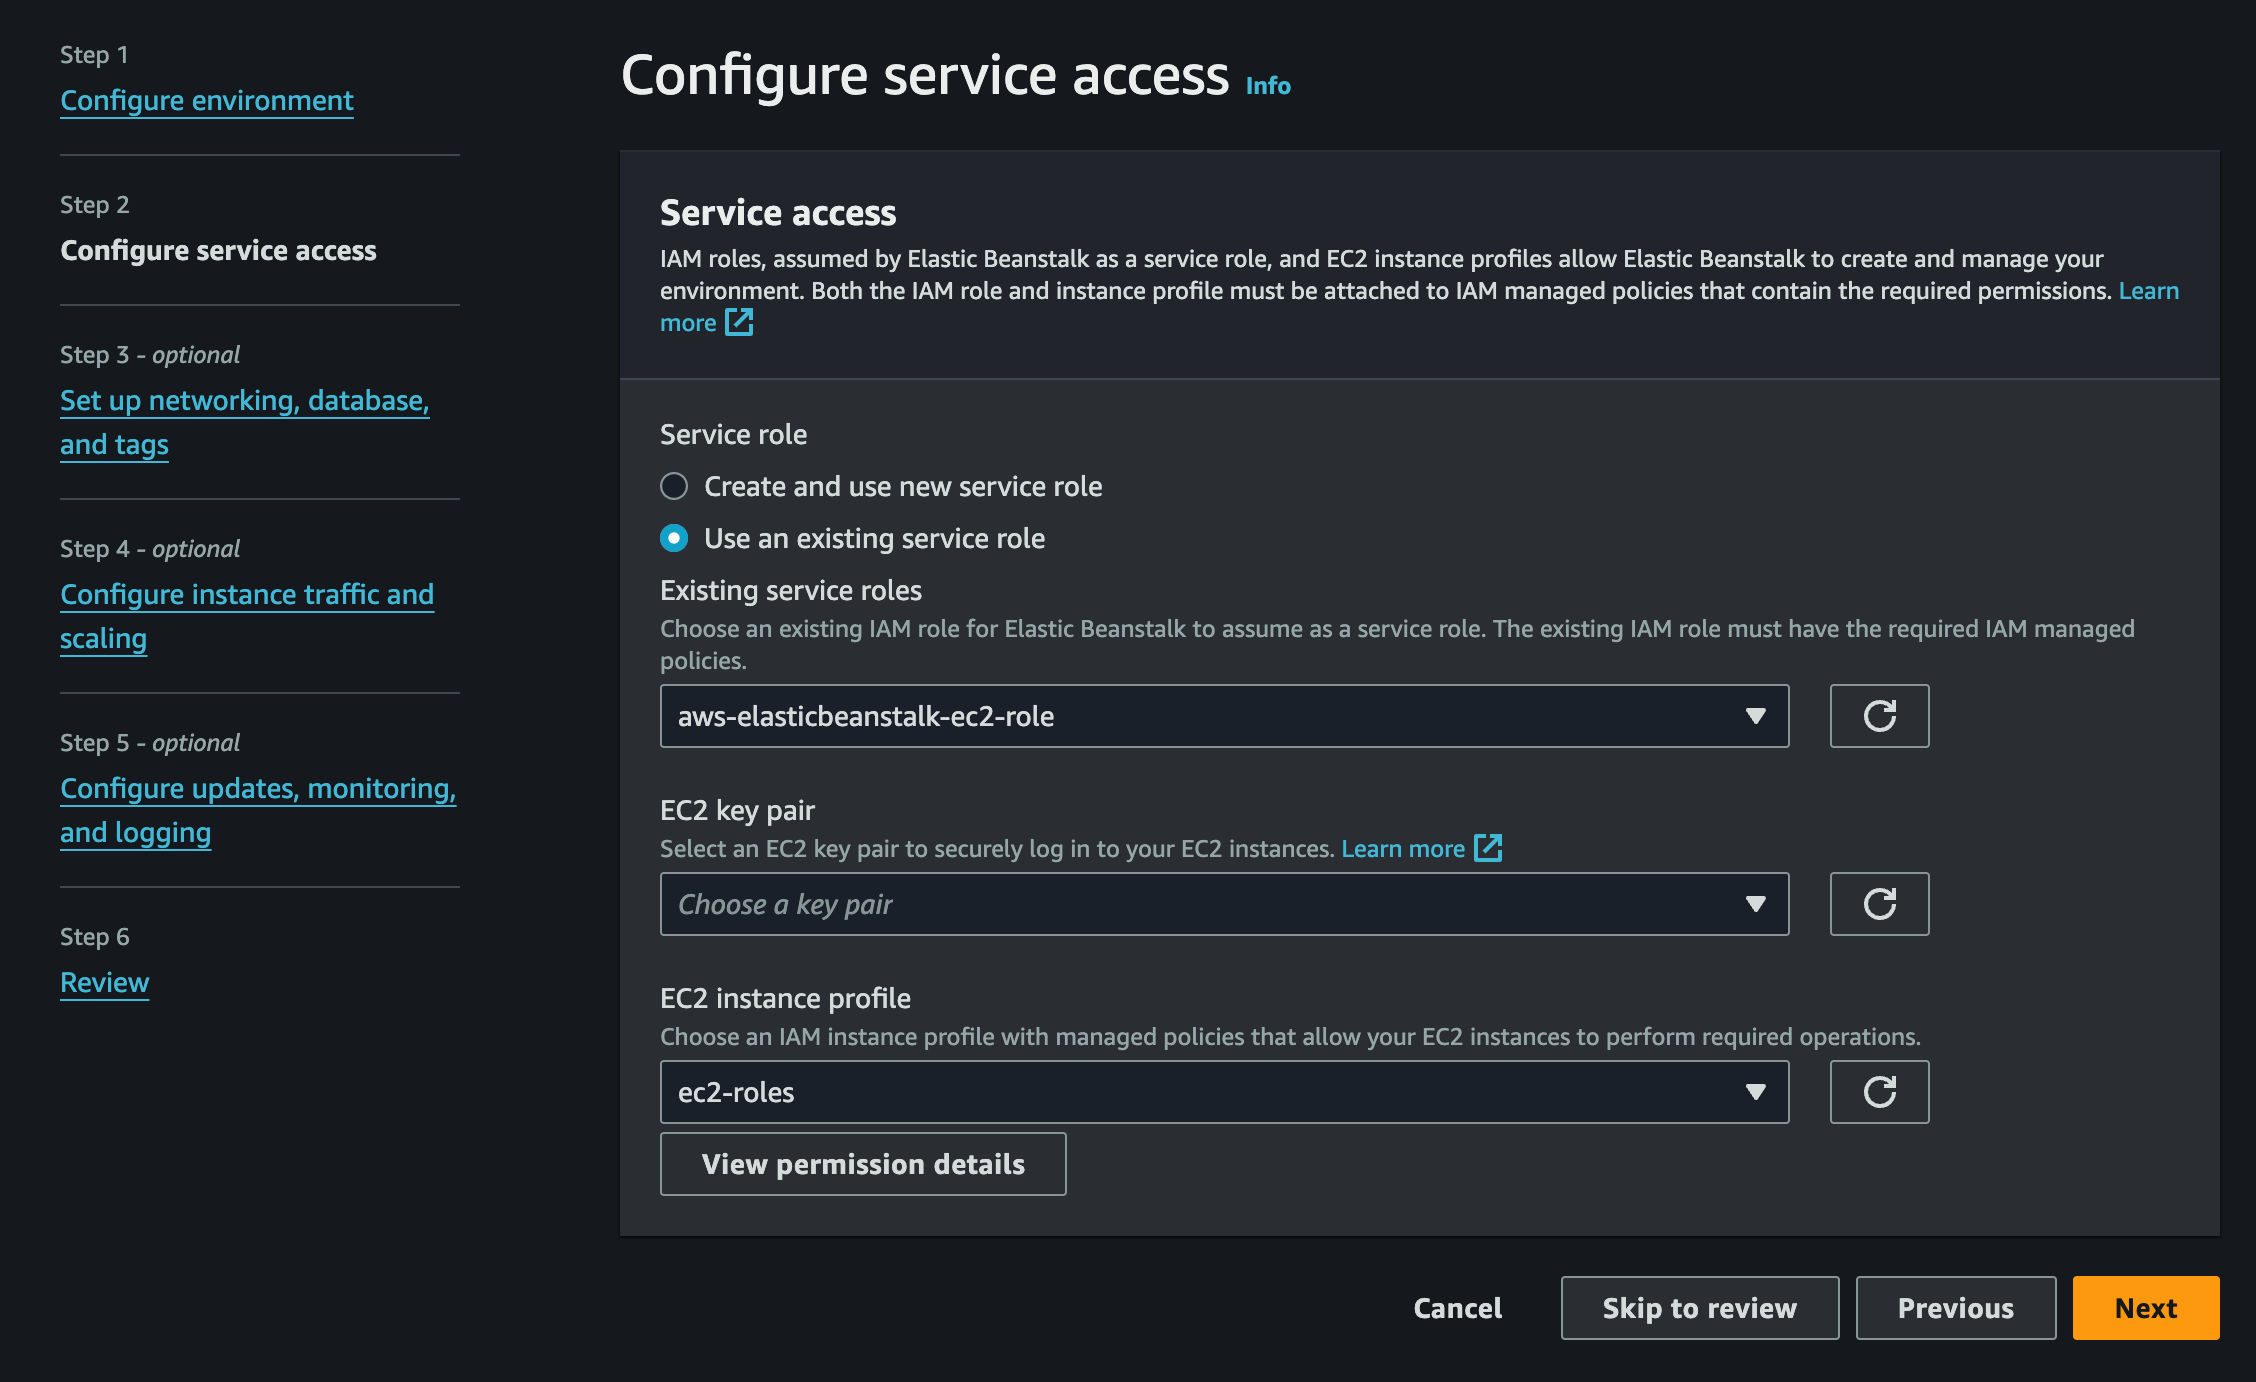
 - Seleccione "Usar un rol de servicio existente" para usar el "aws-elasticbeanstalk-ec2-role" y los "ec2-roles" que creó anteriormente y haga clic en "Siguiente".
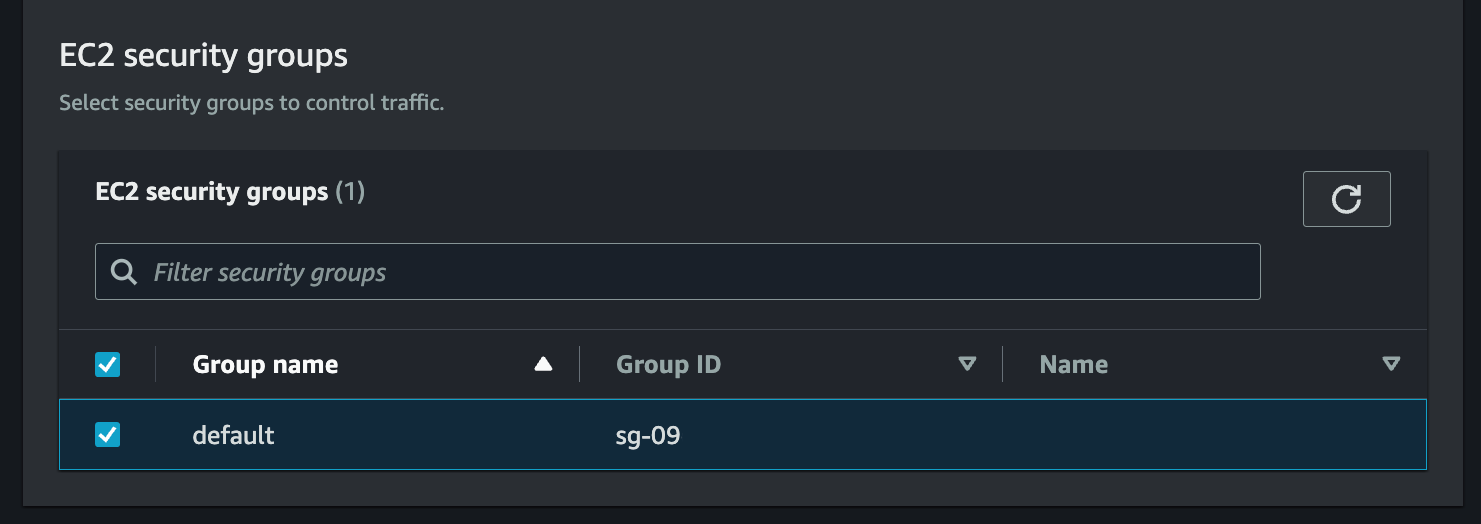
 - Seleccione la VPC predeterminada, luego habilite la dirección IP pública y verifique todas las subredes
 - Desplácese hacia abajo hasta la sección **Grupos de seguridad EC2** y use el predeterminado
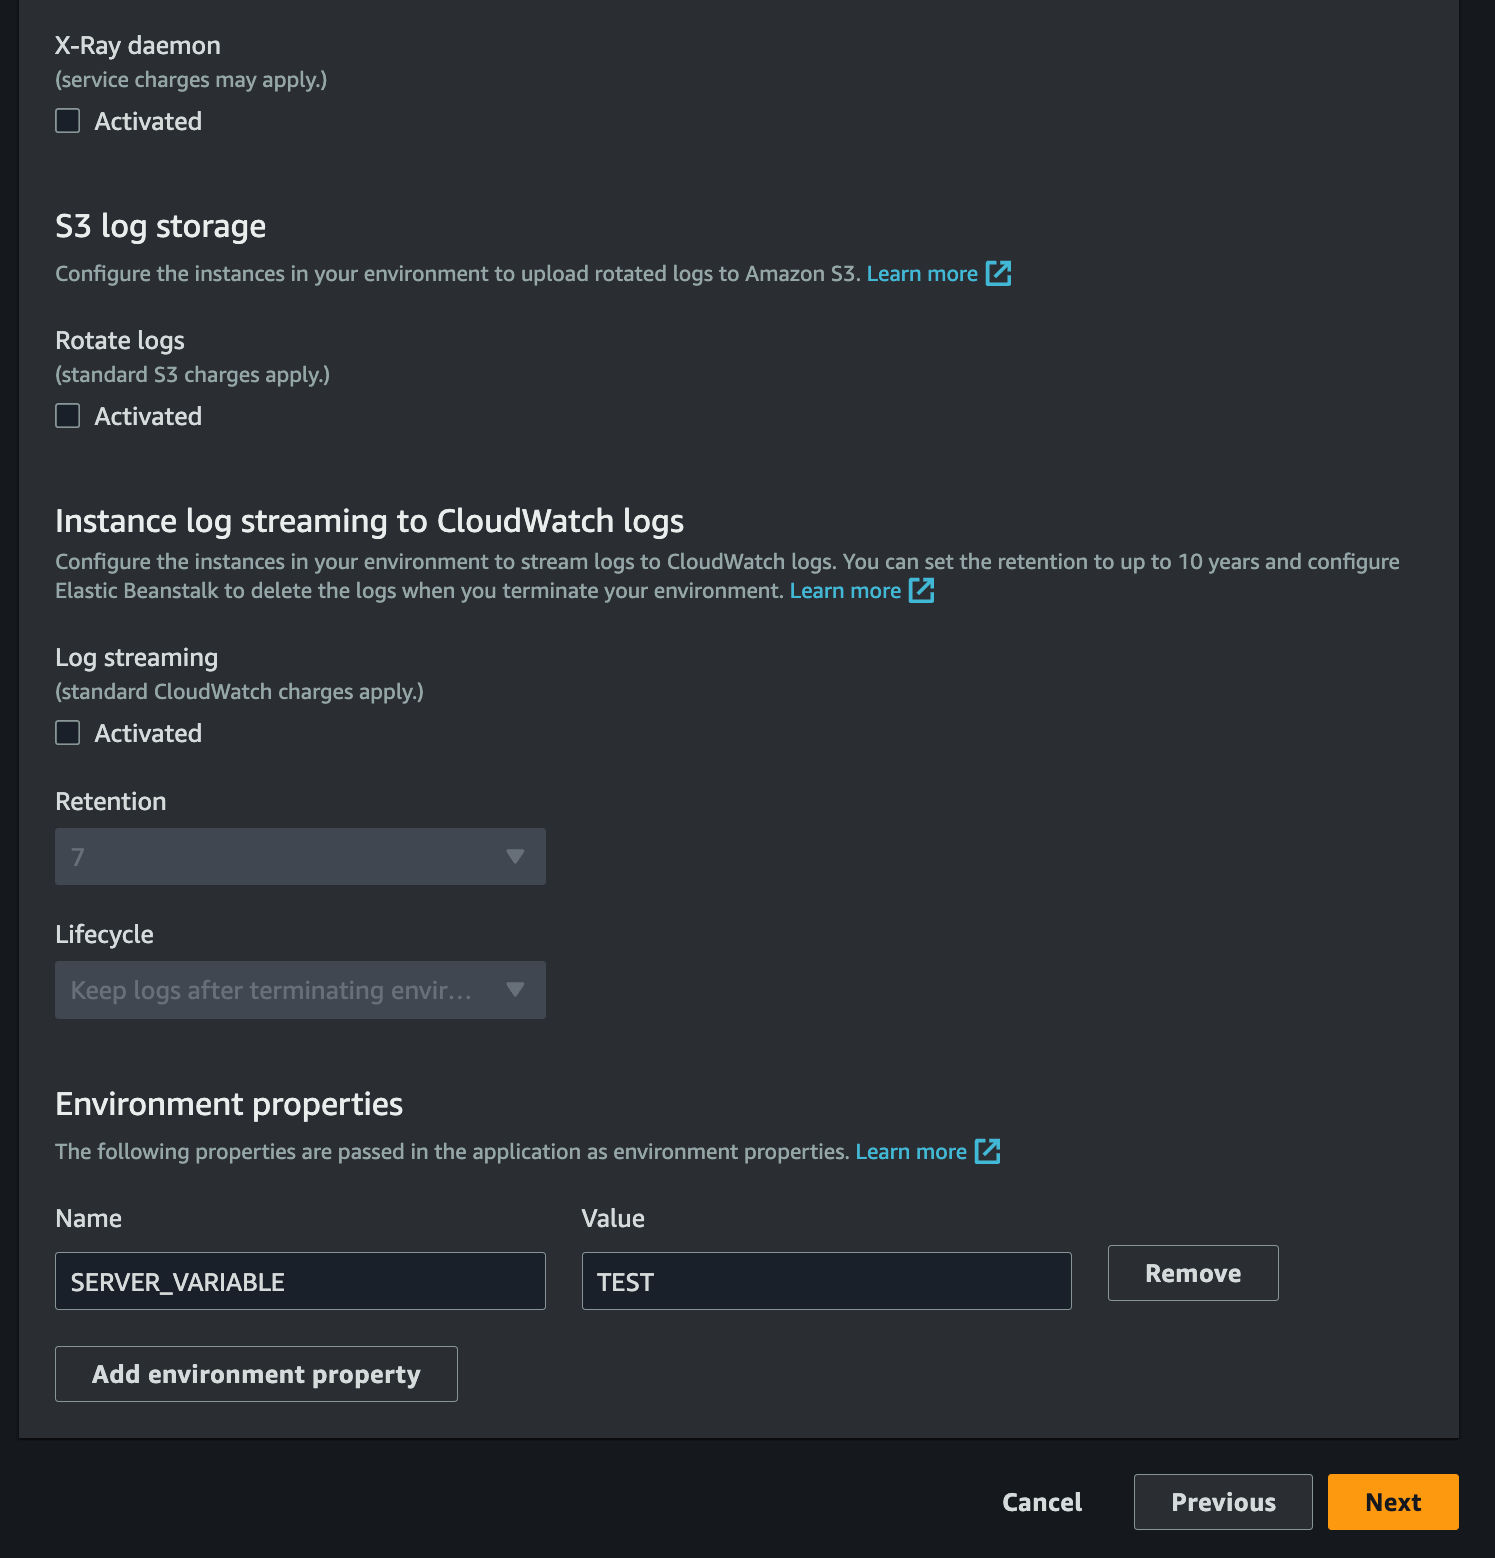
 - Desplácese hacia abajo hasta la sección **Propiedades del entorno** y agregue un par clave-valor para usarlo como variable de entorno.
 - Digamos que la variable de entorno a la que se accederá como `processenvSERVER_VARIABLE` es **SERVER_VARIABLE** y su valor es **TEST**
 - Espere a que la aplicación se active y luego haga clic en el botón "Cargar e implementar" en la esquina superior derecha.
 - Haga clic en "Elegir archivo", seleccione el archivo zip que creó anteriormente y haga clic en "Implementar".
 - Espere a que la aplicación informe que su "Salud" es **Ok**. Una vez que todo esté bien, haga clic en la URL debajo de "Dominio" para ver su aplicación Astro en acción.
 ## Conclusión
¡Hurra! Ahora tiene un proyecto Astro que se implementa en AWS Elasic Beanstalk
Si tiene alguna pregunta o comentario, no dude en comunicarse conmigo en [Twitter](https://twitter.com/direct_messages/create/rishi_raj_jain_)
## Conclusión
¡Hurra! Ahora tiene un proyecto Astro que se implementa en AWS Elasic Beanstalk
Si tiene alguna pregunta o comentario, no dude en comunicarse conmigo en [Twitter](https://twitter.com/direct_messages/create/rishi_raj_jain_)