---
title: "Implemente SvelteKit en AWS Amplify"
description: "Cómo implementar sus sitios web SvelteKit Server-Side Rendered (SSR) en AWS Amplify."
source: "https://www.launchfa.st/es/blog/deploy-sveltekit-aws-amplify"
author: "Rishi Raj Jain"
created_at: 2024-03-30T00:00:00.000Z
---
> **Site index for agents**
> Fetch https://www.launchfa.st/llms.txt to discover every page on this site.
> Every page is also available as Markdown by appending `.md` to its URL.
 En esta guía, aprenderá cómo implementar un proyecto SvelteKit SSR en AWS Amplify. Pasará por el proceso de configuración de un nuevo proyecto SvelteKit, habilitará la representación del lado del servidor mediante el adaptador de AWS Amplify y, finalmente, lo implementará en AWS Amplify.
## Tabla de contenido
- [Requisitos previos](#requisitos previos)
- [Crear una nueva aplicación SvelteKit](#crea-una-nueva-aplicación-sveltekit)
- [Comenzando con el adaptador Nodejs para SvelteKit](#empezando-con-el-adaptador-nodejs-para-sveltekit)
- [Implementar en AWS Amplify](#deploy-to-aws-amplify)
- [Conclusión](#conclusión)
## Requisitos previos
Necesitará lo siguiente:
- [Nodejs 18](https://nodejs.org/en/blog/announcements/v20-release-announce) o posterior
- Una cuenta [AWS](https://aws.amazon.com/free)
## Crea una nueva aplicación SvelteKit
Comencemos creando un nuevo proyecto SvelteKit. Abra su terminal y ejecute el siguiente comando:
```bash
npm create svelte@latest my-app
```
`npm create svelte` es la forma recomendada de desarrollar rápidamente un proyecto SvelteKit
Cuando se le solicite, elija:
- `Aplicación de demostración SvelteKit` cuando se le solicita que seleccione la plantilla de la aplicación
- `Sí, usando la sintaxis de TypeScript` cuando se le solicite agregar verificación de tipo con TypeScript
- `Agregar Prettier para formatear código` cuando se le solicite seleccionar opciones adicionales
Una vez hecho esto, puede ir al directorio del proyecto, instalar las dependencias e iniciar la aplicación:
```bash
cd my-app
npm install
npm run dev
```
La aplicación debería estar ejecutándose en [localhost:5173](http://localhost:5173/)
A continuación, en su primera ventana de terminal, ejecute el siguiente comando para instalar las bibliotecas y paquetes necesarios para crear la aplicación:
```bash
npm install dotenv @vercel/nft
npm install -D prepend-file
```
Las bibliotecas instaladas incluyen:
- `dotenv`: una biblioteca para manejar variables de entorno
- `@vercel/nft`: una biblioteca para determinar todos los archivos necesarios para el tiempo de ejecución de la aplicación utilizando puntos de entrada
Las bibliotecas específicas de desarrollo incluyen:
- `prepend-file`: una biblioteca para anteponer datos a un archivo
## Primeros pasos con el adaptador Nodejs para SvelteKit
Antes de implementar su proyecto SvelteKit, necesita instalar el adaptador `@sveltejs/adapter-node`. Ejecute el siguiente comando en la ventana de su terminal:
```bash
npm install @sveltejs/adapter-node
```
Las bibliotecas instaladas incluyen:
- `@sveltejs/adapter-node`: un adaptador que prepara los sitios web de SvelteKit para ejecutarlos como un servidor Nodejs independiente.
Una vez que el adaptador esté instalado, deberá agregarlo a su archivo `svelteconfigjs`. Abra el archivo y agregue el siguiente código:
```diff
// File: svelte.config.js
import adapter from '@sveltejs/adapter-auto' // [!code --]
import adapter from '@sveltejs/adapter-node' // [!code ++]
import { vitePreprocess } from '@sveltejs/kit/vite'
/** @type {import('@sveltejs/kit').Config} */
const config = {
// Consult https://kit.svelte.dev/docs/integrations#preprocessors
// for more information about preprocessors
preprocess: vitePreprocess(),
kit: {
// adapter-auto only supports some environments, see https://kit.svelte.dev/docs/adapter-auto for a list.
// If your environment is not supported or you settled on a specific environment, switch out the adapter.
// See https://kit.svelte.dev/docs/adapters for more information about adapters.
adapter: adapter()
}
};
export default config;
```
Las adiciones hacen lo siguiente:
- Importa la exportación predeterminada de `@sveltejs/adapter-node`
- Utiliza la importación anterior como "adaptador" de su aplicación SvelteKit
Luego, cree un archivo `amplifymjs` en la raíz del repositorio con el siguiente código:
```tsx
// File: amplify.mjs
import { join } from 'node:path'
import { nodeFileTrace } from '@vercel/nft'
import { sync as prependSync } from 'prepend-file'
import { writeFileSync, mkdirSync, existsSync, cpSync, rmSync } from 'node:fs'
// Define all the Amplify related directories
const amplifyDirectories = [
join(process.cwd(), '.amplify-hosting'),
join(process.cwd(), '.amplify-hosting', 'static'),
join(process.cwd(), '.amplify-hosting', 'compute'),
join(process.cwd(), '.amplify-hosting', 'compute', 'default'),
join(process.cwd(), '.amplify-hosting', 'compute', 'default', 'node_modules'),
]
// Create directories if they do no exist already
if (existsSync(amplifyDirectories[0])) rmSync(amplifyDirectories[0], { force: true, recursive: true })
// Create directories if they do no exist already
amplifyDirectories.forEach((i) => mkdirSync(i))
const deployManifestConfig = {
version: 1,
routes: [
{
path: `/assets/*`,
target: {
kind: 'Static',
},
},
{
path: `/*.*`,
target: {
kind: 'Static',
},
fallback: {
kind: 'Compute',
src: 'default',
},
},
{
path: '/*',
target: {
kind: 'Compute',
src: 'default',
},
},
],
computeResources: [
{
name: 'default',
runtime: 'nodejs18.x',
entrypoint: 'build/index.js',
},
],
framework: {
name: 'sveltekit',
version: '1.20.4',
},
}
// Write the config to .amplify-hosting/deploy-manifest.json
writeFileSync(join(process.cwd(), '.amplify-hosting', 'deploy-manifest.json'), JSON.stringify(deployManifestConfig))
// Move the build/client to the static directory for Amplify
cpSync(join(process.cwd(), 'build', 'client'), amplifyDirectories[1], { recursive: true })
// Ref: https://rishi.app/blog/using-vercel-nft-to-compute-runtime-dependencies-for-your-remix-express-app/
async function computeDependencies(paths = []) {
// the whole app inside index.js,
// include other paths that are
// not bundled with your app builds
const files = paths
// Compute file trace
const { fileList } = await nodeFileTrace(files)
// Store set of packages
let packages = {}
fileList.forEach((i) => {
if (i.includes('node_modules/')) {
let temp = i.replace('node_modules/', '')
temp = temp.substring(0, temp.indexOf('/'))
packages[`node_modules/${temp}`] = true
} else packages[i] = true
})
// Sort the set of packages by name (for easier difference comparison with git)
// Dump the list of the computed packages for further references while deploying the app
Object.keys(packages)
.sort()
.forEach((i) => {
cpSync(i, join(amplifyDirectories[3], i), { recursive: true })
})
}
// Prepend dotenv import into the entrypoint
prependSync(join('build', 'index.js'), `import 'dotenv/config'\n`)
// Compute all the dependents on build/index.js and load them into the compute
computeDependencies(['./build/index.js'])
```
Luego, cree un archivo `amplifyyml` en la raíz del repositorio con el siguiente código:
```yml
version: 1
frontend:
phases:
preBuild:
commands:
- npm ci
build:
commands:
- env >> .env
- npm run build
- node amplify.mjs
artifacts:
baseDirectory: .amplify-hosting
files:
- '**/*'
cache:
paths:
- node_modules/**/*
```
El código anterior hace lo siguiente:
- Utiliza comandos `preBuild` para instalar las dependencias de su proyecto SvelteKit
- Utiliza comandos `build` para:
- Almacene todas las variables de entorno en el archivo `env` en la raíz del proyecto
- Construye tu aplicación SvelteKit
- Mueva el directorio `node_modules` y el archivo `env` al directorio de cálculo de Amplify
## Implementar en AWS Amplify
El código ahora está listo para implementarse en AWS Amplify. Utilice los siguientes pasos para implementarlo:
- Comience creando un repositorio de GitHub que contenga el código de su aplicación.
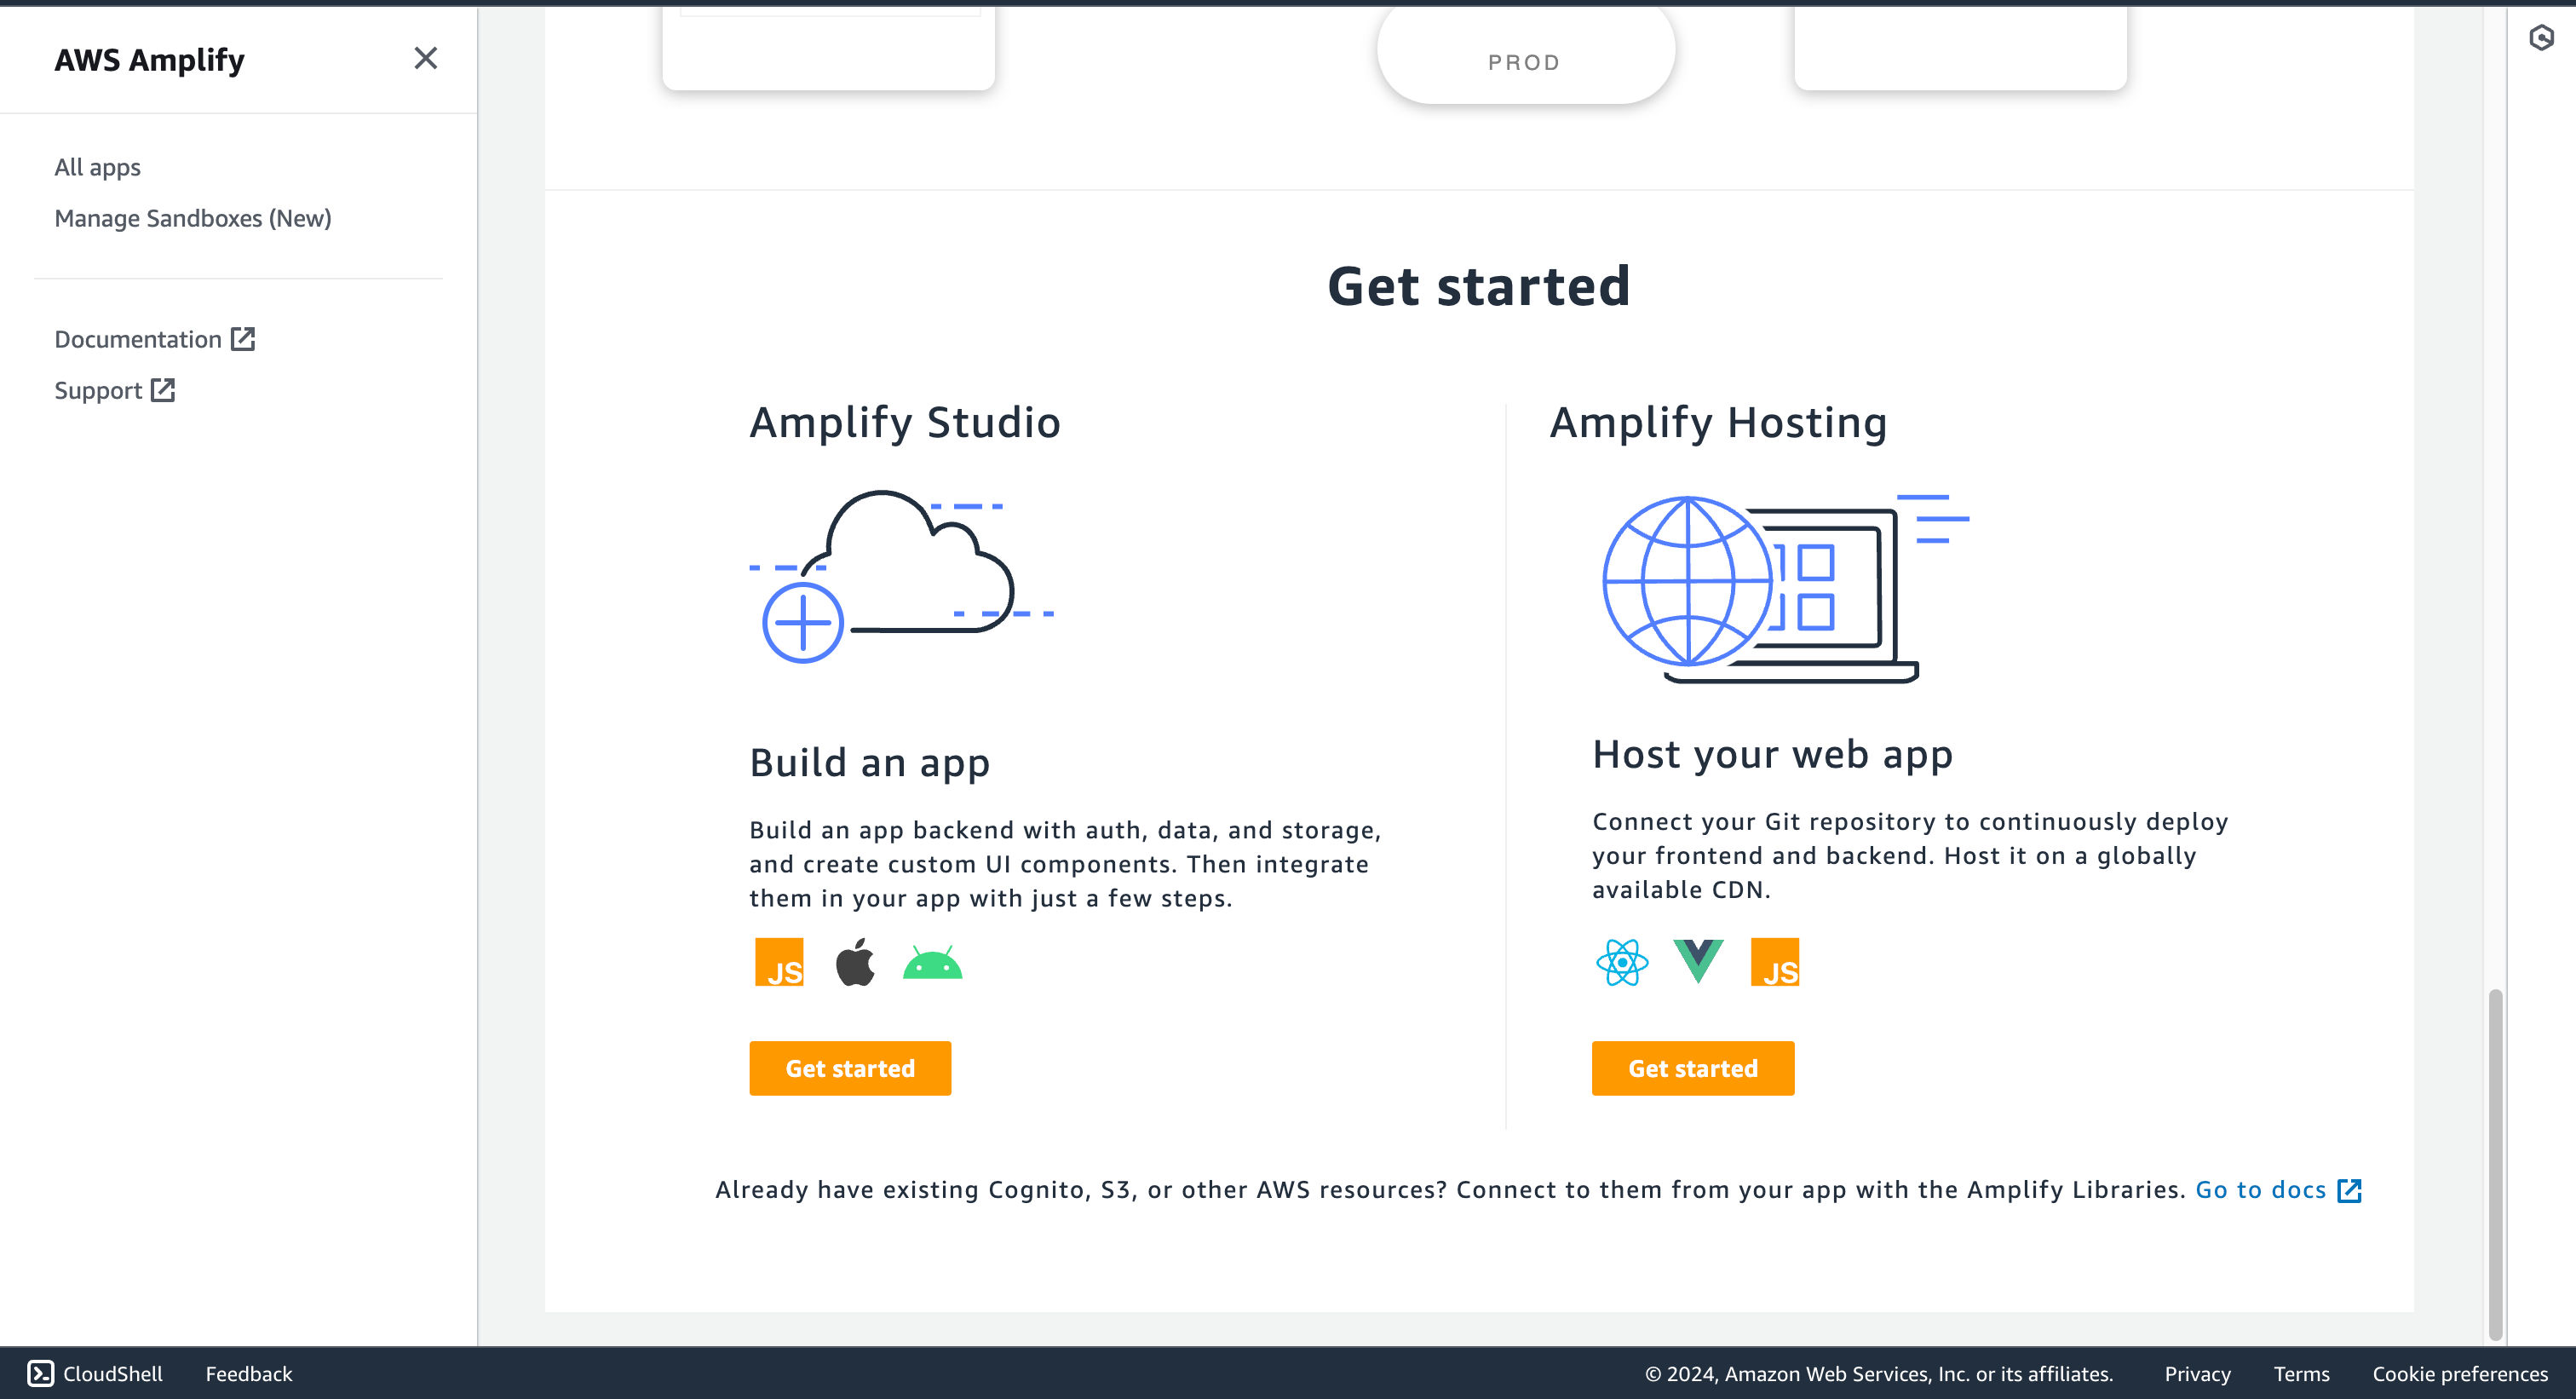
- Luego, navegue hasta el panel de AWS Amplify y haga clic en **Comenzar** en la sección **Alojar su aplicación web**
En esta guía, aprenderá cómo implementar un proyecto SvelteKit SSR en AWS Amplify. Pasará por el proceso de configuración de un nuevo proyecto SvelteKit, habilitará la representación del lado del servidor mediante el adaptador de AWS Amplify y, finalmente, lo implementará en AWS Amplify.
## Tabla de contenido
- [Requisitos previos](#requisitos previos)
- [Crear una nueva aplicación SvelteKit](#crea-una-nueva-aplicación-sveltekit)
- [Comenzando con el adaptador Nodejs para SvelteKit](#empezando-con-el-adaptador-nodejs-para-sveltekit)
- [Implementar en AWS Amplify](#deploy-to-aws-amplify)
- [Conclusión](#conclusión)
## Requisitos previos
Necesitará lo siguiente:
- [Nodejs 18](https://nodejs.org/en/blog/announcements/v20-release-announce) o posterior
- Una cuenta [AWS](https://aws.amazon.com/free)
## Crea una nueva aplicación SvelteKit
Comencemos creando un nuevo proyecto SvelteKit. Abra su terminal y ejecute el siguiente comando:
```bash
npm create svelte@latest my-app
```
`npm create svelte` es la forma recomendada de desarrollar rápidamente un proyecto SvelteKit
Cuando se le solicite, elija:
- `Aplicación de demostración SvelteKit` cuando se le solicita que seleccione la plantilla de la aplicación
- `Sí, usando la sintaxis de TypeScript` cuando se le solicite agregar verificación de tipo con TypeScript
- `Agregar Prettier para formatear código` cuando se le solicite seleccionar opciones adicionales
Una vez hecho esto, puede ir al directorio del proyecto, instalar las dependencias e iniciar la aplicación:
```bash
cd my-app
npm install
npm run dev
```
La aplicación debería estar ejecutándose en [localhost:5173](http://localhost:5173/)
A continuación, en su primera ventana de terminal, ejecute el siguiente comando para instalar las bibliotecas y paquetes necesarios para crear la aplicación:
```bash
npm install dotenv @vercel/nft
npm install -D prepend-file
```
Las bibliotecas instaladas incluyen:
- `dotenv`: una biblioteca para manejar variables de entorno
- `@vercel/nft`: una biblioteca para determinar todos los archivos necesarios para el tiempo de ejecución de la aplicación utilizando puntos de entrada
Las bibliotecas específicas de desarrollo incluyen:
- `prepend-file`: una biblioteca para anteponer datos a un archivo
## Primeros pasos con el adaptador Nodejs para SvelteKit
Antes de implementar su proyecto SvelteKit, necesita instalar el adaptador `@sveltejs/adapter-node`. Ejecute el siguiente comando en la ventana de su terminal:
```bash
npm install @sveltejs/adapter-node
```
Las bibliotecas instaladas incluyen:
- `@sveltejs/adapter-node`: un adaptador que prepara los sitios web de SvelteKit para ejecutarlos como un servidor Nodejs independiente.
Una vez que el adaptador esté instalado, deberá agregarlo a su archivo `svelteconfigjs`. Abra el archivo y agregue el siguiente código:
```diff
// File: svelte.config.js
import adapter from '@sveltejs/adapter-auto' // [!code --]
import adapter from '@sveltejs/adapter-node' // [!code ++]
import { vitePreprocess } from '@sveltejs/kit/vite'
/** @type {import('@sveltejs/kit').Config} */
const config = {
// Consult https://kit.svelte.dev/docs/integrations#preprocessors
// for more information about preprocessors
preprocess: vitePreprocess(),
kit: {
// adapter-auto only supports some environments, see https://kit.svelte.dev/docs/adapter-auto for a list.
// If your environment is not supported or you settled on a specific environment, switch out the adapter.
// See https://kit.svelte.dev/docs/adapters for more information about adapters.
adapter: adapter()
}
};
export default config;
```
Las adiciones hacen lo siguiente:
- Importa la exportación predeterminada de `@sveltejs/adapter-node`
- Utiliza la importación anterior como "adaptador" de su aplicación SvelteKit
Luego, cree un archivo `amplifymjs` en la raíz del repositorio con el siguiente código:
```tsx
// File: amplify.mjs
import { join } from 'node:path'
import { nodeFileTrace } from '@vercel/nft'
import { sync as prependSync } from 'prepend-file'
import { writeFileSync, mkdirSync, existsSync, cpSync, rmSync } from 'node:fs'
// Define all the Amplify related directories
const amplifyDirectories = [
join(process.cwd(), '.amplify-hosting'),
join(process.cwd(), '.amplify-hosting', 'static'),
join(process.cwd(), '.amplify-hosting', 'compute'),
join(process.cwd(), '.amplify-hosting', 'compute', 'default'),
join(process.cwd(), '.amplify-hosting', 'compute', 'default', 'node_modules'),
]
// Create directories if they do no exist already
if (existsSync(amplifyDirectories[0])) rmSync(amplifyDirectories[0], { force: true, recursive: true })
// Create directories if they do no exist already
amplifyDirectories.forEach((i) => mkdirSync(i))
const deployManifestConfig = {
version: 1,
routes: [
{
path: `/assets/*`,
target: {
kind: 'Static',
},
},
{
path: `/*.*`,
target: {
kind: 'Static',
},
fallback: {
kind: 'Compute',
src: 'default',
},
},
{
path: '/*',
target: {
kind: 'Compute',
src: 'default',
},
},
],
computeResources: [
{
name: 'default',
runtime: 'nodejs18.x',
entrypoint: 'build/index.js',
},
],
framework: {
name: 'sveltekit',
version: '1.20.4',
},
}
// Write the config to .amplify-hosting/deploy-manifest.json
writeFileSync(join(process.cwd(), '.amplify-hosting', 'deploy-manifest.json'), JSON.stringify(deployManifestConfig))
// Move the build/client to the static directory for Amplify
cpSync(join(process.cwd(), 'build', 'client'), amplifyDirectories[1], { recursive: true })
// Ref: https://rishi.app/blog/using-vercel-nft-to-compute-runtime-dependencies-for-your-remix-express-app/
async function computeDependencies(paths = []) {
// the whole app inside index.js,
// include other paths that are
// not bundled with your app builds
const files = paths
// Compute file trace
const { fileList } = await nodeFileTrace(files)
// Store set of packages
let packages = {}
fileList.forEach((i) => {
if (i.includes('node_modules/')) {
let temp = i.replace('node_modules/', '')
temp = temp.substring(0, temp.indexOf('/'))
packages[`node_modules/${temp}`] = true
} else packages[i] = true
})
// Sort the set of packages by name (for easier difference comparison with git)
// Dump the list of the computed packages for further references while deploying the app
Object.keys(packages)
.sort()
.forEach((i) => {
cpSync(i, join(amplifyDirectories[3], i), { recursive: true })
})
}
// Prepend dotenv import into the entrypoint
prependSync(join('build', 'index.js'), `import 'dotenv/config'\n`)
// Compute all the dependents on build/index.js and load them into the compute
computeDependencies(['./build/index.js'])
```
Luego, cree un archivo `amplifyyml` en la raíz del repositorio con el siguiente código:
```yml
version: 1
frontend:
phases:
preBuild:
commands:
- npm ci
build:
commands:
- env >> .env
- npm run build
- node amplify.mjs
artifacts:
baseDirectory: .amplify-hosting
files:
- '**/*'
cache:
paths:
- node_modules/**/*
```
El código anterior hace lo siguiente:
- Utiliza comandos `preBuild` para instalar las dependencias de su proyecto SvelteKit
- Utiliza comandos `build` para:
- Almacene todas las variables de entorno en el archivo `env` en la raíz del proyecto
- Construye tu aplicación SvelteKit
- Mueva el directorio `node_modules` y el archivo `env` al directorio de cálculo de Amplify
## Implementar en AWS Amplify
El código ahora está listo para implementarse en AWS Amplify. Utilice los siguientes pasos para implementarlo:
- Comience creando un repositorio de GitHub que contenga el código de su aplicación.
- Luego, navegue hasta el panel de AWS Amplify y haga clic en **Comenzar** en la sección **Alojar su aplicación web**
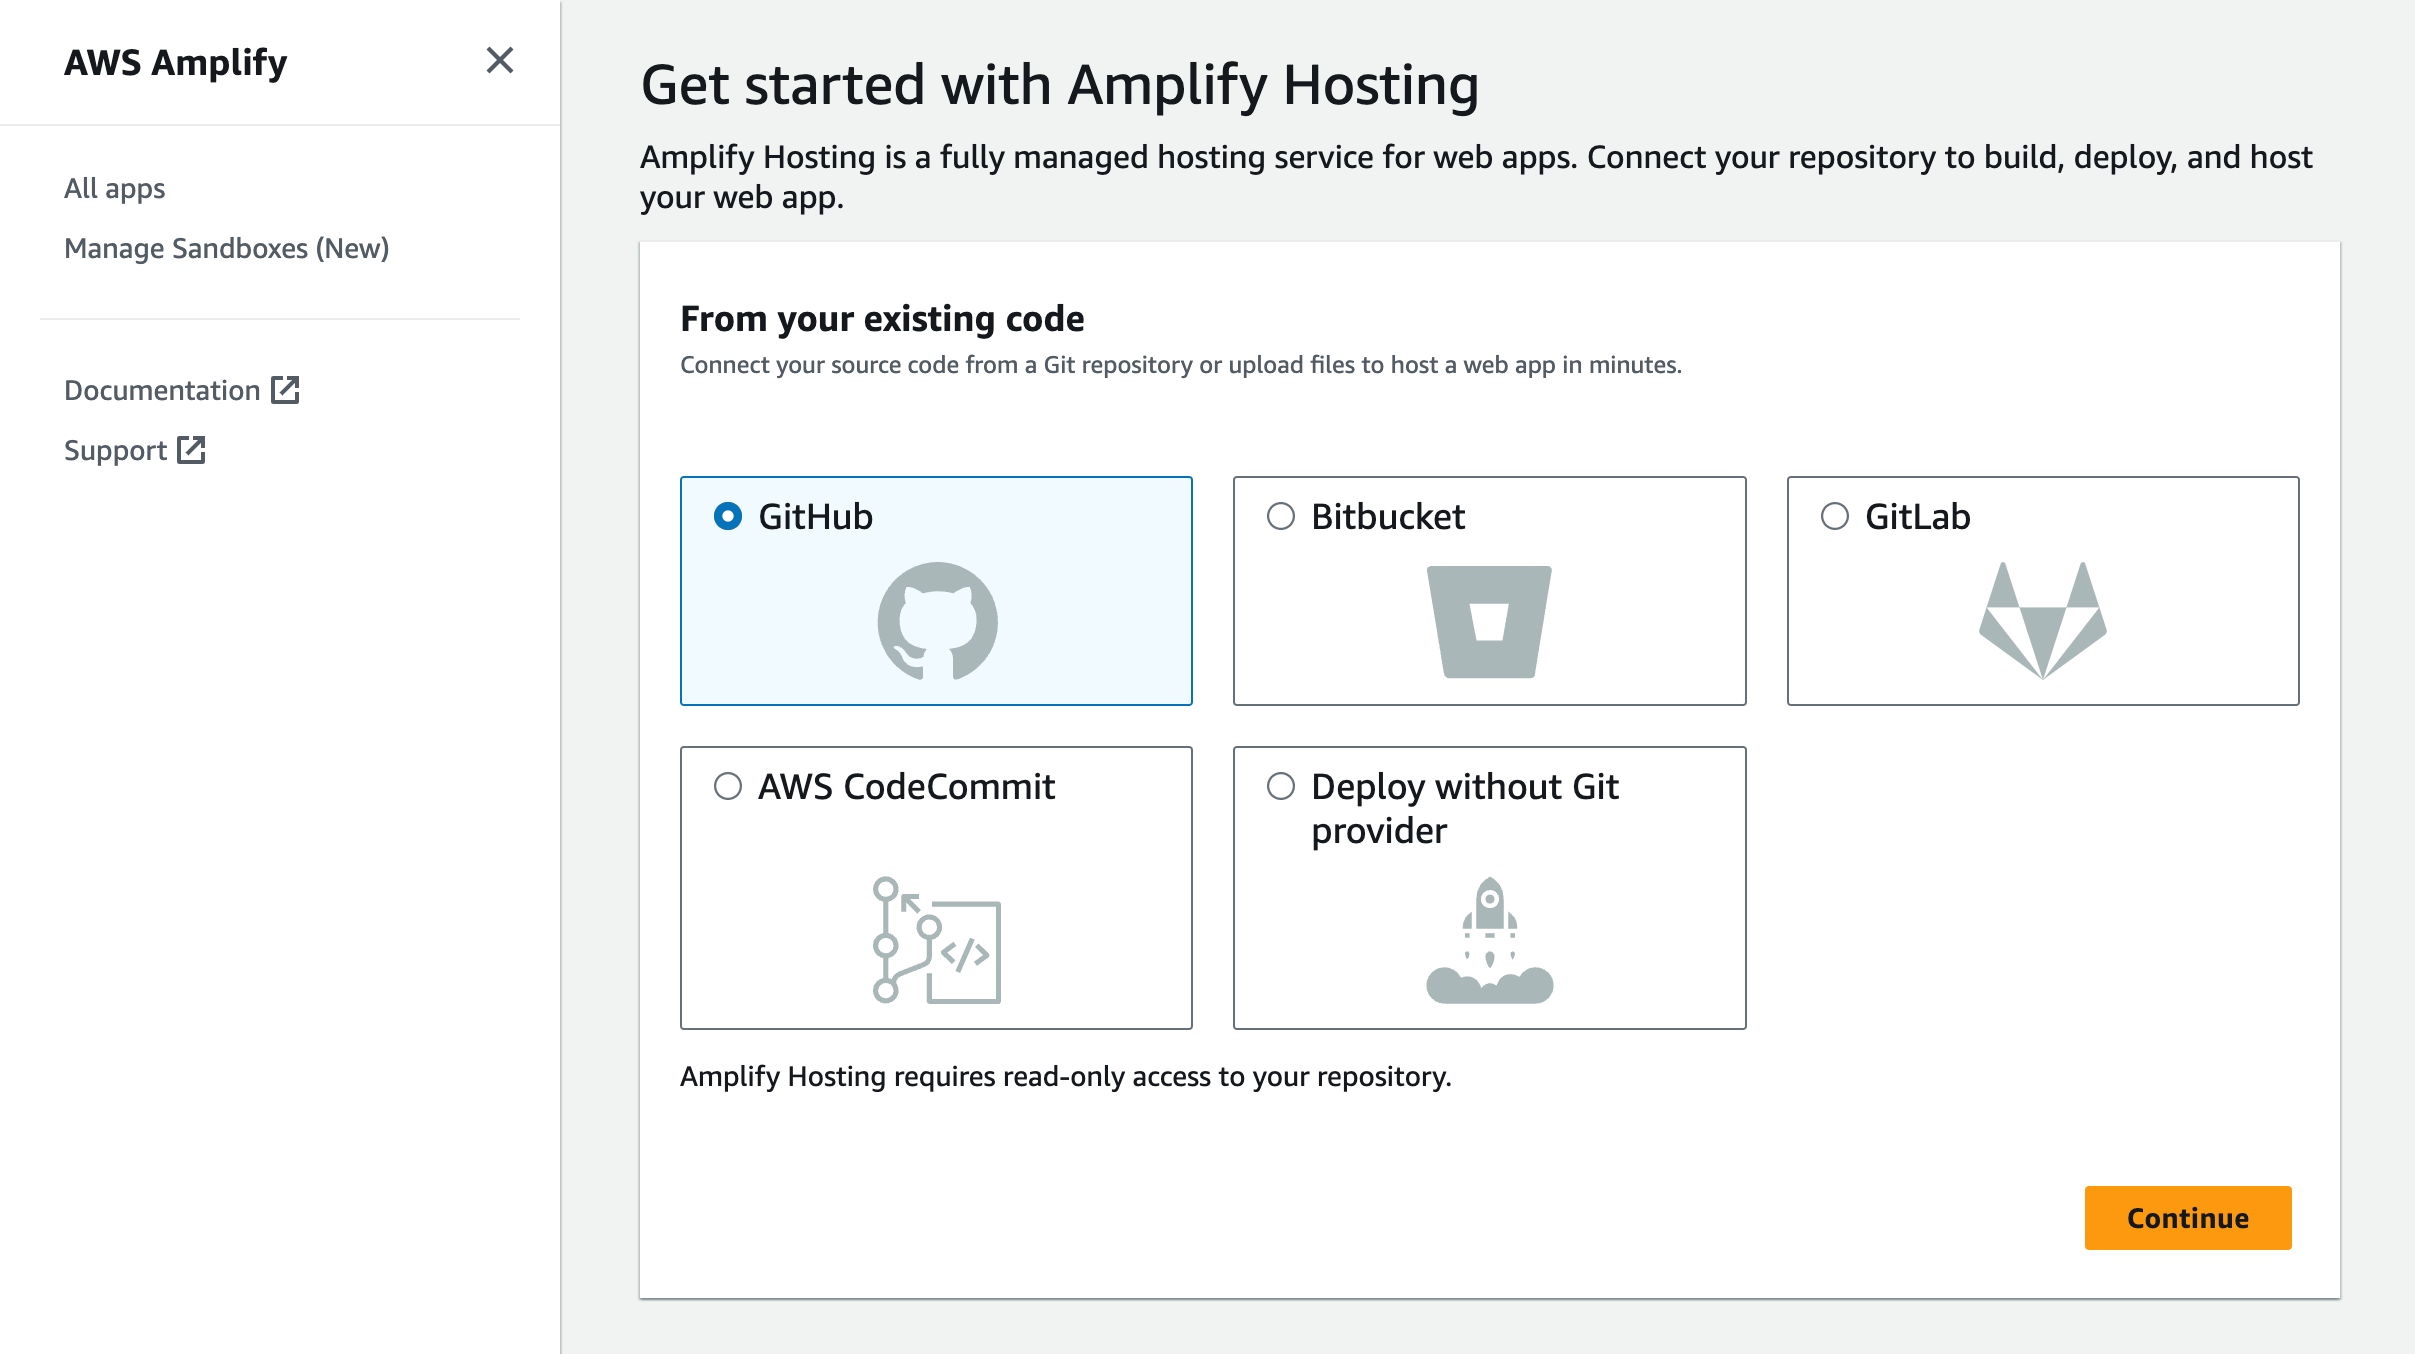
 - Selecciona **GitHub** como fuente de tu repositorio Git.
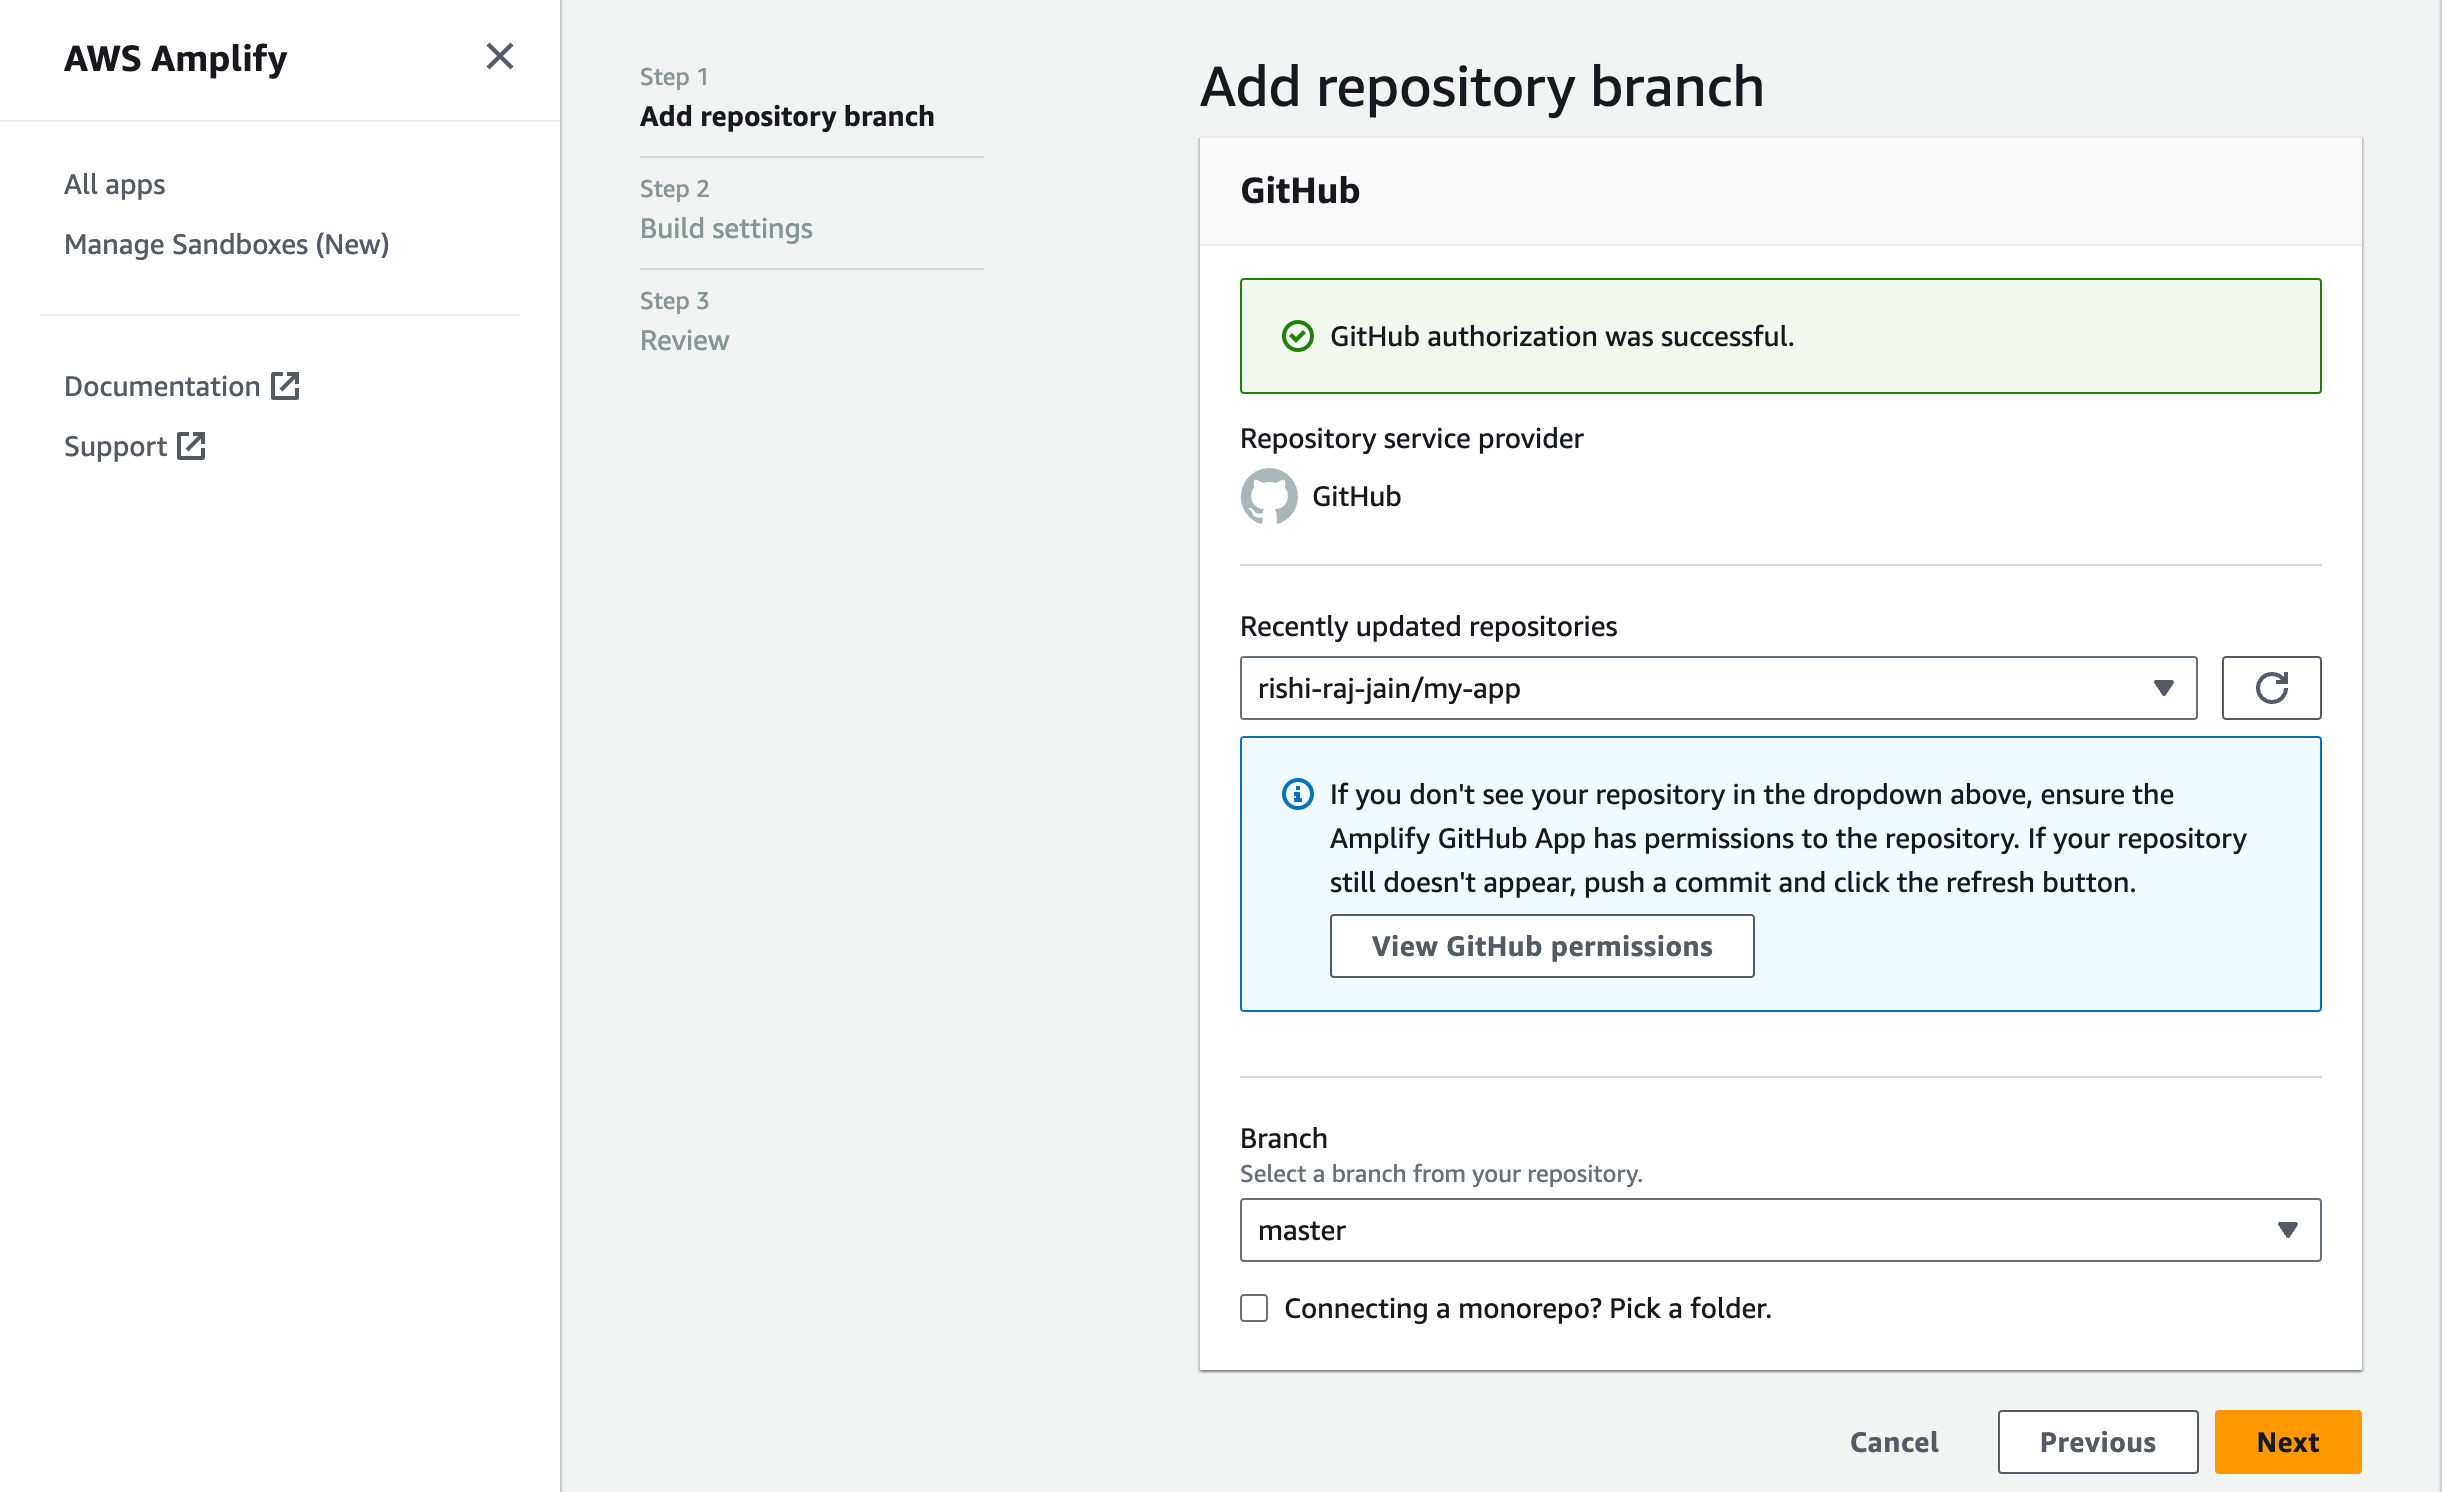
 - Vincula el nuevo proyecto al repositorio de GitHub que acabas de crear.
 - Asigne un nombre a su proyecto y haga clic en **Configuración avanzada**
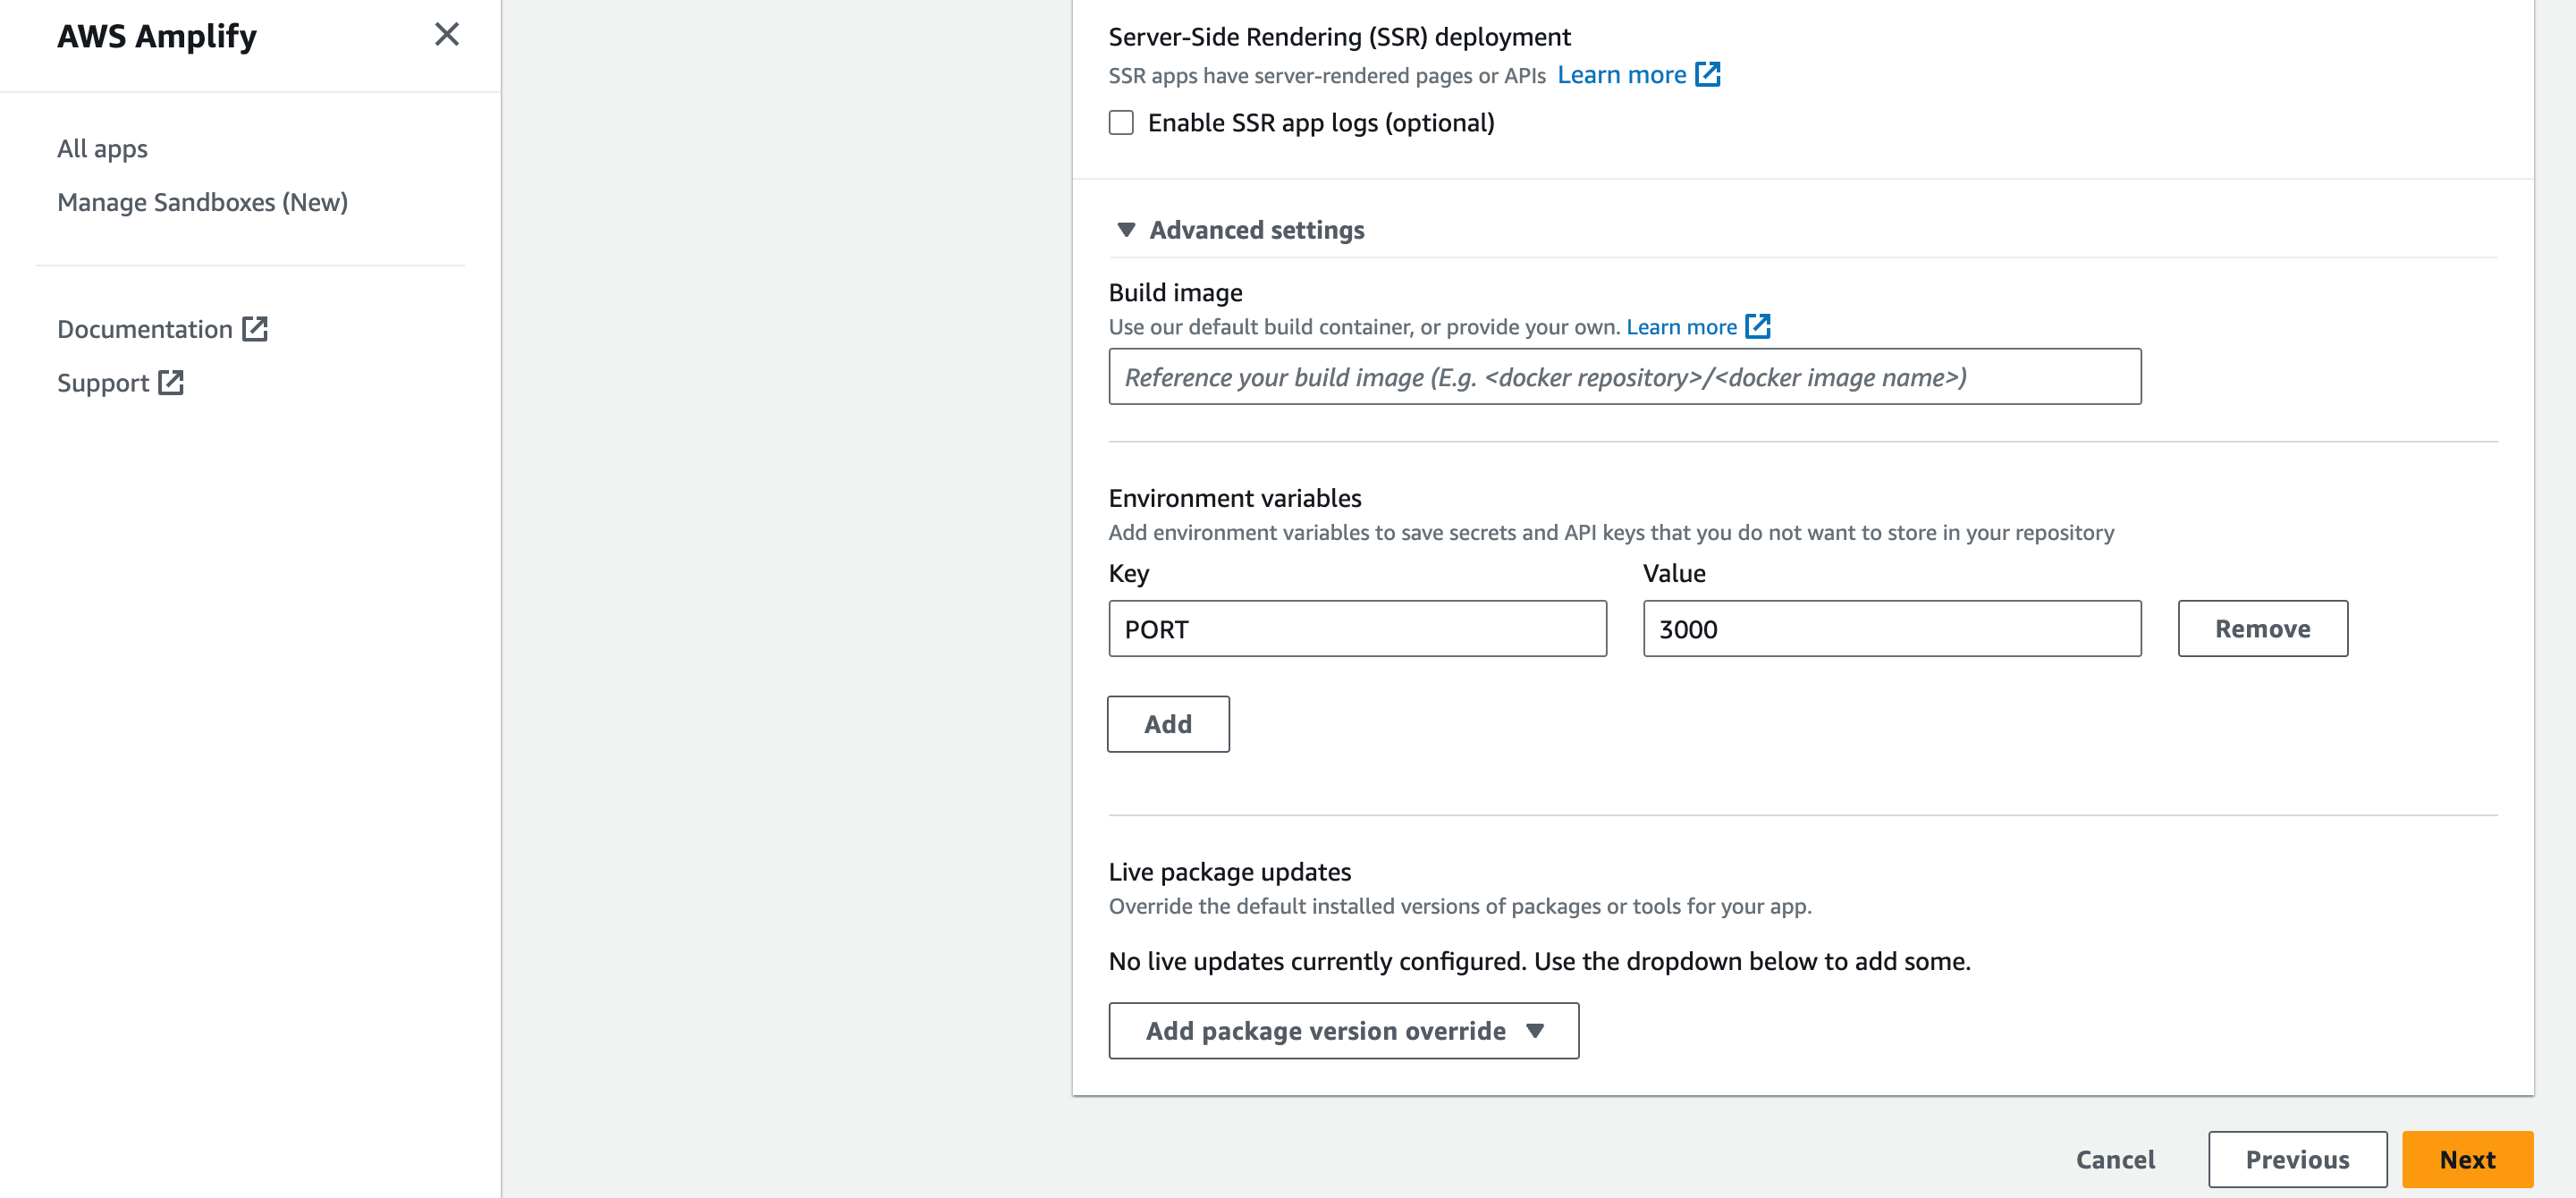
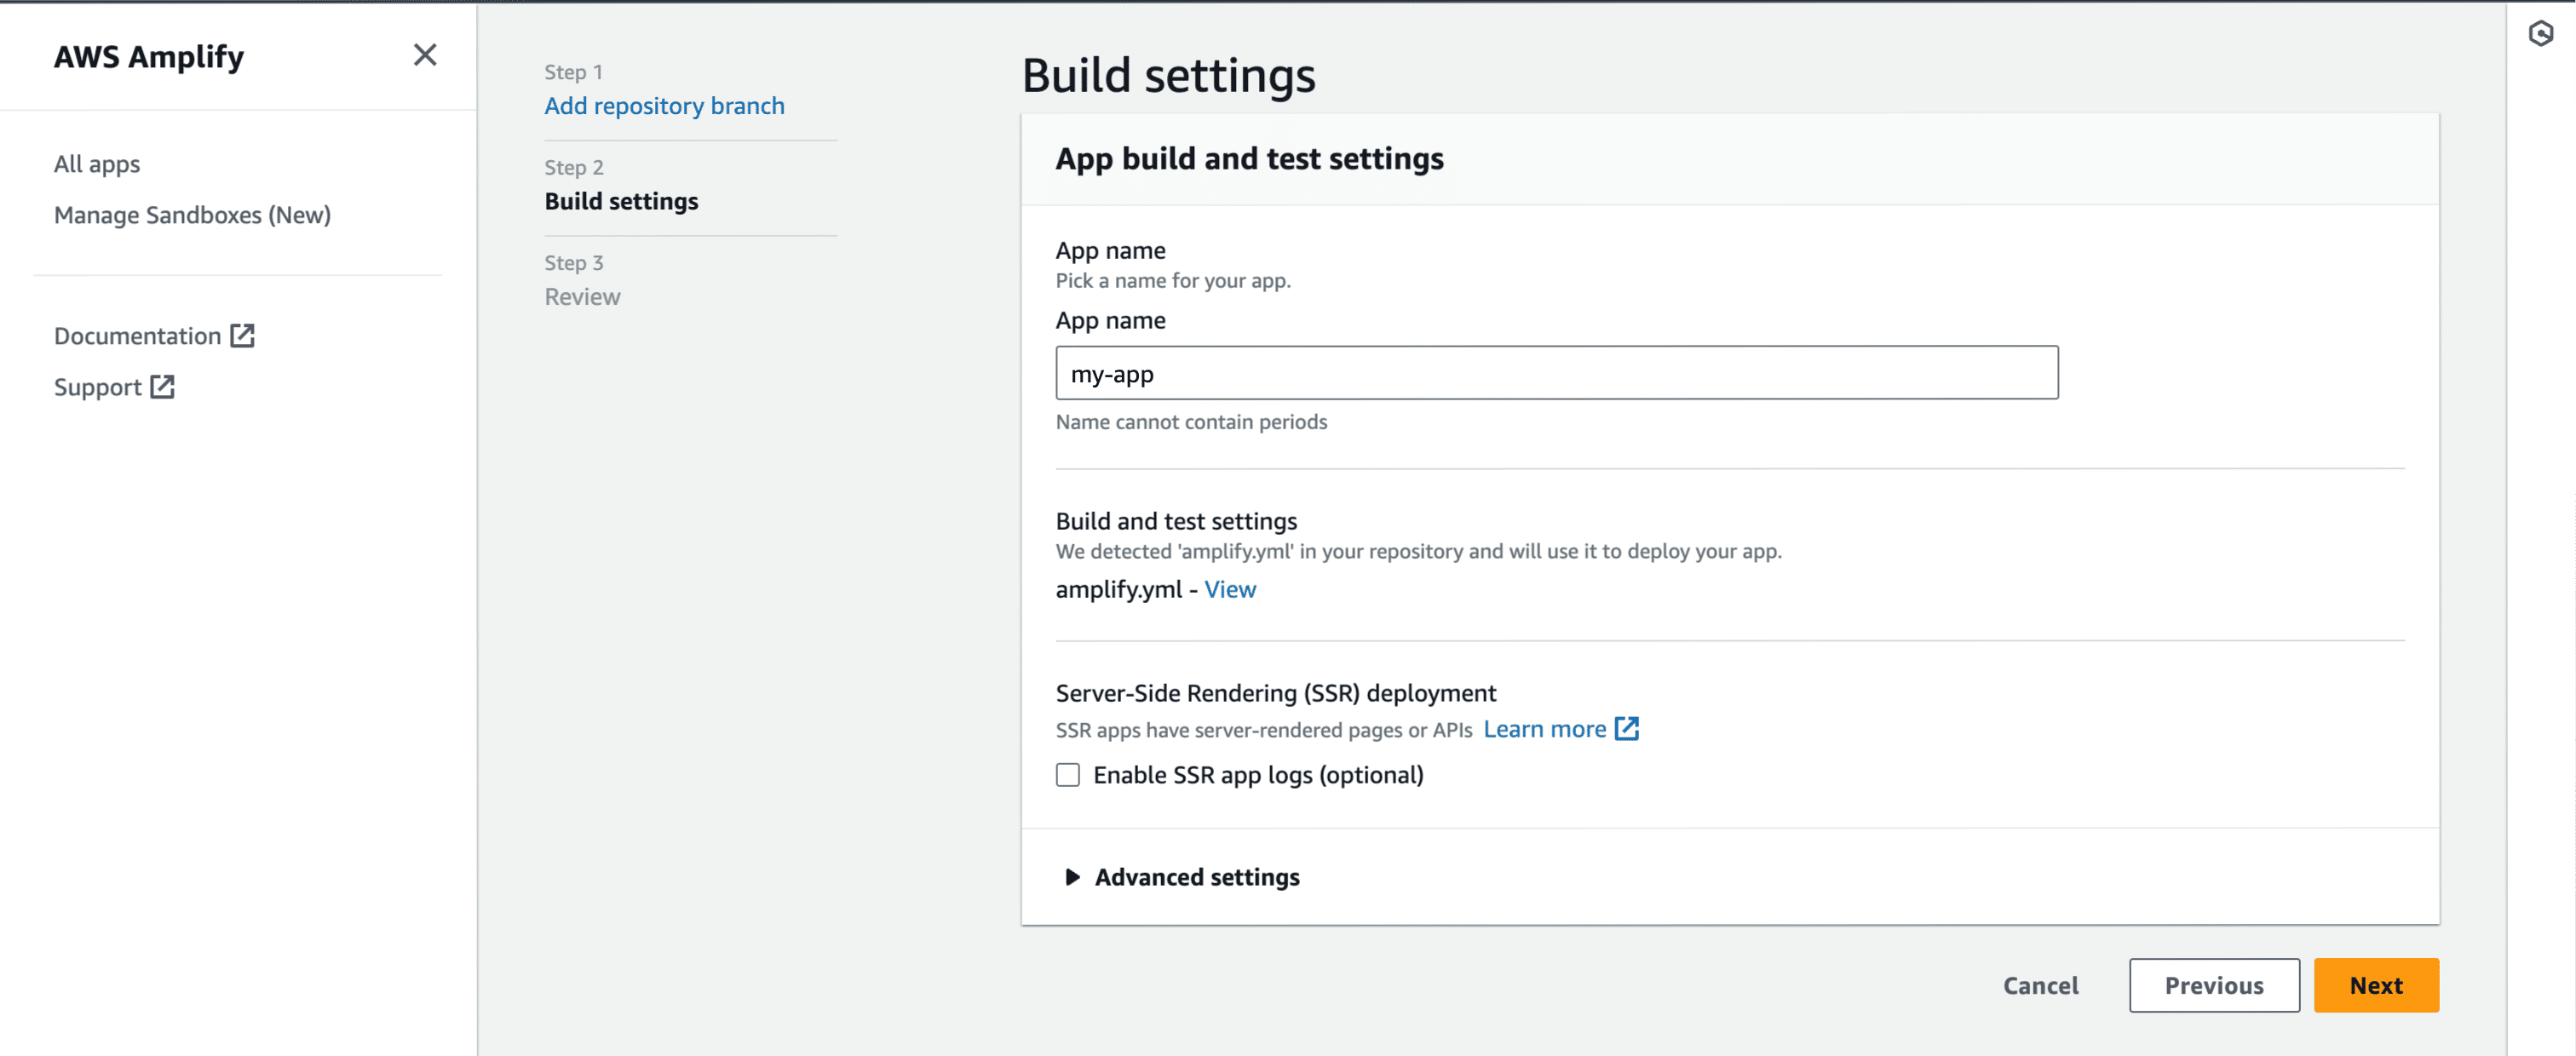 - En **Configuración avanzada**, actualice las **Variables de entorno** para que coincidan con las de su archivo `env` local y `PORT` como 3000. Haga clic en **Siguiente** para continuar.
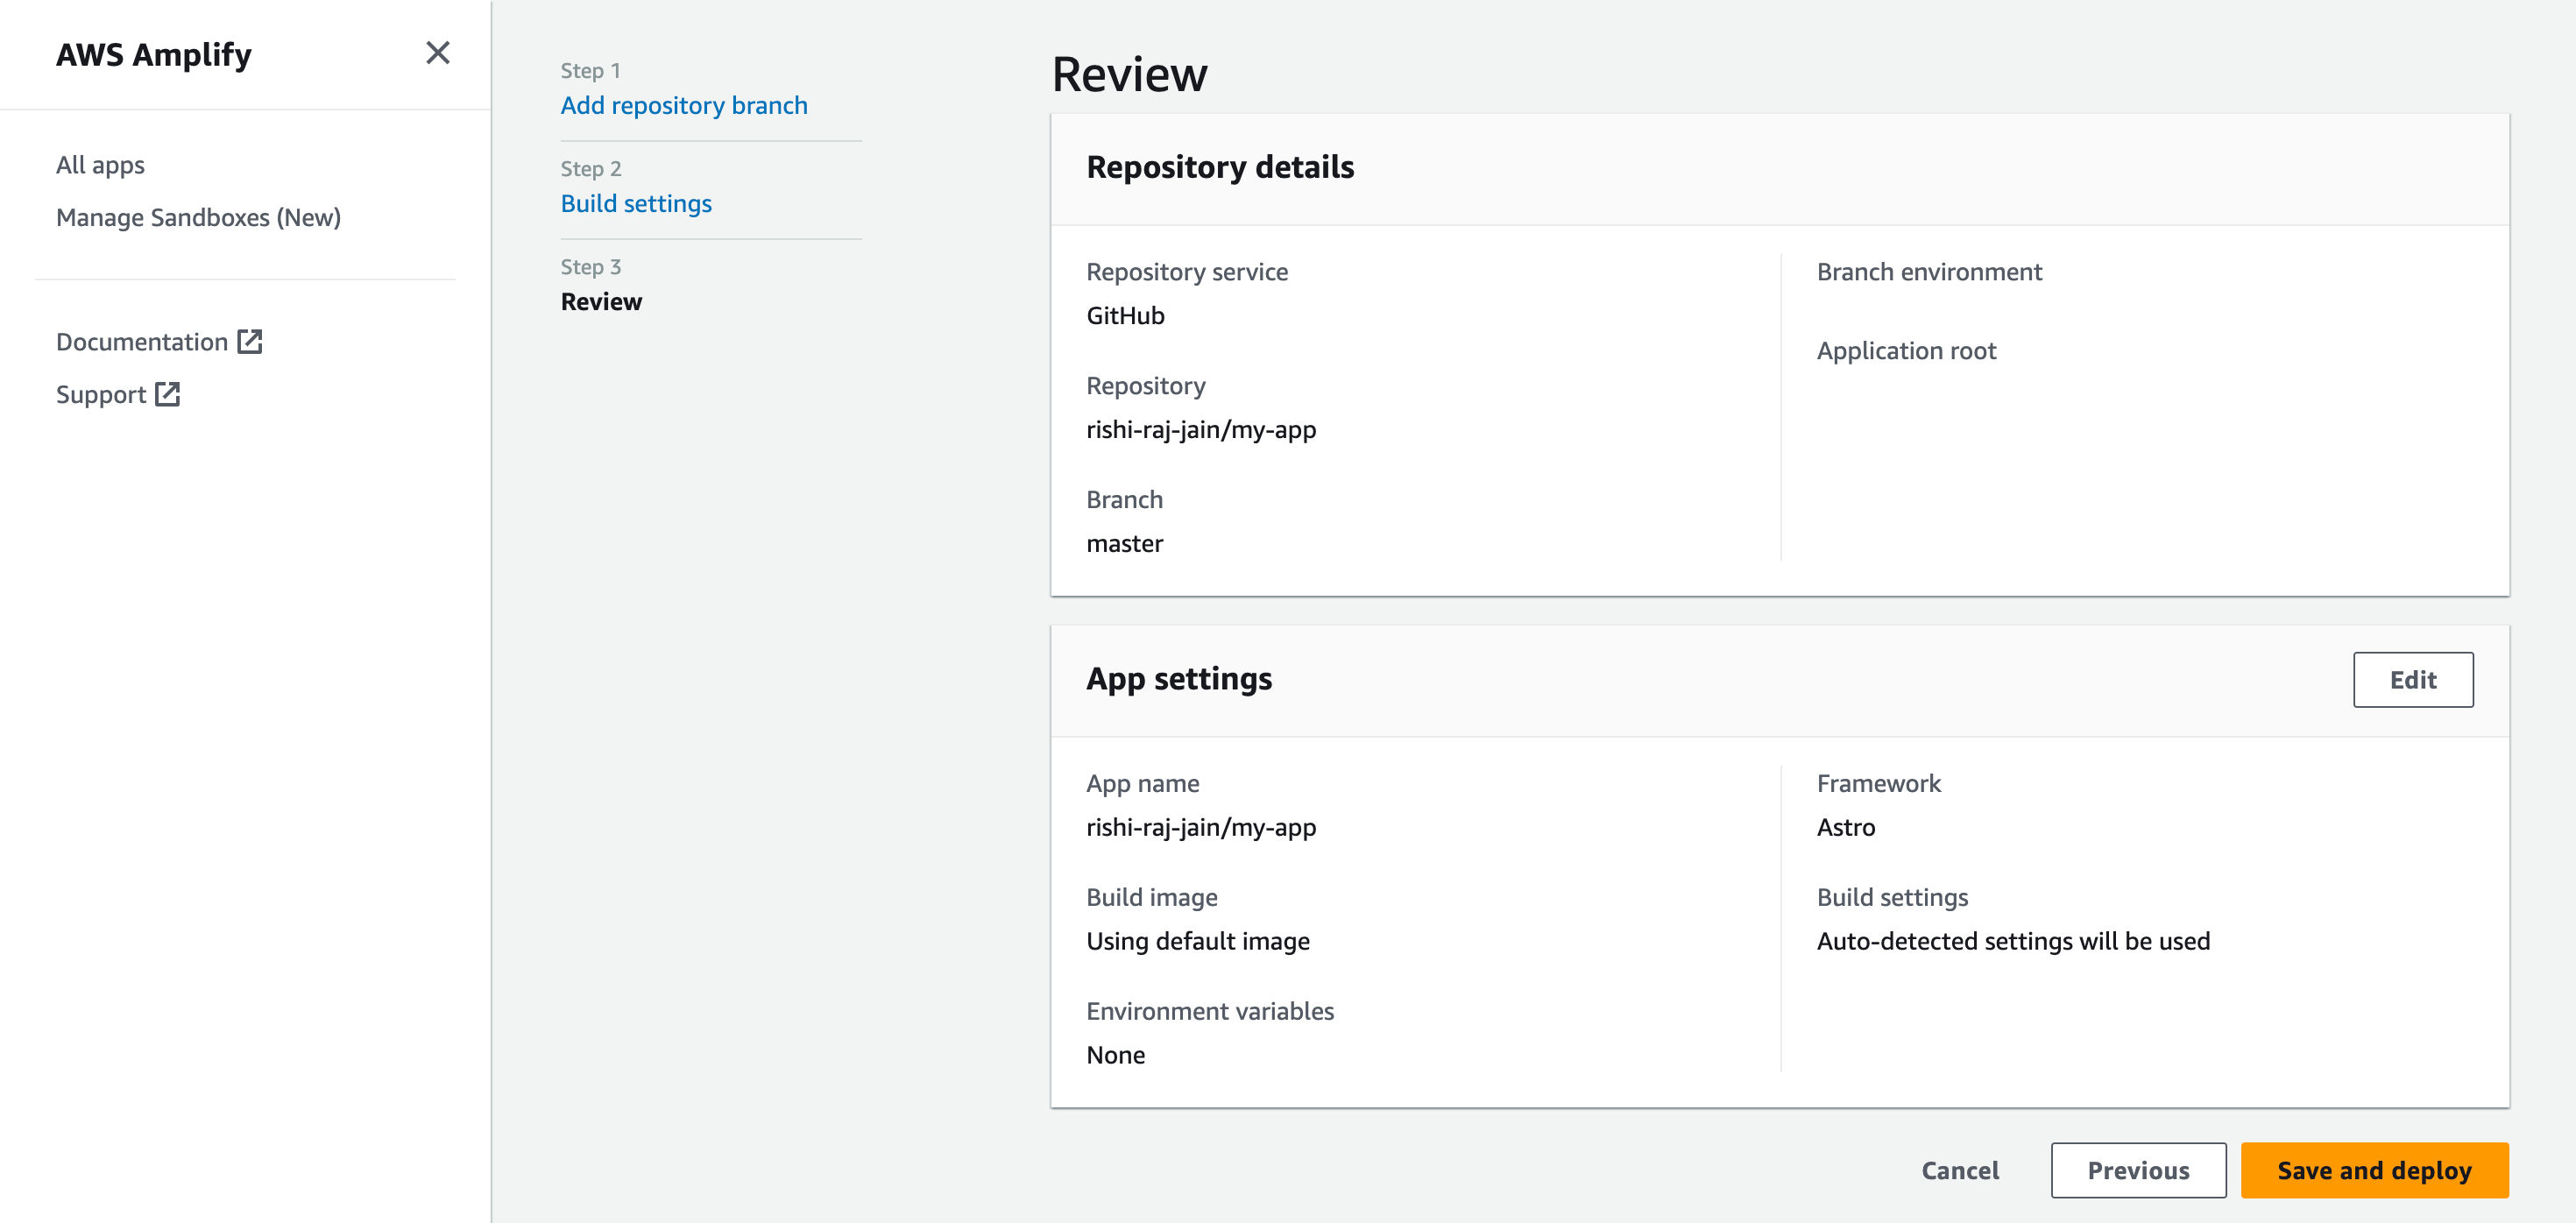
 - Haga clic en **Guardar e implementar** para implementar su sitio web.
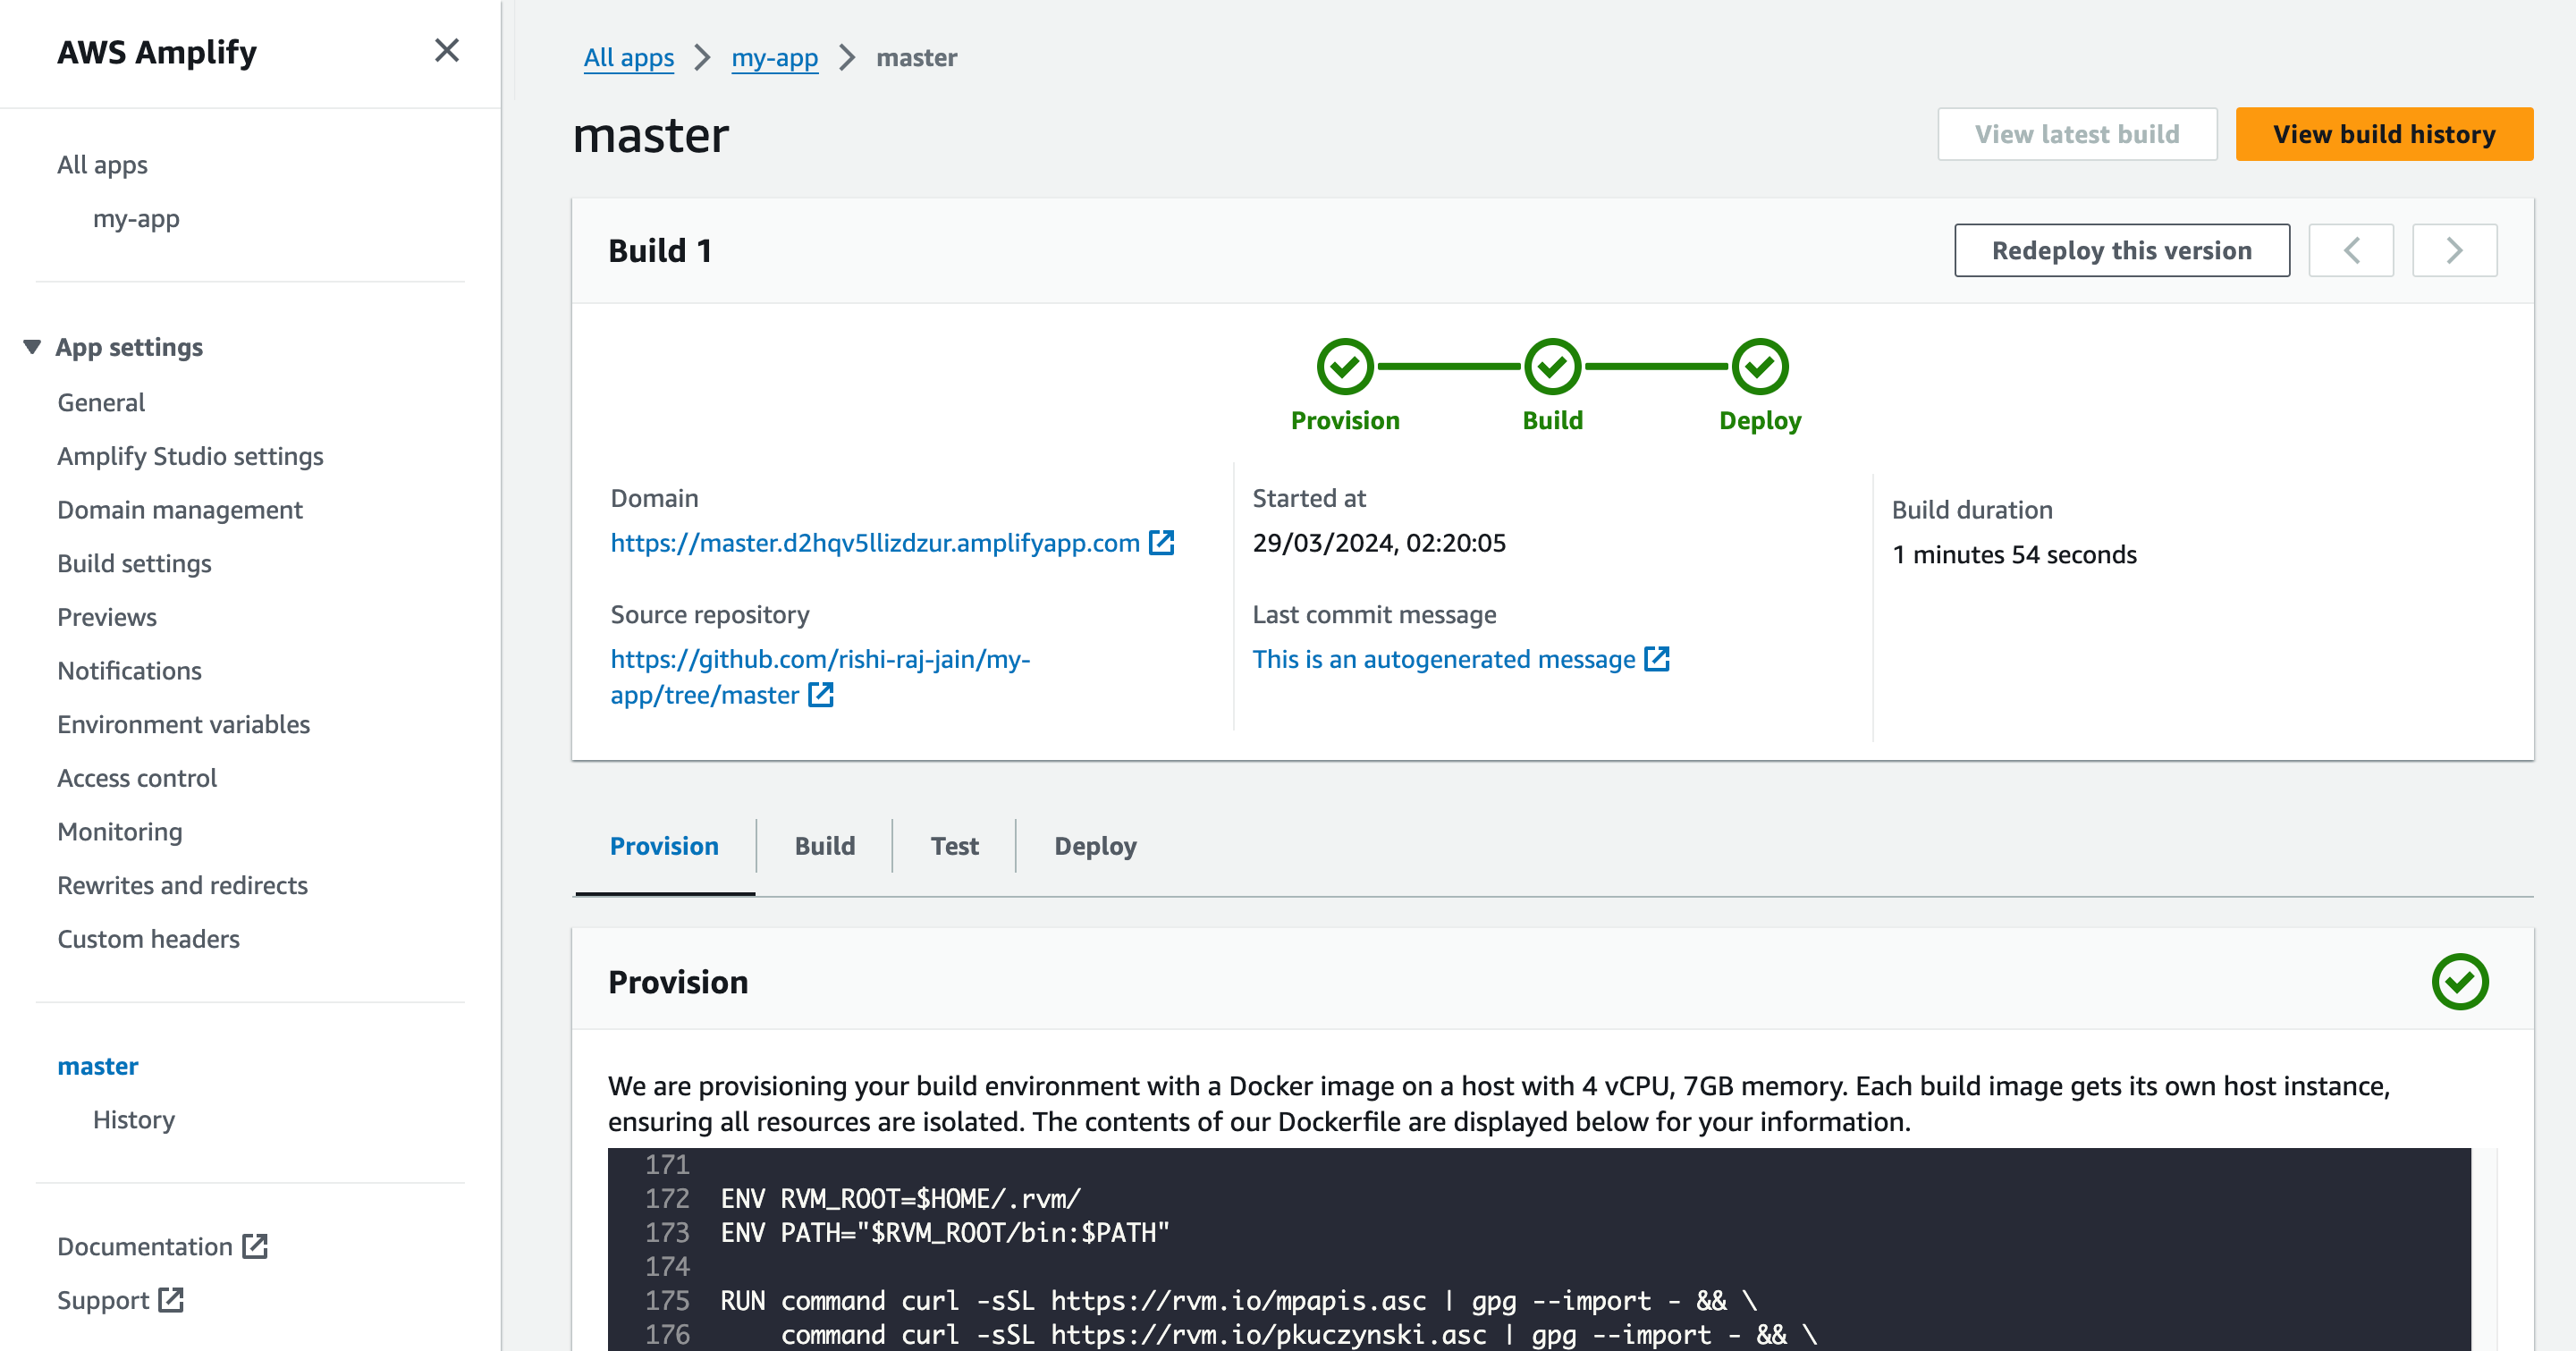
 - Obtenga la URL de implementación bajo el título **Dominio** en la información de compilación exitosa.
 ## Conclusión
¡Hurra! Ahora tiene un proyecto SvelteKit que se implementa automáticamente en AWS Amplify tras la inserción de Git.
Si tiene alguna pregunta o comentario, no dude en comunicarse conmigo en [Twitter](https://twitter.com/direct_messages/create/rishi_raj_jain_)
## Conclusión
¡Hurra! Ahora tiene un proyecto SvelteKit que se implementa automáticamente en AWS Amplify tras la inserción de Git.
Si tiene alguna pregunta o comentario, no dude en comunicarse conmigo en [Twitter](https://twitter.com/direct_messages/create/rishi_raj_jain_)