In this guide, you will learn how to improve your Astro application’s performance by integrating Partytown to offload Google Tag Manager to a Web Worker. You will go through the process of setting up a new Astro project, installing the Partytown integration, and configuring Google Tag Manager to run in a separate thread without blocking the main thread.
High Quality Starter Kits with built-in authentication flow (Auth.js), object uploads (AWS, Clouflare R2, Firebase Storage, Supabase Storage), integrated payments (Stripe, LemonSqueezy), email verification flow (Resend, Postmark, Sendgrid), and much more. Compatible with any database (Redis, Postgres, MongoDB, SQLite, Firestore).
Get all 3 kits$147$99- Next.js Starter Kit
- SvelteKit Starter Kit
- Astro Starter Kit
One-time license · Lifetime updates
Prerequisites
You’ll need the following:
- Node.js 20 or later
- A Google Tag Manager account with a container ID
Table Of Contents
- What is Partytown?
- Create a new Astro application
- Integrate Partytown in your Astro project
- Add Google Tag Manager with Partytown
- Test your Astro application locally
- Understanding the Performance Benefits
What is Partytown?
Partytown is a library that relocates resource-intensive scripts into a web worker, and away from the main thread. This is particularly useful for third-party scripts like analytics and marketing tags that can slow down your website’s performance. By offloading these scripts to a web worker, your main thread remains responsive, resulting in better Core Web Vitals scores and improved user experience.
Create a new Astro application
Let’s get started by creating a new Astro project. Execute the following command:
npm create astro@latest my-appnpm create astro is the recommended way to scaffold an Astro project quickly.
When prompted, choose:
Emptywhen prompted on how to start the new project.Yeswhen prompted if you plan to write TypeScript.Strictwhen prompted how strict TypeScript should be.Yeswhen prompted to install dependencies.Yeswhen prompted to initialize a git repository.
Once that’s done, you can move into the project directory and start the app:
cd my-appnpm run devThe app should be running on localhost:4321.
Now, let’s move on to integrating Partytown in your Astro application.
Integrate Partytown in your Astro project
Install Partytown using Astro CLI
Astro provides a first-class integration for Partytown that makes setup incredibly simple. Execute the following command:
npx astro add partytownWhen prompted, choose:
Yeswhen prompted whether to install the Partytown dependencies.Yeswhen prompted whether to make changes to the Astro configuration file.
The command above installs the @astrojs/partytown package and automatically configures your astro.config.mjs file. The integration handles copying the Partytown library files to the correct location in your build output, so you don’t need to worry about manual setup.
Now, let’s move on to configuring Partytown options.
Configure Partytown options
By default, the Partytown integration works out of the box, but you can customize its behavior for your specific needs. Open your astro.config.mjs file and you’ll see the Partytown integration has been added:
import { defineConfig } from 'astro/config';import partytown from '@astrojs/partytown';
export default defineConfig({  integrations: [    partytown({      config: {        forward: ['dataLayer.push'],      },    }),  ],});
The forward configuration is crucial for Google Tag Manager. It tells Partytown to forward calls to window.dataLayer.push() from the web worker to the main thread. This is necessary because Google Tag Manager uses the dataLayer array to send events and track user interactions.
Now, let’s move on to adding Google Tag Manager with Partytown.
Add Google Tag Manager with Partytown
Create a tracking component
Create a new component to handle Google Tag Manager integration. Create a file src/components/GoogleTagManager.astro with the following code:
---interface Props {  containerId: string;}
const { containerId } = Astro.props;---
<script  type="text/partytown"  src={`https://www.googletagmanager.com/gtag/js?id=${containerId}`}></script>
<script type="text/partytown" define:vars={{ containerId }}>  window.dataLayer = window.dataLayer || [];  window.gtag = function gtag() {    dataLayer.push(arguments);  };  gtag('js', new Date());  gtag('config', containerId);</script>
The code above does the following:
- Accepts a
containerIdprop for your Google Tag Manager container ID. - Loads the Google Tag Manager script with
type="text/partytown"instead of the defaulttype="module"ortype="text/javascript". - Initializes the
dataLayerarray andgtagfunction that Google Tag Manager uses. - Configures Google Tag Manager with your container ID.
The key difference here is the type="text/partytown" attribute. This tells Partytown to intercept these scripts and execute them in a web worker instead of the main thread.
Now, let’s move on to using this component in your layout.
Use the tracking component in your layout
Create a layout file src/layouts/Layout.astro to include the Google Tag Manager component:
---import GoogleTagManager from '../components/GoogleTagManager.astro';
interface Props {  title: string;}
const { title } = Astro.props;---
<!doctype html><html lang="en">  <head>    <meta charset="UTF-8" />    <meta name="viewport" content="width=device-width" />    <meta name="generator" content={Astro.generator} />    <title>{title}</title>    <GoogleTagManager containerId="G-XXXXXXX" />  </head>  <body>    <slot />  </body></html>
Make sure to replace G-XXXXXXX with your actual Google Tag Manager container ID. You can find this ID in your Google Tag Manager account under Admin > Container Settings.
Now update your src/pages/index.astro file to use this layout:
---import Layout from "../layouts/Layout.astro";---
<Layout title="Welcome to Astro with Partytown">  <main>    <h1>Welcome to Astro</h1>    <p>Your Google Tag Manager is now running in a web worker!</p>    <!-- <button track-me> Track Custom Event </button> -->  </main></Layout>
Test your Astro application locally
To test the application, start the development server using the command below:
npm run devOpen your browser’s developer tools and navigate to the Network tab. You should see the Google Tag Manager script being loaded. To verify that Partytown is working correctly:
- Open the Application tab (Chrome) or Storage tab (Firefox) in developer tools.
- Look for Web Workers in the left sidebar.
- You should see a Partytown web worker running, indicating that your scripts are successfully offloaded.
You can also check the Console tab for any Partytown-related messages or errors.
Understanding the Performance Benefits
By moving Google Tag Manager to a web worker with Partytown, you gain several performance benefits:
- Improved Main Thread Performance: Analytics and marketing scripts no longer compete for resources on the main thread, keeping your UI responsive.
- Better Core Web Vitals: Particularly Total Blocking Time (TBT) and First Input Delay (FID) scores improve significantly.
- Faster Page Load: The browser can prioritize rendering and user interactions over third-party scripts.
For Google Analytics 4 (GA4), which is the current version of Google Analytics, the responses come with the correct CORS headers. This means you won’t need to set up proxying for requests to www.google-analytics.com, making the integration even simpler.
If you need to track custom events, you can use the dataLayer.push() method anywhere in your application:
<button track-me>Track Custom Event</button>
<script type="text/partytown">  document.querySelectorAll("button[track-me]").forEach((button) => {    button.addEventListener("click", () => {      dataLayer.push({        event: "button_click",      });      // console.log(dataLayer);    });  });</script>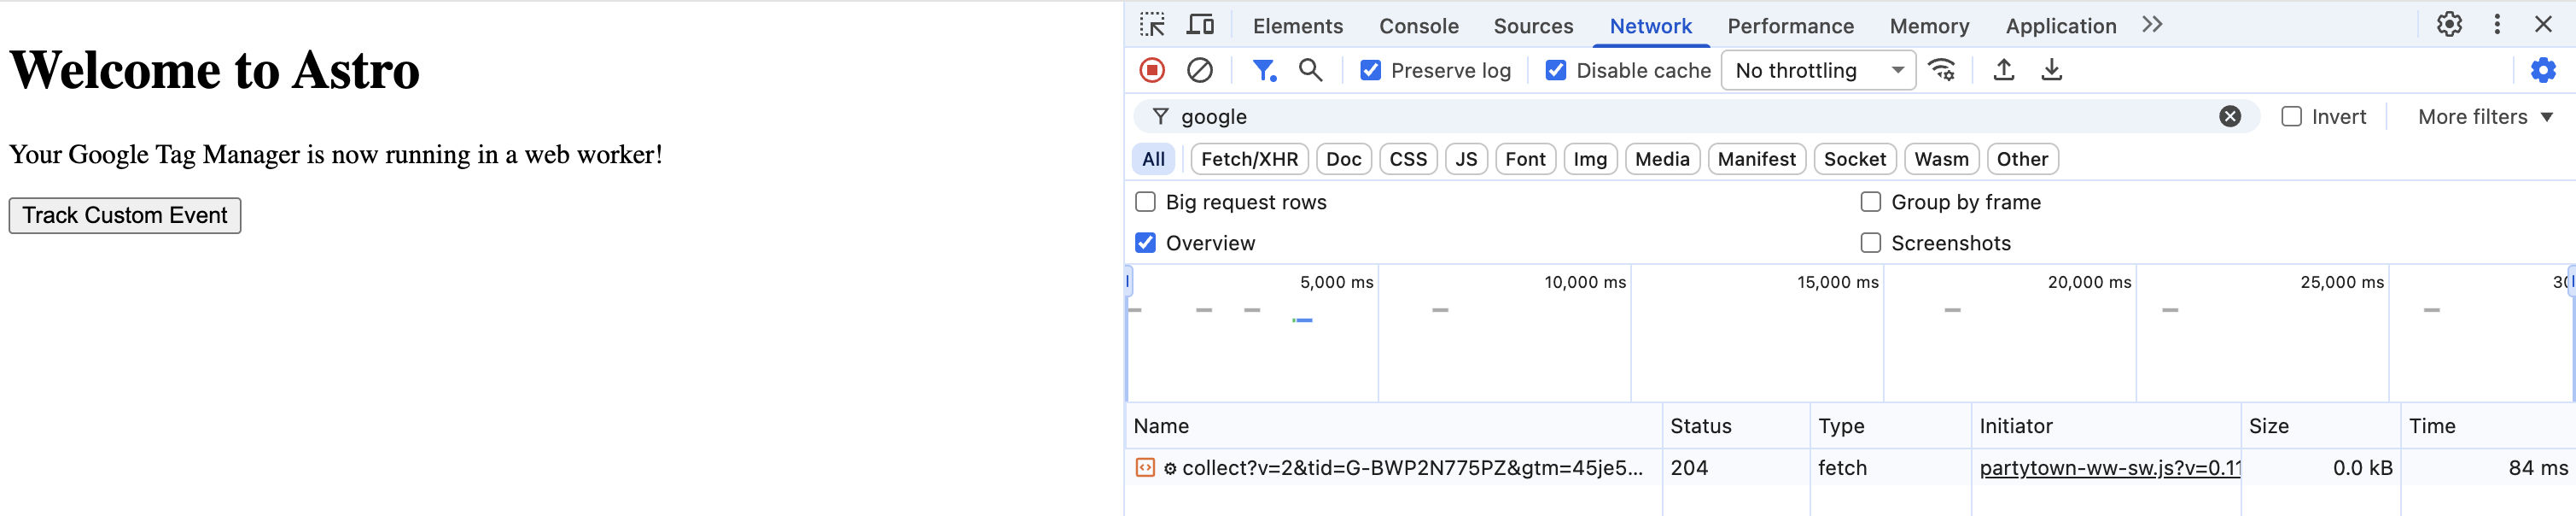
Thanks to the forward: ['dataLayer.push'] configuration in Partytown, these events will be properly forwarded from the web worker to the main thread and sent to Google Tag Manager.
References
Conclusion
In this guide, you learned how to integrate Partytown with Google Tag Manager in an Astro application to improve performance by offloading third-party scripts to a web worker. You’ve also gained experience with using Astro’s first-class integrations and understanding how web workers can help optimize your application’s Core Web Vitals.
If you have any questions or comments, feel free to reach out to me on Twitter.